
Microsoft recently rolled out Windows 11 for users. But since the OS is in its infancy, it makes sense that many Windows fans remain loyal to the more mature Windows 10 for now.
The beloved Windows 10 Start menu is the gateway to many features of the operating system. However, even after the release of Windows 10 November 2021 (v21H2) feature update, some users continue to experience random instances of the Windows 10 Start menu not working.
Windows 10 Start Menu Not Opening
Windows Start menu issues take a variety of forms and often depend on the specific system configuration. The Start button could disappear completely or apps and widgets in the Start menu could go missing. Sometimes, the Start menu doesn’t show up even after multiple presses on the Windows logo key. All of these issues can be frustrating for users.
There are many reasons why the Start menu can stop working but the good news is there’s always a solution.
If you’re looking for a universal fix, you may end up waiting for a long time. Not even Microsoft is completely sure how to completely stop Start menu errors from appearing after each Windows 10 update. However, you can apply various solutions to different problems and get your favorite menu back up and running.
In terms of the common causes of Start menu errors, third-party programs are often the worst culprits. An over-aggressive antivirus tool or PC optimizer can cause unintended issues. A Start menu glitch could also occur because of a faulty installed update. If system files or system services associated with the Start menu get corrupted, it can cause some functions to stop working.
How to Fix the Start Menu Not Working Issue in Windows 10
No matter what type of Start menu error you’re getting, it’s definitely fixable. Most of the steps are also quite simple. Just carry out each instruction down to the letter and your system will be back to normal in no time.
Fix 1. Perform a PC Restart
Oh yes, the famous restart. There’s a good reason guides often advise a reboot to solve many simple problems: it’s often effective. Plus, it’s something everyone can do and doesn’t cost anything. If it works, yay; if it doesn’t, at least you’ve ticked that box.
In many cases, the Start menu will start working again after a restart or two. In certain situations, the glitch happened because the Start menu process got stuck in memory. Rebooting the system clears the RAM and everything starts afresh.
Even though it’s the easiest and simplest method, it isn’t suitable for all situations. Also, make sure to save all your work before attempting a reboot, especially if you’re using the power button to initiate a shutdown.
Tip. Use Ctrl + Alt + Delete > Power > Restart to reboot the PC if you can’t access the Start menu.
Fix 2. Unhide the Taskbar
Sometimes, you can’t access the Start menu because its button isn’t visible on the taskbar. This could be because the taskbar itself is hidden.
To rectify this, simply unhide the taskbar. Here are the steps to do so:
- Hold down the Windows logo key and hit the I key to directly open Settings.
- Navigate to Personalization > Taskbar.
- On the right, enable the option to “Lock the taskbar”.
- Disable the “Automatically hide the taskbar in desktop mode” or “Automatically hide the taskbar in tablet mode” option.
After making these changes, the taskbar, and hence the Start menu icon, will be visible again.
Fix 3. Restart the Start Menu Process
Similarly to how rebooting the computer can fix certain issues, restarting the Start menu can also make whatever ails the feature go away.
The Start menu has its own process, certainly in the latest versions of Windows 10. This process is known as StartMenuExperienceHost.exe. You will find it running when you open Task Manager.
Killing the process will force it to restart. This should help with the issue.
- Right-click any empty space on your taskbar and select Task Manager.
- Navigate to the Processes tab.
- Scroll down the Background Processes section and locate Start.
- Right-click Start and select End Task.
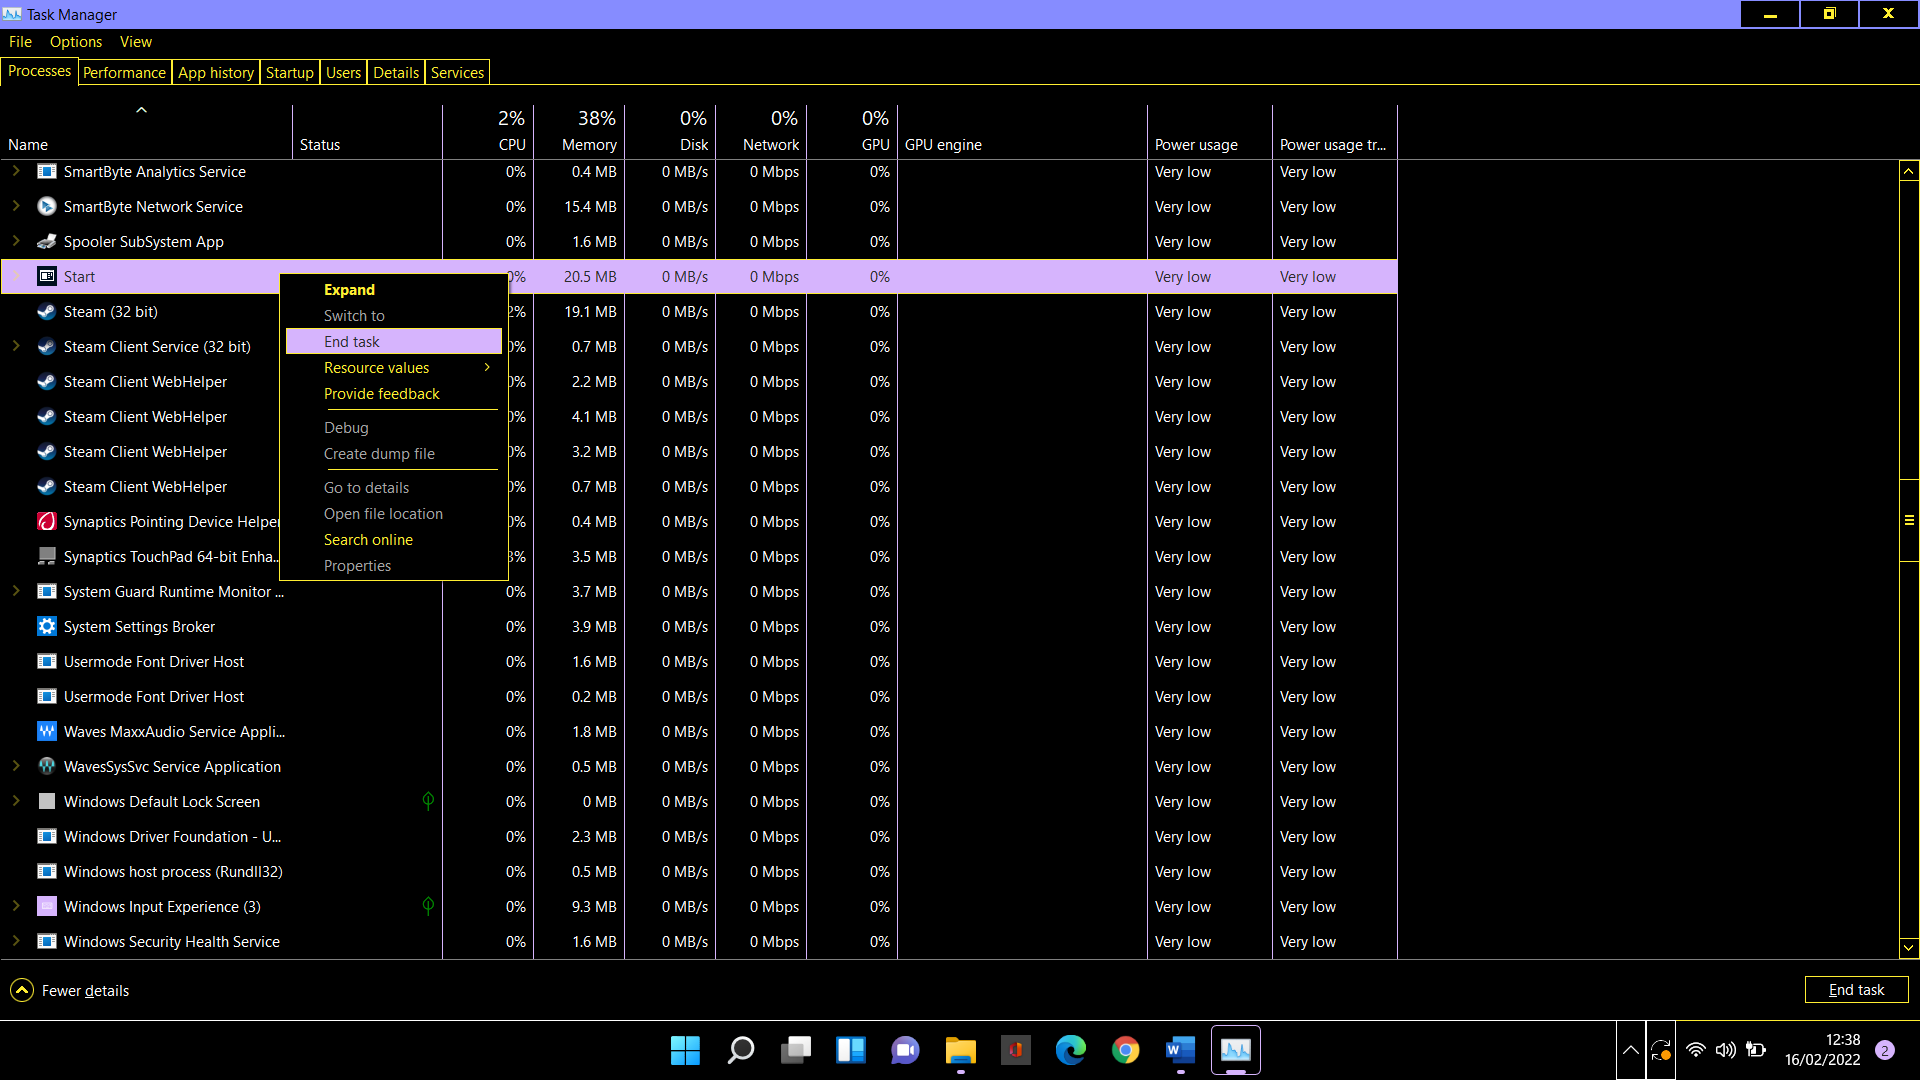
- The operation above will relaunch the Start menu process. Now check if the issue is resolved.
Fix 4. Restart Windows Explorer
It’s possible that a Windows Explorer issue is affecting the Start menu as well. You can restart Explorer and see if that helps.
- Use Ctrl + Shift + Esc to open Task Manager.
- Choose the Processes tab.
- Scroll down to Windows Explorer.
- Right-click the process and select Restart.
Fix 5. Update Windows
Needless to say, Microsoft routinely releases updates to the Windows 10 OS. Most of these are regular security patches and bug fixes. There are some performance updates thrown in to eliminate glitches that cause slowdowns.
Installing a recent update can help with issues like the Start menu not opening on Windows 10. In a situation where the problem happened because of a previously installed update, a fresh one may fix the error.
- Use Windows Key + I to open Settings.
- Navigate to Update & Security > Windows Update.
- Hit the “Check for updates” button.
- Download and install all available updates.
Your PC will likely reboot after the update. Now check that the Start menu is working normally.
Fix 6. Update Graphics Drivers
The Start menu is a feature that aids with user experience on Windows 10. It provides visual information and direction that makes navigating the operating system a beautiful experience.
It’s possible that issues with your graphics driver are affecting how the system renders the Start menu. Though uncommon, this can’t be totally discounted if your graphics or audio drivers aren’t up to date.
Simply update the relevant driver(s) and check how the Start menu responds. You can do this easily via Device Manager.
- Hold down the Windows logo key and hit the X button.
- Select Device Manager.
- In Device Manager, navigate to where the graphics/audio card is. Usually, this is “Sound, video and game controllers” but it may be under another option.
- Right-click the device and select “Update driver”.
- On the next screen, select the “Search automatically for drivers” option.
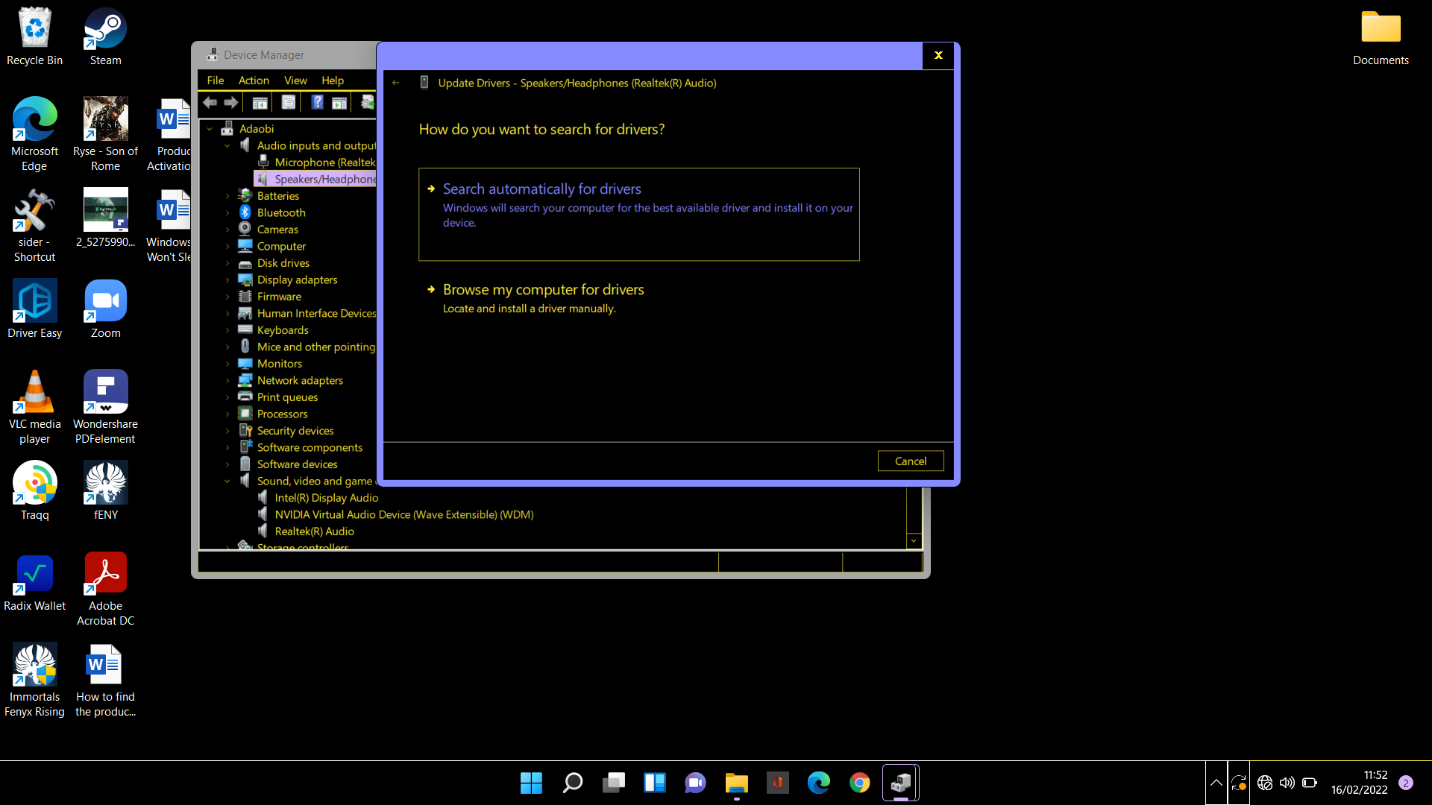
Windows will download and install the latest version.
This is a cool method to update your drivers. The catch is you’ll have to update them one by one. For a faster, more reliable method, you can give Auslogics Driver Updater a try.
Fix 7. Run Scans with DISM and SFC
DISM and SFC scans can help fish out corrupt Windows files and replace them with working copies.
Your Internet connection must be active while running the following operation:
- Hold down the Windows logo key and hit R to open Run.
- Type “cmd” into the Run field.
- Hold down Ctrl and Shift and hit Enter.
- Select Yes when the UAC prompt shows up.
- Run the command below and wait until the operation finishes (to run a command, type or paste it and then hit the Enter key):
dism /online /cleanup-image /restorehealth
- Run the command below and wait till the operation finishes:
sfc /scannow
After finishing the scan reboot your PC and everything should be in perfect shape.


 Done! Great to see you among our subscribers!