- Is Windows 11 Free?
- Is Windows 11 Worth Using?
- Is It Safe to Upgrade to Windows 11?
- Windows 11 vs. Windows 10
- Checking That Your Computer Can Run Windows 11
- Checking Your PC Specifications Manually
- Turning On Secure Boot and TPM
- Things to Keep in Mind Before You Upgrade
- How to Download Windows 11
- How to Use the Windows 11 Installation Assistant
- How to Use the Media Creation Tool
- Join the Windows Insider Program
- Conclusion

The wait for Windows 11 is finally over. Microsoft began the operating system’s mainstream release on October 5. This means you no longer have to be a Windows Insider to install it.
We went over the promised features of the new OS in our guide on how to install the early release of Windows 11. Most of those features are now available. From rounded corners to integrated services like Microsoft Teams, Windows 11 promises to be a whole different experience.
That said, there are still a few kinks to be worked on since the OS is still new. As a result, you could experience minor glitches here and there until Microsoft irons out those issues through updates.
You can make your system more efficient while at it by using a program like Auslogics BoostSpeed. It makes sense to utilize this tool to get rid of junk files and faulty registry keys and optimize your system’s settings. Also, don’t forget to use a reliable antivirus program as hackers are always on the lookout for vulnerable computers.
Is Windows 11 Free?
Microsoft answered this question when it announced the OS in June. As long as you have a Windows 10 license, you’ll get the new operating system for free. If you are not running Windows 10, you’ll have to pay for a Windows 11 license.
Is Windows 11 Worth Using?
The company held nothing back in promoting the operating system. Windows 11 comes with tons of new features that swayed the best of us. Also, with Windows 10 being with us for over five years, the thought of a new environment seems refreshing.
Those new features on Windows 11 include, but are not limited to, the following:
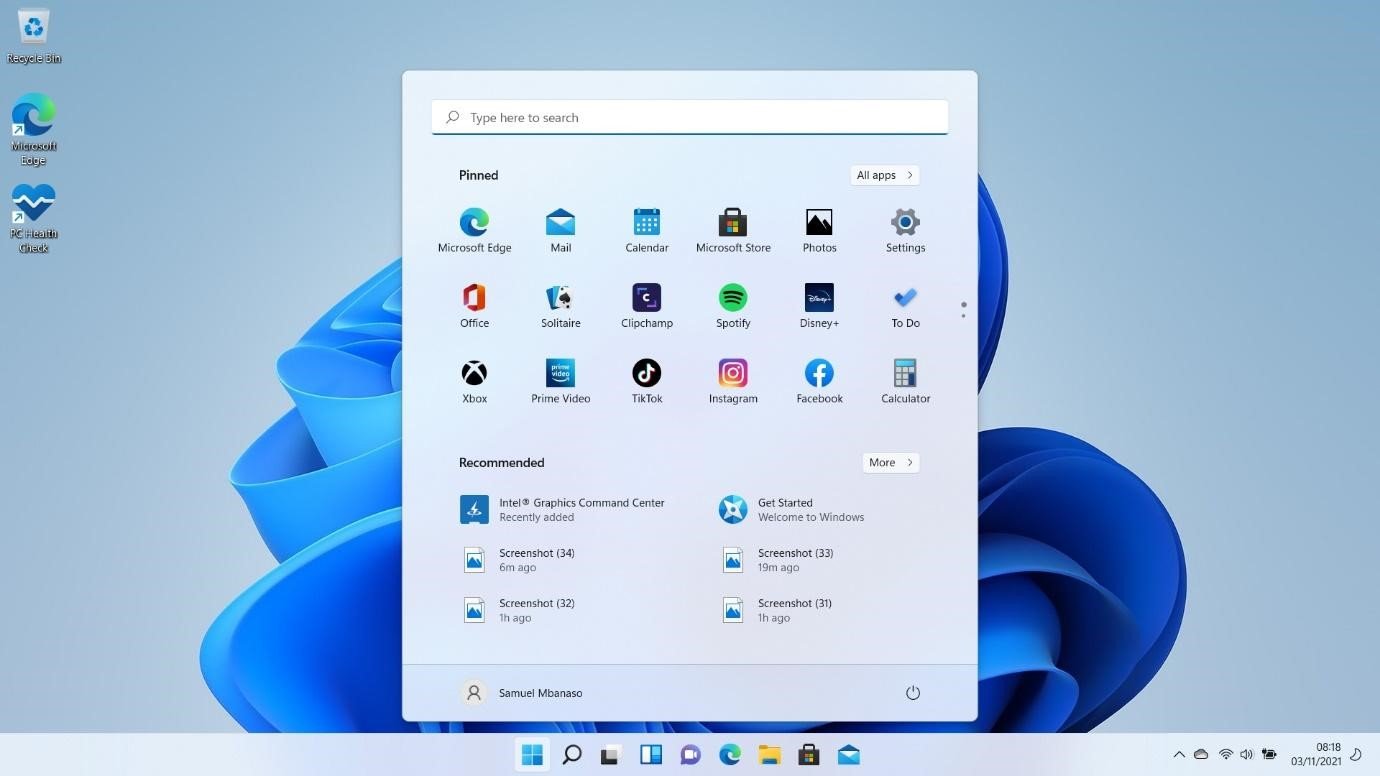
A Revamped UI: After upgrading, you’ll be greeted with a completely new UI. The first thing you’ll notice is the repositioned Start menu and taskbar icons. Of course, you can always shift them back to their traditional positions, but you may love them that way. Other things you’ll notice are the pastel shades, rounded window corners, and cleaner context menu.
Android Apps: Chromebooks have been blowing up. It won’t be wrong to attribute Chrome OS’ success to its compatibility with Android apps. Since Windows doesn’t have a seamless relationship with mobile operating systems, Microsoft decided to start with Windows 11.
The OS will be able to run Android apps. However, that feature hasn’t been released yet. It will likely come in 2022.
While you can use your Phone app to do this, the integrated feature will make the process more native.
Snap Layouts and Groups: This is a holdover from Windows 10 – but with significant improvements. You can now arrange multiple windows with considerable ease. All you have to do is hover your mouse cursor over the Maximize button of an open window and choose how you want your programs arranged.
Widgets: The Widgets feature is another Windows 11 introduction – or reintroduction. They were called Gadgets in Windows 7 but were never brought back with Windows 8.
The Windows 11 Widgets feature has its own taskbar button. It rests on the left side of the screen and shows things like Weather right off the bat when you open it. Of course, you can customize the space later by adding your own widgets.

Auto HDR: This feature upscales the display of games that don’t support high dynamic range. Microsoft is bringing the feature from its new XBOX Series X consoles.
Microsoft Teams: You no longer have to go through a lengthy process to open up Microsoft Teams. The service is now integrated with Windows 11 and also sits pretty in the taskbar.
Is It Safe to Upgrade to Windows 11?
Yes. It’s entirely safe to upgrade to the new OS. However, make sure you go through the proper channels.
If you have a Windows 10 license, you can get the official Windows 11 package for free. So, don’t be drawn in by sites that offer you pirated versions, as they could end up breaking your computer. Also, you won’t get to enjoy the full Windows suite if you go for them.
Windows 11 vs. Windows 10
Windows 11 stands out thanks to its cleaner interface and new features. However, many can argue that five years of updates on Windows 10 make it more stable.
The new operating system also has more advanced security policies since Microsoft mandates features like Secure Boot and TPM. That said, Windows 10 also leverages the technologies – although they remain optional.
It all comes down to your preference. Do you want to stick with the OS you’ve grown comfortable with for now or jump over to the shiny new thing?
Checking That Your Computer Can Run Windows 11
Lots of complaints have flown around regarding Windows 11’s strict system requirements. Many users eager to use the new OS were met with a discouraging message telling them they couldn’t run it.
If you’re yet to see the Windows 11 upgrade banner on your PC, there’s a chance your computer can’t run the OS.
It would be best if you started by confirming that your PC is eligible. Here are the system requirements for Windows 11:
- Secure Boot support
- TPM (Trusted Platform Module) 2.0
- Free storage of at least 64GB
- At least 4GB of RAM
- Two or more processor cores
- Processor clock speed of 1GHz or faster
TPM 2.0 is mostly shipped with modern PCs. That means your processor will likely check other boxes if it comes with the module. You have to confirm that you have Secure Boot turned on and more than 64GB of free storage on your hard drive.
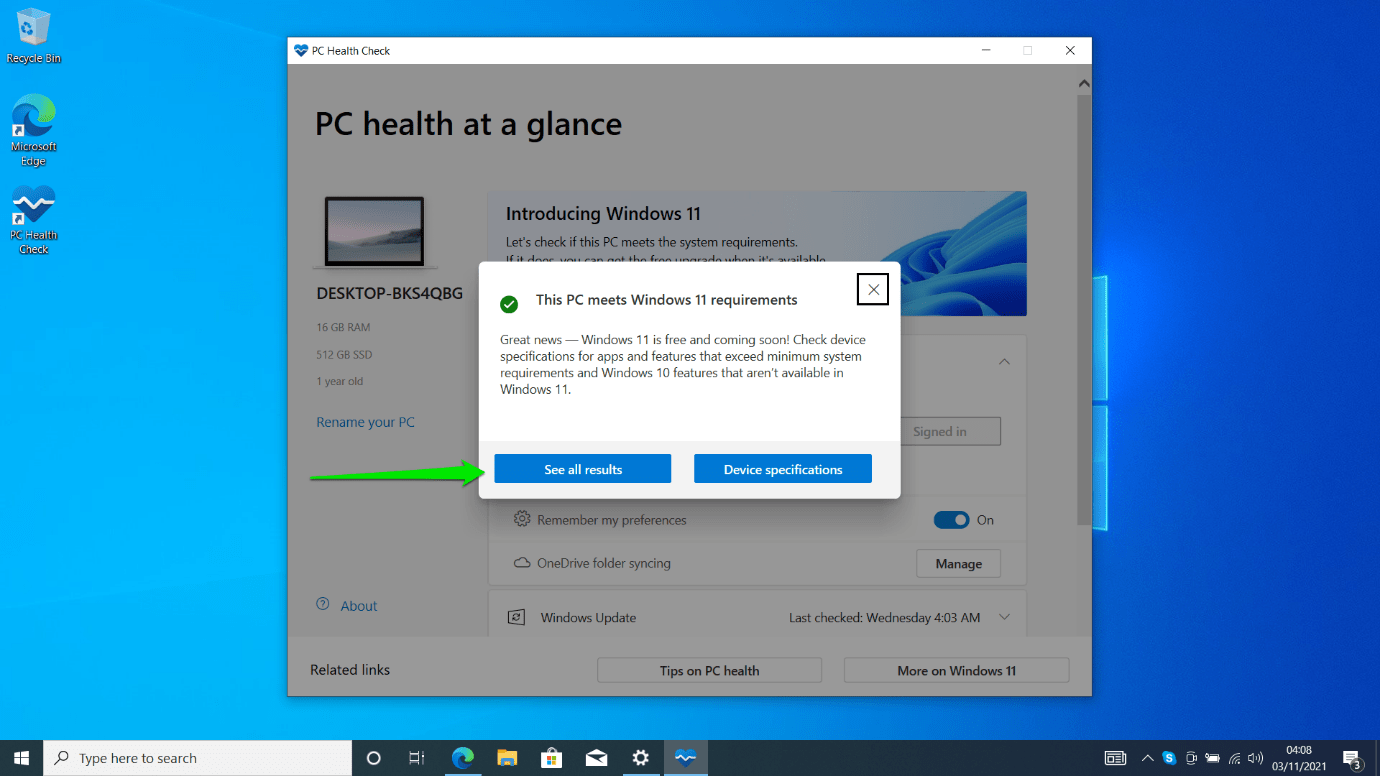
Checking if your PC is compatible is simple. You can quickly use the PC Health Check application.
Here’s how:
- Head to the Microsoft website and click on PC Health Check on the Windows 11 download page.

- Click on “Download PC Health Check App” under “Check for Compatibility”.
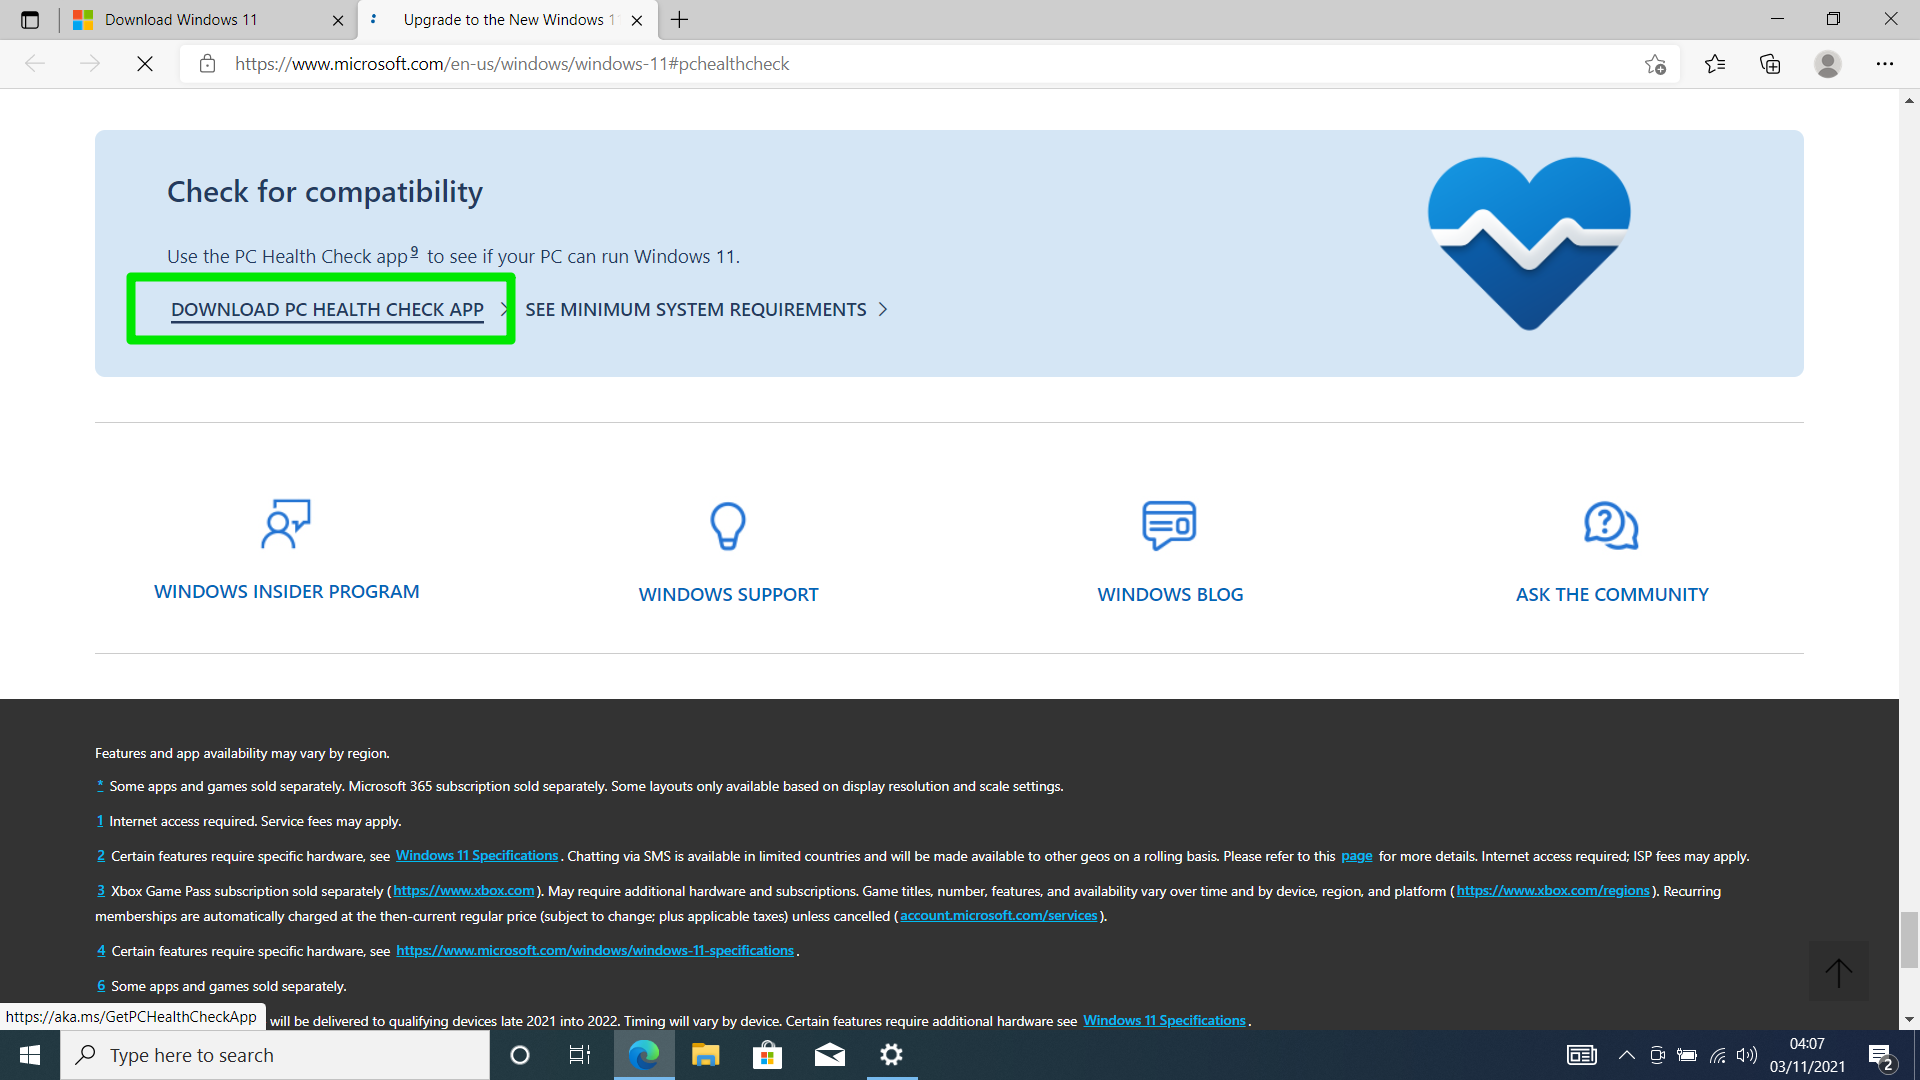
- Open the file once the download completes.
- Click on “I accept the terms in the License Agreement” and select Install when you see the setup page.
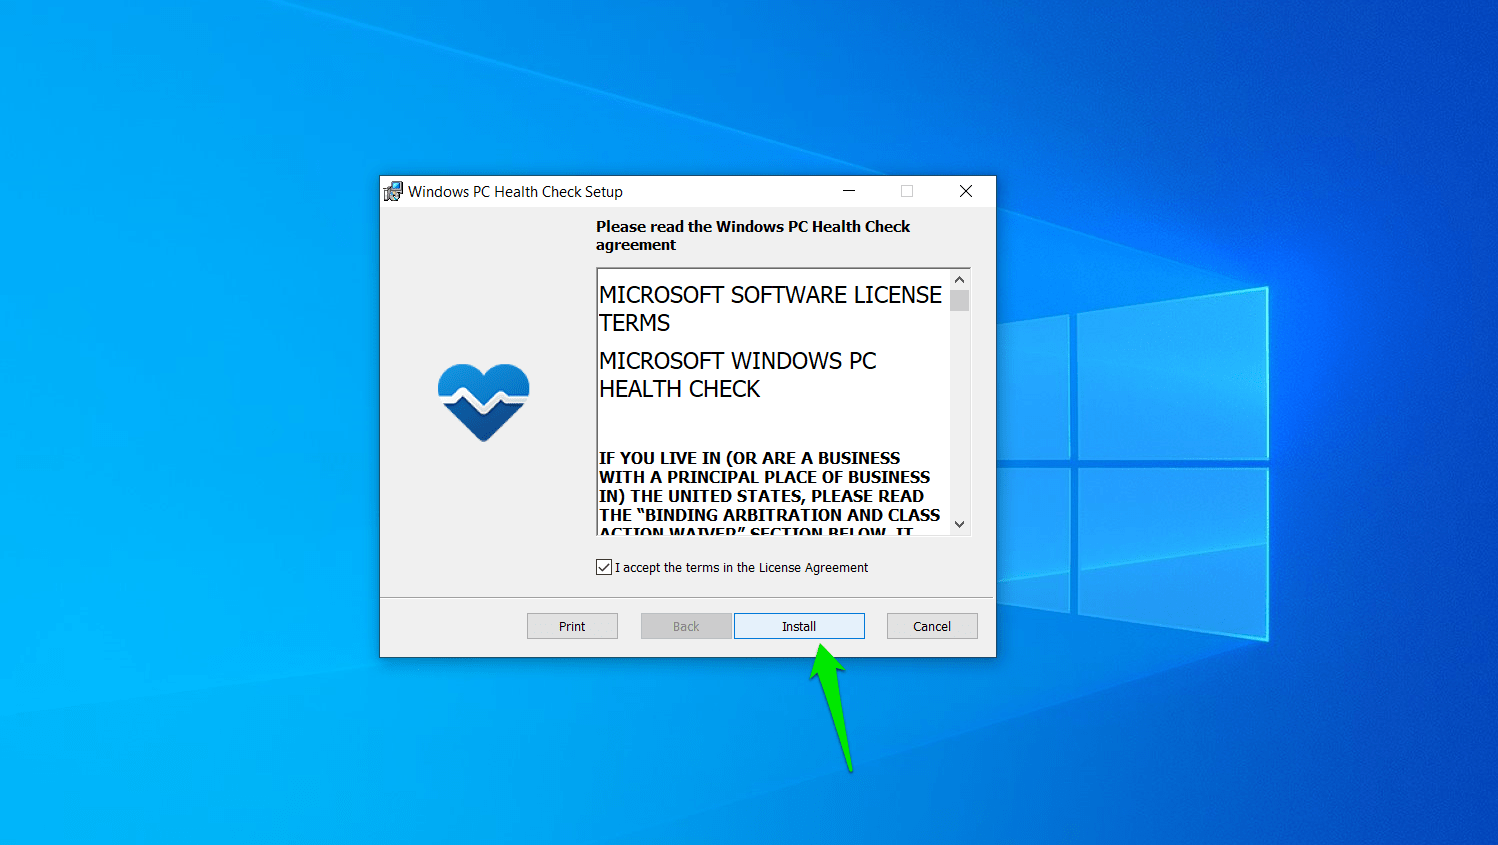
- Click on Finish to open the application.
- Once you launch the app, you’ll see different resources on the first page. It displays the name of your computer and some basic details in the left pane.
- To check your PC’s compatibility, click on “Check now” under “Introducing Windows 11”.
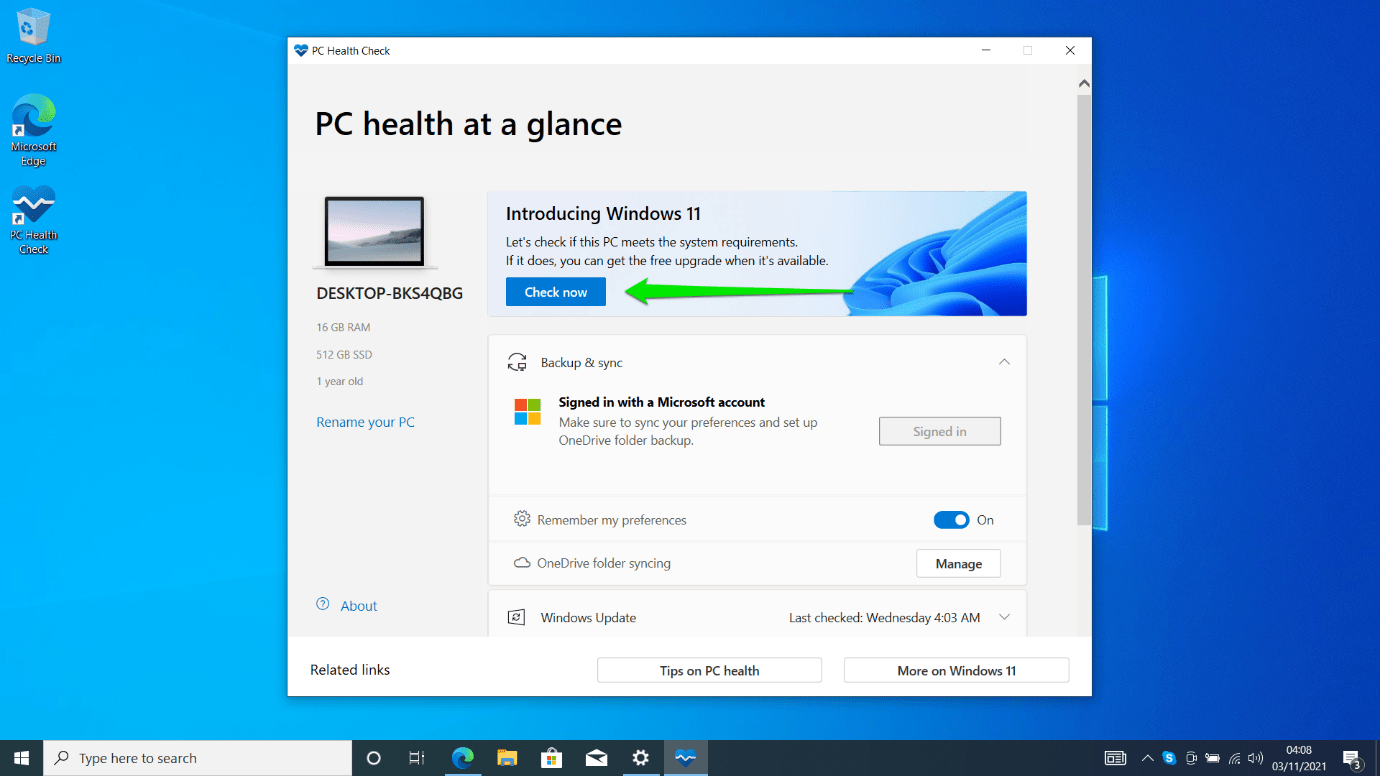
- A dialog box will pop up, confirming whether your computer meets the operating system’s requirements or not. Next, you can click on “See all results” to check what’s missing on your computer.
Checking Your PC Specifications Manually
Sometimes, the PC Health Check app gets things wrong. For example, if TPM or Secure Boot is turned off at the BIOS level, the program could report that your system can’t run Windows 11.
So, if you believe that your machine should run Windows 11, we’ll show you the steps to check if it has all the required components.
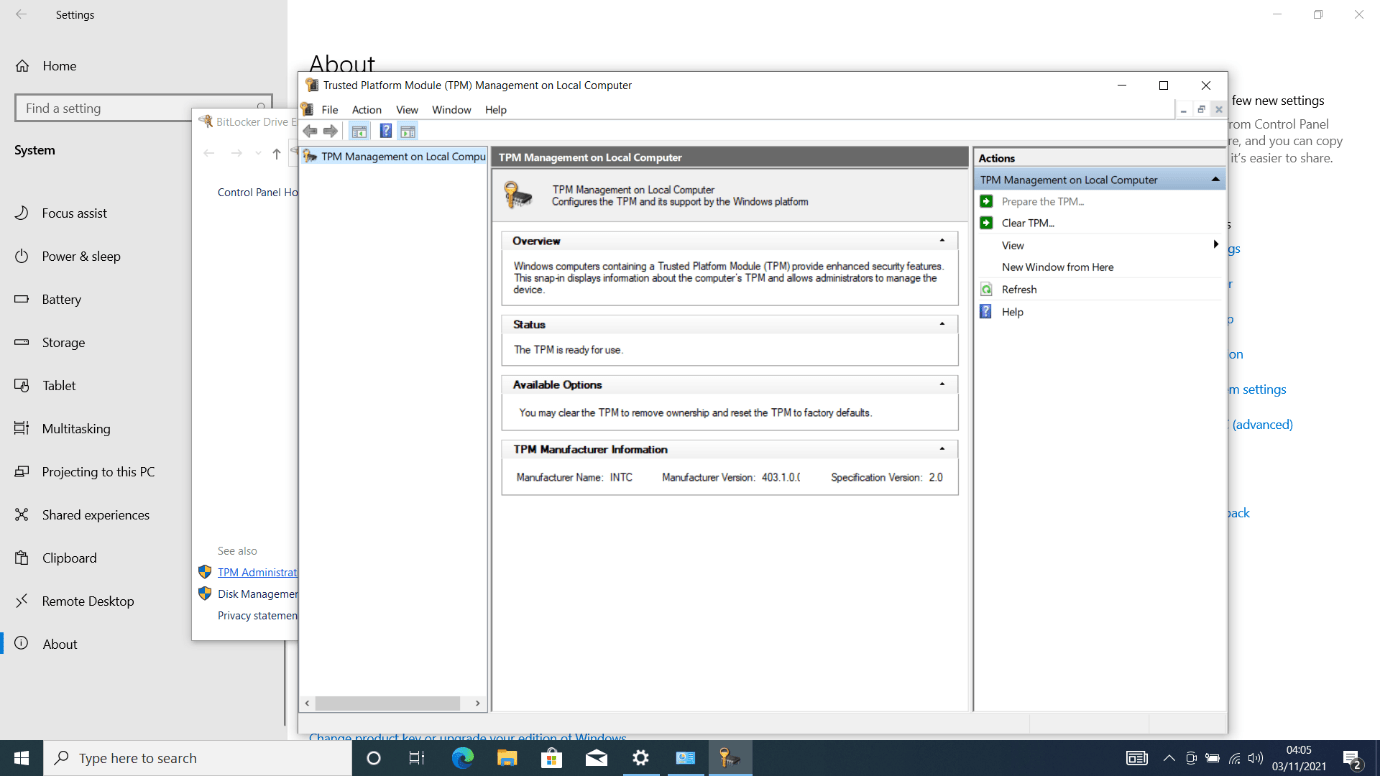
Checking Your TPM Status:
- Press Win + R or right-click on the Windows icon in your taskbar and click on Run.
- Once the Run dialog window shows up, open the TPM management window by typing “tpm.msc” and hitting the Enter key.
- The Trusted Platform Module (TPM) Management window will fly out.
- If TPM isn’t installed, you should see a message that says, “Compatible TPM cannot be found.”
- However, if your computer has the module installed, you should see the following sections:
- Overview: This section gives brief info on TPMs.
- Status: This section tells you whether the TPM is ready to use or not. If it’s not ready, then you have to go to your BIOS and turn it on.
- Available Options: This section lets you know if you can reset the module to factory defaults.
- TPM Manufacturer Information: This section displays the manufacturer information and version of your TPM. Windows 11 requires version 2.0. However, systems with version 1.2 can also install the OS.
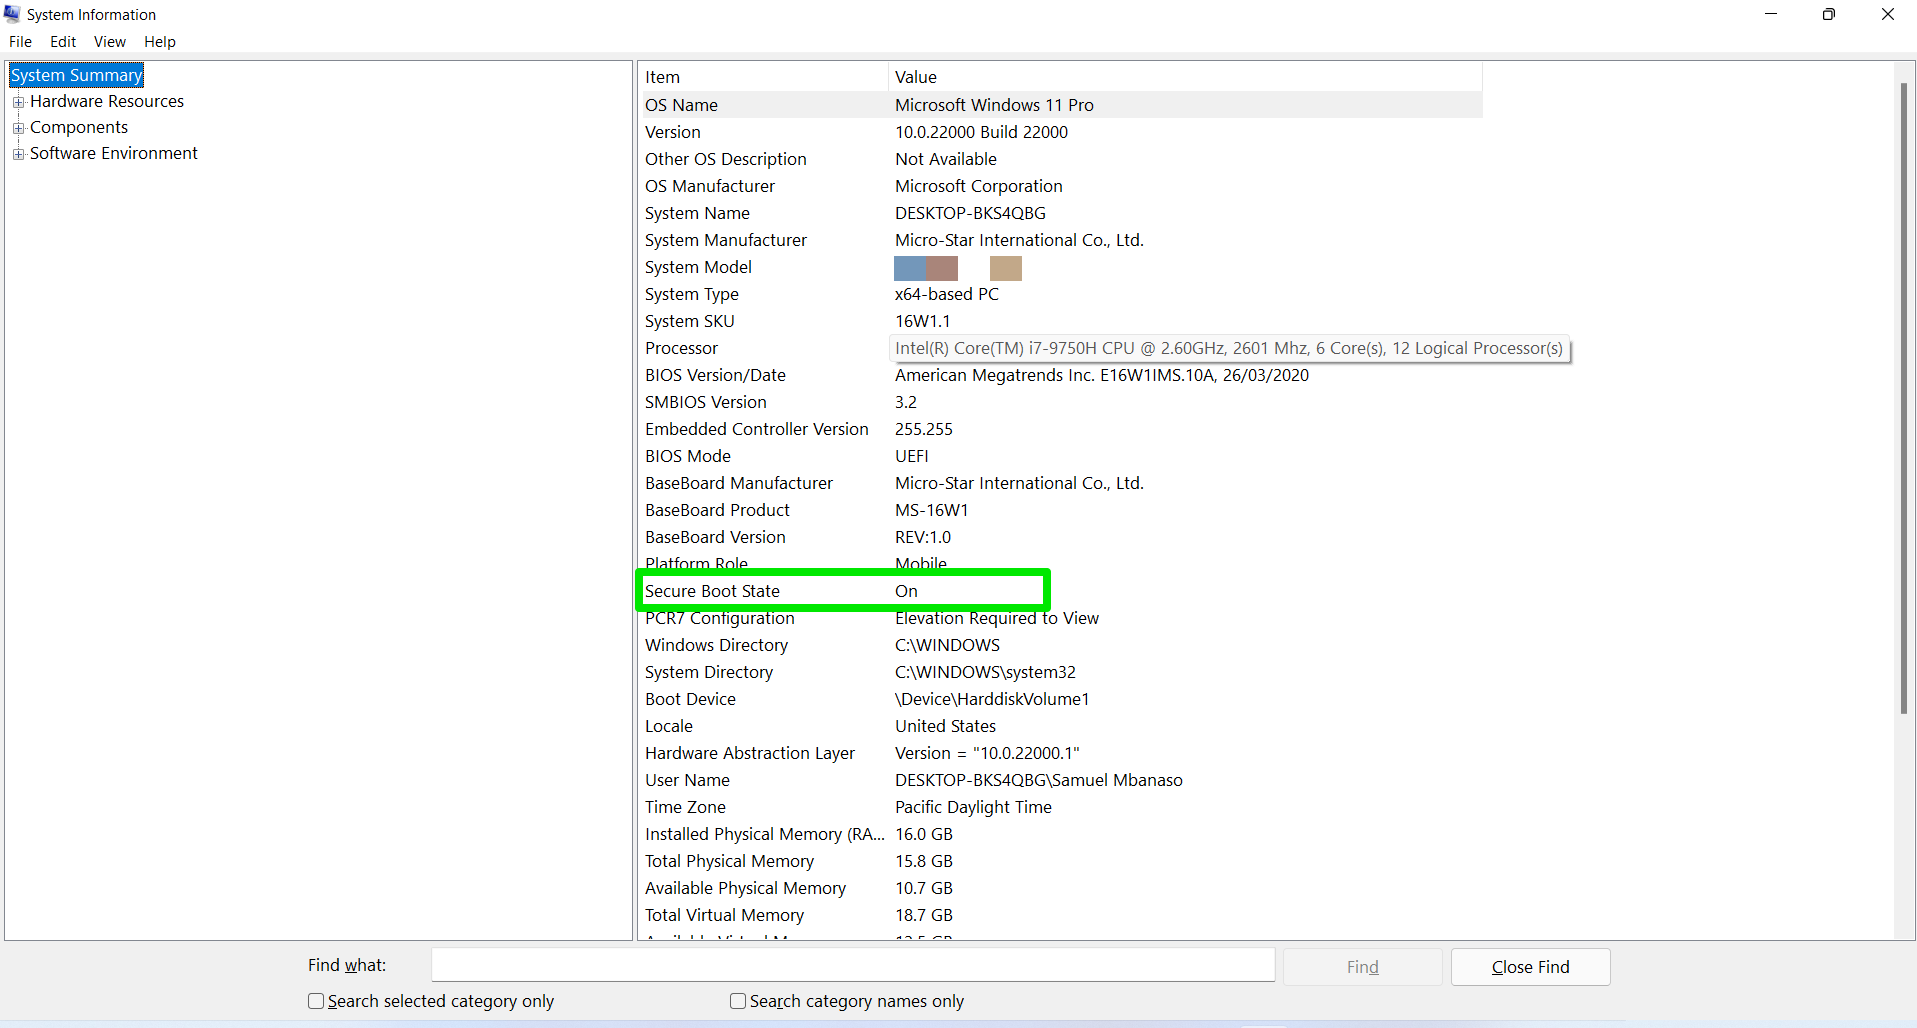
Checking for Secure Boot Support:
- Press Win + R or right-click on the Windows icon in your taskbar and click on Run.
- Once the Run dialog window shows up, open the System Information window by typing “msinfo32” and hitting the Enter key.
- The System Information window will now appear.
- Scroll to Secure Boot State to check if Secure Boot is turned on or not.
Turning On Secure Boot and TPM
You have to turn on both security features to install Windows 11. Head to our guide here to find out how to do that.
Things to Keep in Mind Before You Upgrade
Upgrading your computer is a pretty big deal. So, there are specific things you should keep in mind before you start:
- Back up your computer: While Windows allows you to upgrade and carry your files and apps along to Windows 11, we recommend that you back up important files. It’s best to stay on the safe side when moving to an entirely new operating system.
- If your computer doesn’t meet the system requirements, don’t force the issue. Microsoft seems focused on using the TPM chip for many security policies. Therefore, it would be best to stay on Windows 10 if your computer doesn’t have the tech. This way, you’re getting security updates designed for your system. After all, Windows 10 will continue receiving updates until 2025.
- Most users who upgraded to Windows 11 found that they couldn’t downgrade without deleting everything. Unfortunately, this means you’ll likely lose your applications and files if you decide to head back to Windows 10 after the “Go Back” period elapses. So again, make sure you back up your system and confirm that you’re willing to stay on Windows 11.
How to Download Windows 11
There are different ways to download and install the operating system. Microsoft provided these methods to make sure the OS is accessible and easy to install. In addition, you can use Windows 11’s installation package to restore your PC and even repair it. We’ll show you different methods to upgrade your PC.
How to Upgrade to Windows 11 Through Windows Update
The Windows Update service allows you to install the new OS the same way you apply significant Windows 10 feature updates. All you have to do is head to the Windows Update page and click on Download and Install.
Note that even if you have automatic updates turned on, you have to click the button to upgrade to Windows 11 manually. So, follow these steps:
- Hit the Windows + I combo on your keyboard to launch Settings.
- Select Update & Security on the first screen of the Settings window.
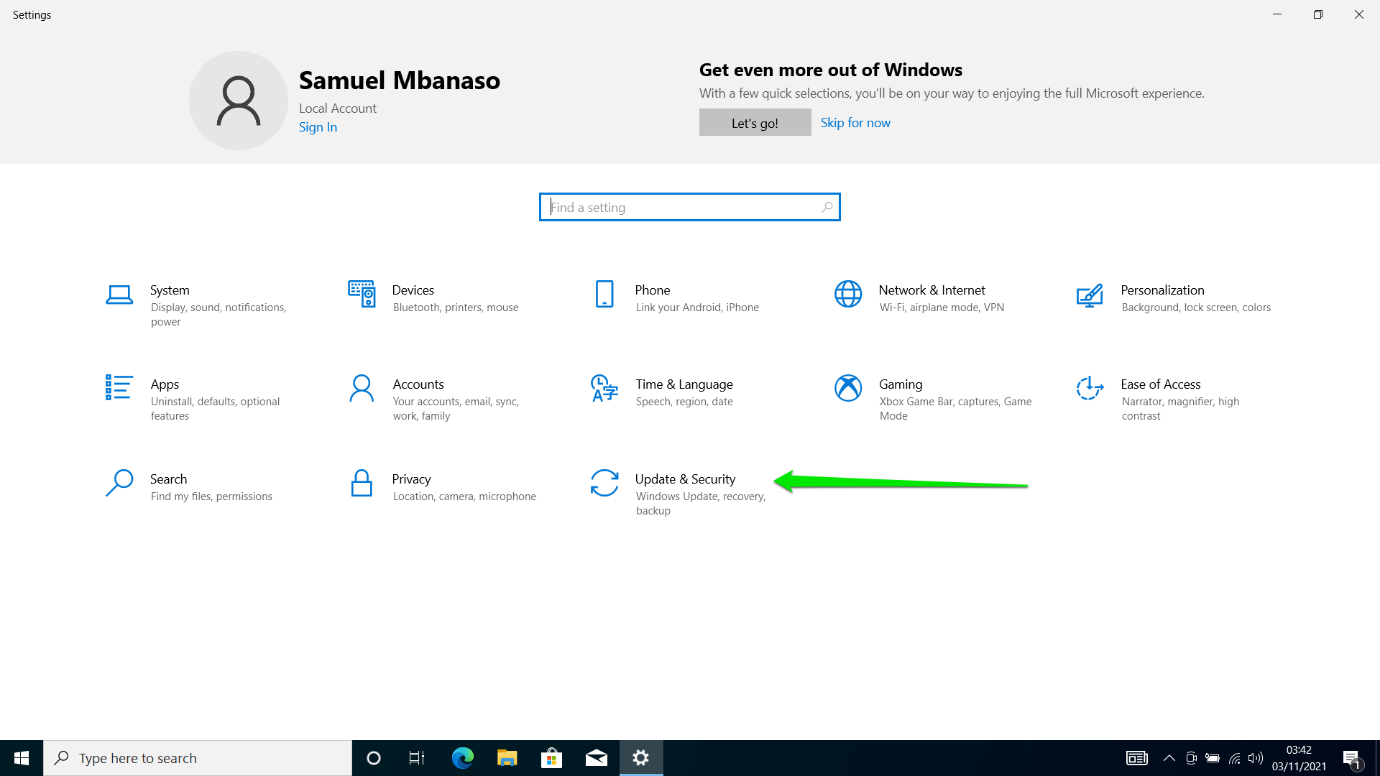
- After the Update & Security page appears, you should see a banner asking you to upgrade to Windows 11. Next, click on the Download and Install button.
- Windows Update will now download and install the operating system, keeping your applications and files intact.
Download Windows 11 From Microsoft’s Website
As we mentioned, the Windows 11 release is going out in batches. So, even if your PC is eligible to install the OS, your update might show up in Windows Update later. If you can’t wait, you can get the new OS from Microsoft’s website.
Going through the website, you can download and run the Windows 11 Installation Assistant, use the Windows 11 Media Creation Tool, or download the Windows 11 Disk Image (ISO) file.
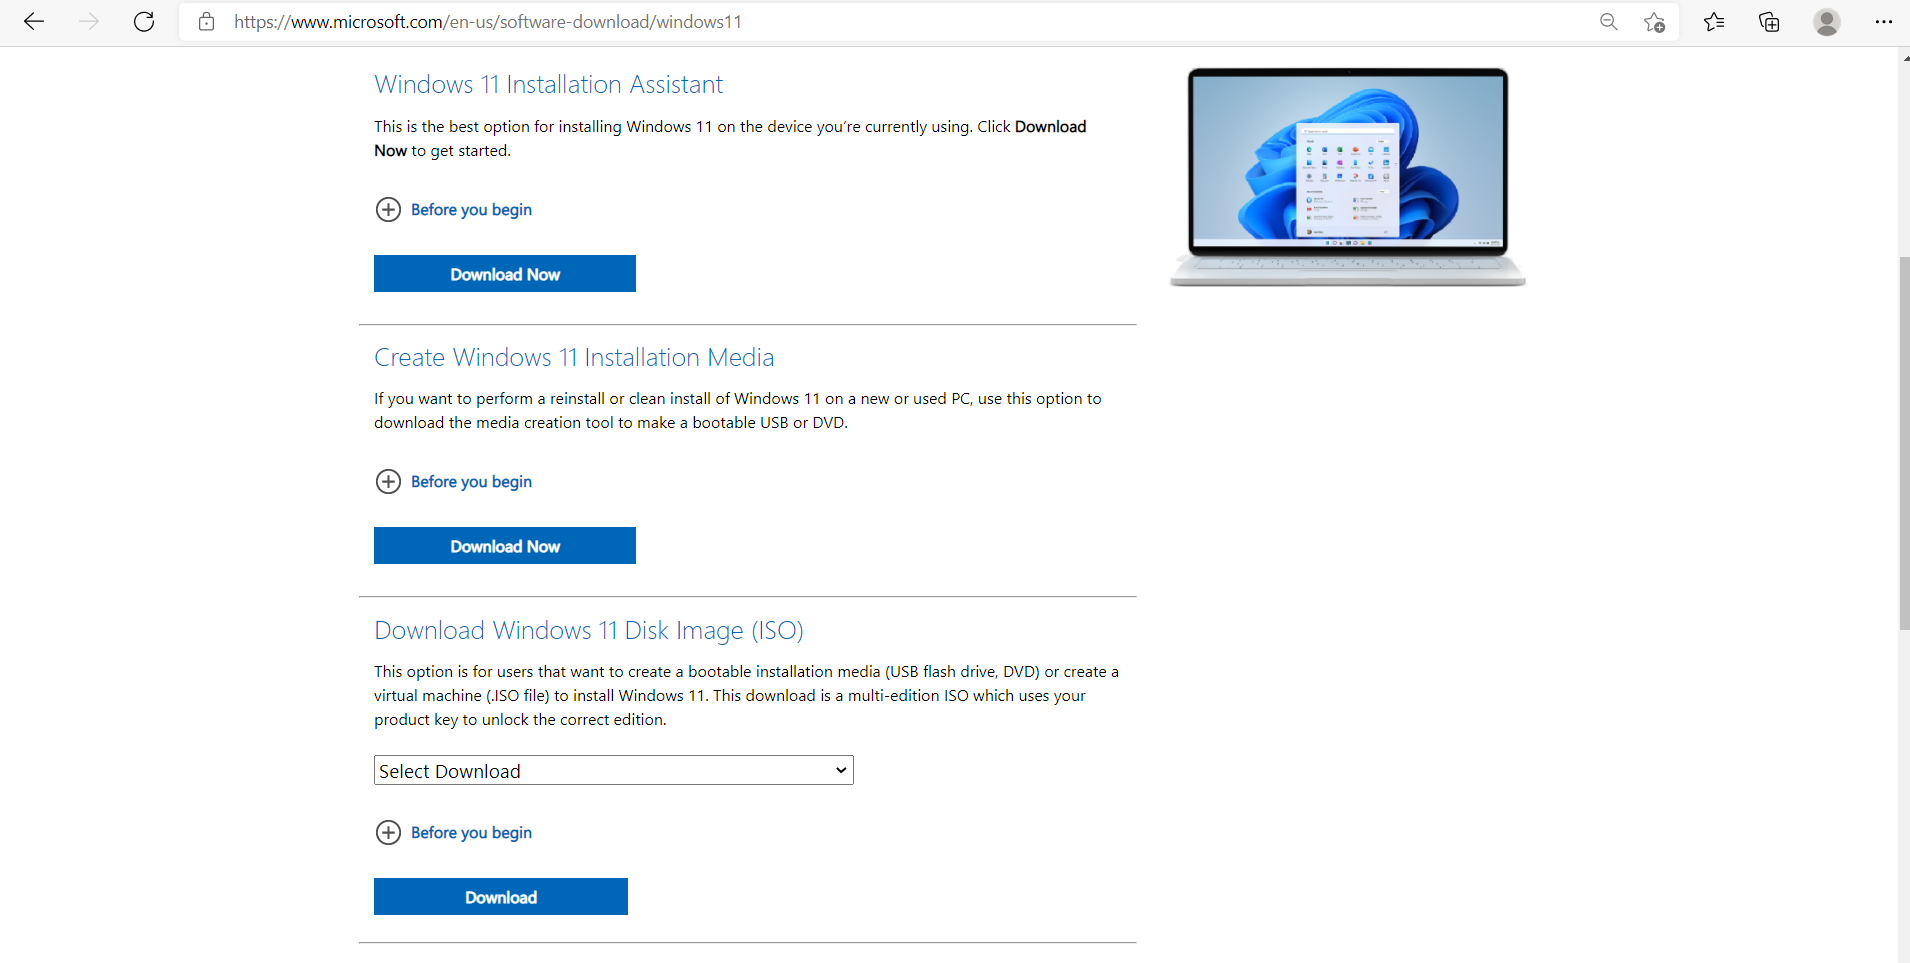
While each process upgrades your system to Windows 11, they have their unique features.
Using the Windows 11 Installation Assistant is not different from using the WU client. It helps you download and install the OS if it’s unavailable through Windows Update or if the client is having issues.
The Media Creation Tool allows you to set up a bootable USB drive or DVD that can be used to install or recover Windows 11 at any time in the future. You won’t have to download the Windows installation package anymore. Just stick the drive into your PC to install the OS.
Downloading the Disk Image (ISO) file is even better. It allows you to create a Windows 11 installation DVD using tools like Nero. You could also use the file to create a bootable USB drive without relying on the Media Creation Tool to download files from Microsoft’s servers.
We’ll walk you through each process step by step.
How to Use the Windows 11 Installation Assistant
- Open the Microsoft website and click on the Download button under Windows 11 Installation Assistant.
- After your browser downloads the tool, run it.
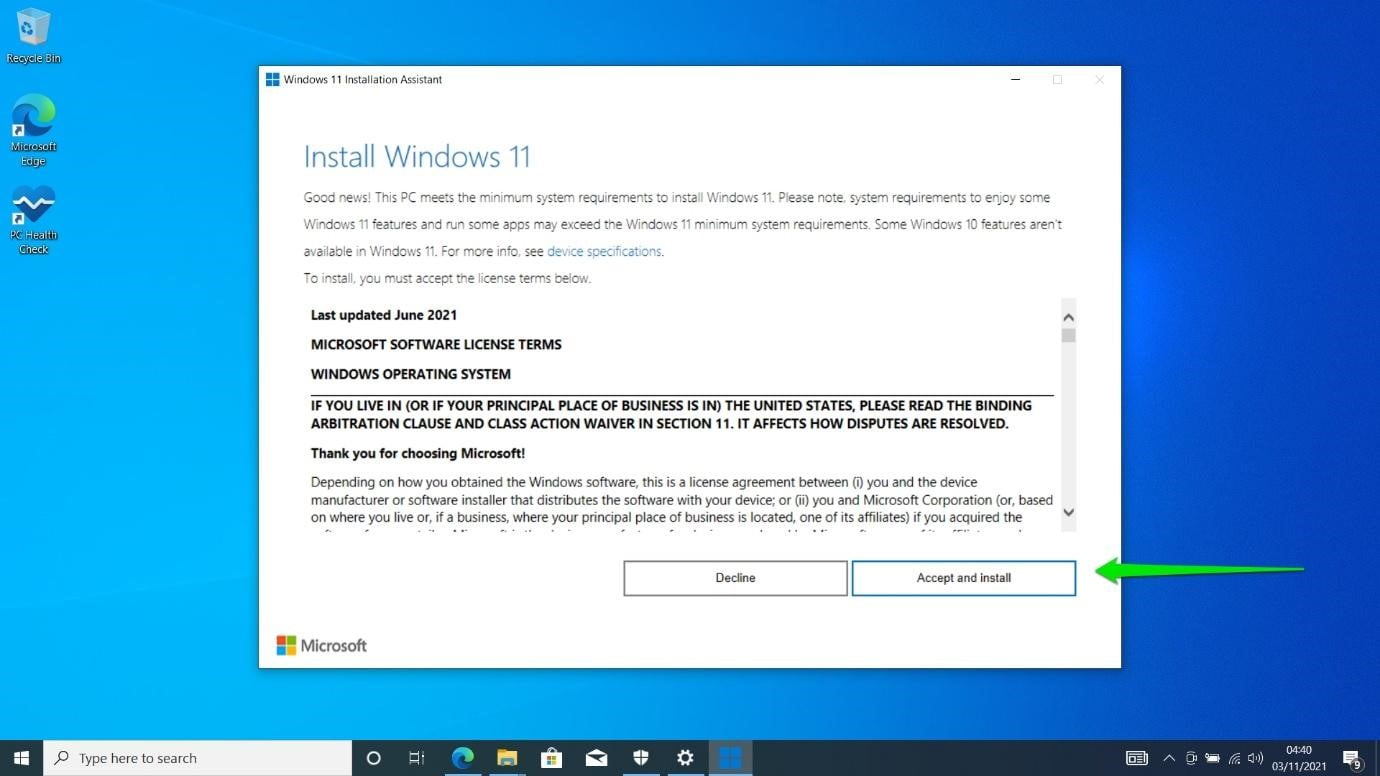
- Select Yes in the User Account Control window.
- Once the Assistant opens, click on the Accept and Install button.
- The Downloading page will now appear.
- Once the phase is complete, a countdown will show on your screen. The tool will automatically restart your PC in 30 minutes. However, you can click on Restart Now to get on with it.
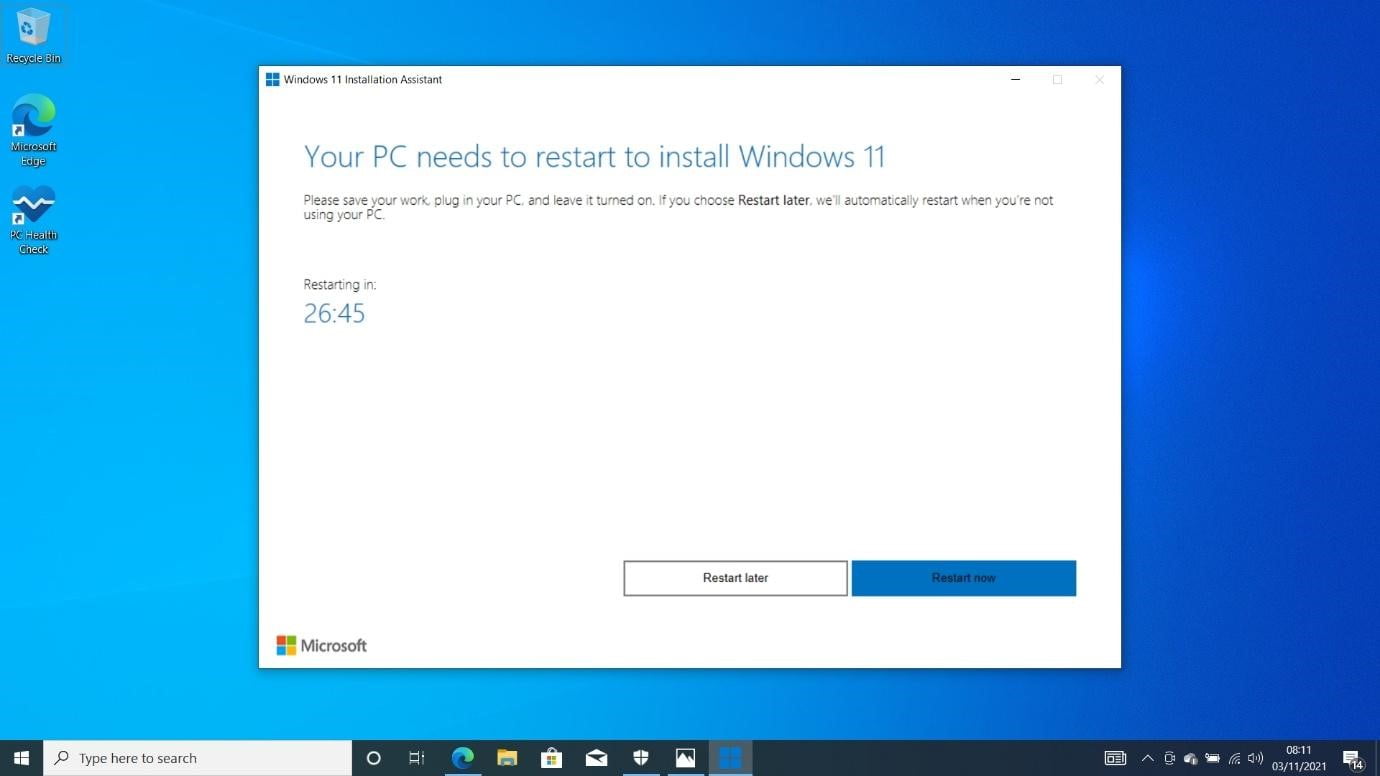
- Another warning page will show up, giving you the last chance to save any open work. Click on the Close button.
- Your PC will now restart into the installation environment.
- From here, the process is straightforward. After the installation completes, you only have to perform a few rituals and you’ll be on your desktop in no time.

How to Use the Media Creation Tool
You can also use the Media Creation Tool to download the Windows 11 Disk Image (ISO) file. That means you can also follow this process instead of downloading the file directly from the Microsoft site:
- On the Microsoft website, click on the Download button under “Create Windows 11 Installation Media.”
- Run the setup file once your browser downloads it.
- Select Yes in the UAC window.
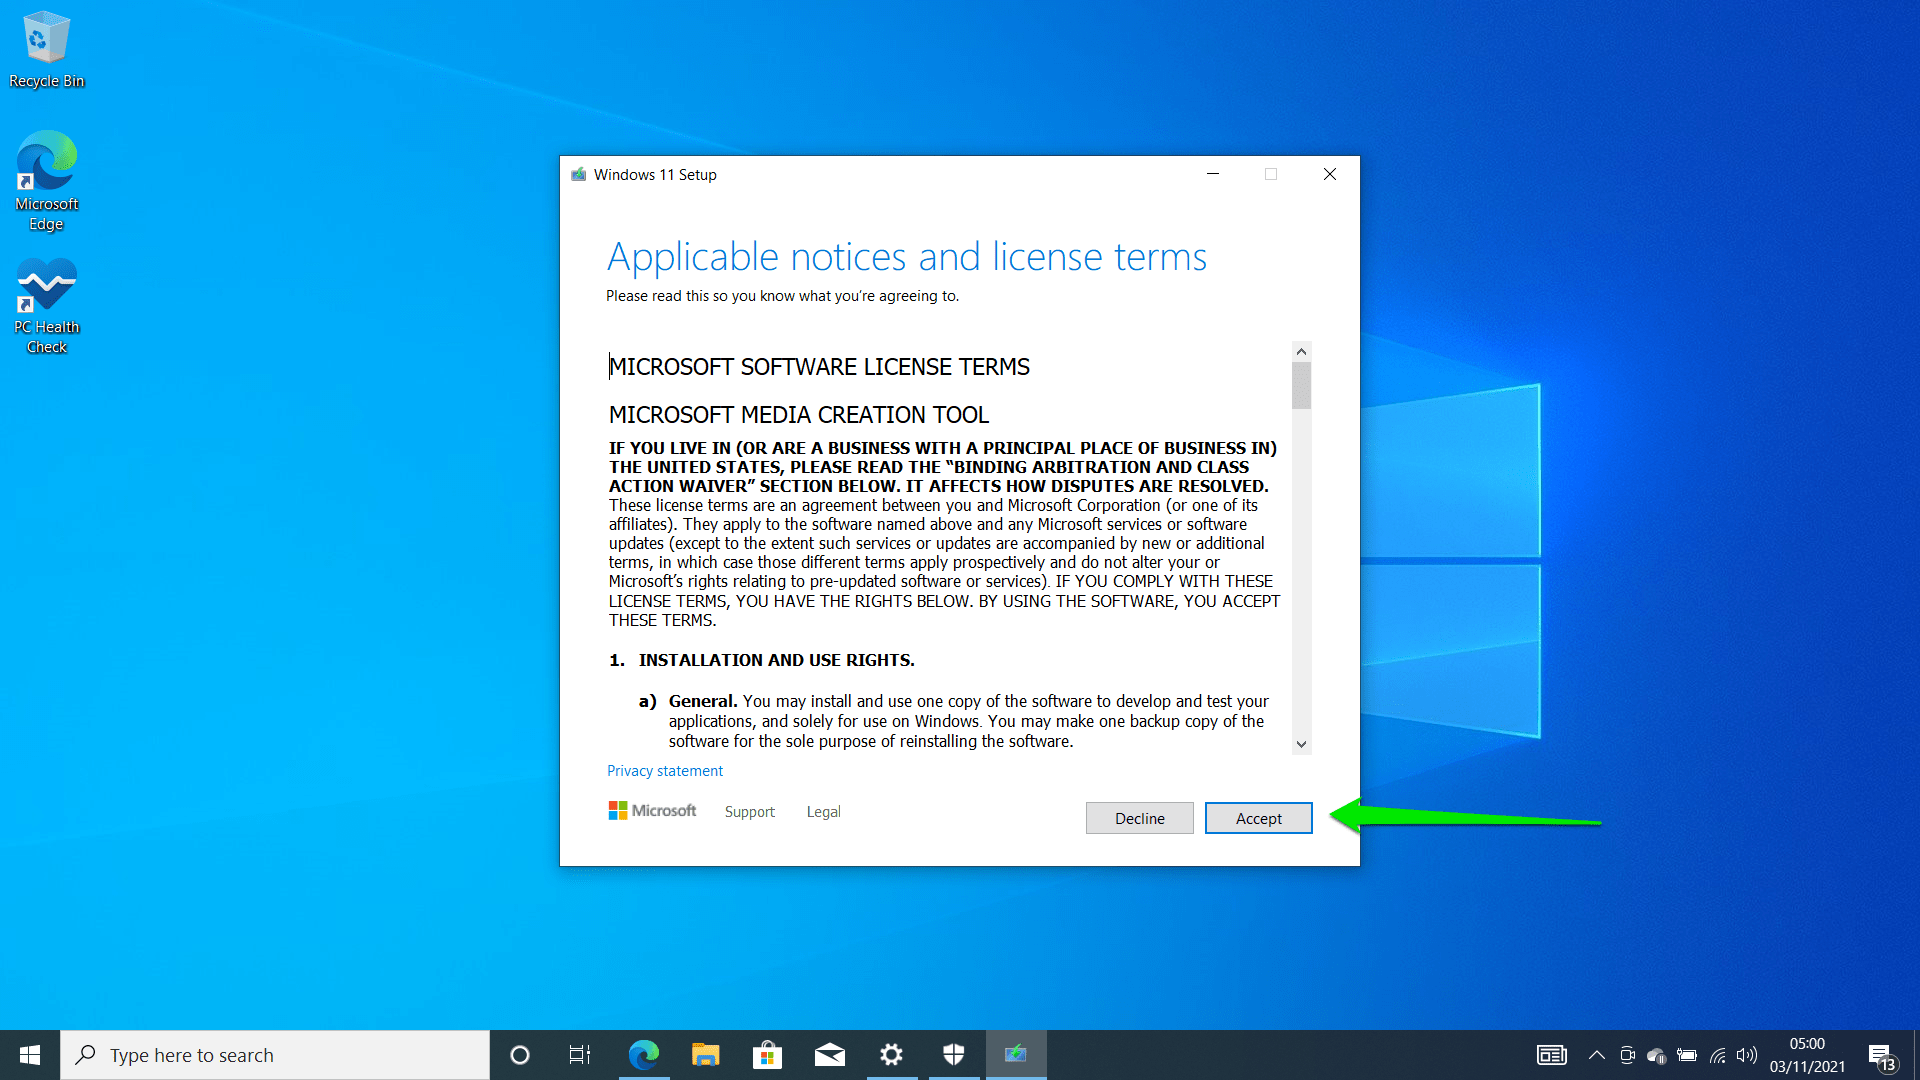
- Accept the license once the Windows 11 Setup window appears.
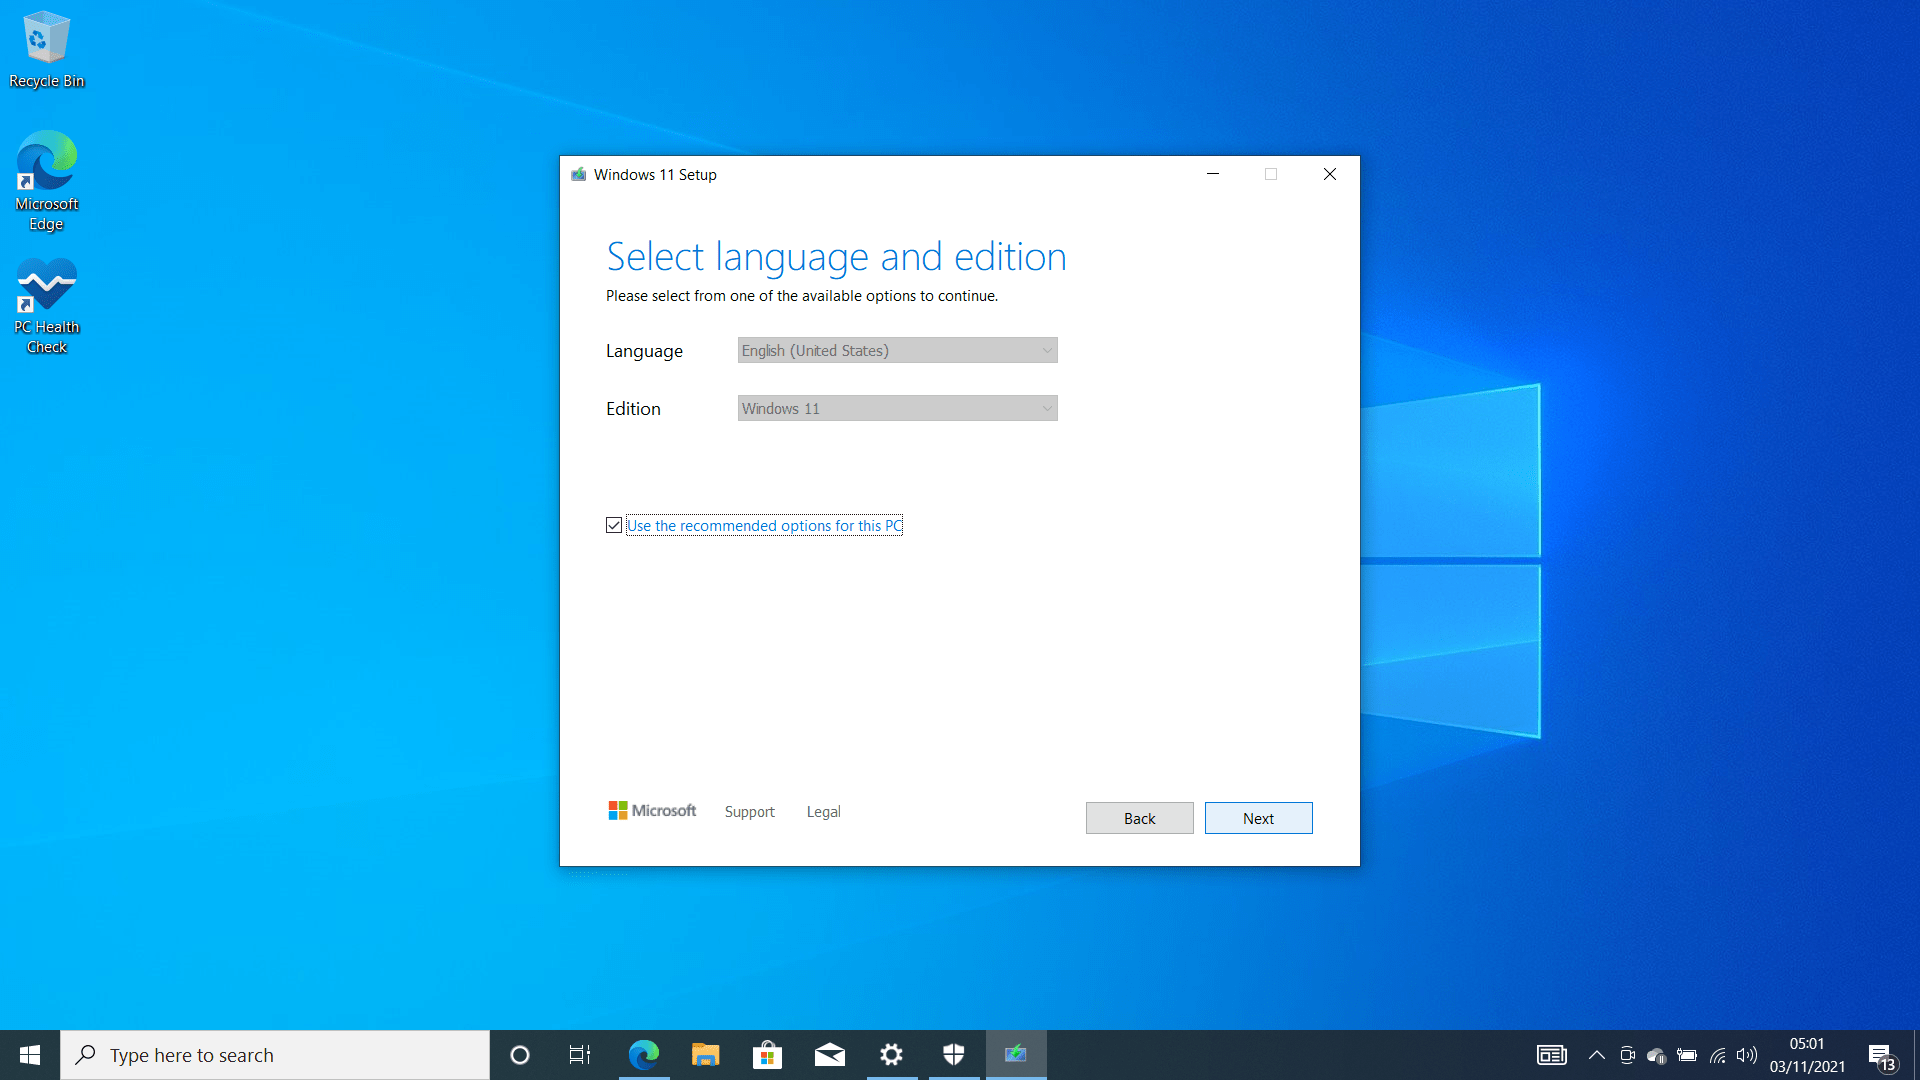
- On the page that follows, click on the Next button. Uncheck the “Use the recommended options for this PC” box if you want to change your language.
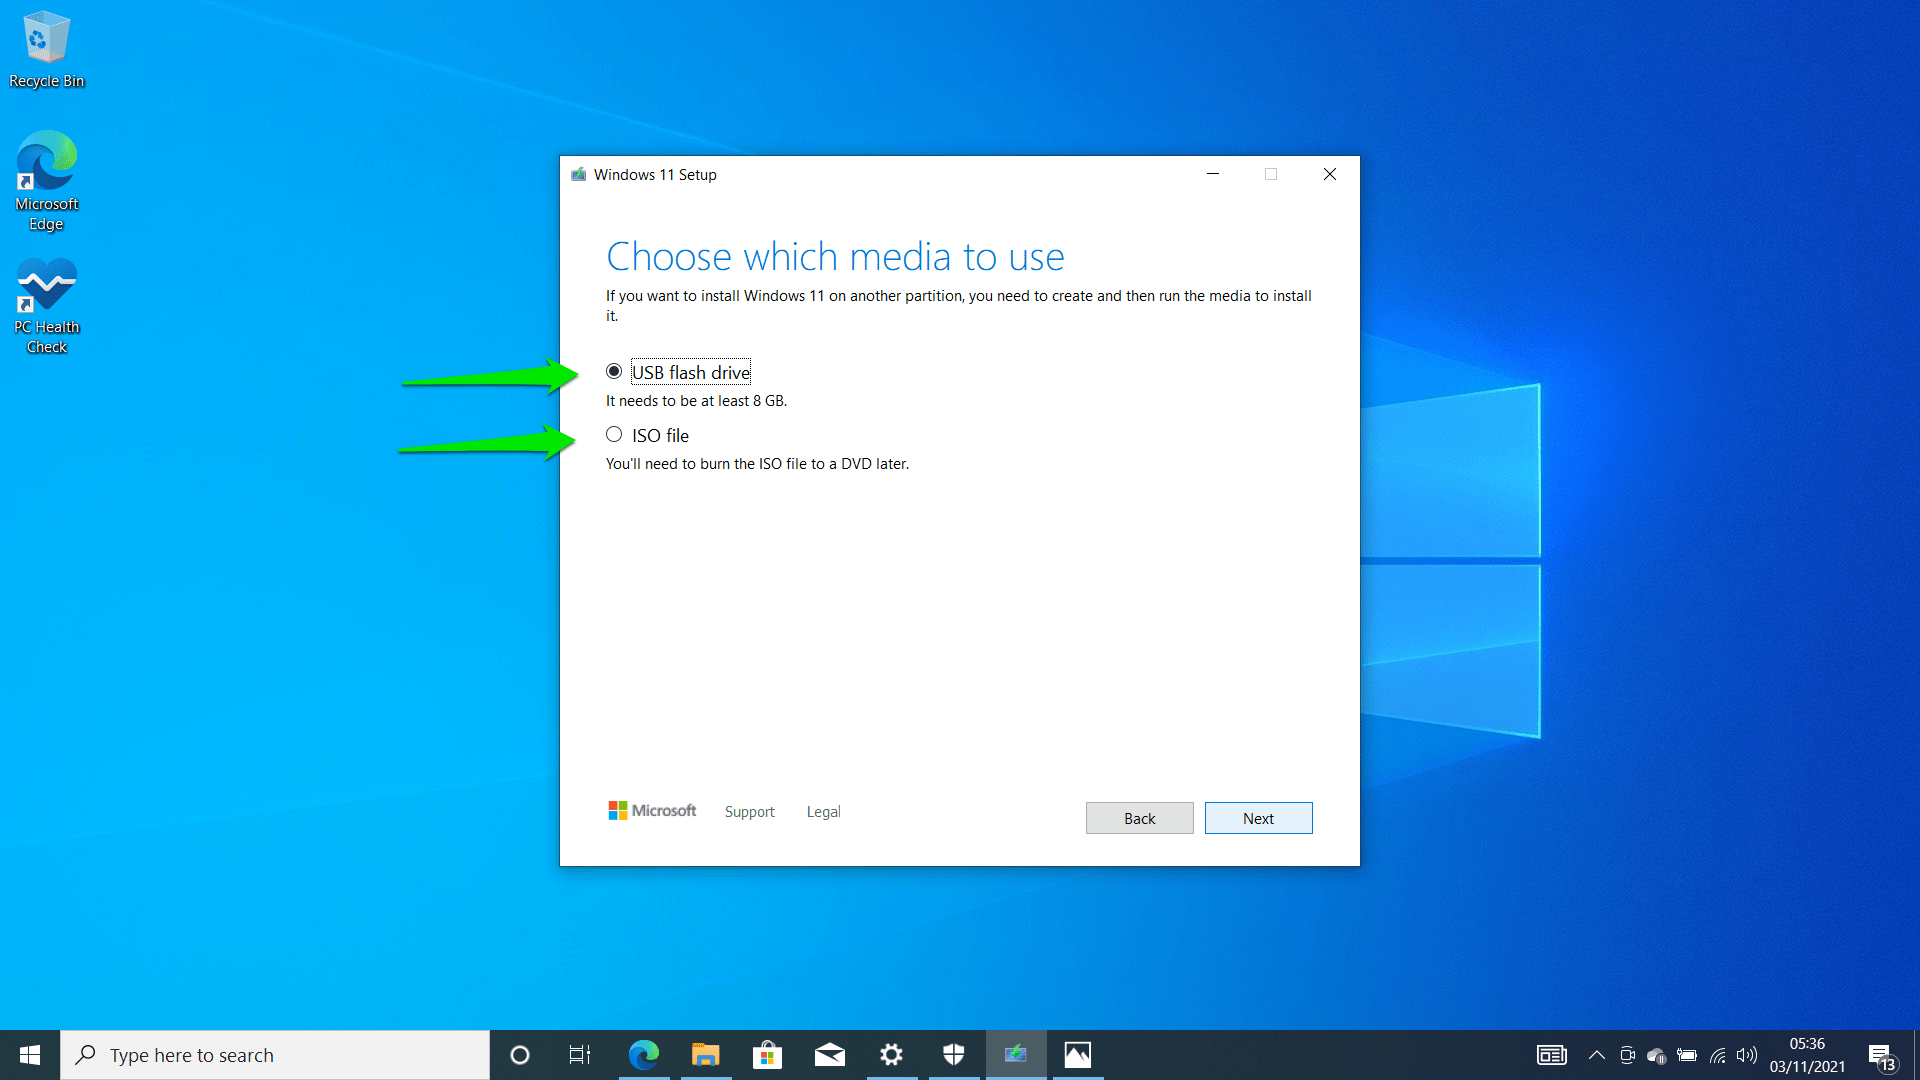
- On the next page, you’ll have to choose between USB Flash Drive and ISO File. Going for the ISO File option means you’re downloading the setup package to your computer. You can burn it to a DVD later.
- If you go for the USB option, the next page allows you to choose your USB flash drive. It should be detected automatically. Click on the Next button after selecting it.
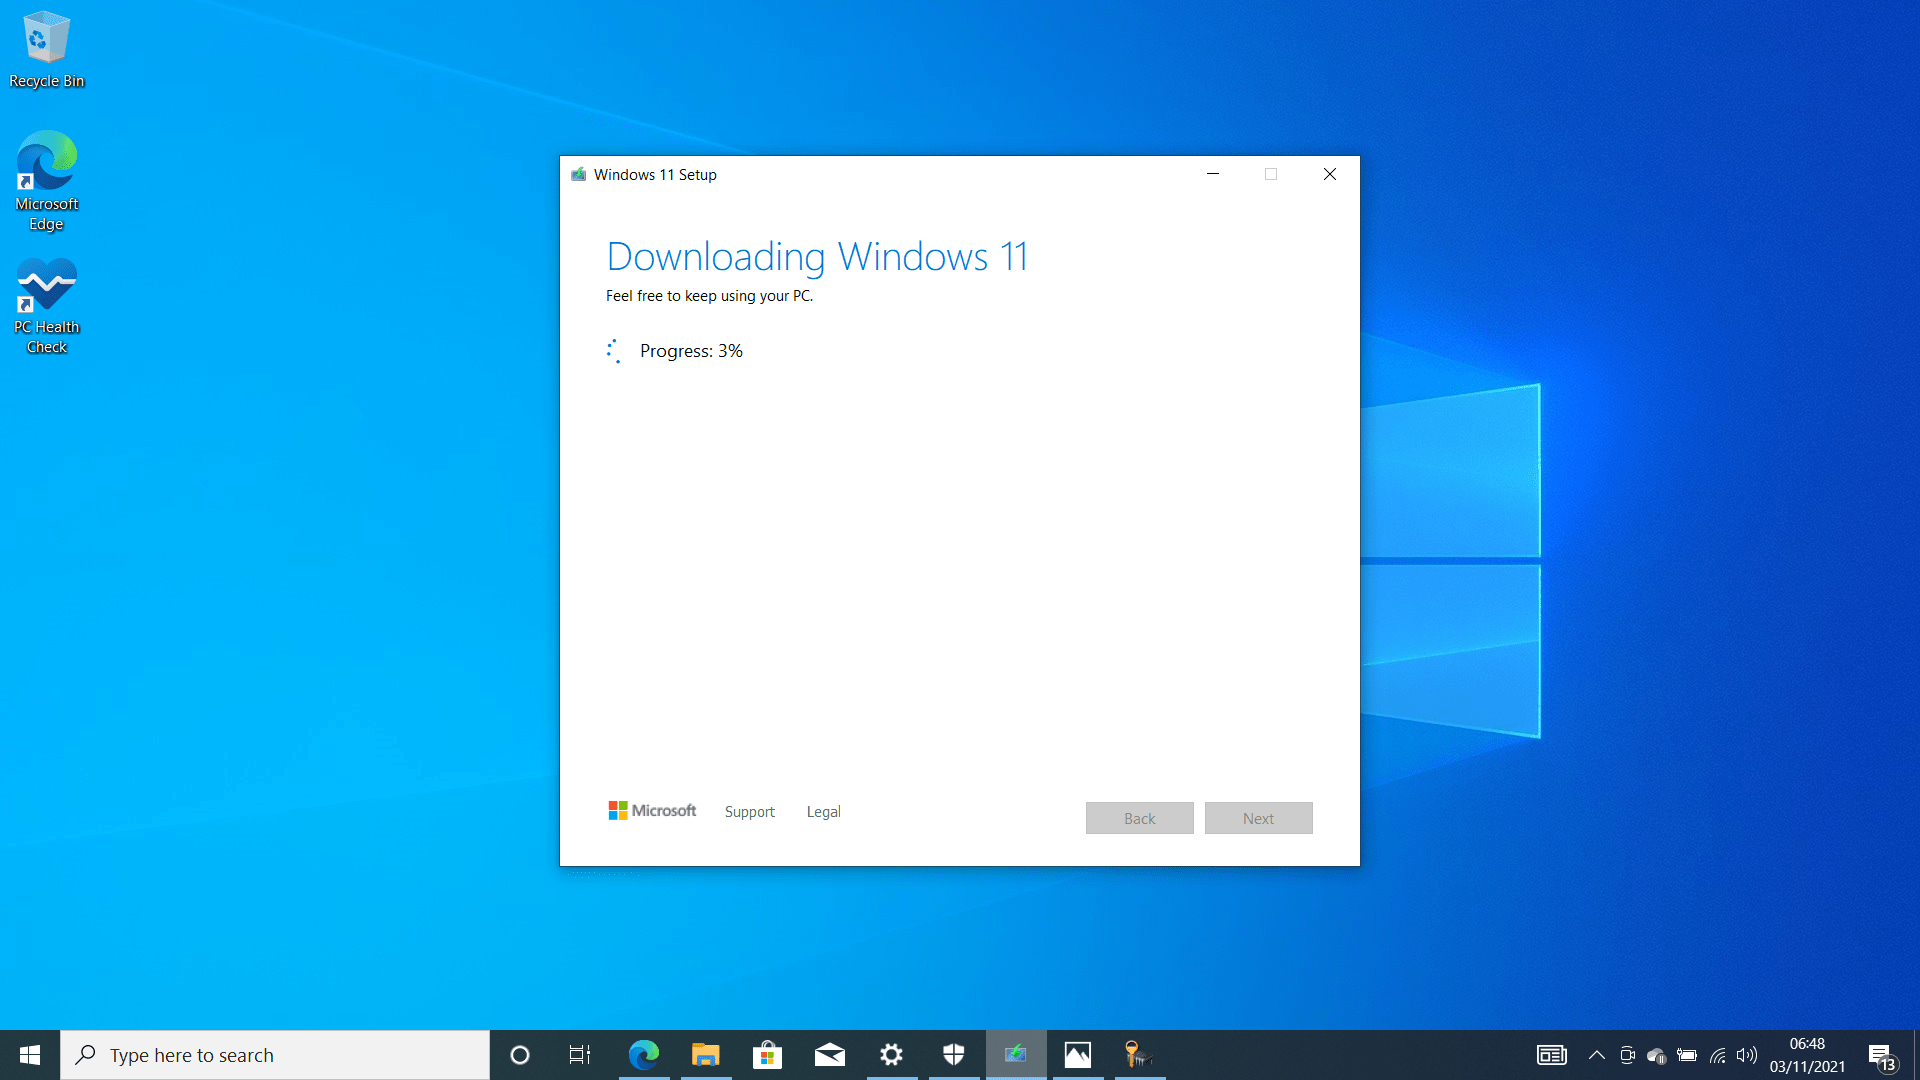
- You should now see the Downloading Windows 11 page. This is the same page you’ll see after selecting the ISO File option.
- After the download completes, the setup will start creating a bootable USB drive.
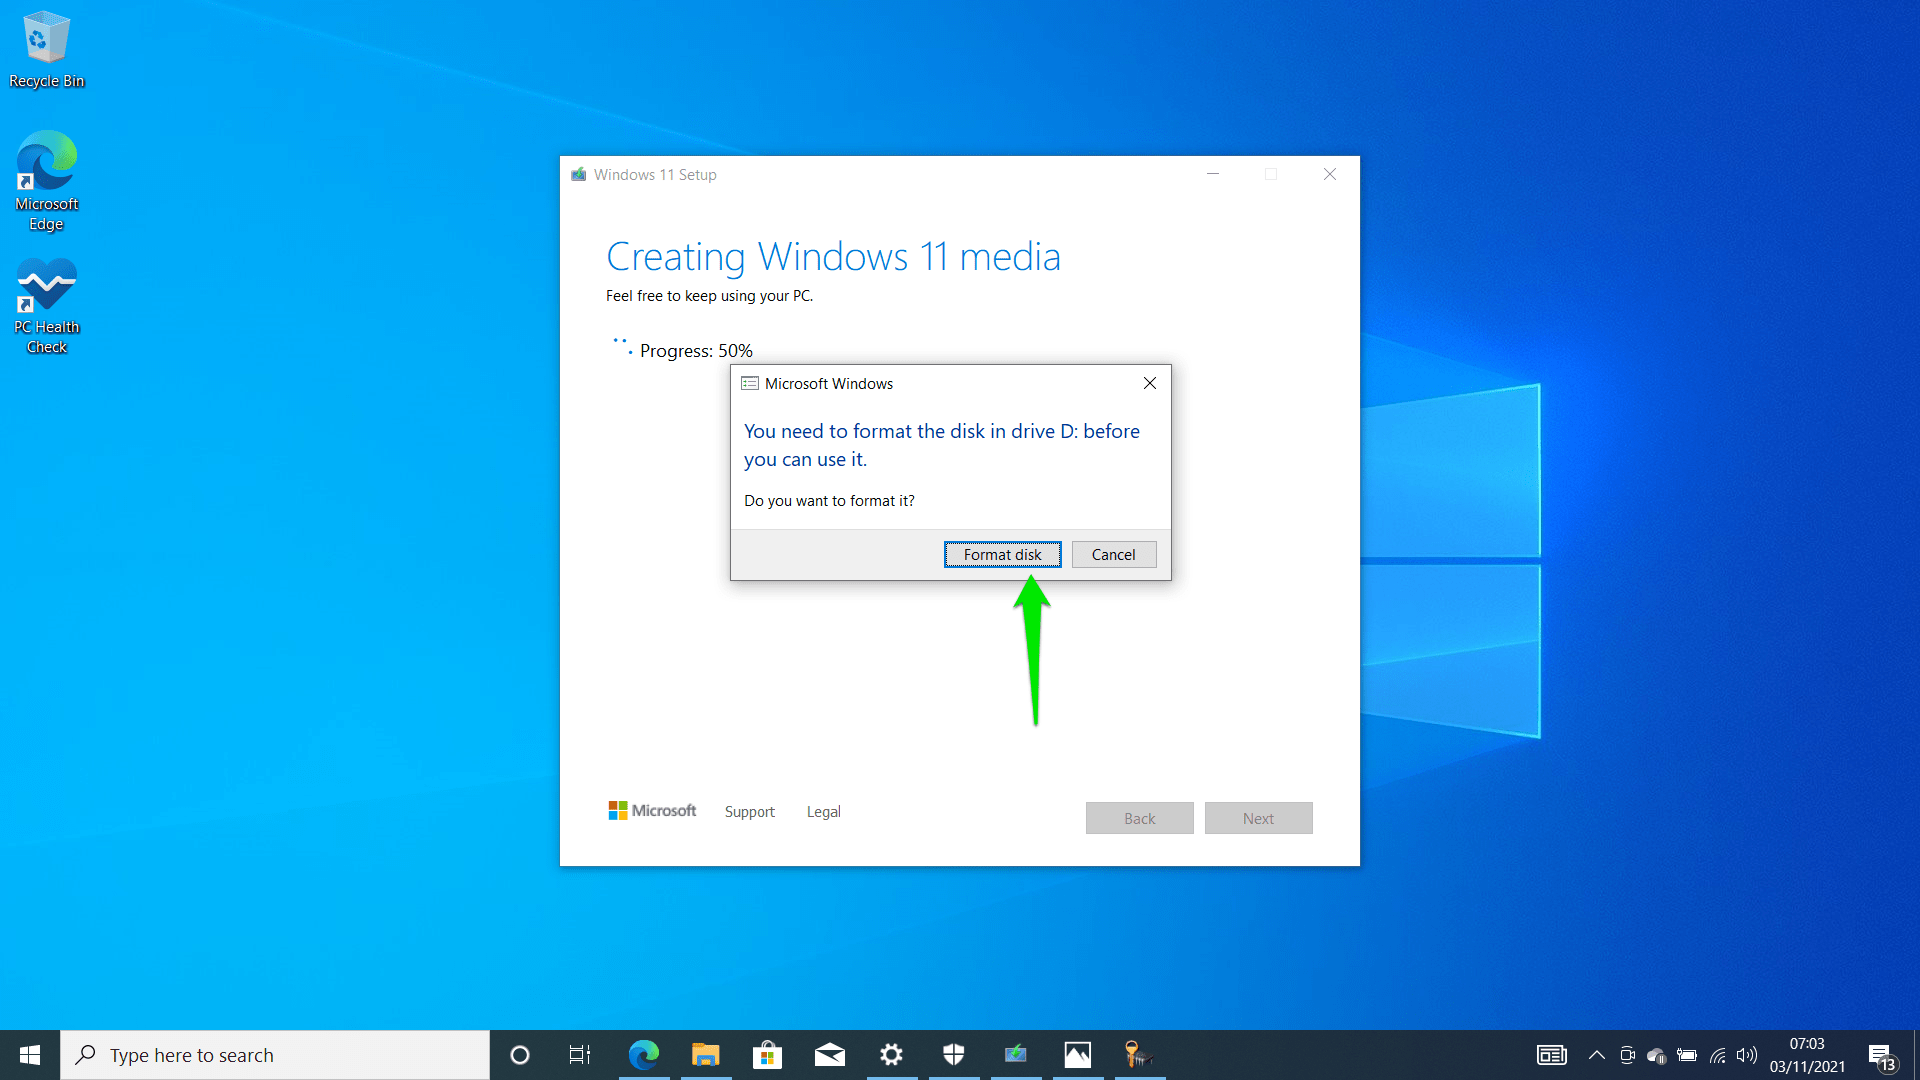
- A pop-up will ask you to format the disk. Click on Format Disk and allow the setup to continue its job. Don’t click on Start in the small Format dialog. Instead, close the page and let the Windows Setup complete the process.
- The Media Creation Tool will notify you that your USB drive is ready once it completes the process. Click on Finish.
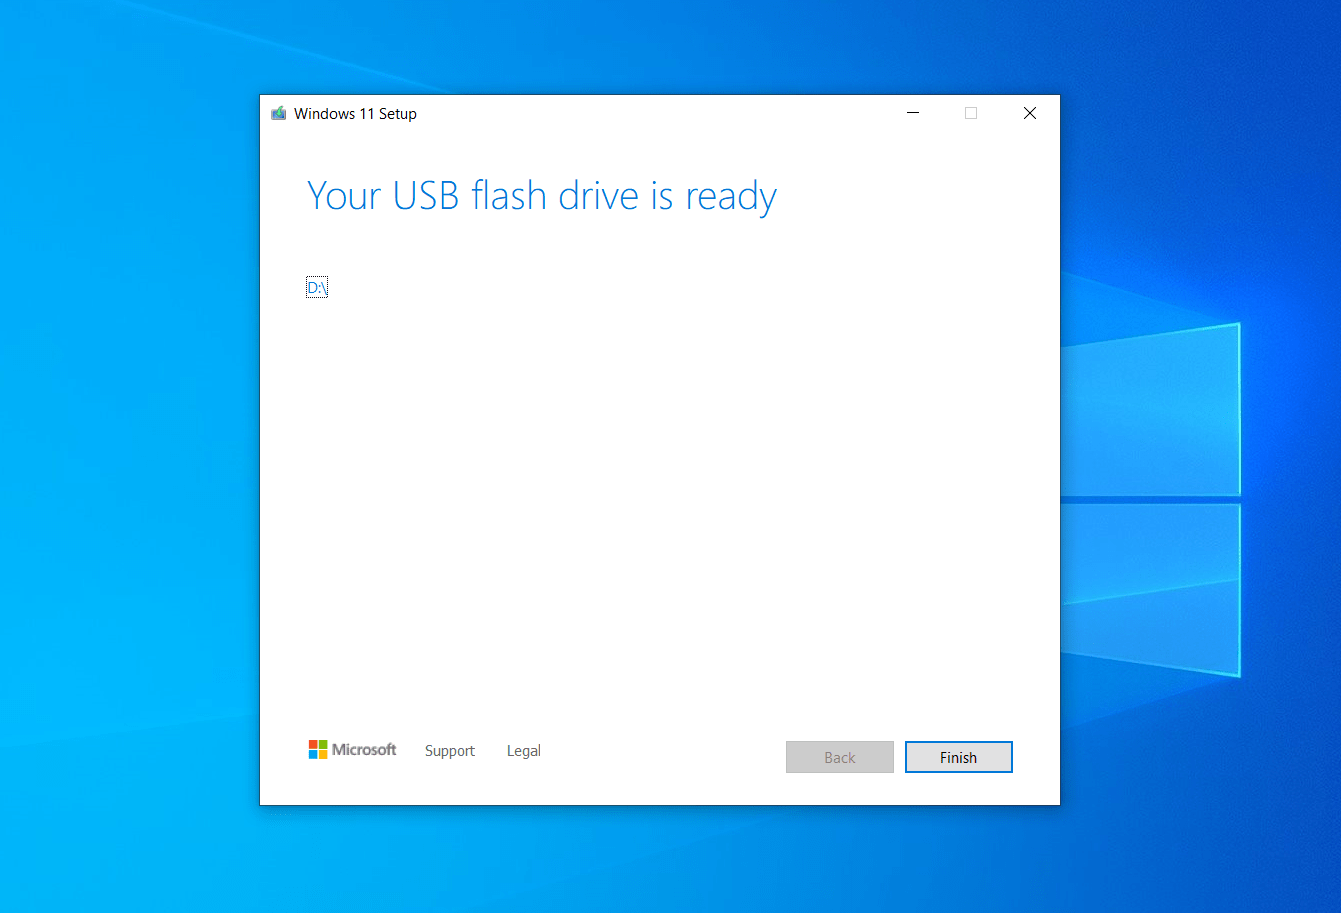
- To install Windows 11 using the USB drive, you have to shut down your computer, insert the drive, and restart your system. Next, click on any button once your PC prompts you. Then follow the steps on the setup page.
Join the Windows Insider Program
Even though Microsoft has started rolling out the official version of Windows 11, it’s still a work in progress. Multiple updates will be rolled out in the future to introduce new features, including the Android app integration.
The operating system was first released through the Windows Insider Program. Users who enrolled in the program still get access to yet-to-be-released updates before the public. You should be an Insider if you also want to use new and experimental features before they go mainstream.
To be a Windows 11 insider, you need a Microsoft account and an eligible computer. Here’s how to join:
- Head to the Windows Insider Program web page after creating your Microsoft account to register. Preview builds might start showing up on your PC 24 hours after signing up.
- Now that you’ve registered, head to the Settings application using the Win + I shortcut.
- Click on Update & Security.
- Next, click on Windows Insider Program on the left side of the screen.
- Select Get Started once the Windows Insider Program page opens.
- Click on the Link Account option and select the Microsoft Account you used to register for the program. A pop-up will appear and show your email if you’re logged into your PC with the account. If not, you’ll have to provide your login details.
- Once the “Pick your Insider Settings” pop-up appears, select Dev Channel, Beta Channel, or Release Preview Channel.
Note: Dev Channel releases are more experimental and could contain more bugs. They’re the first builds released for testing. Beta Channel builds are more stable as they’re updates to Dev channel builds. Release Preview Channel builds are the most stable of the three and identical to the official versions.
- After selecting a channel, click on Confirm. Then, click on the Confirm button again and restart your computer.
- You can now download and install preview releases through the Windows Update client.
-
Conclusion
Do I need to upgrade to Windows 11? Users from all over the world keep asking this question. If the new features and offerings are big enough to sway you, we don’t see why you shouldn’t make the switch. Most of the features in the OS, from the visual cues to the integrations, are layered over Windows 10’s core. So, there’ll be little to miss when you make the switch.
Another thing to note is that you have a limited period for going back to Windows 10 once you upgrade. The period could be as little as 10 to 30 days. After that, you might not have the option to keep your files and apps if you want to reinstall Windows 10. You can follow this guide to see how you can roll back to Windows 10.


 Done! Great to see you among our subscribers!