- 1. Compress the Images in Your Word Document
- 2. Don’t Copy and Paste Images. Use the Insert Pictures Option
- 3. Format Images Before Inserting into Word Document
- 4. Pay Attention to the Embedded Objects in Your Document
- 5. Turn Off Font Embedding
- 6. Use Default Word Styles for Formatting (Or Adjust these Styles for Your Use)
- 7. Make Word Save Changes Faster
- 8. Save a Copy of the Document Without Tracking Changes
- 9. Save a Copy of the Document in PDF Format and Optimize

Even though it is very easy to use, Microsoft Word is a package that can be quite tricky to use. Because it has so many options, users can get lost trying to connect these options with what they want to do with their document. So, when a user wants to reduce the size of a Word document, there’s no option that tells you, “This is how to reduce word file size.”
But reducing the size of a document is important. A large word document generally puts a larger processing burden on your computer. In such instances, you have to get technical with your computer or use third-party apps like Auslogics BoostSpeed before you can get your PC running at normal speed.
Thankfully, you can reduce the size of the Word document you are working on using different methods. Some of these methods are better than others because they don’t require many steps. Others are more effective because they compress word documents to the smallest size possible.
The option you choose depends on you. Nevertheless, this article shows you 9 such reliable options. Each of these options can help you reduce the size of your Word document effortlessly.
1. Compress the Images in Your Word Document
Word documents are generally really small. Even a document with 1,000 pages could tally up to only 50 kb. This is one of the best things about text files, however many documents nowadays contain more than just text. When you include pictures in the Word document, it adds a bit of ‘weight’ to the document, so documents with more than a few images can easily end up being quite large. In this case, if you want to reduce the size of your Word document, you can either remove the images or modify them somehow.
The easiest way to modify the images on your document in Word is to compress them. This is easy to do because Microsoft Word is fitted with format options that do just this.
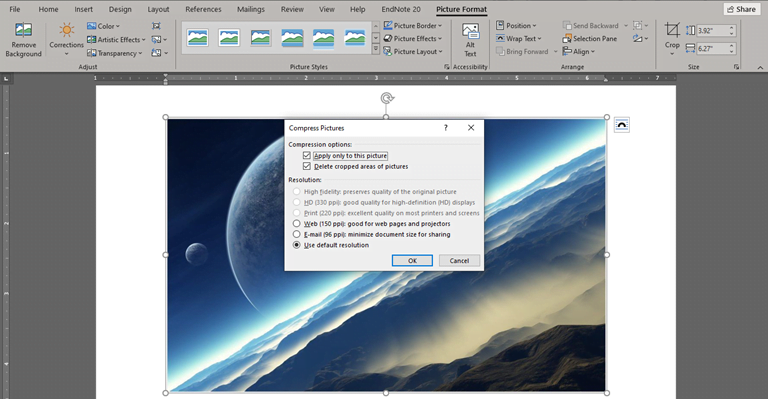
- Navigate to the image in your document and click on it. This brings up an additional tab titled the Picture Format.
- Move your cursor to the Adjust ribbon and click on the Compress Pictures option.
- In the dialog box that pops up, choose the Apply only to this picture option. This compresses the image that you clicked. But if you have more than one image in the document and want to compress all of them, uncheck this option.
- Choose the Delete cropped areas of pictures option.
- Select the Use default resolution option. This better integrates the compressed image with the rest of your document.
- Click OK to implement the changes.
2. Don’t Copy and Paste Images. Use the Insert Pictures Option
When you want to bring images into your document file, there are generally two options before you. The most common option is the copy and paste option. This is the easiest to do since you only need to copy the image from an outside source and use ctrl + V to paste it. But this is not the standard method for including images in Word documents.
The second method is to use the Insert Pictures option on the Insert tab. When you use this option, Microsoft Word helps you adjust the image resolution to fit inside the document. However, copying and pasting images does not have the same effect. In other words, when you use the Insert Pictures option, the size of the document on Word tends to be smaller.
Inserting a picture into a document through the default method on Word is the easiest thing to do. All you have to do is:
- Click on the area in your document that you want the picture inserted.
- Navigate to the Insert tab on Word.
- Click on the Pictures submenu. This action brings up two or three options for where your picture might be located.
- Choose the most suitable option depending on the location of the image you want to insert. This might be from an online source or your computer (hard drive).
- Find the image and double-click on it to bring it into the document.
3. Format Images Before Inserting into Word Document
Regardless of whether you use the Insert Picture or Copy and Paste option, the resulting document size depends on the original image. If the original image is a high-resolution photo, it is only natural that your word document inherits the size property. Thus, the smartest thing to do to have a smaller document with images is to first format the original image before bringing it into your document.
Windows offers you several methods to format the size of images. The easiest to use of these options is Microsoft Paint. With a few clicks, you can reduce the size of an image before inserting it in a Word document.
To format image sizes on Microsoft Paint,
- Make a copy of the image you want to format from the original location on your computer.
- Right-click on the copied image file and select the open with option.
- Choose Paint from the side-drop options.
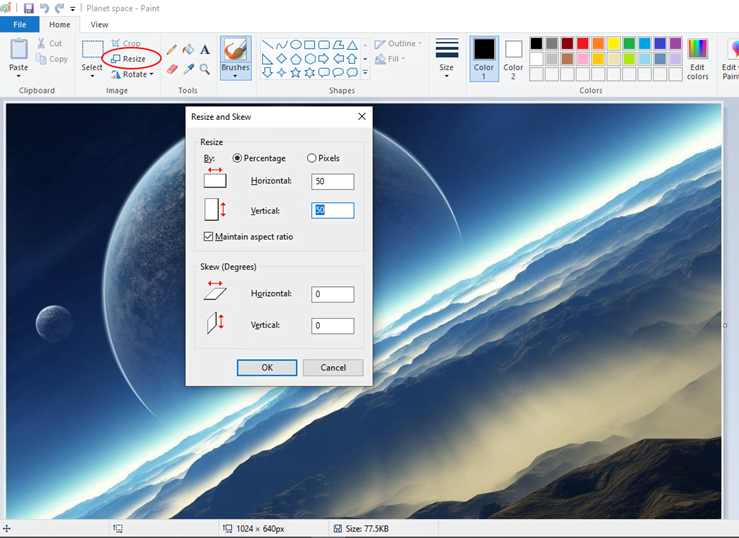
- On the Home tab, navigate to the Image menu and click Resize.
- Select Resize by percentage and change aspect values to 25, 50, or 75, depending on how much you want to shrink the image. Note that choosing values above 100 will enlarge the image instead.
- Leave the Maintain aspect ratio option checked and click OK.
Now, when you insert this formatted image in your Word document, it won’t ‘weigh’ as much as it would have with the original image.
4. Pay Attention to the Embedded Objects in Your Document
One other important factor that affects the size of your Word document is the presence of embedded objects. An embedded object in this context is an independent digital object that is included in your document. The object is referred to as independent because modifying it does not affect its source. A good example is a Microsoft Excel table.
So, if you embed said Excel table in your Word document, changing its cells does nothing to the original Excel file. Similarly, when you change the content of the file on Excel, nothing happens to the embedded one in your document. This way, an embedded object is different from a linked object.
But embedded objects come with extra baggage. So, avoid them if you can. If not, convert them to text so that Word takes them in as native objects.
To convert embedded objects in your Word document, simply use ctrl + shift + f9. This converts the object into a picture. If the object is an Excel file that you want to be displayed, copy and paste the content of the table directly into the document.
5. Turn Off Font Embedding
Pictures and Excel files are not the only objects that can be embedded in a Word document. Font embedding is a word-processing method that allows documents to retain the same font styles. This way, if the document is shared to someone without the fonts on their computer, they can still see the texts in the original font style. However, documents with embedded fonts tend to be larger than documents without.
So, if you want to reduce the size of your Word document and have tried every other option, you can check for and remove font embedding. To do this,
- Navigate to the File tab in Word and click it.
- Scroll down to Options and click it.
- From the ensuing menu, choose the Save tab on the left side of the menu.
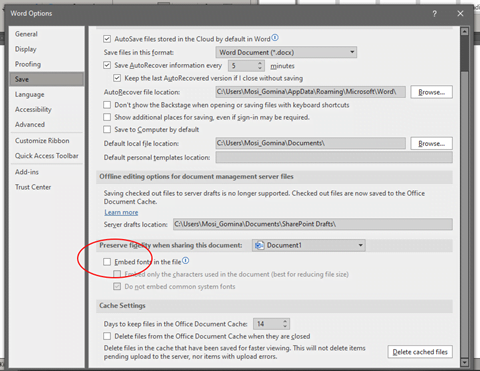
- Scroll down to the Preserve fidelity when sharing this document
- Make sure that the first option under this submenu (Embed fonts in this file) is unchecked.
- Click OK and close the File menu.
This should remove every font embedding in the Word document and reduce the document size.
6. Use Default Word Styles for Formatting (Or Adjust these Styles for Your Use)
One of the things that Microsoft Word has in common with other office software packages is the default page. This page contains the original formatting for word documents, including font style, font size, and page setup.
If you are like most Word users, you may want to use different formatting styles. However, until you make your preferred styles the default, using them will cost you a few more bytes. This is because using the default styles results in smaller documents on average.
So, make sure you use default or modified styles in your documents. This is especially effective for reducing document sizes when you apply them to headings and font sizes, as well as font colors and page setup. The fewer the changes to these styles, the better for smaller document sizes.
7. Make Word Save Changes Faster
So far, we have spun this article around Word documents that you share offline. However, when you share a document online, there is a chance that previous changes are not implemented on the original file.
In other words, Word might still include the weight of previously formatted objects, for example, embedded objects, in the final document even though they are no longer there. The chances of this are small, but they exist. So, what you need to do is save all changes to the document as soon as you can. This means that you continue to click on ctrl + S after typing for a while. A better option is to change AutoRecover settings.
To change Autorecover settings, once again,
- Navigate to the File tab in Word and click it.
- Scroll down to Options and click it.
- From the menu that pops up, choose the Save tab on the left side of the menu.
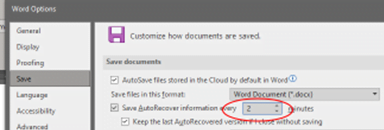
- Move your cursor to the Save documents option.
- Focus on the Save Autorecover information every … option, and reduce the time allotted to this function. Reducing it to 2 minutes is fine.
- Click OK and close the File menu.
8. Save a Copy of the Document Without Tracking Changes
One other tricky formatting option that often increases the size of documents in Word is the Track Changes function. This function is intended to help you track the changes you make to a document over time, and possibly reverse them. However, when the function is running, it adds a bit more weight to your document. Thus, if you want to reduce the size of a document that is tracking changes, all you need to do is deactivate this function.
To stop the Track Changes function in Word,
- Move your cursor to the Review tab and click it.
- Navigate to the Changes ribbon and click on the Accept dropdown menu.
- From the ensuing options, select Accept All Changes and Stop Tracking.
![]()
This deactivates the tracking function on your document and also reduces the document size.
9. Save a Copy of the Document in PDF Format and Optimize
When you compare Word documents (that is, documents with .DOCX extension) with PDF documents with the same content, you will find that the latter is always considerably smaller. The main reason for this is that the PDF format can publish document graphics in smaller resolutions. This is the result of optimization.
Therefore, when you want a smaller document file, you can simply save a copy of the document in PDF format. To do this,
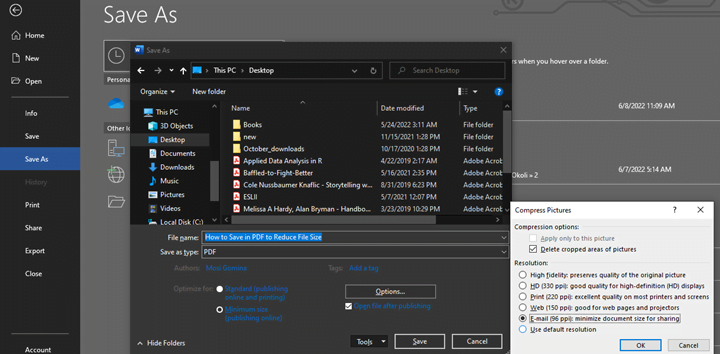
- Click on the File tab and choose the Save As option from the ensuing menu.
- Select where you want the file to be saved on your computer.
- In the Save As dialog box, change the file name to your preference and choose PDF in the Save as type option.
- Move your cursor down a bit to the Optimize for submenu and click on Minimum size (publishing online).
- Move your cursor to the right and click the Tools option.
- Choose your preferred resolution and click OK.
- Click Save to save the document in the styled PDF format you just completed.
That ought to reduce the size of your document considerably. However, keep in mind that this size reduction only works on the new PDF file. Your original document in DOCX format remains the same size.
All in all, whichever of these 9 methods you use, make sure to go over the document once again. Document size reduction is useless if you end up losing vital parts of the document. So, ensure that you reduced the document’s size without losing any of its content.


 Done! Great to see you among our subscribers!