When it comes to sending and receiving emails, Gmail can be quite reliable. Most of the time, it will let you attach your files to your message conveniently. This email service lets you send documents and media files to anyone as long as the files meet the requirements.
However, Gmail is still far from perfect. Even when you don’t exceed the file size limit, you’d get an error message which says, “Attachment failed. This may be due to a proxy or firewall.”
So, what should you do if you can’t attach files in Gmail? Should you switch to a different email service?
Well, before you do that, let us teach you how to fix Gmail attachment uploading errors.
What Causes this Problem?
Before you try to fix attachment failed issues on Gmail, you need to understand what causes the error. As the message suggests, it could be due to a firewall or a proxy server. However, other factors can also prevent you from attaching your files to your emails. Here are some of them:
- If you’re trying to send an executable file, Gmail is blocking it as a security measure for preventing the spread of viruses.
- In other cases, the problem has to do with the user’s browser. It’s possible that one of your browser extensions is limiting the functionality of Gmail.
- Another reason why you can’t attach files in Gmail is that your browser does not support the email service. If you want to access the best experience, opt for supported browsers like Edge, Chrome, Safari, and Firefox.
Now, if you’re ready to fix attachment failed issues on Gmail, try the methods below.
Method 1: Turning Off Your Firewall
As the error message suggests, your firewall may be preventing you from attaching files on Gmail. So, we recommend switching it off temporarily. Here are the steps:
- Press Windows Key+R on your keyboard to launch the Run dialog box.
- Inside the Run dialog box, type “firewall.cpl” (no quotes), then hit Enter.
- Go to the left-pane menu, then click Turn Windows Defender Firewall on or off.
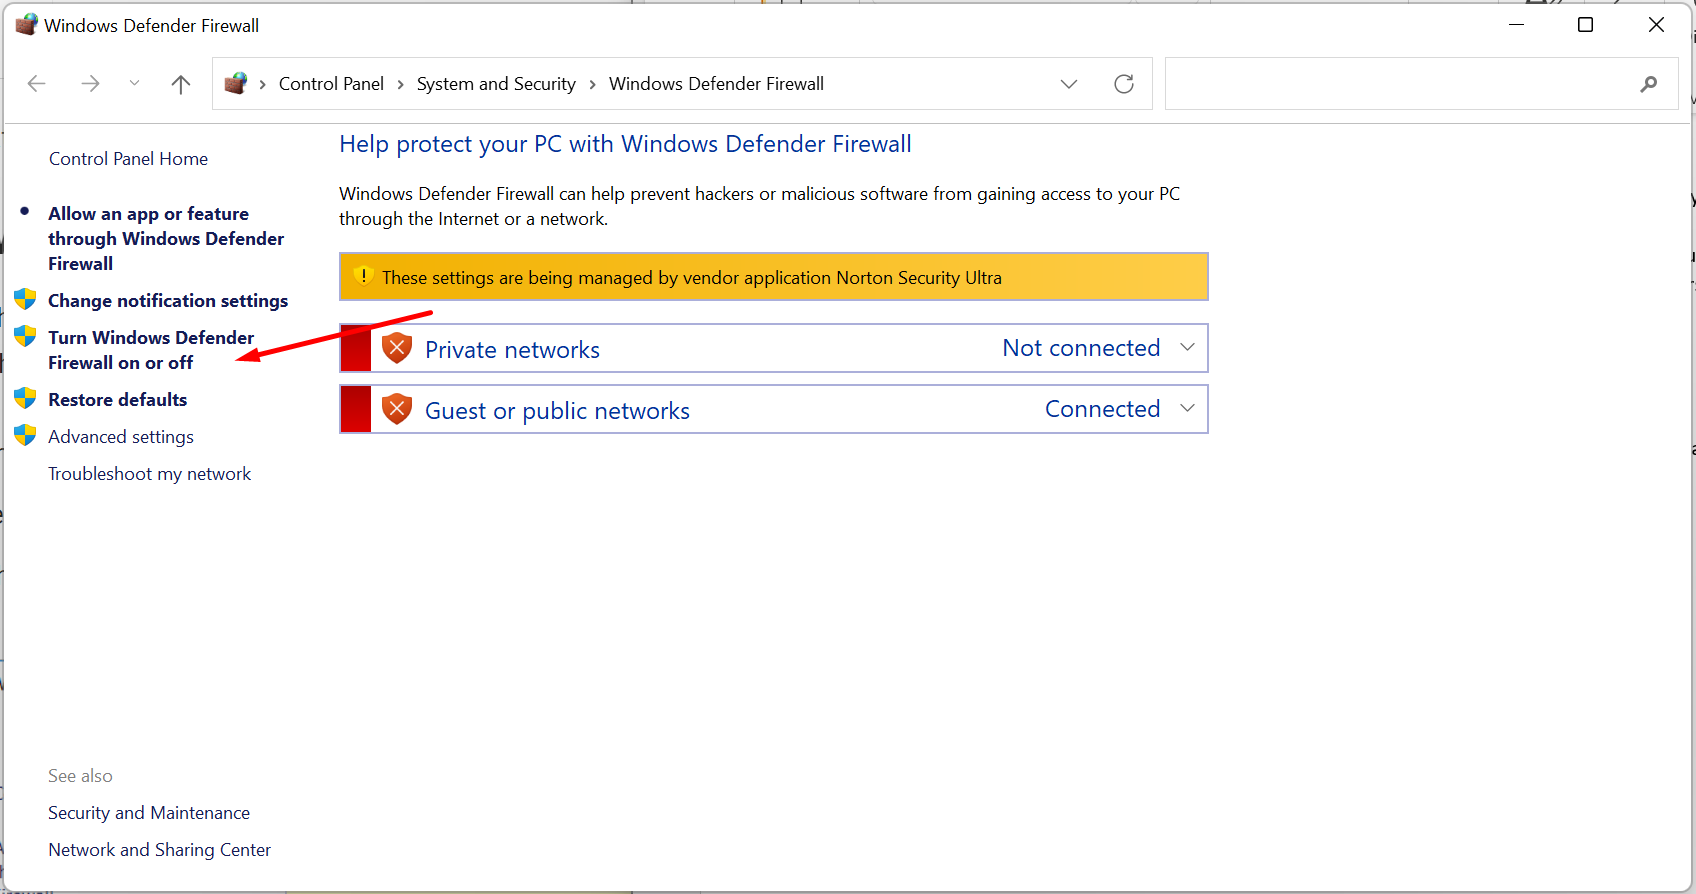
- Select the ‘Turn off Windows Defender Firewall’ option under the Domain, Private, and Public Network Settings.
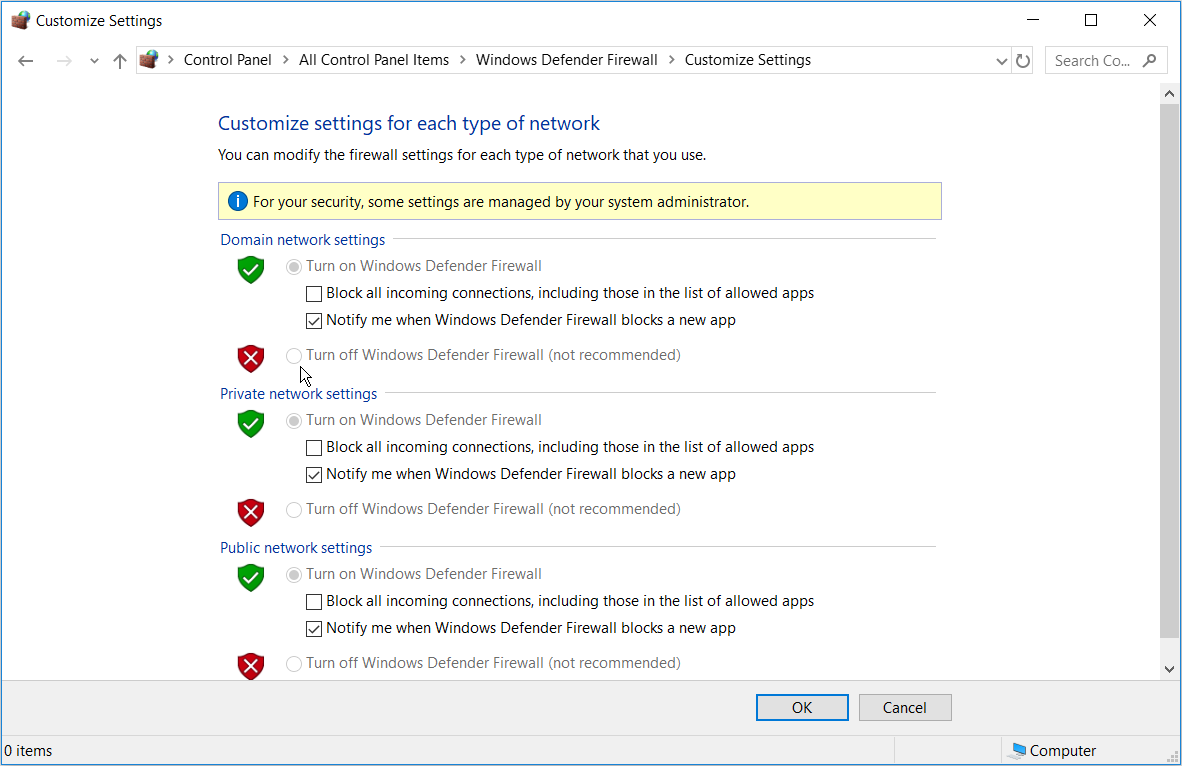
- Once you’ve selected the right option, click OK and close the window.
Are you using a third-party antivirus program? If so, then you may need to switch that off temporarily. Once you’ve successfully sent your email, be sure to turn your antivirus back on immediately.
Method 2: Disabling Your Proxy Server
Another reason why you can’t attach files in Gmail is because of a proxy server. So, if you have one enabled, try disabling it to see if it fixes the issue. You can do that by following the steps below:
- Press Windows Key+S on your keyboard to bring up the search bar.
- Type “internet options” (no quotes), then select Internet Options from the results.
- Go to the Connections tab, then click LAN Settings.
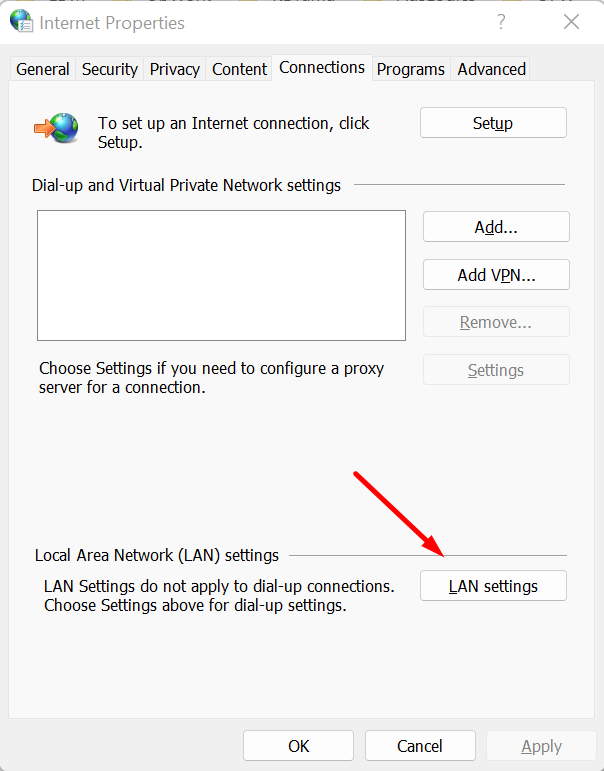
- On the Local Area Network (LAN) Settings window, deselect the ‘Use proxy server for your LAN’ option.

- Click OK on the LAN Settings window, then click Apply and OK on the Internet Properties window.
Method 3: Understanding the Limits for File Attachments
One of the major disadvantages of Gmail is the file attachment limit. You cannot go beyond 25 MB. Otherwise, the email service will recommend that you upload the file to Google Drive and add the link to that in your message.
As we’ve mentioned, .exe files are also not permitted on Gmail messages for security reasons. So, if the file does not meet these parameters, your best bet is to find a different solution for sending it.
Method 4: Clearing Your Browser Cache and Cookies
If the problem has to do with your browser, then clearing your cache and cookies may do the trick. Whenever you visit a website, cookies are automatically generated. They’re supposed to improve your browsing experience by storing your browsing data.
Meanwhile, browser cache serves to remember portions of web pages like the images. So, the next time you visit a website, the pages will load faster.
Over time, cache and cookies accumulate and overwhelm your browser. So, you need to clean them regularly. If you’re using Google Chrome, here are the steps you need to take:
- Launch Google Chrome, then click Ctrl+H on your keyboard. Doing so should open a new tab for your browsing history.
- Go to the left-pane menu, then click Clear Browsing Data.
- Select All Time under the drop-down list for Time Range.
- Click the ‘Cookies and other site data’ and ‘Cached images and files’ options.
- Click Clear Data.
Method 5: Going Incognito
Now, if a browser extension is preventing you from attaching files to your emails, then here’s a solution for you. You can go incognito and sign into your Gmail account.
If you have several extensions or add-ons, one or two of them could be affecting the functionality of Gmail. Once you’ve opened your Gmail account in an incognito window, try to send an email with an attachment again. If the problem persists, then try the next method.
Method 6: Using the Gmail Mobile App
It wouldn’t hurt if you tried attaching files to your email using the mobile version of Gmail. So, we recommend that you get your smartphone or mobile device and access Gmail there. Try composing a message, attaching the file, and sending the email.
Method 7: Updating Your Drivers
Did you try attaching a file that is stored in an external drive? If so, then there must be wrong with your storage device. If you have outdated drivers, you may be unable to attach files from your drive successfully. In this case, the best solution is to update your drivers to the latest versions recommended by the manufacturer.
You can do this manually, but the process can be tedious and even risky. For one, you have to go through the manufacturer’s site and search for the driver version that is compatible with your operating system and processor type. If you download and install the wrong driver, you may cause bigger problems for your PC.
As such, we recommend skipping all the hassle by automating the process. If you want a quick and safe way to update your drivers, use Driver Updater instead. All you need to do is click a button and the tool will automatically scan your system and search for compatible drivers.
Another quality you’ll love about Auslogics Driver Updater is how it handles problematic drivers. Once you run a scan, it will fix all driver issues and not just the ones related to the Gmail file attachment error. So, once the process is done, you’ll notice a significant improvement in the overall performance and speed of your computer.
Do you think we missed a great solution to this issue?
Feel free to share it in the comments below!


 Done! Great to see you among our subscribers!