- What to Expect from Windows 11
- When Will Windows 11 Be Available?
- Will My Computer Support Windows 11?
- How to Get Windows 11
- Things to Keep in Mind When Upgrading to Windows 11
- Will Windows 11 Support Rolling Back to Windows 10?
- How to Uninstall Windows 11 Within the First 10 Days
- How to Downgrade from Windows 11 After the 10-Day Period Is Up
- Opting Out of the Insider Program
- Conclusion
- Keeping Your PC Optimized

When Microsoft announced the introduction of Windows 11, users got excited, speculating as to what the new OS would bring to the table. The official release may take some while, and if you’re like many users, you must be wondering if your PC will support it. The good news is that you don’t have to wait that long to get a peek at the new Windows version. We’ll show you how to upgrade your Windows 10 computer to Windows 11. For those who have already upgraded and are not satisfied with Windows 11, we have just the information you need on how to roll back to Windows 10.
What to Expect from Windows 11
The new Windows 11 operating system brings an array of features and changes to Windows PCs, some of which you are bound to like and others not so much. The new features include a new Mac-like user interface, a centered Start menu, new icons, and widgets. Other improvements include better virtual desktop support and better multitasking, thanks to Snap Groups and Snap Layouts.
That’s not all. The new operating system introduces Android apps that will be installable from within the revamped Microsoft Store app via the Amazon Appstore. Microsoft Teams has been given a facelift and now comes integrated into the Windows 11 Taskbar, making it easier to access.
File Explorer was not left behind, with the Ribbon being replaced with a simplified toolbar. Instead of the “View”, “File”, and “Edit” tabs, now you simply get options to create a new folder, copy, cut, paste, and delete. File Explorer windows now sport rounded corners, and the right-click context menu appears quite differently.
These are just some of the changes coming to Windows 11.
When Will Windows 11 Be Available?
Microsoft hasn’t announced an official release date yet, but Windows 11 is expected to debut before the end of the year, and the upgrade rollout will continue into 2022. According to the company, the “upgrade rollout plan is still being finalized, but for most devices already in use today, we expect it to be ready sometime early in 2022.”
Like with other updates, Windows 11 will be rolled out in phases. This means that not all Windows 10 PCs that are eligible for the upgrade will be offered the new OS at the same time.
Will My Computer Support Windows 11?
Well, it depends. Windows 11 is the most advanced upgrade to Windows, and your system needs to meet certain hardware requirements to support the new OS. If your PC is already running Windows 10, then the upgrade to Windows 11 should be hassle-free and straightforward. However, not all computers will be compatible with the new OS from Microsoft.
The company published a list of the minimum system requirements that your PC must meet to run Windows 11. They are as follows:
- Processor: at least 1GHz with two or more cores on a compatible 64-bit processor or System on a Chip (SoC)
- System firmware: UEFI, Secure Boot support
- Security: TPM (Trusted Platform Module) version 2.0
- Memory: 4GB RAM
- Storage: at least 64GB of available storage space
- Graphics card: DirectX 12-compatible, with a WDDM 2.0 driver
- Display: at least nine-inch display, with HD resolution (720p) and 8 bits per color channel
Most of these requirements are fairly easy to check. Here is how to find out if your PC supports Unified Extensible Firmware Interface (UEFI) Secure Boot:
- Press the Win + R keyboard shortcut, type msinfo32into the “Run” dialog box, and hit “Enter”.
- Search for “BIOS Mode”, which should display “UEFI”.
- Next, check if “Secure Boot State” says “On”. If it says “Unsupported”, then your PC may not run Windows 11.
The TPM version can be found in “Device Manager” under the “Security devices” category, and it should be version 2.0.
As you can see, there is a stringent set of hardware requirements to be met, meaning that not all PCs currently running Windows 10 will qualify for an upgrade to Windows 11. This is due to the secure nature of Windows 11, which will require hardware that meets that kind of security.
Most computers manufactured since 2019 will work well with Windows 11, although there may be some exceptions. To qualify, a computer must come with a TPM either integrated into its motherboard or installed separately into the CPU.
The chip’s main responsibility is to protect encryption keys and other credentials stored on the computer. This is good news to users since it means more security. If there’s an attack, your sensitive details will be locked away in a safe place that the attackers or malware can’t access.
If your PC doesn’t support Windows 11, all is not lost. We should expect computers pre-installed with Windows 11 to be available later this year.
It goes without saying that you’ll require an active internet connection and a Microsoft account to complete the setup process. Microsoft introduced the PC Health Check tool to help users figure out if their PCs will support Windows 11. However, Microsoft has since withdrawn the tool, saying it will post an improved version of the app soon.
Older hardware, such as Intel 7th Generation Core processors, is not included in the list of compatible CPUs, same as AMD Zen 1 processors.
If your device won’t run Windows 11 and you can’t afford a new device that supports the new OS, you can keep using Windows 10 until October 14, 2025. After that, Microsoft will no longer support it.
How to Get Windows 11
As we mentioned above, Windows 11 is expected to officially start rolling out before the end of the year. While there’s no telling the exact date, Microsoft has hinted the OS could arrive as early as October.
If you can’t wait, Microsoft has made it possible to download the preview build through the Windows Insider Program. To get your hands on it, you have to be a Windows Insider. The good news is that anyone can become an Insider with just a few clicks. The best part about being in the program is that you get to test new software and features before anyone else. You then provide feedback to help Microsoft polish them before releasing them to the general public.
Here is how to sign up for the Windows Insider Program:
- Click on the Windows search bar in your taskbar or simply press the Windows logo on your keyboard and type “Insider” (without quotes).
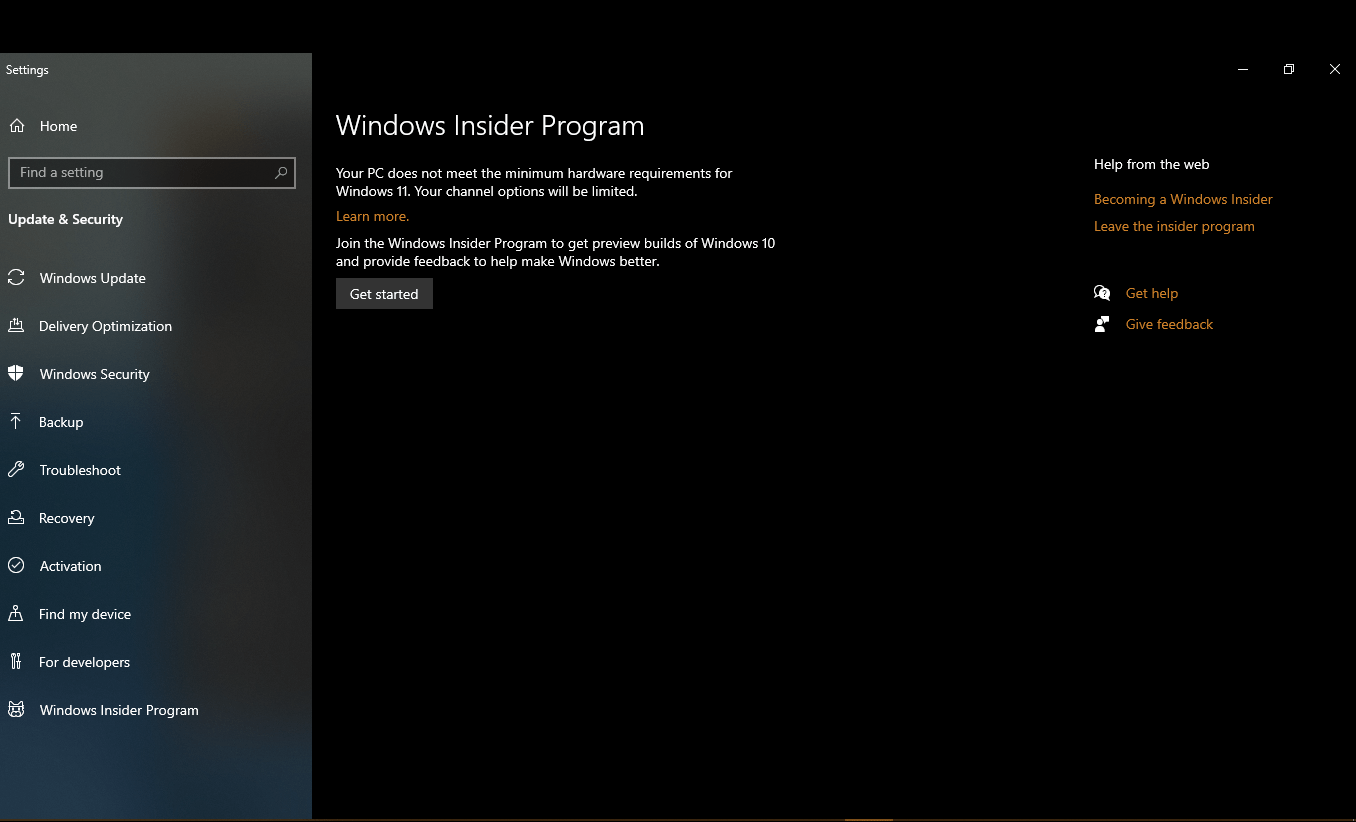
- Select “Windows Insider Program settings” from the options that get displayed to open the “Windows Insider Program” page in the “Settings” app.

- You’ll see a prompt that asks you to join the Insider program. Click on the “Get started” button to initiate the process.
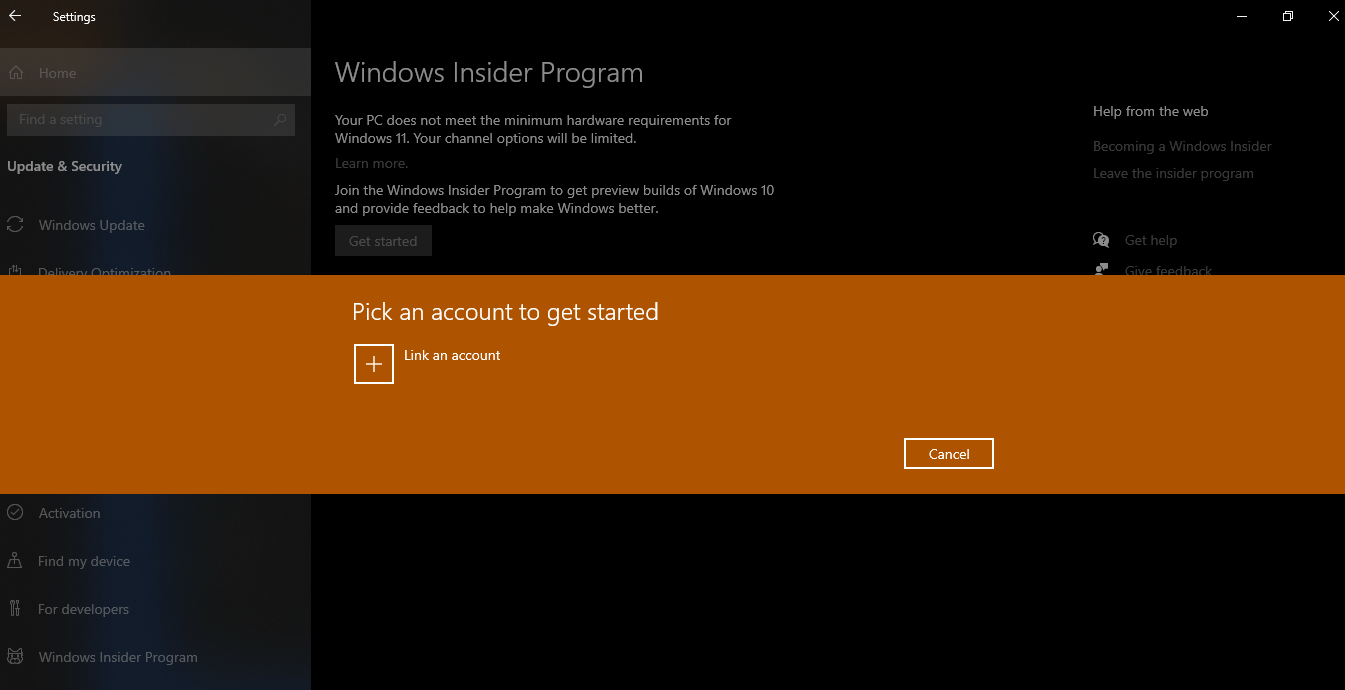
- On the next screen, click on the “Link an account” option and choose the Microsoft account that you want to use in the Insider program.
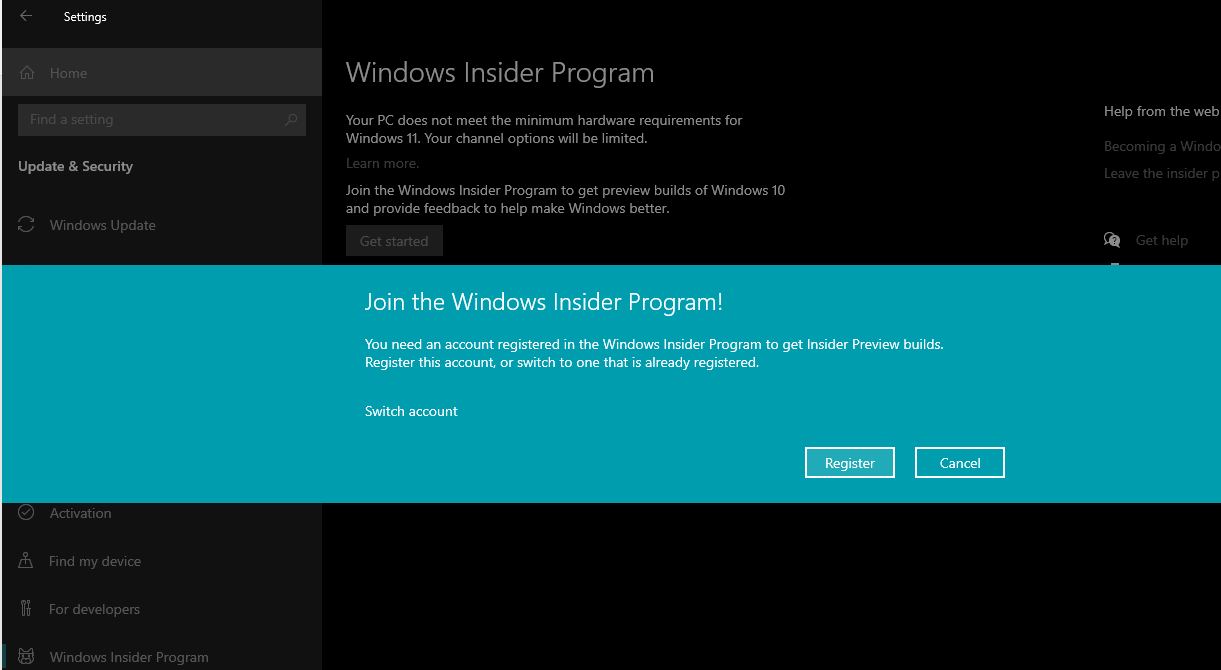
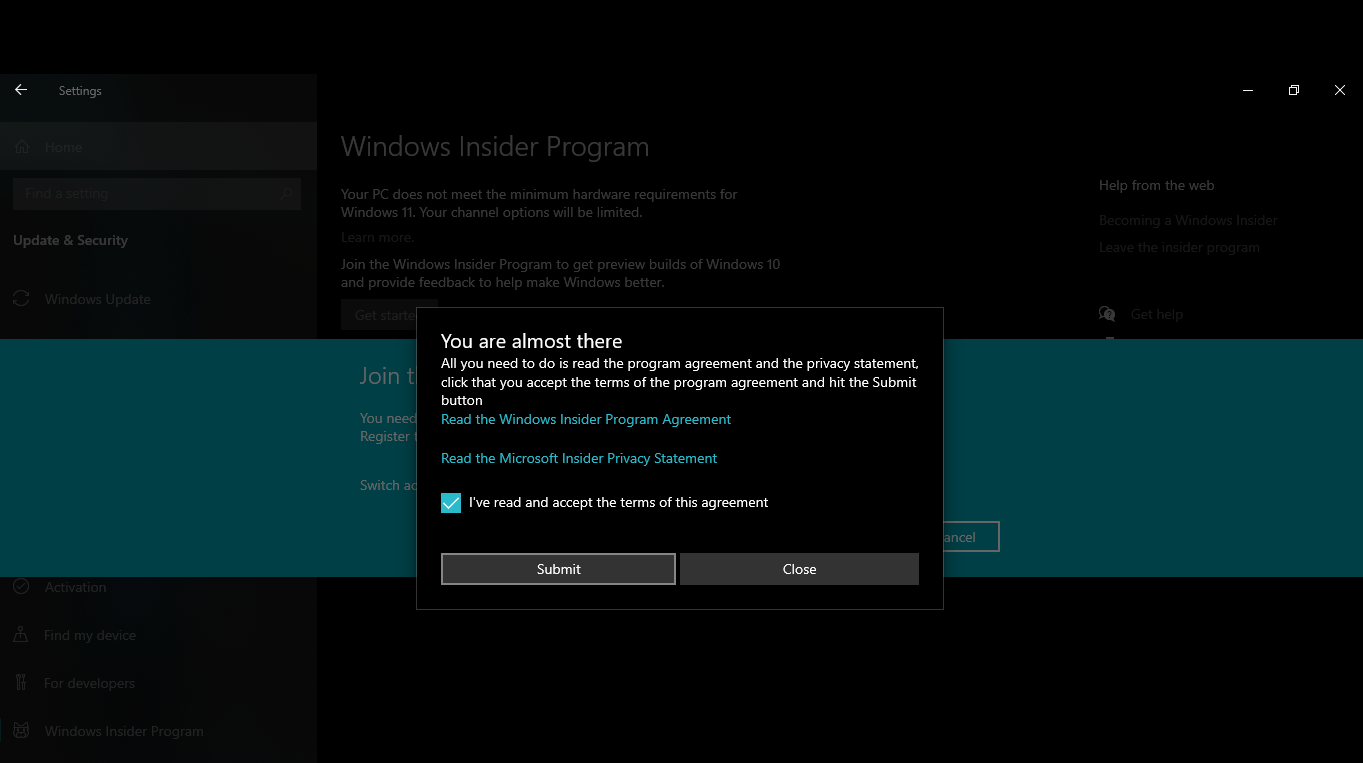
- If it’s your first time joining this program, click on “Register” and then “Sign Up”. Be sure to click on the “I’ve read and accepted the terms of this agreement” checkbox and click the “Submit” button. You may be redirected to a website to complete the registration.
- Once you see the “You’re good to go” notification, your device is ready. You’ll now be able to see the “Link an account” prompt on your screen as outlined in Step 4.

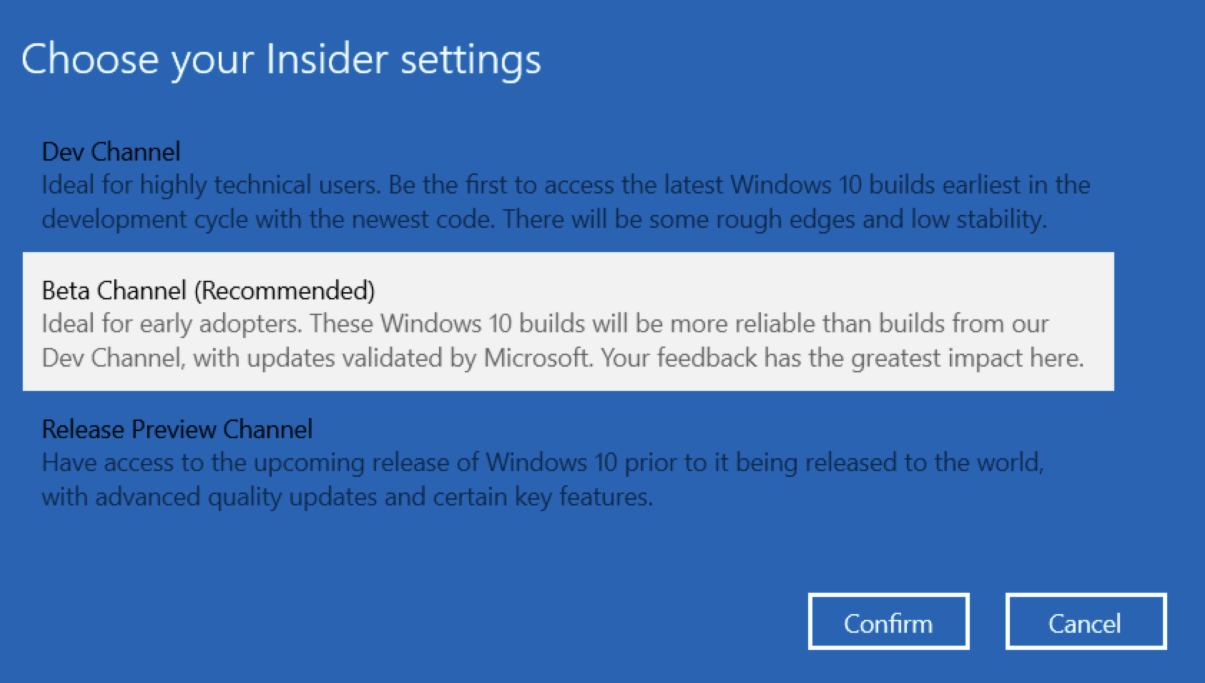
- After selecting the Microsoft account you want to use, you get the option to choose your Insider settings. You can opt for the Dev Channel, Beta Channel (Recommended), or Release Preview Channel. Remember, you can change your settings at any time via the Windows Insider Program page in the Settings app. Since we want to get Windows 11, you must choose the Dev Channel.
- Now, go to the Windows Update screen in the Settings app and click on “Check for updates”. The Windows 11 Insider Preview should start downloading. Be sure to have a stable internet connection for the process to be flawless. It should take around an hour or two, depending on your machine’s specifications, for Windows 11 to download and install on your PC.
- Once the installation completes successfully, click on the “Restart now” button.
That’s it! You can now start previewing the new OS and checking out its features.
Things to Keep in Mind When Upgrading to Windows 11
Before installing the new Windows OS, it’s advisable to back up your files to an external disk since you can hardly tell what may go wrong. This way, all your important files and documents will be easily accessible even if your PC becomes unusable.
Some people have resorted to downloading Windows 11 from third-party sources. This is a risky move that will expose your PC to various kinds of malware, including Trojans, adware, spyware, password stealers, and other types of threats. Hackers can easily slip in an infected file, which can be in the form of an activator file or something else. For the untrained eye, it’s hard to detect the presence of a malicious file in the Windows 11 ISO file. Thus, you may end up installing malware on your computer without knowing it.
The safest way to check out Windows 11 is to register for the Windows Insider Program and download the Windows 11 Insider Preview Build 22000.100, version 21H2. The upgrade is available free of charge – provided your PC meets the minimum system requirements and has a properly licensed copy of Windows 10.
And here is another thing. You get 10 days to see whether Windows 11, with all the new changes, will work for you. Within these 10 days, you can switch back to Windows 10 at any time, retaining your data and settings. If the 10 days elapse and you are yet to make your decision whether to keep or uninstall Windows 11, you can still roll back to Windows 10, but you’ll have to perform a clean install.
Windows 11 will only be available as a 64-bit OS for 64-bit CPUs, retiring 32-bit Windows. However, 32-bit Windows apps will be supported.
Will Windows 11 Support Rolling Back to Windows 10?
It’s worth noting that the preview build of Windows 11 is not stable and your PC may start acting up. So, if you’re not satisfied with Windows 11 after joining the Insider program, or if you’re contemplating joining the Insider program to test the beta version of Windows 11 but are still not sure, you must be asking yourself, “Can one downgrade from Windows 11”?
The short answer is yes. You can easily roll back from Windows 11 to Windows 10 using various methods. Most of the features you’ll see after upgrading to Windows 11 are still in the testing stages, and things are bound to change. For this reason, the final product may look quite different, depending on the Insiders’ feedback and what developers decide to change.
How to Uninstall Windows 11 Within the First 10 Days
As you may be aware, you can roll back to the previous Windows version within 10 days after the upgrade. The option is available under the “Recovery” tab in the “Settings” app. Here is the full guide:
- Press the Windows logo on your keyboard and launch “Settings” by clicking on the cogwheel.
- Select the “System” tab on the left sidebar and navigate to the “Recovery” tab on the right sidebar. You can also find the “Recovery” setting in the “Windows Update” tab under Advanced options > Additional options.
- On the “Recovery” page, under “Recovery options”, look for the setting that says “Go back”. You should see the “Go back” button on the right side. Click on it to proceed. If you don’t see that option, it means the 10-day limit is over and you’ll have to use the reinstallation method, which we explain below.
Important note: You won’t be able to go back on battery power. So, be sure to plug in your PC before you continue.
- A page will open displaying a list of options describing why you may want to go back to Windows 10. Select the most appropriate one and click on “Next”.
- On the next page, you’ll be prompted to check for updates. Select “No, thanks” to continue. On the next screen, you’ll see a couple of notifications informing you what to expect when going back to the earlier Windows version. While your files won’t be affected, it’s safer to back them up.
- Click on “Next” and then “Next” again on the “Don’t get locked out” page.
- Now, click on the “Go back to Windows 10” option at the bottom of the blue screen.
That’s it! Your PC will restart, and the setup process will now take over. Your system will be reverted to your build of Windows 10.
How to Downgrade from Windows 11 After the 10-Day Period Is Up
What if the 10 days after the upgrade are over and you want to roll back from Windows 11 to Windows 10? There’s a way to do that, and it involves a full reinstallation of Windows 10, also known as a clean install.
The thing is, after 10 days since upgrading your system, Windows assumes that you’ve decided to keep the new OS and therefore deletes the files from the previous installation to free up disk space.
The only way you can perform a Windows 11 rollback is to fully reinstall Windows 10. Here’s how:
- Go to Microsoft’s official download pageand click on the “Download tool now” button under “Create Windows 10 installation media”.
- Choose to save the exe file to your preferred location. Once downloaded, double-click the file to launch the Windows 10 setup.
- Select “Yes” on the UAC prompt.
- In the “Microsoft Software License Terms” window, click on the “Accept” button.
- After a few seconds, under the “What do you want to do” section, choose the “Upgrade this PC now” option.
- Click on the “Next” button.
- The latest version of Windows 10 will be downloaded. After the download is complete, click on “Next” and select the “Accept” button again.
- On the “Choose what to keep” screen, select “Nothing”. This option will remove everything, including files, apps, and settings.
- Click on the “Next” button and then select “Install” on the “Ready to install” page.
Once everything is configured, you’ll have to set up the device as if you’re using it for the first time. This means you’ll need to create a new user account, customize your settings, and download apps afresh. You can then restore your personal files from your backup drive.
Alternatively, you can opt to use a USB drive containing Windows 10 and configure your computer to boot from the USB. If you choose this method, be sure to have a USB thumb drive with at least 8GB of space. To create bootable USB media, follow these steps:
- Repeat Steps 1 to 5 above, but this time select “Create installation media (USB flash drive, DVD, or ISO file) for another PC”.
- Click on “Next”. This will open a screen where you can choose to clear the “Use the recommended options for this PC” box or leave it checked.
- Click on the “Next” button and choose the “USB flash drive” option.
- Click on “Next” and select your USB flash drive. If you don’t see it listed, click on the “Refresh drive list” link.
- Click on “Next” and then “Finish”. The tool should initiate the process of downloading the files and create an installer containing the latest installation files. These are the files that will install a fresh and stable copy of Windows 10.
- Now, connect the bootable media drive to your device and switch it on. You must configure your PC to boot from the USB flash drive. You can do this via BIOS or UEFI on your motherboard.
- On the “Windows Setup” page, click on “Next” and click the “Install now” button.
- Follow the on-screen instructions to install Windows 10.
Opting Out of the Insider Program
To stop receiving Windows 11 Insider Preview builds, you’ll have to opt out of the Windows Insider Program. To do that, follow these steps:
- Open the “Settings” app (Win + I), and navigate to Update & Security > Windows Insider Program.
- Find the “Stop getting preview builds” switch and activate it by toggling the button to “On”.
- Restart your PC to update the settings.
- To leave the Insider Program, click on the “Leave the insider program” link under “Help from the web” to open the Microsoft webpage. You’ll need to log in to continue. Click on the “Log in” link next. After logging in, click on the “Leave Insider Program” button.
- On the page that opens next, select the “Stop Insider Preview builds” option.
- If you don’t want to receive emails from Microsoft’s Insider Program, you can go back to the “Windows Insider Program” page and unlink your Windows Insider account by clicking on the ‘Unlink” button.
- To be sure you’re unenrolled from the Insider Program, launch “Settings” and go to Update & Security > Windows Insider Program. The “Get started” button should be displayed.
In some cases, Windows 10 may still try to update to Windows 11. This might happen if Windows was in the middle of downloading a Windows 11 preview build when you were opting out of the Insider Program. Unfortunately, you won’t be able to interfere with the download/install process. If this happens, let the process finish, and when you see “Restart to install the newest Windows feature update”, don’t click on the button.
Instead, delete all the files in the SoftwareDistribution folder, which is located in C:\Windows\SoftwareDistribution\Download folder. To completely remove the updates, you need to permanently delete them rather than move them to the Recycle Bin. To do that, hold down the Shift key and hit “Delete”. Then press “Enter”. The process might take a while depending on the size of the files.
Once they have been deleted from your computer, click on the “Power” button and select “Update and Restart”. Windows will attempt to use the updates, but since they are no longer available, the update will fail.
Conclusion
Windows 11 is definitely bringing lots of impressive improvements to Windows PCs. If you like how the new File Explorer, the Widgets feature, or the revamped Settings app functions, then you should go ahead and keep using the new OS.
However, if you are not satisfied with Windows 11 yet, you can downgrade to Windows 10 and wait for a more stable version to be released later this year.
Keeping Your PC Optimized
The Windows 11 operating system may be good news to Windows users, but one can only enjoy the new features it brings if their PC is optimized. The more you use your PC, the more junk files will accumulate, taking up precious disk space. Luckily, you can avoid all that by installing a reliable PC optimization program like Auslogics BoostSpeed. It comes with various advanced tools to help you tweak your system settings and improve your PC’s overall performance.
Take Auslogics BoostSpeed’s Optimize tab, for example, which lets you switch between different modes to match your preferences. For instance, if you want to play a game, you can switch to the Game Mode, which improves the Frames per Second (FPS) rate of your computer games. This means you’ll be able to enjoy smoother gameplay. If saving power is your priority, you can select the Economy Mode. Other options are as follows:
- Normal Mode (to run programs using the PC’s default settings)
- Office Mode (for when you want to work with your documents and productivity apps)
- Custom Mode (which lets you set your own preferences)
Additionally, the Optimize tab lets you defragment your hard drives to ensure files and apps load faster when opened. You can also optimize Windows startup apps and Windows tasks to ensure faster startups and give active tasks priority in resource allocation.
Other enhancements accessible via the Optimize tab include memory optimization for faster application launches, processor optimization for optimal resource allocation, and desktop protection to prevent crashes.
Auslogics BoostSpeed is an all-in-one utility that gives your Windows system an overall boost and helps to keep everything running smoothly and fast.
Have you tried the new Windows 11 OS? Did you encounter any issues rolling back from Windows 11 to Windows 10? Please share your thoughts and experiences by dropping your comments below.


 Done! Great to see you among our subscribers!