- 1. Make sure it is not a hardware issue
- 2. Plug your device into a different port
- 3. Employ Windows Audio Troubleshooter
- 4. Configure your audio recording settings
- 5. Prevent other apps from controlling your microphone
- 6. Fix your microphone driver
- 7. Uninstall audio control software
- 8. Scan your computer for malware
- 9. Fix your registry issues
- 10. Perform a system restore

‘Your voice dries up if you don’t use it’
Patti Page
No doubt, we are willing to go to great lengths to be heard. Otherwise, conflict and tension follow. Fortunately, you can voice your opinions even if your microphone keeps resetting to 0 – you can easily resolve this problem by applying our proven fixes. Just keep reading to get your device back up and running.
To begin with, if it is the question ‘Why is my mic muted on Windows?’ that has brought you here, get ready for some digging around. This problem can crop up due to numerous causes, and some of them might seem quite surprising.
So, why does a microphone reset to zero? In fact, the reasons that happens include, but are not limited to, hardware failures, bad drivers, software interference, incorrect settings, faulty ports, and even malware. We will root them out one by one in order to make your audio recording problems vanish into thin air.
It is time to get your microphone back on track:
1. Make sure it is not a hardware issue
This is definitely the first step to take, since your device might be faulty. If you use an external microphone, connect it to another computer and see if there are any issues present. If the device keeps malfunctioning, you should consider investing in a new audio recording piece of hardware.
2. Plug your device into a different port
If your microphone level randomly resets to zero, try connecting the device to another port – the current one might be the culprit. So, check this out straight away.
3. Employ Windows Audio Troubleshooter
Undoubtedly, Microsoft developers are rather thoughtful. That is why your OS can deal with many problems on its own, and recording issues are not an exception.
Here is what you should do to make Windows fix your mic:
- Open your Start menu and locate the Search box (or press the Windows logo key + S shortcut on your keyboard).
- Type ‘troubleshoot’ without quotes. Select Troubleshoot from the search results and open it.
- Navigate to the Hardware and Devices section, which is in the left pane.
- Select the Run the troubleshooter option. Click on it.
- Follow the on-screen prompts to assist the scan.
Once your PC has been analyzed, you will receive a report containing available solutions to your problem. If the troubleshooter has failed to identify the problem, do not despair and proceed to the following fix.
4. Configure your audio recording settings
It is essential to check whether your microphone is set as the default recording device on your computer. To do that, take the steps below:
- Go to your taskbar and locate the volume control icon.
- Right-click on the icon and click on Recording devices.
- Locate your external microphone. Make sure it is enabled.
- Right-click on the device and select Set as Default Device.
- Click on Apply and select OK to save the changes.
Note: if you have a built-in webcam, we recommend you to disable it, since its mic might be hogging the limelight and doing your external device out of its service.
5. Prevent other apps from controlling your microphone
The point is, one of your apps might have taken over the device in question. To avoid ‘turf wars’, do the following:
- Open your Start menu and go to Control Panel. You can also enter Control Panel by pressing the Windows logo key + S shortcut and selecting the Control Panel option from the list.
- Once you are in Control Panel, click on Sound.
- Navigate to the Recording tab.
- Locate your microphone and double-click on it.
- Go to the Advanced tab and locate ‘Allow applications to take exclusive control of this device’. Make sure to uncheck it.
- Click Apply and then OK to save your changes.
No app can have ultimate control over your microphone now.
6. Fix your microphone driver
If your microphone volume control keeps sliding back to zero, the device driver might be faulty, missing, or outdated. Anyway, it needs fixing. To repair it, you have 3 options:
Employ special software
This is the easiest way indeed. Download a special tool and let it do the job for you. For instance, if you opt for Auslogics Driver Updater, rest assured that all your driver problems will be resolved with just one click of a single button.

Make use of the integrated Device Manager tool
Troubleshooting problematic drivers is the task you can entrust to Device Manager: this tool comes as part of your OS and is designed to deal with driver issues.
Follow the instructions to use Device Manager in
Windows 7
- Launch the Start menu and navigate to Computer.
- Right-click on it and select the Manage option.
- The Computer Management screen will show up.
- There you should open Device Manager.
- In Device Manager, locate your microphone and right-click on it. You can try reinstalling the device or updating its driver.
Windows 8 (8.1)
- Right-click on your Windows logo icon to open the Quick Access menu.
- Select Device Manager from the menu. From the list of available devices, select your microphone.
- Right-click on the device and try to solve the matter with it by reinstalling it or updating its driver software.
Windows 10
- Simultaneously press the Windows logo and X buttons on your keyboard.
- Select Device Manager. Once in it, navigate to your microphone and right-click on it.
- Try updating the driver of the device. Also consider reinstalling it.
Fix your microphone driver manually
And that’s the toughest way: you have to know the exact model of your microphone and the latest driver version needed. This method implies plenty of web search, and your vendor’s official website is the best place to start it.
Bear in mind that downloading and installing the wrong driver for your microphone is something to avoid, as this might bring no benefit whatsoever or even complicate matters even further.
7. Uninstall audio control software
Such programs can be pretty useful, but they may cause your microphone to mute itself. This is how you can uninstall them properly:
- Open your Start menu and proceed to Control Panel.
- Go to Programs and click on Programs and Features.
- Locate your audio control software and click Uninstall to remove it.
- Wait for the uninstallation process to complete.
Finally, you should restart your computer and see if your microphone works well now.
8. Scan your computer for malware
Malicious software is by no means a trivial enemy: these days malware attacks become more and more vicious and cunning. As surprising as it may seem, your microphone is a coveted target for hostile software. So, if the device refuses to work the way it is supposed to, the chances are your PC is malware-infected.
In a situation like this, what you should do is run a full system scan. Here is how you can do that:
Use Windows Defender
Your OS can in fact stand up for itself: it has the built-in Windows Defender suite, which is quite good at removing hostile intruders. To use this feature to your advantage, follow the instructions below:
Windows 7
- Open your Start menu and locate the Search box. Type ‘Defender’ (without quotes) and click on Windows
- Defender when it appears on the list. You can also launch Windows Defender this way: open your Start menu, move to Control Panel and click Windows Defender.
- Once in the Windows Defender home window, navigate to Scan and click the arrow next to it. Select the Full Scan option.
Windows 8 (8.1)
- Open your Start menu and move to the Search bar.
- Type ‘Windows Defender’ (without quotes) into it.
- Select Windows Defender from the list.
- The Windows Defender home window will open.
- Click on Update and move to Home.
- Go to Scan Options, select Full, and choose Scan now.
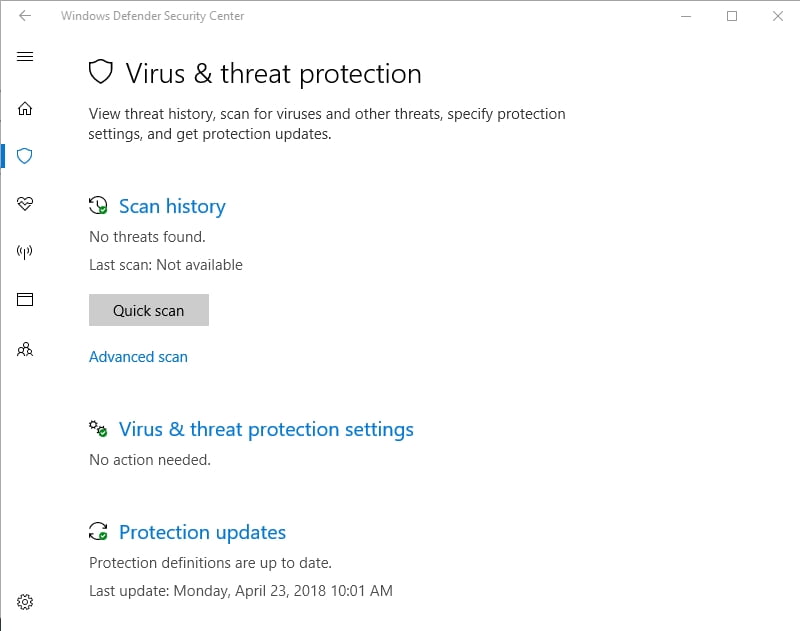
Windows 10
- Click on your Start icon and locate the Settings gear. Click on it.
- Open Update & Security and proceed to Windows Defender.
- When the Windows Defender screen appears, select Open Windows Defender.
- Once in the Windows Defender Security Center window, click on the shield icon in the left pane.
- Then click on the Advanced scan link and select the Full scan option.
Utilize a third-party antivirus
You might just as well choose a non-Microsoft antivirus product for your anti-malware crusade. Just remember that you should use reliable and reputable software.
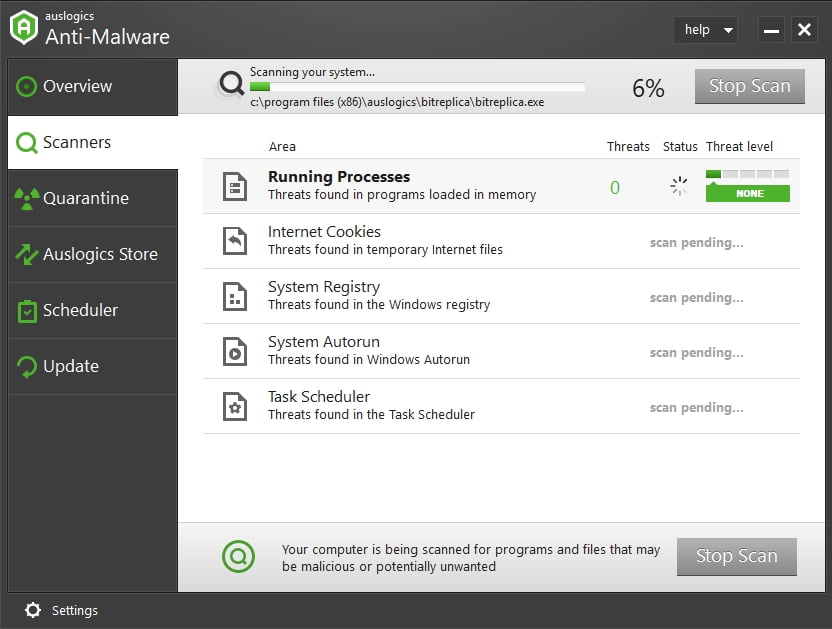
Employ anti-malware software
Certain anti-malware products are literally indispensable when it comes to detecting and killing particularly sly threats. Auslogics Anti-Malware is a case in point: this shrewd malware hunter will scan every nook and cranny of your OS to make sure there are no unwelcome guests around.
9. Fix your registry issues
Some of the apps that were once running on your PC and using your microphone might have clogged your system registry with leftover entries. This means you should clean up Windows Registry to stop your microphone level going to 0.
The catch is, Windows Registry is an extremely subtle component of your system: even a tiny mistake can damage it beyond repair. That said, we recommend you to edit it manually only if you have exceptional technical skills. If that is not your case, you can use reliable freeware such as Auslogics Registry Cleaner and have your registry fixed in no time.

10. Perform a system restore
All to no avail? Then consider using the System Restore feature. If it has been enabled on your PC, you can roll your system back to a date before your microphone issues came up.
These are the steps to take in
Windows 7:
- Open your Start menu, move to the Search box, and type System Restore.
- When the System Restore screen opens, click on Restore system files and settings. Then click Next.
- Select the restore point you wish to go back to and confirm it.
Windows 8 (8.1):
- Press the Windows logo key + Q shortcut.
- Type ‘Recovery’ (without quotes) into the Search box.
- Click Settings and then select Recovery.
- Select Open System Restore.
- You will see the most recent working restore point. However, you can choose another one by checking Choose a different restore point.
- Confirm your restore point.
Windows 10:
- Open your Start menu and proceed to Control Panel.
- Open System and Security and click File History.
- Go to the Recovery section and select the Open System Restore option.
- Click Next and choose the restore point to which you want to take back your system.
- Click Next and Finish. Then give your confirmation.
We hope your microphone works well now.
Do you have any ideas or questions regarding this issue?
We are looking forward to your comments!


 Done! Great to see you among our subscribers!