- Here are 10 easy ways to resolve your playback device issue:
- 1. Disable audio programs running in the background
- 2. Restart your Skype
- 3. Make sure the correct playback device is set as default
- 4. Disable the ‘Automatically adjust speaker settings’ option
- 5. Reinstall your audio device
- 6. Re-enable your audio device
- 7. Re-enable your speakers
- 8. Reset Skype configuration files
- 9. Update your drivers
- 10. Reinstall your Skype

‘What do people talk about on Skype?
3 % Hi, how are you? 97 % Can you hear me?’
Author Unknown
We know you love Skype – it allows you to pack a lot of talking and messaging into your busy life, right? But we bet you wish you relationship with this app were a little less eventful. For instance, the error message ‘Problem with playback device’ is something you definitely want to vanish as soon as possible. Luckily, this matter is 100 % solvable – just make use of the tips below.
Note: If your issue is ‘problem with playback device Skype Windows 7’, you may still find this article useful, since most of the fixes described below work well both in Win 10 and Win 7.
Here are 10 easy ways to resolve your playback device issue:
- Disable audio programs running in the background
- Restart your Skype
- Make sure the correct playback device is set as default
- Disable the ‘Automatically adjust speaker settings’ option
- Reinstall your audio device
- Re-enable your audio device
- Re-enable your speakers
- Reset Skype configuration files
- Update your drivers
- Reinstall Skype
We will walk you through all of them:
1. Disable audio programs running in the background
The “Problem with Playback Device” error can crop up due to some other app hogging the limelight. Thus, go to your Task Manager and see if any other program is running in the background of your system. Do not hesitate to disable any active audio programs. Then check if the issue has gone.
2. Restart your Skype
This fix is pretty simple: quit your Skype and then open it again. If this manoeuvre has been to no avail, proceed to the following method – your triumph is just around the corner.
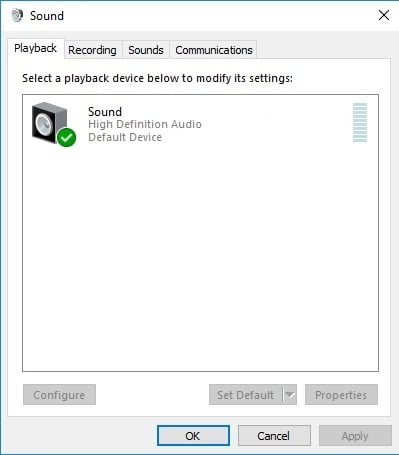
3. Make sure the correct playback device is set as default
The thing is, you might have accidentally set the wrong device in your Skype.
If you use the classic Skype app:
- Open your Skype -> Go to Tools -> Navigate to Options
- Move to Audio Settings -> Go to Speakers -> Select the device you need -> Save
If you use the new version of Skype:
- Open your Skype -> Go to your Settings section
- Navigate to Speakers -> Make sure the right device is set as default
4. Disable the ‘Automatically adjust speaker settings’ option
This one is often reported to be an effective fix for playback device issues. So, if you use the classic Skype app, give this method a try:
- Open your Skype -> Go to Tools -> Open Options
- Navigate to Audio settings -> Speakers
- Turn off Automatically adjust speaker settings -> Save you changes by clicking on Save
5. Reinstall your audio device
If the “Problem with Playback device” issue persists, try reinstalling your audio device. Here is how to do that in Windows 10:
- Press Windows logo key + X -> Select Device Manager from the list
- Go to Sound, video and game controllers -> Find your audio device -> Right-click on it -> Choose Uninstall

After the device has been uninstalled, reboot your PC. Then your Win 10 will install the device automatically.
6. Re-enable your audio device
No luck so far? There is no need to despair. Just do the following:
- Press Windows logo key + X -> Select Device Manager from the list
- Go to Sound, video and game controllers -> Find your audio device -> Right-click on it -> Choose Disable
- Right-click on the device again -> Choose Enable
7. Re-enable your speakers
Here is another trick worth a try:
- Right-click on your Speaker icon (the bottom right corner) -> Select Playback devices from the list of options
- The Playback devices window will open -> Right-click on the empty space there -> Make sure the Show Disabled Devices and Show Disconnected Devices options are enabled
- Locate your audio device -> Right-click on it -> Disable
- Right-click on your device again -> Enable
- Apply -> OK
8. Reset Skype configuration files
Resetting Skype configuration files may help you get your Skype app back on track. Here is what the manipulation implies:
- Close your Skype -> Make sure it is not running in the background, using Task Manager
- Press Windows logo key and R to open the Run box -> Insert %appdata% -> Hit Enter
- Find your Skype folder -> Change its name to Skype.old (You will be able to find your Skype history there)
- Open your Skype and see if the problem has been fixed.
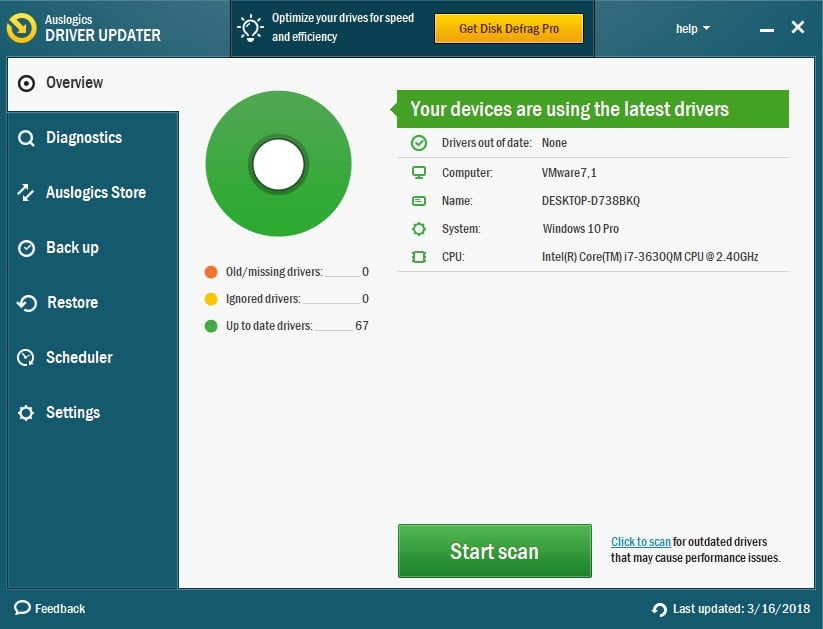
9. Update your drivers
Out-of-date playback device drivers can turn using Skype into a nightmare. In fact, the sooner you update them, the better.
Here is a list of the options to consider:
- Use Device Manager:
Win + X -> Device Manager -> Right-click on a device -> Select the Update driver option - Update your drivers manually:
go to your vendor’s website, download the latest driver versions and install them on your PC. - Employ Auslogics Driver Updater to fix all your driver issues in one click.
10. Reinstall your Skype
Your Skype app might be the culprit itself, so reinstall it to fix your ‘Problem with playback device’.
To reinstall Skype in Windows 10, follow the instructions below:
First, let’s back up your Skype history:
- Press Windows logo key and R simultaneously to open the Run box -> Type ‘%appdata%\skype’ (without quotes) -> Hit Enter
- Copy the following folders: ‘My Skype Received Files’, ‘Your Skype Name’ and paste them to another location.
Now follow the steps below to uninstall your Skype:
- Press Windows logo key + R to open the Run box -> Type ‘appwiz.cpl’ without quotes into it
- Go to Programs and features -> Locate Skype -> Right-click on it -> Select Uninstall/Change -> Uninstall Skype
- Then move to C:\Program Files -> Locate and delete the Skype and the SkypePM folders
Then install the latest version of Skype.
You can retrieve your Skype history now:
- Press Windows logo key + R to open the Run box -> Type ‘%appdata%\skype’ (no quotes) -> Press OK
- Take the ‘My Skype Received Files’ and the ‘Your Skype Name’ folders to this folder
We hope you can make and receive Skype calls now.
Do you have any ideas or questions regarding this issue?
We are looking forward to your comments!


 Done! Great to see you among our subscribers!