- Common Methods of Repairing BSODs in Win 7
- 1) Disabling Automatic Restart
- 2) Installing Updates
- 3) Installing the Latest Drivers
- 4) Checking if there are Hard Disk Errors
- 5) Run the Startup Repair Tool
- How to Fix BSOD in Windows 7 (Other Methods)
- 1) Checking the Hardware Components
- 2) Fixing the Master Boot Record (MBR)
- 3) Reinstalling Windows 7

These days, PC users are not worried when they see blue screen of death errors or BSODs in Win 7. Also referred to as the “STOP” error, the BSOD is one of the most common death screens that occur in Windows OS. These errors even appear in green, red, and yellow, among other screen colors.
However, if this is the first time you encounter this issue, what should you do? Should you throw away your computer and buy a new one? Well, don’t do that just yet! In this article, we will teach you how to repair BSOD errors in Windows 7. We will show you some methods of fixing this problem which haunts Windows users every now and then.
Common Methods of Repairing BSODs in Win 7
If you see a blue screen of death error on your Windows 7, you can try the common fixes below:
1) Disabling Automatic Restart
In most cases, Windows 7 is configured by default to automatically restart when a blue screen of death occurs. In this case, you won’t have enough time to read the error text and determine the cause of the issue. The first thing you have to do is disable automatic restart so you can hold the blue screen of death for some time. Follow the steps below:
- Go to My Computer and right-click it.
- Go to Properties.
- Click the Advanced tab.
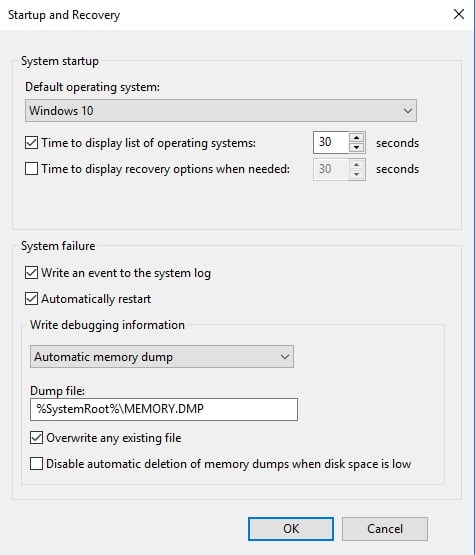
- Go to the Startup and Recovery section and click the Settings button.
- Go to the System Failure section and uncheck the box for the Automatic Restart option.
- Save the settings by clicking OK.
If you are having trouble booting into Windows, you can go into Safe Mode. From there, you will be able to follow the steps above. Here are the instructions on starting Windows 7 in Safe Mode:
- Restart your computer.
- Before the Windows logo appears, press F8.
- Using the arrow keys, choose Safe Mode from the menu.
- Hit Enter.
2) Installing Updates
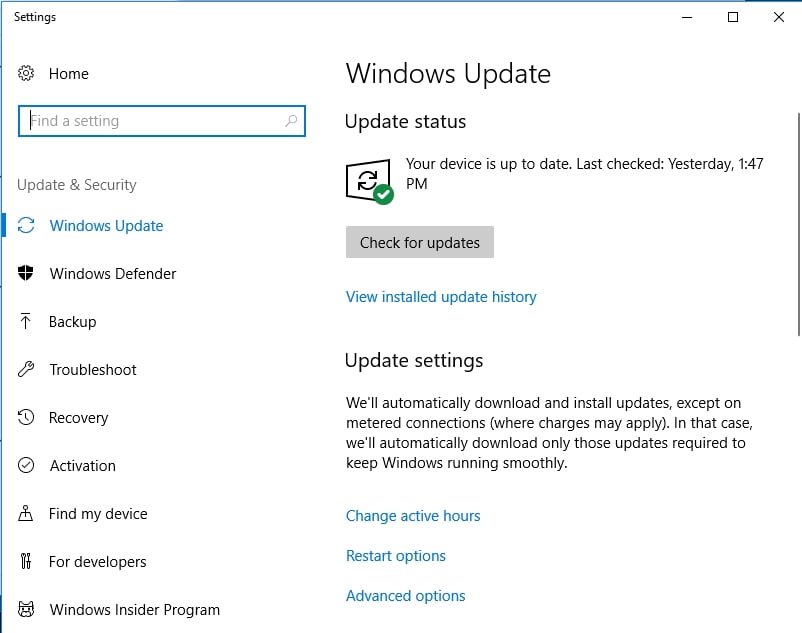
One of the ways you can fix and even prevent a BSOD from occurring is by ensuring that you regularly update your computer with the latest security patches. In Windows 10, there is little you can do to stop the automatic updates. However, in Windows 7, the OS is not typically configured to install updates by itself. You can always do it manually by following the steps below:
- Go to Start.
- Go to the search box and type “Update” (no quotes).
- From the list of results, select Windows Update.
- On the left, look for Check for Updates and select this option.
- Look for any pending updates.
- Select Install Updates.
Pro tip:
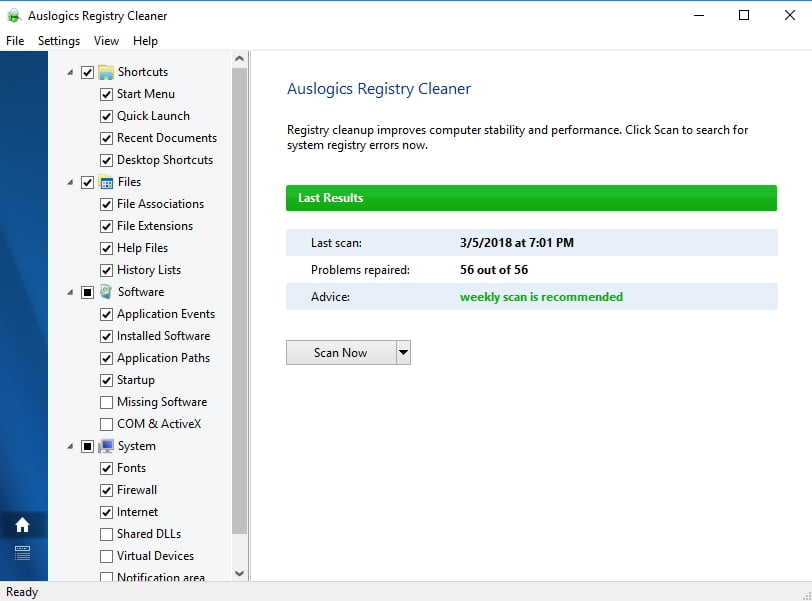
Make sure that there are no invalid or repetitive entries in your Windows registry when you install updates. You can safely, effectively, and conveniently eliminate these errors by using Auslogics Registry Cleaner. This extra step helps you prevent crashes, enabling stable and smooth operation.
3) Installing the Latest Drivers
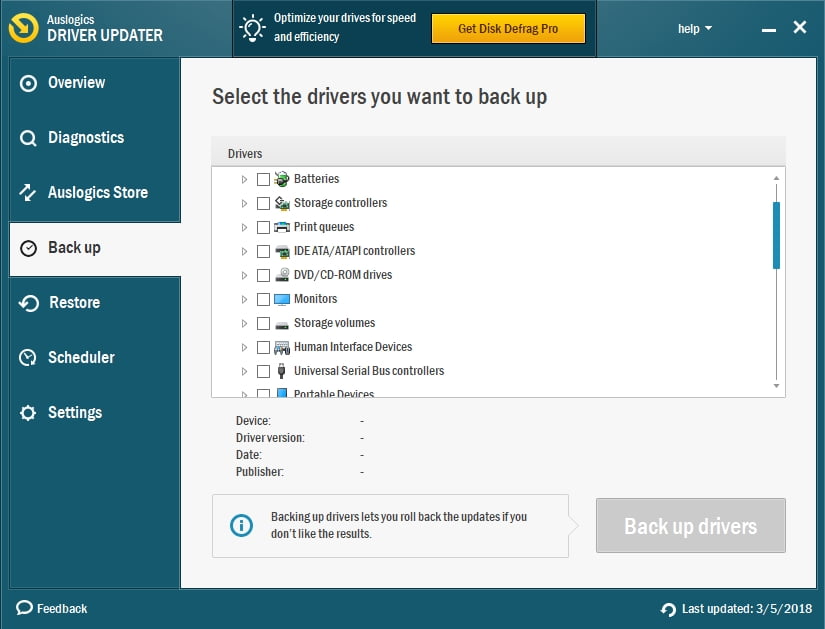
A blue screen of death may show up on your computer due to faulty or corrupted drivers. Updating or fixing them allows you torepair BSOD errors in Windows 7. Check the latest versions of your drivers by visiting the site of your computer’s manufacturer.
In some cases, blue screen of death errors occur due to an incompatible device driver. The efficient way to fix this is to use Auslogics Driver Updater. Using this program, you can conveniently see potential driver problems and quickly update your drivers to the latest versions recommended by your computer’s manufacturer.
4) Checking if there are Hard Disk Errors
You can use the utility tools in Windows 7 to identify and repair errors on the hard disk. In some cases, fixing hard disk or memory issues can help you stop a blue screen of death from showing up.
How to Identify Hard Disk Errors:
- Go to Start.
- Go to Computer.
- Go to the main drive where you installed Windows 7. Right-click the drive and select Properties.
- Go to the Tools tab. Under the Error Checking section, click Check Now.
- Select Automatically Fix File System Errors.
- Select Scan for and Attempt Recovery of Bad Sectors.
- Click Start.
How to Identify Memory Errors:
- Go to Start.
- Go to Control Panel.
- In the search box, type “Memory” (no quotes).
- From the list of results, select Diagnose your Computer’s Memory Problems.
- You should see the next steps of instructions. Follow these steps to fix the BSOD error.
5) Run the Startup Repair Tool
You can manually run the Startup Repair tool by choosing the preinstalled recovery option on your computer. You can also run this program, using the original Windows installation disk or a system recovery and repair disk.
Using the Preinstalled Startup Repair Tool:
- If there are CDs, DVDs, flash drives in the system, make sure you disconnect all of them.
- Restart your computer.
- While your computer is booting, press and hold the F8 key. Make sure you do this before the Windows logo shows up.
- You will see the Advanced Boot Options screen. Using the arrow keys, select Repair Your Computer and hit Enter.
If you don’t see the Repair Your Computer option, it means you don’t have the recovery tool preinstalled in your unit. You can either use the original installation disk or a recovery disk.
- Choose a keyboard layout then click Next.
- Once you’re taken to the window for System Recovery Options, click Startup Repair.
Using the Original Installation Disk or a Recovery Disk:
- Insert the original installation disk or recovery disk.
- Restart your computer.
- Boot from the disk by pressing any key.
- Select your language and keyboard layout (if available).
- Click Next.
- If you’re using the Windows 7 installation disk, click Repair Your Computer.
- You will be taken to the window for System Recovery Options.
- Click Startup Repair.
How to Fix BSOD in Windows 7 (Other Methods)
Apart from the ones we’ve mentioned in this article, there are other unconventional ways of fixing a blue screen of death error in Windows 7. Here are some of them:
1) Checking the Hardware Components
In some cases, a BSOD shows up due to overheating parts. As such, it is important for you to check whether there are hardware components that are suffering from increased heat levels. These days, there are programs that can help you identify these overheating parts.
On the other hand, increasing temperatures in your system might simply be caused by clogged fans. You can prevent this problem by regularly cleaning your computer. You can also try removing external hardware, such as printers, USB storage drives, and gamepads, among others. Doing so will allow you to identify whether any of these components is causing the blue screen of death.
2) Fixing the Master Boot Record (MBR)
The Master Boot Record (MBR) shows the information which identifies your operating system. It is essential in enabling the system to normally boot. If the MBR gets corrupted, it can cause serious problems, including the blue screen of death error. You can fix the MBR by following the steps below:
- Insert the original Windows installation disk to your computer. Boot your unit from it.
- Select the language and region.
- Select Repair Your Computer.
- Under the System Recovery Options, choose Command Prompt.
- In the Command Prompt, paste the lines below then hit Enter:
bootrec /fixmbr
bootrec /fixboot
bootrec /scanos
bootrec /rebuildbcd
- After exiting the Command Prompt, restart your computer. This should fix the blue screen of death if it is caused by a damaged MBR.
3) Reinstalling Windows 7
If none of the methods we shared works for you, you can ultimately opt for reinstalling your operating system. Here are the steps:
- Insert the original Windows installation disk to your computer. Boot your unit from it.
- Select Install Now.
- Follow the instructions for reinstalling Windows 7.
Have you tried any of the methods we mentioned above?
Let us know if it worked by writing in the comment section below!


 Done! Great to see you among our subscribers!