- How to Manage the Automatic Maintenance Settings in Windows 10
- What Functions are Performed by Automatic Maintenance in Windows 10
- How to Change Automatic Maintenance Settings on Windows 10 Computer
- Windows Automatic Maintenance Problems and How to Fix Them
- How to Turn Off Automatic Maintenance in Windows 10
- The Best Method to Maintain and Speed Up Windows 10
- Conclusion
- FAQ

While Windows dominates the world’s OS market, it still develops through trial and error. To improve computer performance, you need to perform regular Windows maintenance, such as installing Windows updates, removing junk files, running disk defragmentation, scanning for viruses, and more. Luckily, Windows 10 comes with the Automatic Maintenance feature, which saves you the trouble of manually initiating these processes, making it possible for your PC to be in good health at all times.
In this article, you will learn how to speed up Windows 10 with Windows Automatic Maintenance and a dedicated PC optimizer to get the most out of your computer.
How to Manage the Automatic Maintenance Settings in Windows 10
What Is Windows Automatic Maintenance?
Windows Automatic Maintenance is a built-in feature that conducts a set of regular Windows maintenance tasks to improve computer performance and keep your device running smoothly.
The goal of Windows Automatic Maintenance is to enhance the reliability of your computer and ensure that it is secure and updated. By keeping your PC optimized, Windows Automatic Maintenance helps to prevent freezes, crashes, and other problems that can hinder your work and cause data loss.
What Functions are Performed by Automatic Maintenance in Windows 10
Tasks carried out by the Automatic Maintenance feature include
- security scans with Windows Defender,
- software updates,
- disk defragmentation and optimization,
- and several other system diagnostic operations.
Windows Automatic Maintenance is designed to run maintenance activities when the PC is not in use (but is turned on) so that you won’t experience any inconvenience. The default time is 3 am daily, but you can re-schedule it if you wish, just in case your computer is always powered off at that time or you are usually active then.
The maintenance session lasts a maximum of 1 hour per attempt. If you happen to be using your computer at the scheduled time, the system will defer the maintenance. The suspended task will resume during the next idle period.
However, you should note that a task that is marked as critical will not be suspended. The system will make sure that it completes even if you want to use your PC.
Some tasks might not be able to be completed during the normal 1 hour maintenance window. This often happens when there are too many scheduled events or perhaps your PC was turned off. In such a case, you can define a recurring time frame (known as a deadline) in which the system must complete the task successfully at least once.
Should a task miss its deadline, the maintenance scheduler will initiate it again and attempt to complete it during the next maintenance window. But in order to ensure that a delayed task gets done, the scheduler will now have to extend the regular 1 hour time limit.
You will receive a warning notification in the Action Center if there is an issue with running a task. You can then initiate it manually. After the action is successful, the scheduler will set the maintenance schedule back to normal.
How to Change Automatic Maintenance Settings on Windows 10 Computer
There are different methods you can use to set the time for the daily maintenance tasks and choose whether or not the scheduler can wake the system to run maintenance.
Method 1: Using Control Panel
Follow these steps:
- Hold the “Windows key and press I.” Type “Control panel” (no quotes) in the Run box that opens. Click OK or hit Enter.
- Select “Large icons” in the ‘View by:’ drop-down menu in the upper left-hand corner of the Control Panel window.
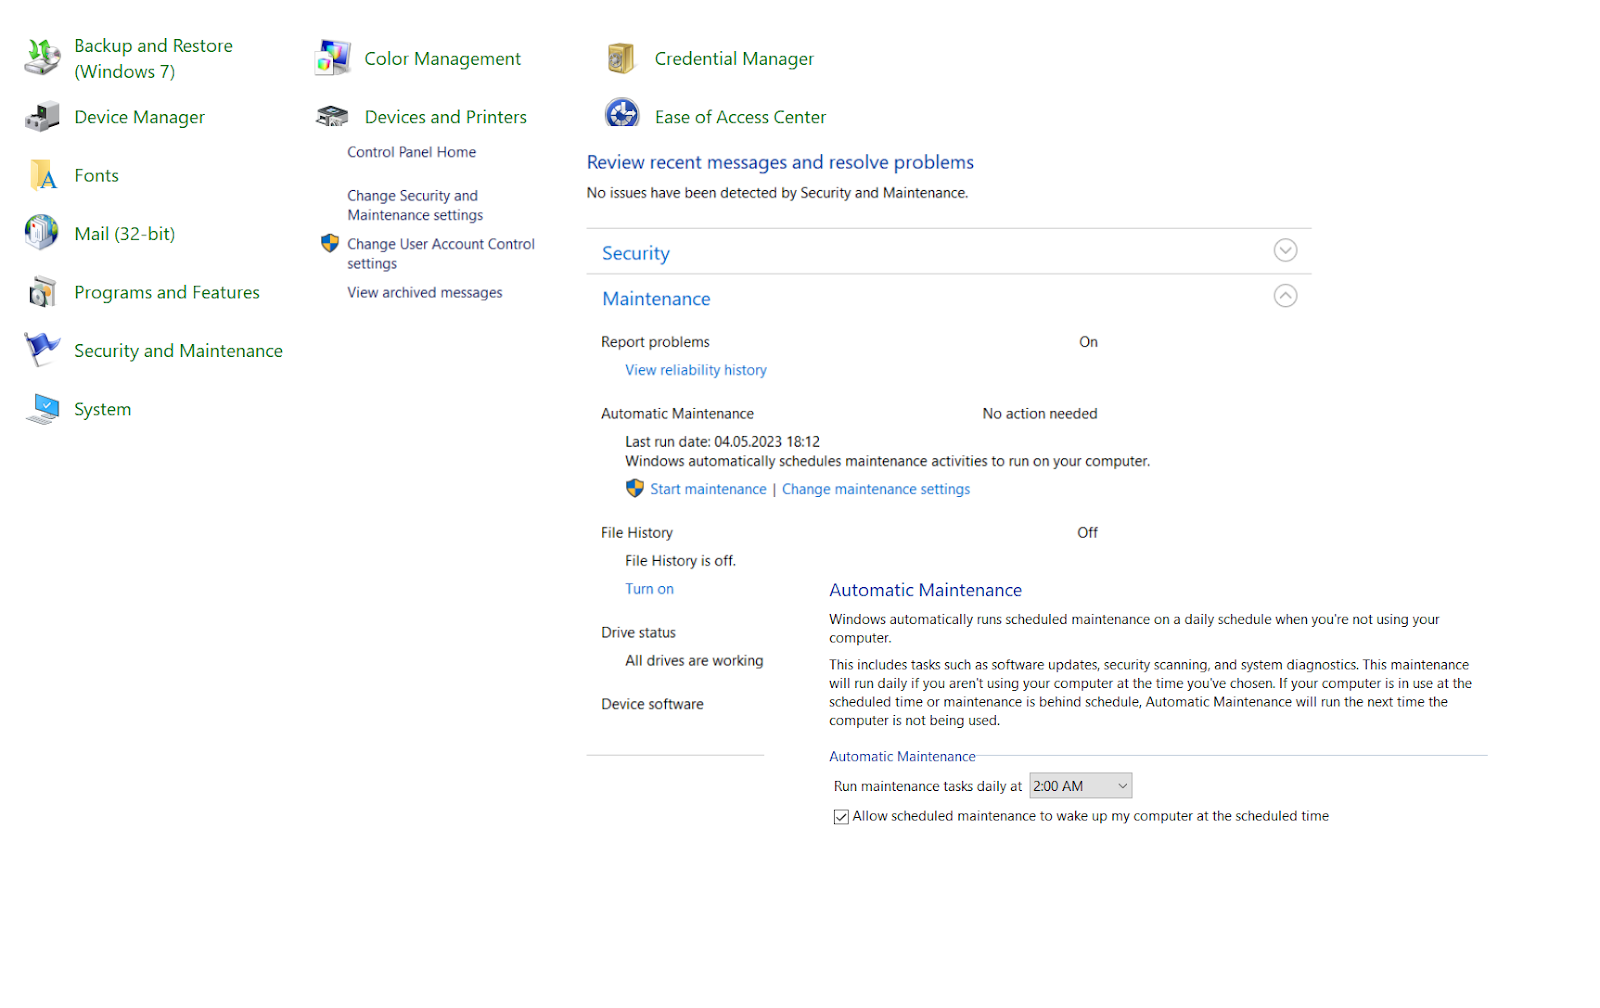
- Look through the list of items and click on “Security and Maintenance.”
- In the new page that opens, click the arrow to next to the “Maintenance” option to expand it. Then, under “Automatic Maintenance,” click the link that says, ‘Change maintenance settings.’
- You can now indicate the time you want the daily Automatic Maintenance to run. Afterward, mark the “Allow scheduled maintenance to wake up my computer at the scheduled time” checkbox if you want to activate that option. Unmark it if you don’t want the scheduled maintenance to wake your computer.
- Click the OK button.
- You will receive a UAC (User Account Control) prompt. Click Ok to grant permission.
- You can now close the Control Panel window.
Method 2: Using Registry Editor
It is a good idea to perform a full backup before making changes in the Windows registry. Why? Because editing the registry can be risky. If you do something incorrectly, it can cause irreversible damage to your operating system. A backup will help you reverse any such damage.
Follow these steps:
- Hold the Windows key and press I. Type “Regedit” (no quotes) in the Run box that opens. Click the OK button or press Enter.
- Click “Yes” when presented with the UAC prompt.
- Once you are in the Registry Editor window, perform a backup by clicking on File > Export. Enter a File name and select a location where the backup file will be saved, then click Save.
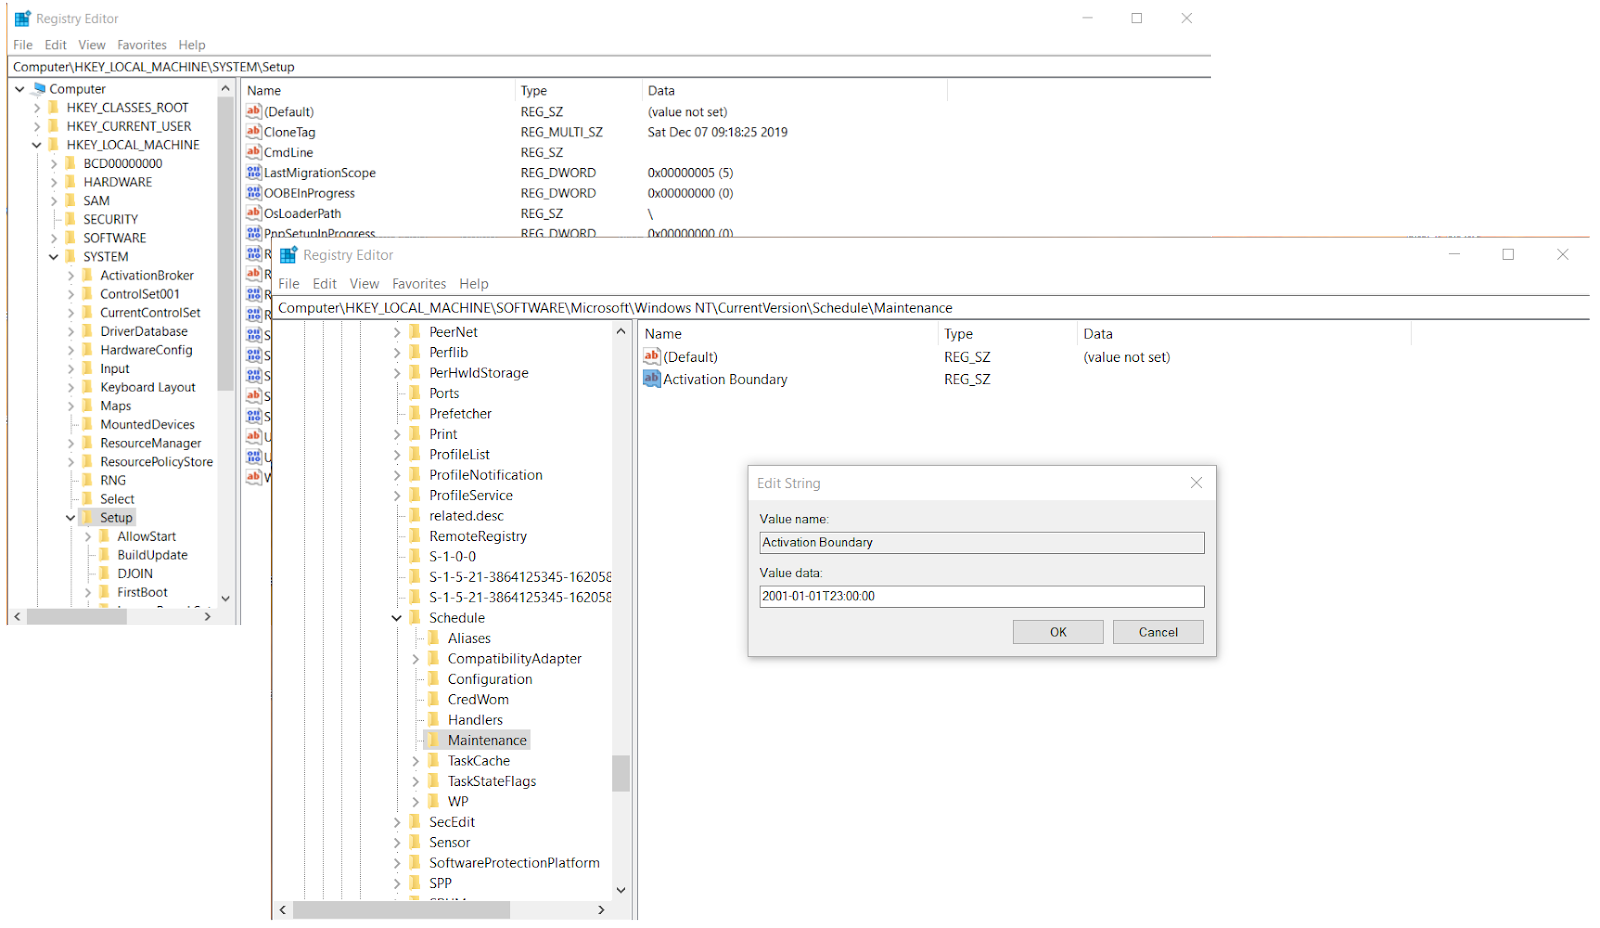
- Now, back in the main Registry Editor window, navigate to HKEY_LOCAL_MACHINE > SOFTWARE > Microsoft > Windows NT > CurrentVersion > Schedule > Maintenance
- When you get to the Maintenance key, double-click on Activation Boundary displayed in the right pane.
NB: If you don’t see the Activation Boundary in the right pane of the Maintenance key, you will have to create it yourself. To do this, right-click on the blank area and click on ‘New’ from the context menu that opens, then select String Value and name it ‘Activation Boundary’ (no quotes).
- After double-clicking on the Activation Boundary string value, enter the time of your choice as indicated below into the Value Data field:
| Time | Date Value |
| 12:00 AM | 2001-01-01T00:00:00 |
| 1:00 AM | 2001-01-01T01:00:00 |
| 2:00 AM – default | 2001-01-01T02:00:00 |
| 3:00 AM | 2001-01-01T03:00:00 |
| 4:00 AM | 2001-01-01T04:00:00 |
| 5:00 AM | 2001-01-01T05:00:00 |
| 6:00 AM | 2001-01-01T06:00:00 |
| 7:00 AM | 2001-01-01T07:00:00 |
| 8:00 AM | 2001-01-01T08:00:00 |
| 9:00 AM | 2001-01-01T09:00:00 |
| 10:00 AM | 2001-01-01T10:00:00 |
| 11:00 AM | 2001-01-01T11:00:00 |
| 12:00 PM | 2001-01-01T12:00:00 |
| 1:00 PM | 2001-01-01T13:00:00 |
| 2:00 PM | 2001-01-01T14:00:00 |
| 3:00 PM | 2001-01-01T15:00:00 |
| 4:00 PM | 2001-01-01T16:00:00 |
| 5:00 PM | 2001-01-01T17:00:00 |
| 6:00 PM | 2001-01-01T18:00:00 |
| 7:00 PM | 2001-01-01T19:00:00 |
| 8:00 PM | 2001-01-01T20:00:00 |
| 9:00 PM | 2001-01-01T21:00:00 |
| 10:00 PM | 2001-01-01T22:00:00 |
| 11:00 PM | 2001-01-01T23:00:00 |
- Click the OK button.
- You can now close the Registry Editor window.
Windows Automatic Maintenance Problems and How to Fix Them
Windows Automatic Maintenance is designed to work seamlessly in the background, making sure your system is running at its best. That said, users run into problems with this feature from time to time.
There are several Windows Automatic Maintenance issues that can arise on your PC:
- Windows Automatic Maintenance stops running: This can trigger problems like outdated software, the hard drive not showing up and your PC stuttering every few seconds. Such predicaments are often caused by a software conflict within your system or corruption in system files.
- Windows Automatic Maintenance starts to act at the wrong time: While it is set to run when your computer is idle by default, you can schedule it to run at a specific time. However, the feature may go astray and begin to interfere with your work and make your Windows PC slow.
- Windows Automatic Maintenance takes too long to complete: This issue may arise due to your computer performing disk defragmentation or running an anti-malware scan with Windows Security, which can cause Windows maintenance to last longer. In some situations, this can force your PC to freeze or run slower than usual.
- Windows Automatic Maintenance leads to high CPU usage: As a result, your computer can become noticeably slower and develop other issues. This problem may be triggered by a bug in your operating system or a conflict with other software.
To troubleshoot Windows Automatic Maintenance issues on a Windows PC, you can try restarting your computer, performing a clean boot, cleaning the registry, removing malware, or using the Windows Troubleshooter. If your Windows maintenance issue persists, you may want to disable the feature and switch to a dedicated PC optimizer to improve computer performance. You’ll find all the necessary details and instructions below.
How to Turn Off Automatic Maintenance in Windows 10
Although Automatic Maintenance is a useful feature that keeps your computer running seamlessly, you can still disable it if you wish. To do this you will have to perform some registry modifications.
As previously mentioned, it is a good idea to perform a full back up before making changes in the Windows registry. Why? Because editing the registry can be risky. If you do something incorrectly, it can damage your operating system. A backup will help you reverse any such damage.
Follow these steps:
- Hold the Windows key and press I. Type “Regedit” (no quotes) in the Run accessory’s text field and press Enter or click OK.
- Click the “Yes” button when presented with the UAC prompt.
- Perform a registry backup – Click the File tab and click on Export. Enter a name for the backup file and select a location to save it. Then click on Save.
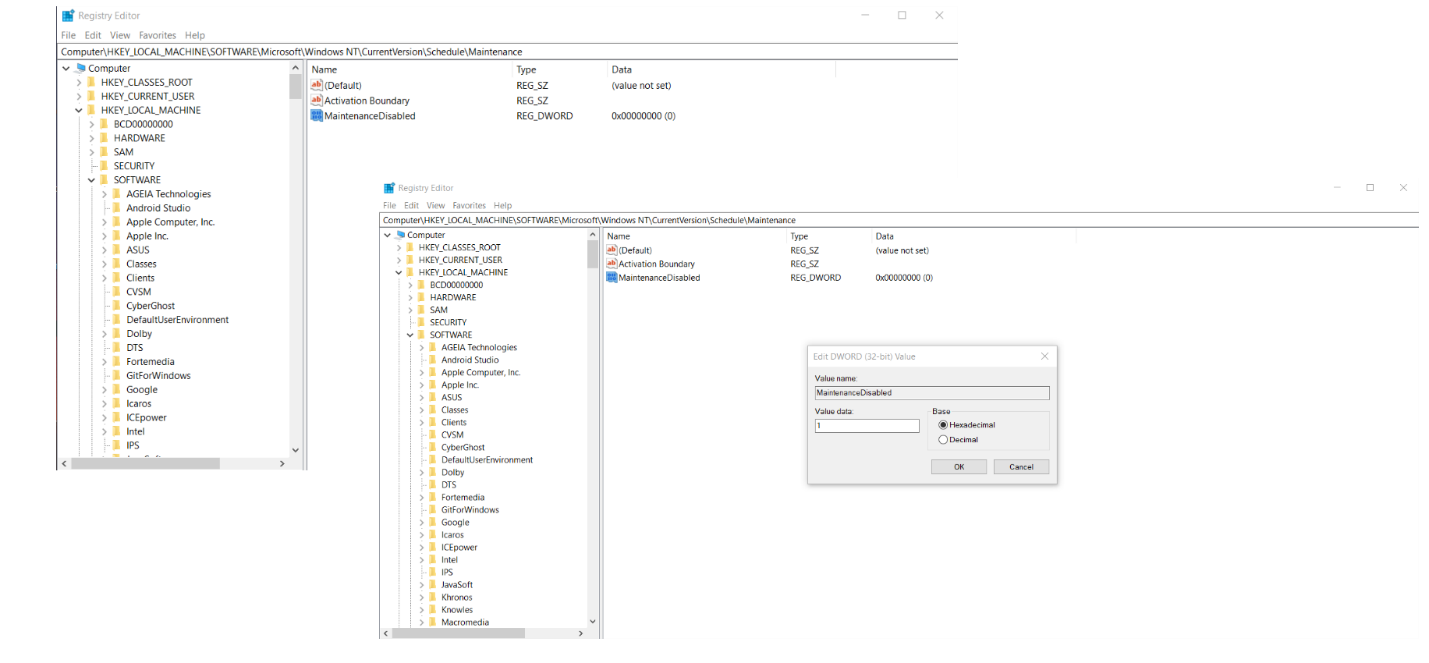
- Back in the main window of the Registry Editor, navigate the path:
HKEY_LOCAL_MACHINE > SOFTWARE > Microsoft> Windows NT > CurrentVersion > Schedule > Maintenance
- When you open the Maintenance key, right-click on a blank area in the left pane and hover your mouse pointer over “New,” then click on “DWORD (32-bit) Value.”
- Enter “MaintenanceDisabled” (no quotes) as the name of the new DWORD.
- Now, double-click on the newly created “MaintenanceDisabled DWORD” and type “1” in the Value Data field.
- Click the OK button and restart your computer.
Windows Automatic Maintenance will be deactivated after you perform the above steps. If you wish to enable it again, all you have to do is to delete the ‘MaintenanceDisabled’ DWORD in Registry Editor. Simply follow the same procedure as shown above. When you get to the ‘Maintenance’ key in Step 5, right-click on ‘MaintenanceDisabled’ in the right pane and select Delete. Confirm the action if prompted by UAC.
The Best Method to Maintain and Speed Up Windows 10
Over time, your Windows 10 OS can become sluggish due to factors like disk fragmentation, out-of-date or buggy software, non-optimal settings, and PC clutter.
While Windows Automatic Maintenance is a handy feature that can make things better, it may not be enough to improve computer performance to a level where your PC operates smoothly. In such a case, we recommend trying a third-party PC optimizer to perform Windows maintenance.
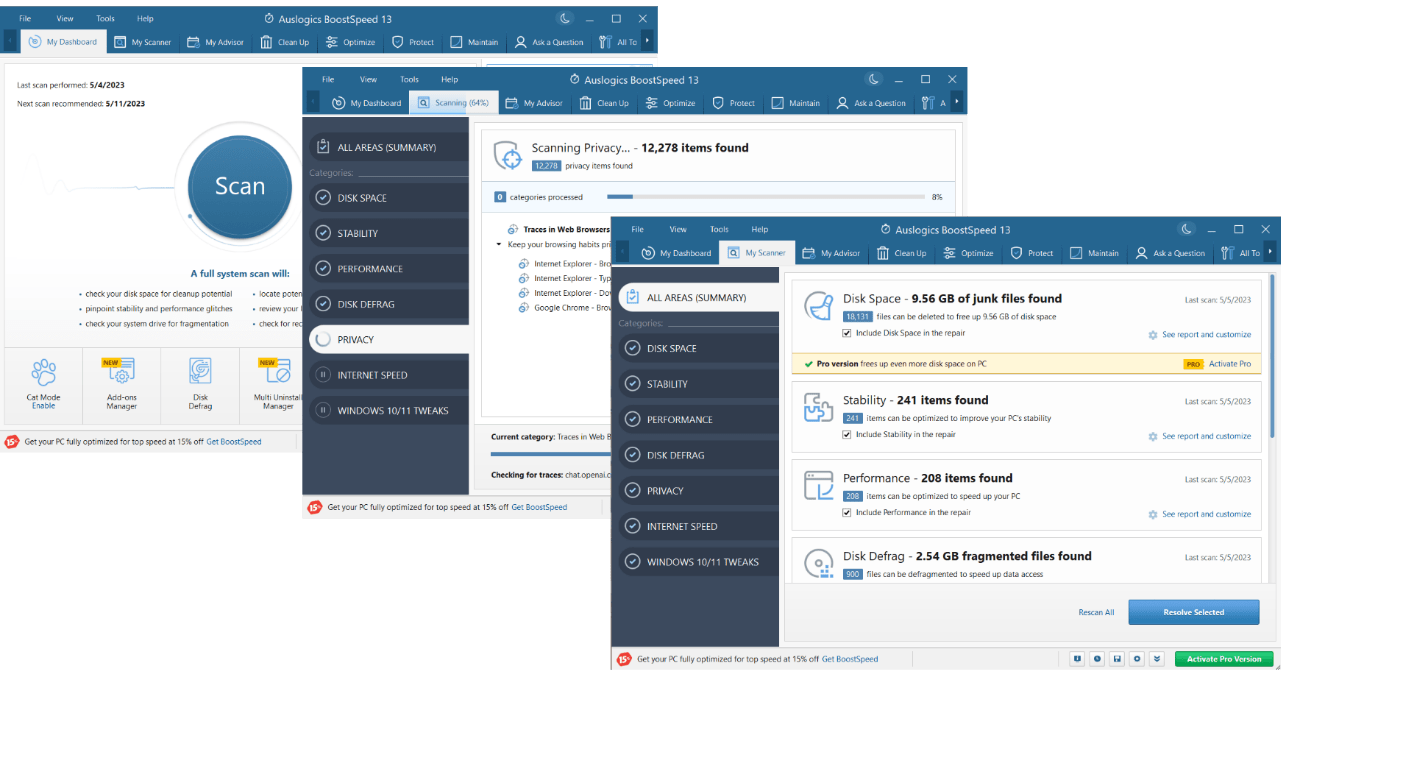
What Auslogics has to offer in this context is BoostSpeed – an all-in-one tool designed to take care of routine system checks and speed up Windows 7, 8, 10, and 11 computers.
At a click of a button, you can run a full checkup of your system to find out what state it is in now and quickly fix performance, stability, Internet connection, privacy, and disk space issues:
- Download and run the Auslogics BoostSpeed PC optimizer.
- You will be taken to the “My Dashboard” window.
- Click on the large Scan button.
- Wait until Auslogics BoostSpeed is done checking your system.
- Once the scan is over, click “Resolve Selected” to have all the detected issues fixed.
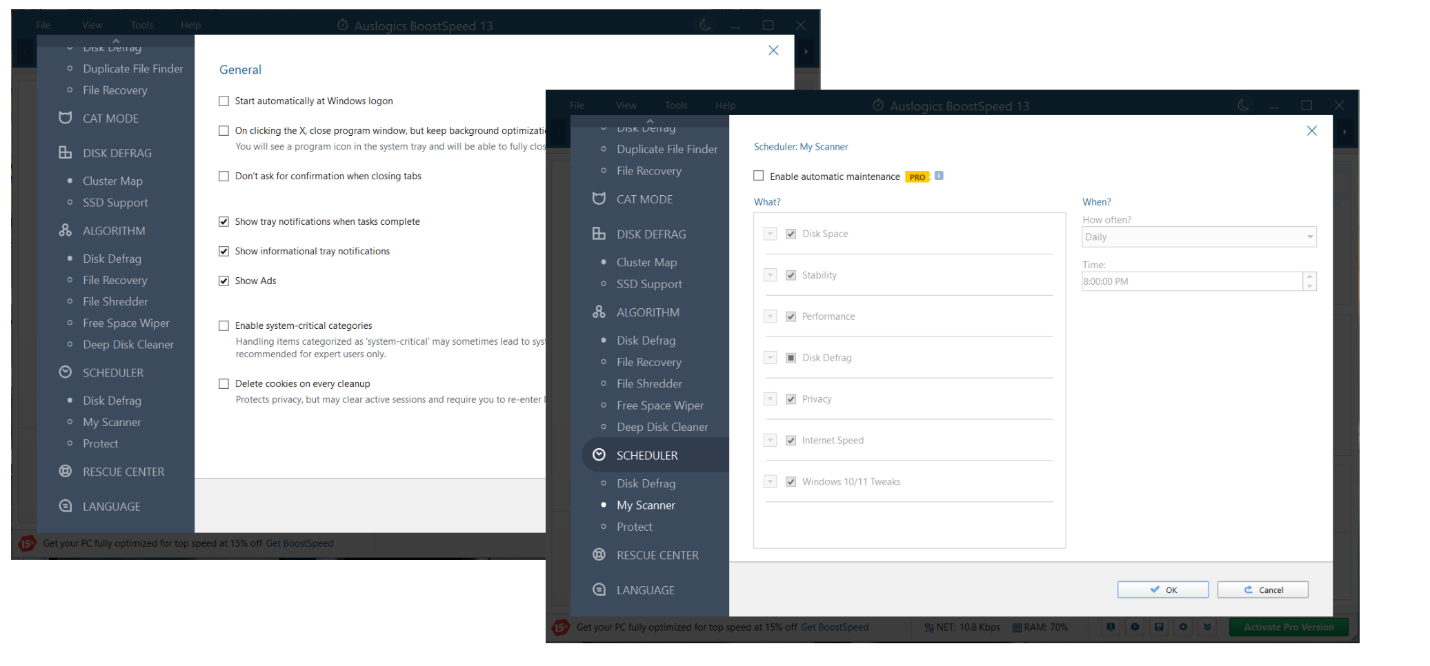
Then you can completely automate PC check-ups and troubleshooting to have all areas of your system maintained at a convenient time:
- While the Auslogics BoostSpeed PC optimizer is up and running, click on the File option in the top-left corner of the app’s window.
- Select “Settings” from the menu.
- Navigate to “Scheduler” on the left pane and click My Scanner.
- Check the “Enable Automatic Maintenance” option.
- Make sure the categories below are checked too.
- Configure when and how often you want your computer maintained.
- Click OK to confirm your choice.
Conclusion
Your Windows OS needs regular maintenance to run smoothly – otherwise, it can quickly become sluggish, buggy and even unusable. It is important that maintenance tasks are performed consistently and on a schedule. You should either remember and take the time to perform them manually or automate the process and enjoy the peace of mind.
We recommend the latter option since it can save plenty of time and effort. Anyway, maintenance tasks should not be skipped or delayed, and you can simplify the job with the built-in Windows Automatic Maintenance feature or a dedicated PC optimizer like Auslogics BoostSpeed.
FAQ
Should I Disable Windows 10 Automatic Maintenance?
Although Windows Automatic Maintenance is a helpful feature, there may be cases where you may want to turn it off. For example, it may hog valuable system resources and trigger performance issues, especially on older computers. Besides, it can drain your battery life or interfere with other apps. If you experience any of these issues, you may consider switching to another Windows maintenance solution, such as Auslogics BoostSpeed.
How Long Does Windows 10 Automatic Maintenance Take?
The length of time that it takes Windows Automatic Maintenance to do its job can vary depending on factors like the type and number of maintenance tasks being performed, the speed and capacity of your hardware, and the maintenance settings involved. By default, Windows maintenance is assigned a 1-hour window.
How Do I Schedule Windows Automatic Maintenance?
To schedule automatic maintenance in Windows 10, open the Control panel, enter the Security and Maintenance category, and click the arrow next to Maintenance. Afterwards, click Change maintenance settings under Automatic Maintenance and configure the settings to your liking.
Is It Necessary to Keep Automatic Maintenance Always On?
Keeping Windows 10 Automatic Maintenance always on is not obligatory but is generally recommended. This feature performs essential system maintenance tasks and helps your system run smoothly. If, for some reason, you prefer to keep Windows Automatic Maintenance off, we recommend you to take care of your PC by using a third-party PC optimizer. Auslogics BoostSpeed can help you with that.
What Will Happen If the Automatic Maintenance Feature Is Disabled?
If you turn off Windows Automatic Maintenance, you will have to perform Windows maintenance tasks manually or use third-party maintenance software. Otherwise, your system’s performance will drop.


 Done! Great to see you among our subscribers!