- 1. Use the Internet Connection Troubleshooter
- 2. Make use of a VPN
- 3. Switch to a public DNS
- 4. Use IPs, not URLs
- 5. Use proxy websites
- 6. Use proxy browser extensions
- 7. Utilize the Google Translate service
- 8. Try Short URLs
- 9. Use HTTPS
- 10. Convert websites to PDFs
- 11. Turn Off the Windows Firewall
- 12. Flush Your DNS Cache
- 13. Reset the Winsock Component
- 14. Release and Renew Your IP Address
- 15. Perform a Clean Boot
- 16. Use Internet archives

‘Walk where your heart leads you’
Gao Xingjian
In recent years we have all been exposed to numerous web restrictions and limitations. In fact, Internet censorship and surveillance is rapidly becoming part and parcel of our societies. We agree that it is undoubtedly a means of curbing piracy and cracking down on certain gruesome activities. However, internet service providers (ISPs) sometimes block websites that have little to do with actual crime. And that’s when resistance sets in and encourages us to seek ways to access restricted websites.
If this is your case, you are on the right track, as we have prepared an exhaustive guide on how to unblock sites on a PC. All the methods below are simple and easy to implement, so neither specialized knowledge nor skill is required to get things done.
Nonetheless, remember that many websites have been blocked for a good reason, so exercise prudence in exploring the web and keep your PC safeguarded against malicious attacks. Make sure you have a reliable antivirus product installed or configure Windows Defender to provide continuous protection. In addition, we strongly advise you to use Auslogics Anti-Malware, since this tool can hunt down the threats you never even knew existed.
That said, here are our 10 tips to help you bypass ISP blocking of websites on Windows 10
and Windows 11. We’ll also show you how to unblock websites if they’re not showing up due to a glitch in your browser or operating system.
Let’s begin:
1. Use the Internet Connection Troubleshooter
The Internet Connection Troubleshooter is a great place to start. It’s Windows’ built-in tool that checks for common problems affecting your system’s network connection. It works by restarting certain services and detecting conflicts.
Once it finds the problem, it attempts to fix it. If the troubleshooter can’t fix the problem, it provides information about the issue.
We’ll show you how to fix the problem on Windows 10 and Windows 11 as there are different methods involved for both operating systems.
Follow these steps for Windows 10:
- Right-click the Start button and launch the Settings application.
- Click on Update & Security once the Settings window appears.
- Go to the left side of the Update & Security page and select Troubleshoot.
- Once the Troubleshoot window opens, click on Additional Troubleshooters.
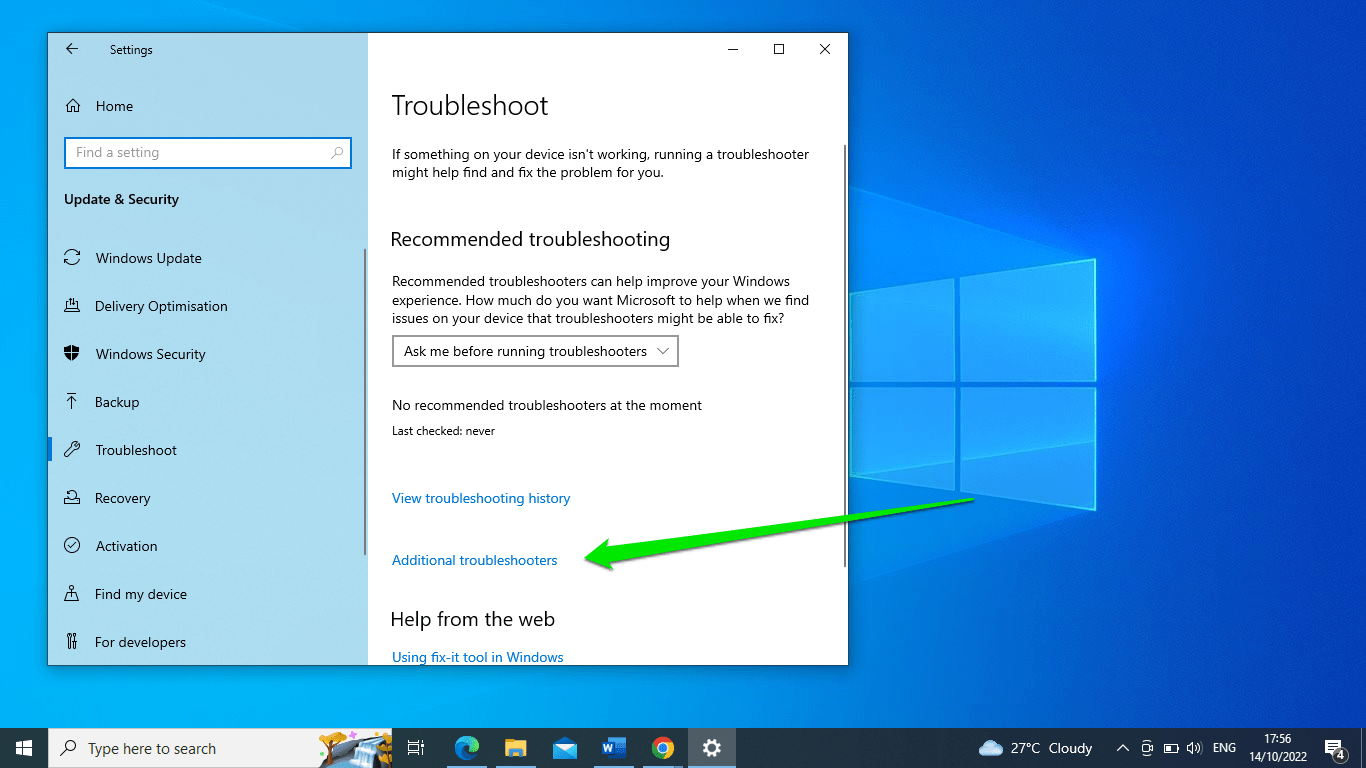
- Next, select Internet Connections and click on Run the Troubleshooter.
- You can click on the “Help me connect to a specific web page,” option, and then enter the address of the website that you can’t connect to.
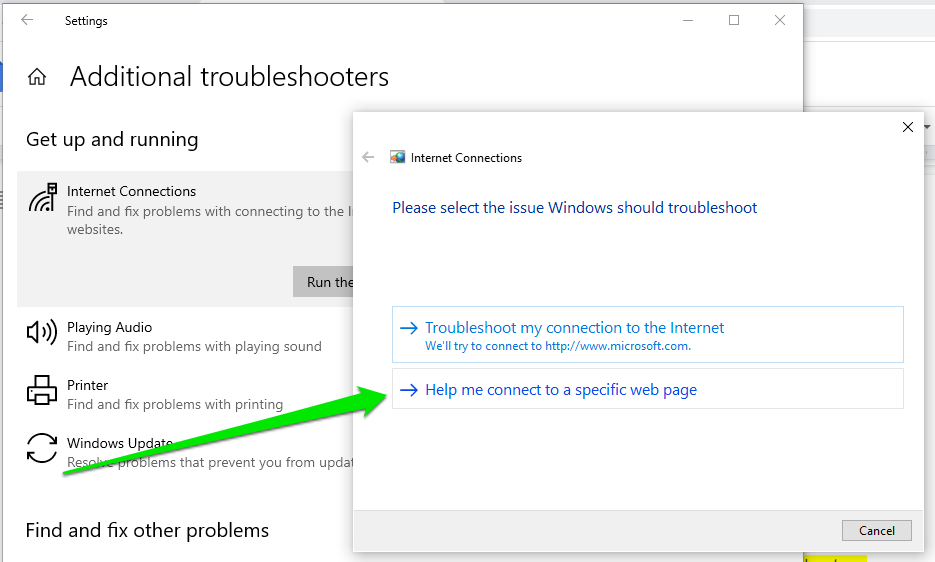
- Click on Next and allow the troubleshooter to find and fix the problem and help you connect.
- If that doesn’t work, go back and use the “Troubleshoot my connection to the Internet” option.
Follow these steps for Windows 11:
- Right-click on the Start button and launch the Settings application.
- Once Windows 11’s Settings app opens, scroll through the System page and click on Troubleshoot.
- After the Troubleshoot page appears, click on Other Trouble-Shooters.
- On the next page, click on the Run button next to Internet Connections.
- You can click on the “Help me connect to a specific web page,” and then enter the address of the website that you can’t connect to.
- Click on Next and allow the troubleshooter to find and fix the problem and help you connect.
- If that doesn’t work, go back and use the “Troubleshoot my connection to the Internet” option.
2. Make use of a VPN
If the website you are trying to access has been blocked by your ISP, using a virtual private network (VPN) is actually the easiest way to circumvent the limitation in question.
To start with, a VPN is a most helpful technology: it enhances your security and privacy by providing encrypted connections, keeping malware and viruses at bay, and making unwanted content, ads and pop-ups give your screen a wide berth. And on top of that, VPNs can magic away restrictions imposed on desirable websites. Sounds lovely, doesn’t it?
There are plenty of excellent VPN tools on the market, and you can opt for any of them, depending on your needs and budget. Some VPNs are free while certain premium products may cause you to cough up – the choice is yours. Anyway, there is a solution for everybody.
If you already have a VPN, try using it to access any website that has been blocked by your ISP. If your VPN connection is failing, make sure to read through this article of ours: it is full of proven fixes to try out.
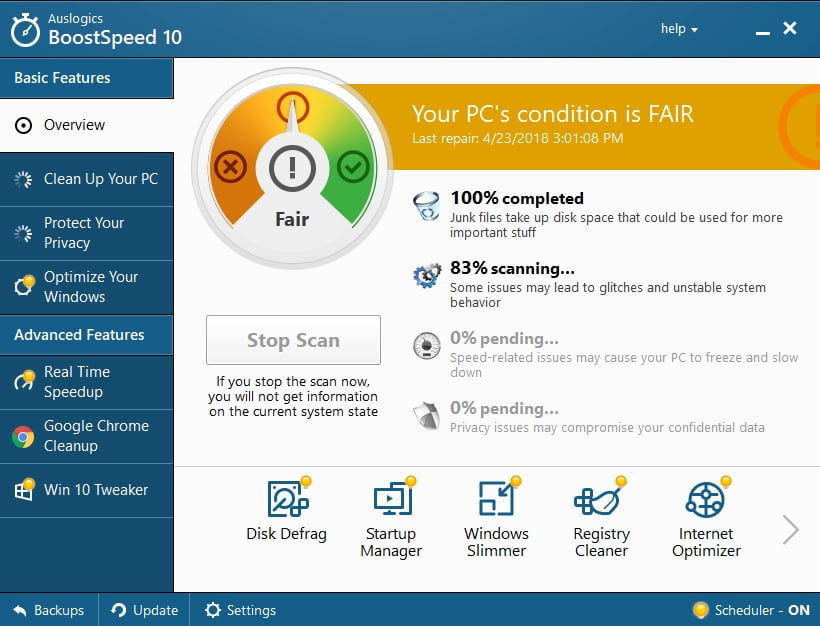
And finally, do not forget that using a VPN does not make your browsing 100 % safe – especially if you trespass on the websites your ISP considers worth blocking. So, stay alert, keep your software up to date, create and safely store strong passwords, and steer clear of phishing scams. Besides, consider using special software that will prevent security breaches and data leaks. For instance, Auslogics BoostSpeed will protect your privacy and improve the performance of your Windows 10 computer.
3. Switch to a public DNS
Changing your Domain Name System (DNS) settings is a reportedly effective workaround to get past Internet censorship and filtering.
By default, your computer automatically uses your ISP’s domain servers to resolve IP addresses. It’s at that level that censorship often occurs. Switching to a public DNS such as Google’s should fix the issue in this case.
Here is what you should do to make the trick work:
There are different methods for Windows 10 and 11.
Here’s how to change your DNS server on Windows 10:
- Go to your Taskbar -> Locate the Connection icon -> Right-click on it.
- Go to Network & Internet settings -> Select Change adapter options.
- Locate your connection -> Right-click on it and open Properties.
- Select Internet Protocol Version 4 (TCP/IPv4) and enter its properties.
- Once in the General tab, check Use the following DNS server addresses.
- Navigate to Preferred DNS server and set it to 8.8.8.8.
- Go to Alternate DNS server and input 8.8.4.4.
- Click OK to confirm your settings.
Follow these steps for Windows 11:
- Go to your Taskbar -> Locate the Connection icon -> Right-click on it.
- Click on Network & Internet Settings -> Select Advanced Network Settings.
- On the next page, scroll down to the Related Settings section and click on “More network adapter settings.”
- Locate your connection -> Right-click on it and open Properties.
- Select Internet Protocol Version 4 (TCP/IPv4) and enter its properties.
- Once in the General tab, check the “Use the following DNS server addresses” box.
- Navigate to “Preferred DNS server” and set it to 8.8.8.8.
- Go to “Alternate DNS server” and input 8.8.4.4.
- Click OK to confirm your settings.
Hopefully, now you are able to access restricted websites.
Nevertheless, ISPs are quite shrewd these days: some of them have their own ways to stop those who use public DNS servers from accessing blocked websites. Fortunately, there is no need to despair: you still have plenty of tricks up your sleeve – just keep reading and press on with your efforts.
4. Use IPs, not URLs
Although ISPs are notorious for blocking certain URLs, most IP addresses are not haunted this way. Here is how you can use this situation to your advantage:
- Press the Windows logo key + S to open the Windows Search bar.
- Type ‘cmd’ (without quotes) and select Command Prompt from the list.
- Run Command Prompt as an administrator (right-click on it and select the necessary option).
- Input the following command (without http://www.) and hit Enter:
tracert + the URL - Now you can see the IP address.
- Copy it. Then paste it into your browser’s address bar.
No luck? Then proceed to the following workaround – your triumph is yet to come.
5. Use proxy websites
Proxy websites may come as a godsend if the website you are trying to access has been blocked by your ISP. A proxy website is a third-party online service that will camouflage your IP and get you through the blockage so that you can get the information you need. The only problem is, this method slows down your connection, so make sure you have it in peak condition so far.
6. Use proxy browser extensions
Using a proxy browser extension is a nice way of cracking blockages and filters, so you are free to choose and add the best extension for you, depending on your browser. However, bear in mind that this solution limits the speed of your Internet connection.
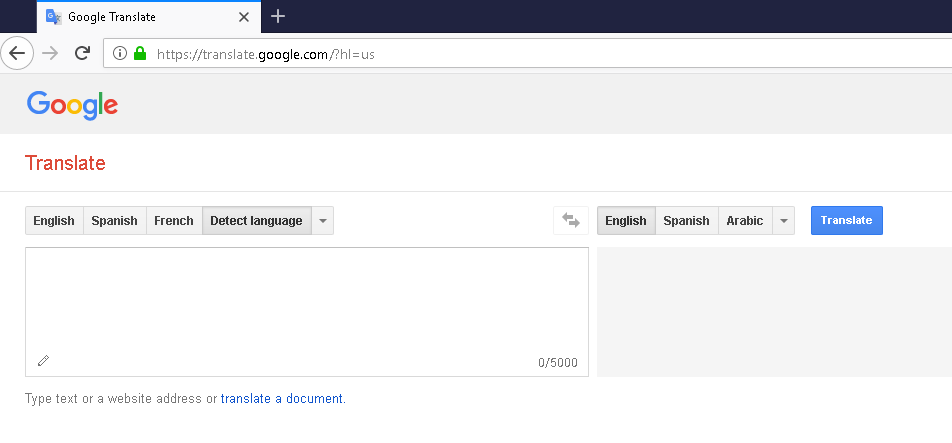
7. Utilize the Google Translate service
That is an awesome trick indeed: good old Google Translate can actually save your day by helping you bypass the restrictions imposed by your bossy ISP.
Here is what you should do:
- Open the Google Translate service.
- Type the URL of the website you wish to unblock into the text input field.
- Proceed to the text output field and set it to the language you wish to see on the desirable pages.
- Once the translation is done, the link in the translation field will become clickable.
- And voila, now you can see what you want through Google Translate.
8. Try Short URLs
This method is both simple and effective: just copy the URL of a blocked website and paste it into an online URL shortening service. The short version you will get is likely to lead you through the blockage.
9. Use HTTPS
Unfortunately, this solution will not work with all websites, but it is still worth a try. To move to the HTTPS option, do the following: launch your browser and replace your ‘http://’ address part with ‘https://’ or put ‘https://’ before the ‘www.’ part. Now you should be able to bypass the restriction.
10. Convert websites to PDFs
And here is another way how to unblock sites on a PC: you can use available online services to convert websites into PDFs, which will make the desired content accessible in the form of nice printable sheets.
11. Turn Off the Windows Firewall
Your firewall is responsible for protecting your computer from possible Internet breaches. It scrutinizes inbound and outbound connections, filtering out connections it considers to be malicious.
In this case, it may be blocking the website you’re trying to access. You can turn off the firewall to confirm this theory.
Follow these steps on Windows 10 and Windows 11:
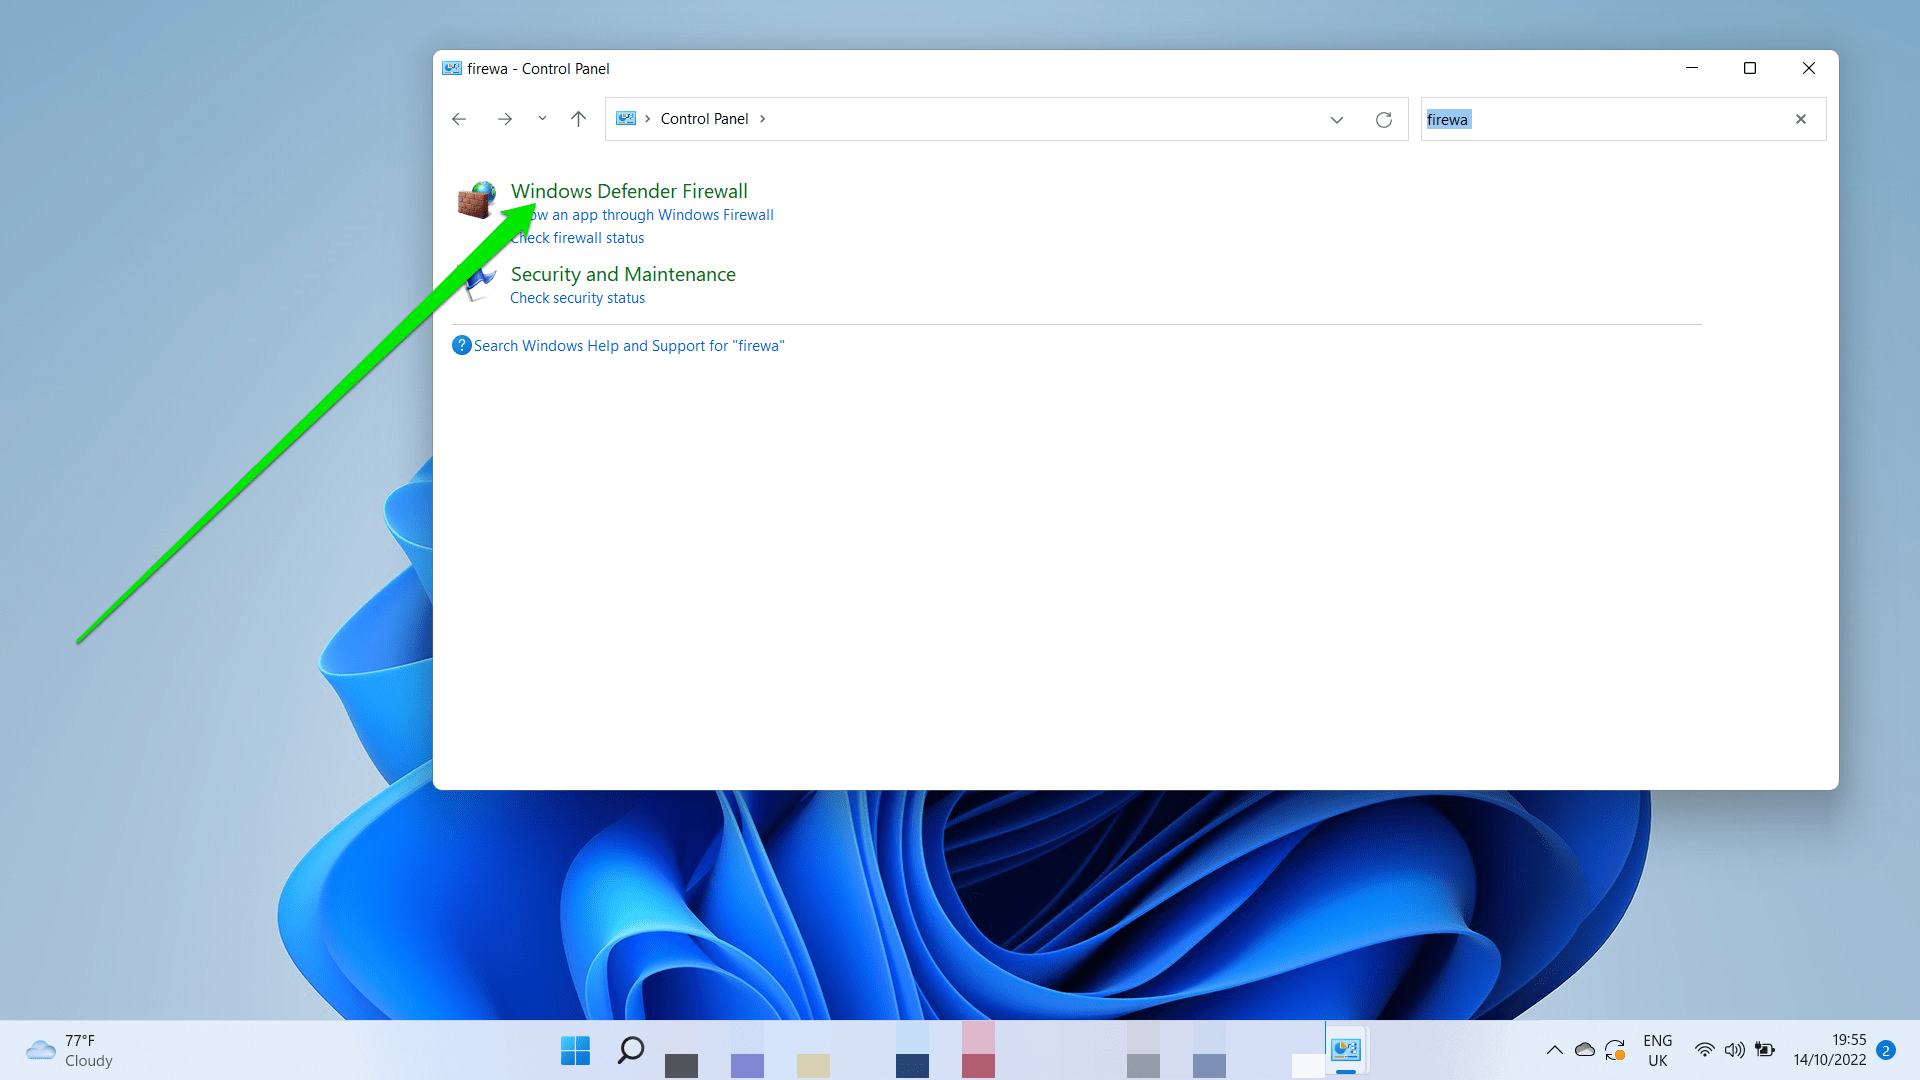
- Open the Start menu and type “Control panel.”
- Click on Control Panel in the search results.
- Once the Control Panel window opens, head to the search bar in the top-right corner and type “Firewall.”
- After the results appear, click on Windows Defender Firewall.
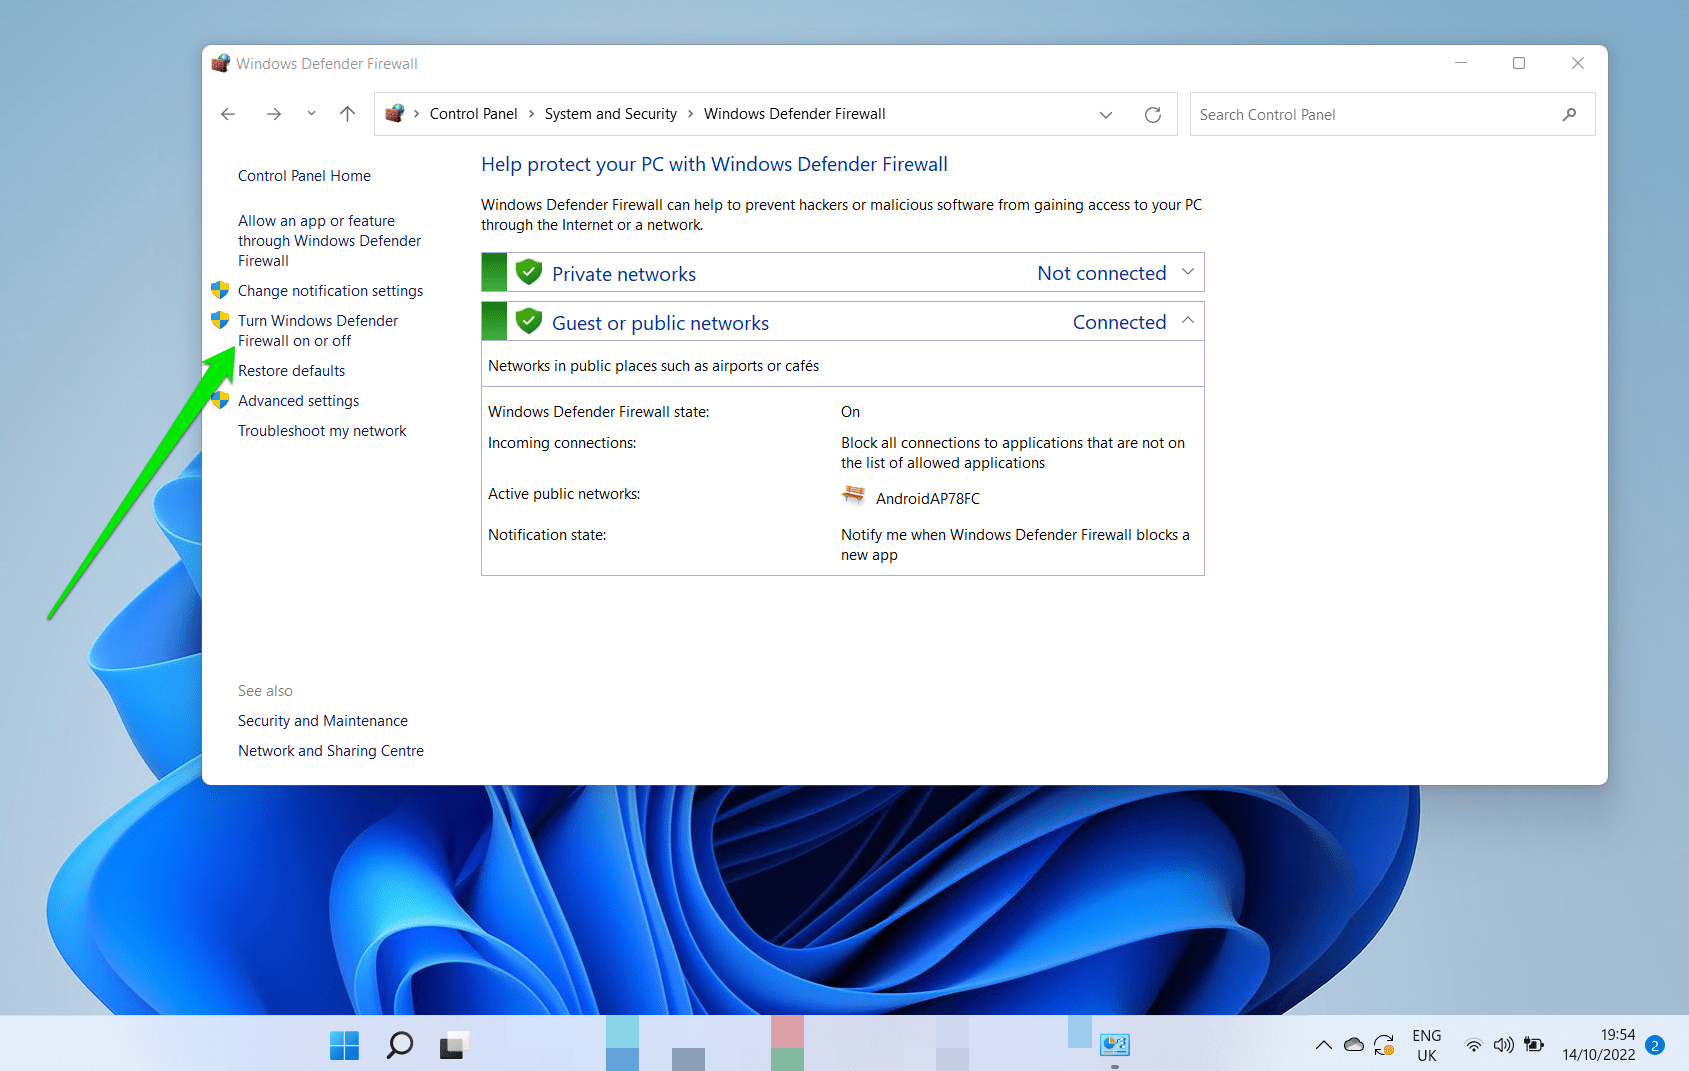
- When you see the Windows Defender Firewall page, head to the left pane and click on “Turn Windows Defender Firewall on or off.”
- On the page that follows, expand Private network settings and select the radio button for “Turn off Windows Defender Firewall.”
- Do the same for Public network settings.
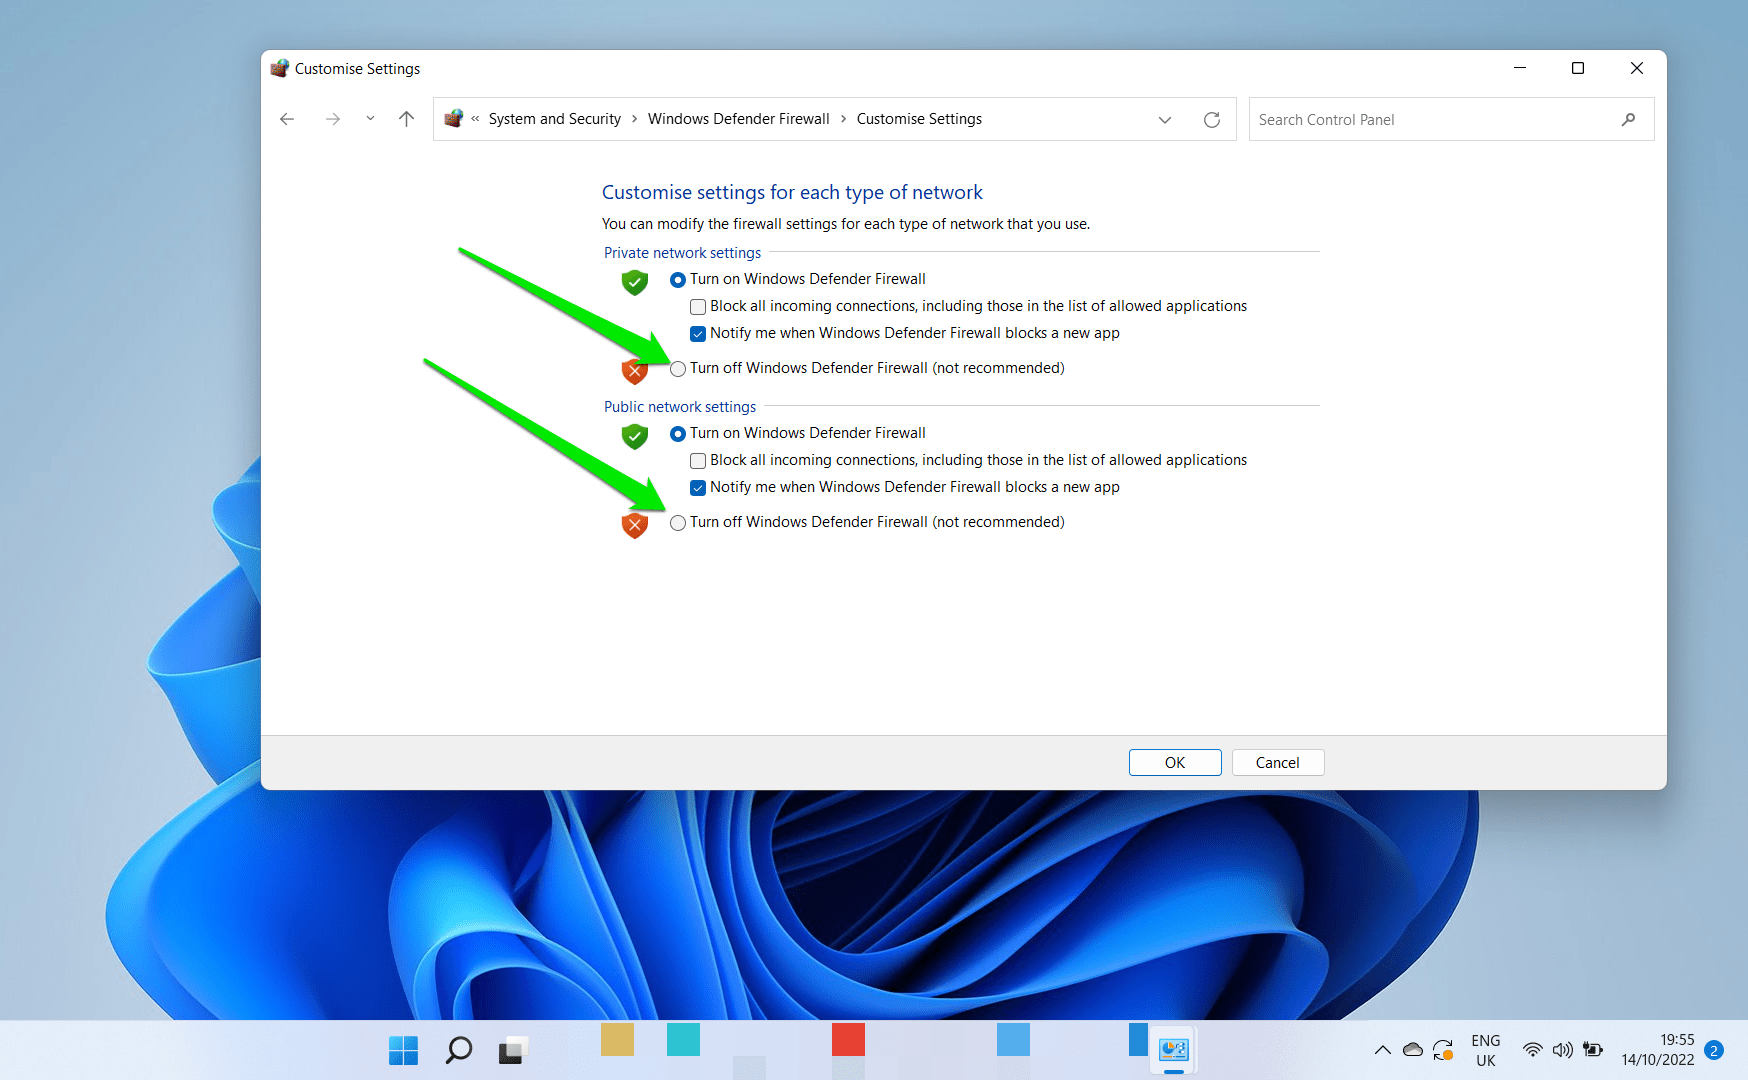
- Click on the OK button.
12. Flush Your DNS Cache
Your DNS cache is a file that contains the IP addresses of websites that you have visited or attempted to visit. The cache is built up using your DNS server. Whenever your system uses your default domain name server to resolve IP addresses, it stores the information in the DNS cache.
The cache could become problematic or out-of-date because the website you’re trying to visit has updated its IP address or moved to a new one. The cache may also contain blacklisted IP addresses, especially if you used your ISP domain server.
Since you’re now using a public DNS server, you can force your system to rebuild the DNS cache by flushing it.
Follow these steps:
- Press the Windows logo key + S to open the Windows Search bar.
- Type ‘cmd’ (without quotes) and select Command Prompt from the list.
- Run Command Prompt as an administrator (right-click on it and select the necessary option).
- Click on Yes in the confirmation prompt.
- Input the following commands and hit Enter after each:
ipconfig /flushdns
Ipconfig /registerdns
- Restart your computer and check for the problem.
13. Reset the Winsock Component
The Windows Socket component is an application programming interface that facilitates Internet connection for Wwindows applications through the TCP/IP. It lives in your computer as a dynamic link library containing different sets of configurations.
The tool may become corrupt and prevent some websites from loading properly. In some cases, it may trigger the error you’re experiencing. Resetting it to default settings can resolve the issue once and for all.
Here’s how to do that:
- Press the Windows logo key + S to open the Windows Search bar.
- Type ‘cmd’ (without quotes) and select Command Prompt from the list.
- Run Command Prompt as an administrator (right-click on it and select the necessary option).
- Click on Yes in the confirmation prompt.
- Input the following command and hit Enter:
netsh winsock reset
- Restart your computer and check for the problem.
14. Release and Renew Your IP Address
If the IP reserved for your computer by your router
for your computer
becomes problematic, you’ll start experiencing numerous issues, one of which is blocked or unreachable websites.
You can resolve the issue by releasing your current IP and requesting a new one from your router or Internet device.
The steps are simple:
- Press the Windows logo key + S to open the Windows Search bar.
- Type ‘cmd’ (without quotes) and select Command Prompt from the list.
- Run Command Prompt as an administrator (right-click on it and select the necessary option).
- Click on Yes in the confirmation prompt.
- Input the following commands and hit Enter after each:
ipconfig /release
ipconfig /renew
- Restart your computer and check for the problem.
15. Perform a Clean Boot
Performing a clean boot helps you determine if the problem is the result of app conflicts. Sometimes, programs and services that run at startup interfere with other processes, causing various problems.
The clean boot method involves starting your computer without allowing those startup services and programs to launch. Then you can check for the problem.
If you can connect to the website without issues, then one of those applications has been causing the issue.
Let’s show you how to run the clean boot and find the cause of the issue:
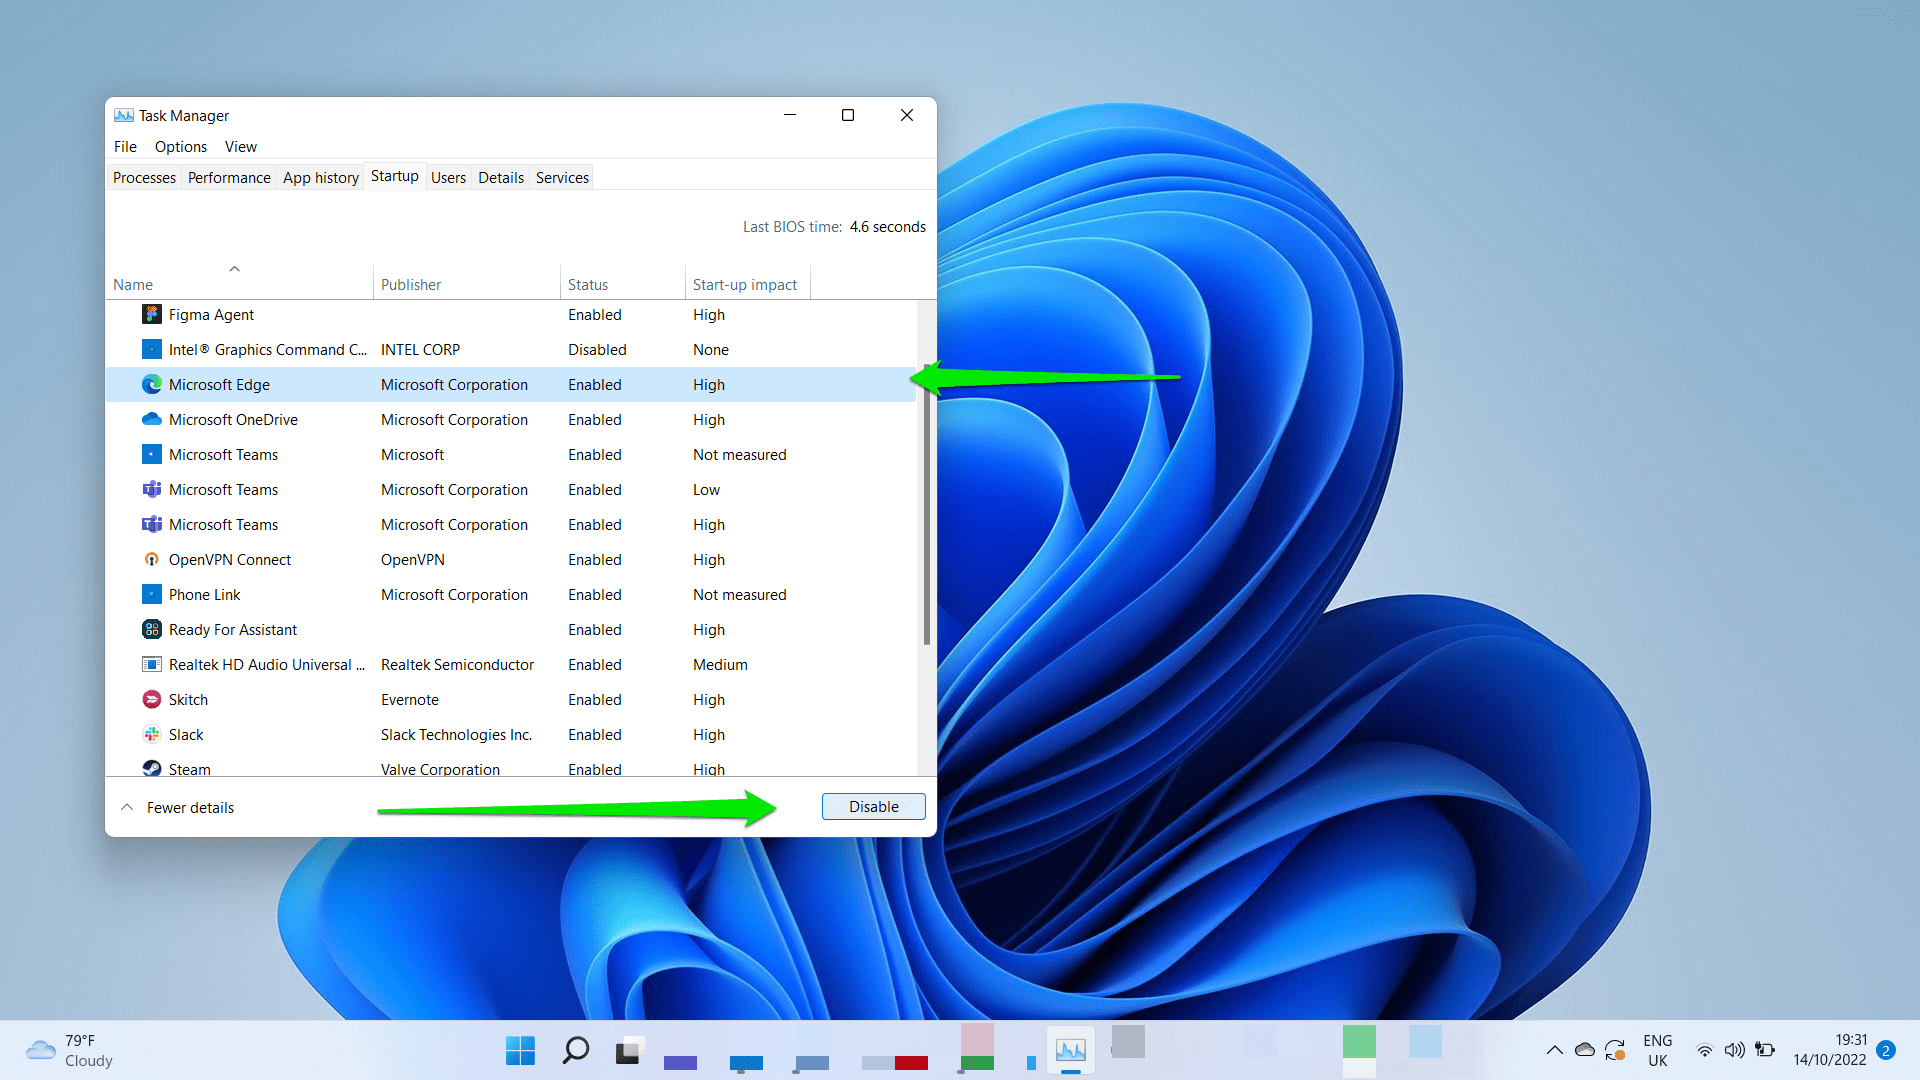
- Open the Task Manager. You can right-click the Start button and select Task Manager or use the CTRL + Shift + Esc shortcut.
- Go to the Startup tab after the Task Manager shows up. If you see the minimal view, click on More Details, then go to the Startup tab.
- You’ll now see the list of applications that are configured to launch on Startups.
- Click on each and select Disable. You’ll have to repeat this step for every app you want to disable.
Now, follow these steps to disable startup services:
- Go to the Start menu and type “system configuration.”
- Click on System Configuration in the search results.
- After the System Configuration window opens, head to the Services tab.
- Click on the check box beside “Hide all Microsoft services, then click on Disable All.
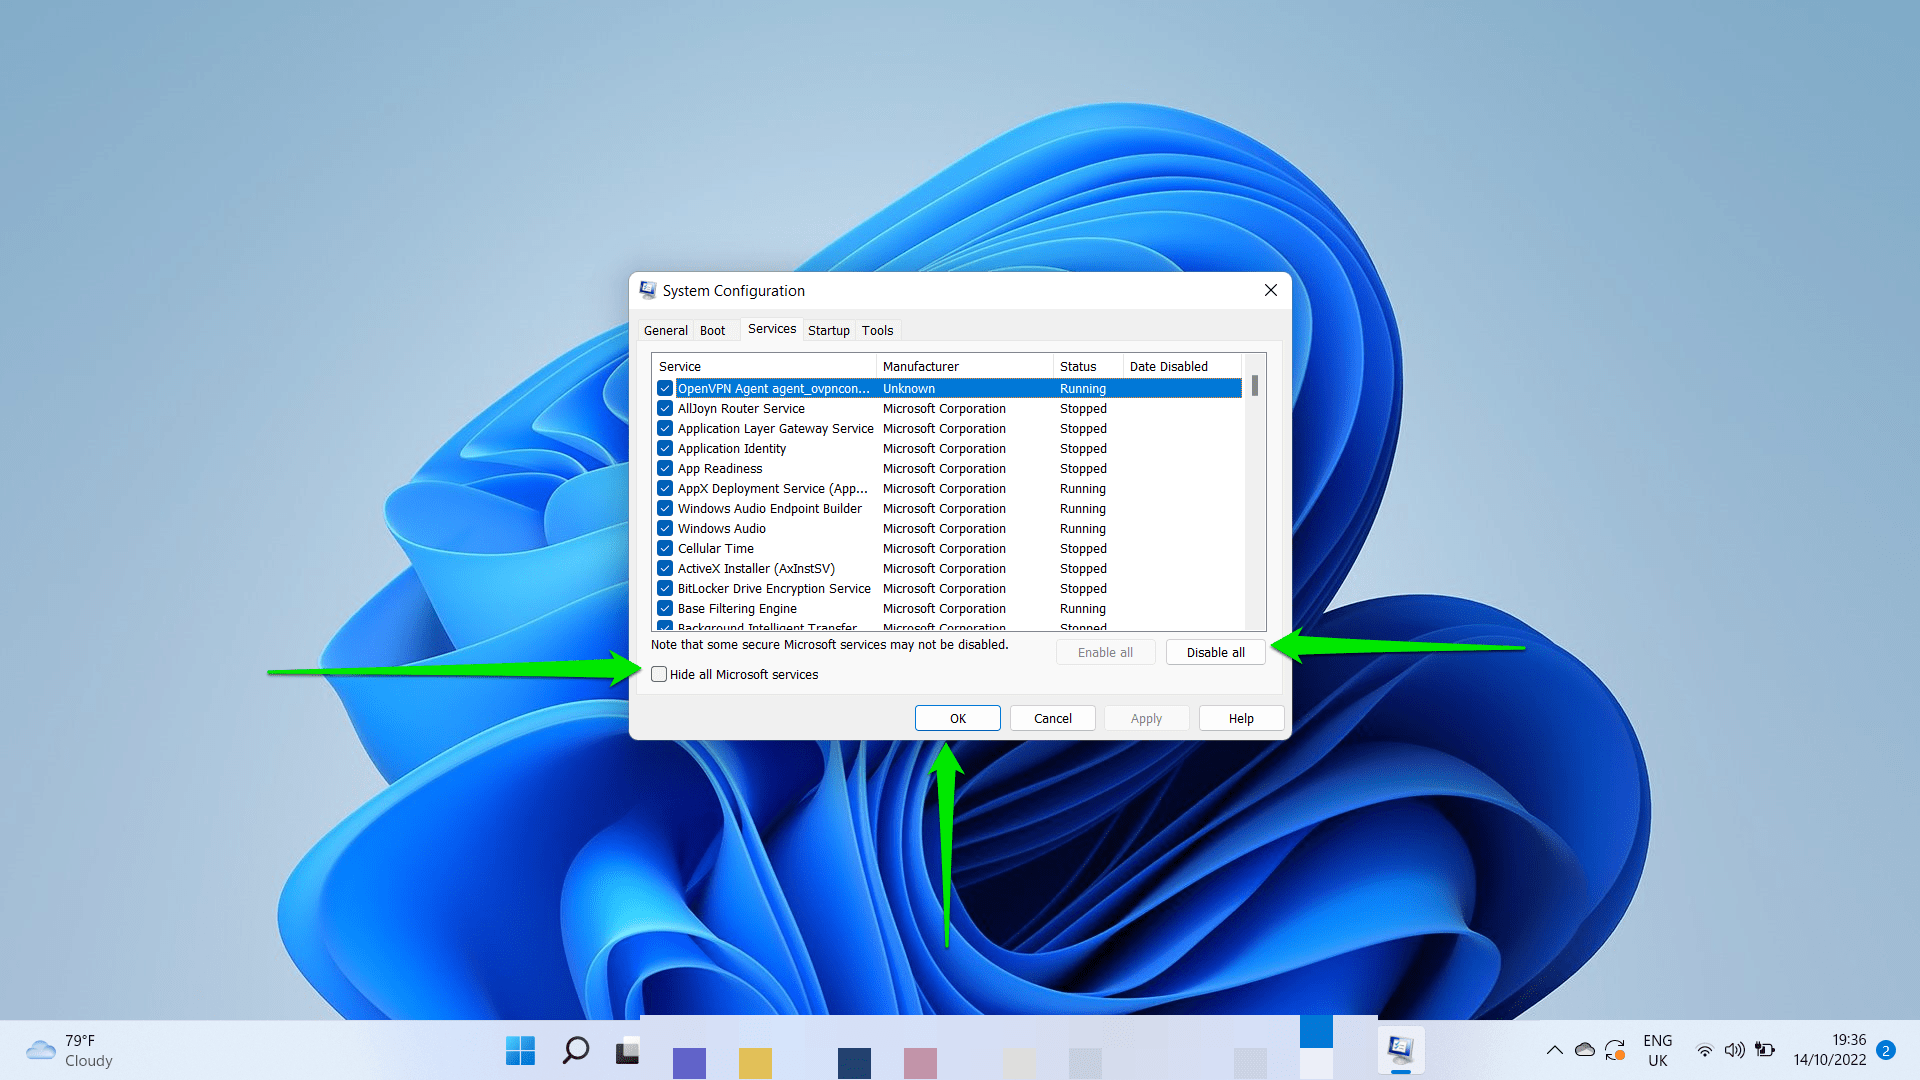
- Click on the OK button and restart your Windows 10 or Windows 11 PC.
Once your PC boots, open your browser and try opening the website. If the website loads without problems, you just confirmed that one of the programs or services has been preventing the website from loading.
You can find the responsible app or services by enabling each and checking for the problem. If the website stops loading right after you enable a particular service or program, then it’s the culprit.
You can cut your stress by enabling the entire startup services and checking. If the website still loads, then none of the services are responsible and you can start checking the programs. However, if the website stops loading, go through the services one after the other until the issue is resolved again. Note that the last service you disabled before the problem stoppeds is the cause of the problem.
16. Use Internet archives
No success so far? Well, this might mean your ISP has stolen a march on you and foreseen subterfuge. In a case like this, we advise you to search for digital archives that may store the copies of the web pages that you cannot access directly now.
That’s how to fix the Windows 11 blocking websites issue!
We hope you have managed to reach your coveted content.
Do you have any ideas or questions regarding this issue?
We are looking forward to your comments!


 Done! Great to see you among our subscribers!