- What Is Monitor Ghosting?
- Why Is a Monitor Ghosting?
- How to Know If a Monitor Is Ghosting
- How to Fix the Monitor Ghosting Issue
- How to Get Rid of Monitor Ghosting:
- Fix 1: Perform Some Preliminary Checks
- Conduct a Monitor Ghosting Test
- Inspect Your Monitor Cable
- Unplug Connected Devices
- Update Your Graphics Card Drivers
- How to Use Windows Update to Update Your Drivers
- How to Use the Device Manager to Update Your Graphics Card Driver
- How to Update Your Graphics Card Drivers from the Website of the Driver Manufacturer
- How to Use Auslogics Driver Updater to Update All Faulty Drivers on Your PC
- Fix 2: Modify the Display Settings on Your Monitor
- Fix 3: Check for Monitor Damage
- Fix 4: Upgrade to a Better Monitor
- Conclusion
Visual artifacts, anomalies, lagging effect, after-image, and distortions in a picture—these are some of the terms associated with monitor ghosting. No matter what you call it, this problem still diminishes your visual enjoyment.
If you are experiencing this issue on your PC, this post reveals some ideas that will help you resolve it/
What Is Monitor Ghosting?
It is when a moving object leaves traces of where it has been on your screen. Ghosting is a type of image artifact.
The ghosting effect occurs when your display cannot refresh pixels fast enough to keep up with images in motion, causing the picture to appear smeared.
Monitor ghosting can occur regardless of what you are doing on your PC. You could be using your browser, working on a Word document, watching or editing a video, or playing a game. However, the problem is maddening when it happens during gameplay. It can cost you the game, especially on hand-to-hand combats, races, or a first-person shooter.
Why Is a Monitor Ghosting?
A monitor’s low refresh rate, especially when combined with a high response time, causes ghosting. It is the fault of the monitor, not your operating system.
To be clear, refresh rate is the number of times your monitor can display new images within a second. It is expressed in Hertz. Most monitors have a 60 Hz refresh rate, meaning that they display 60 images in a second. The higher the refresh rate, the better your visual enjoyment.
Response time, on the other hand, is how many milliseconds it takes your display panel to shift colors – from black to white, or vice versa. Contrary to refresh rate, lower response times reduce image issues, such as ghosting.
How to Know If a Monitor Is Ghosting
You should not confuse monitor ghosting with other types of visual anomalies or artifacts. You might be experiencing one thing and think it’s the other. So, how can you tell whether your monitor is ghosting or if you are dealing with a different sort of issue entirely?
You need to know if your monitor has developed a critical issue that requires a more aggressive fix, which you won’t find in this guide.
Here’s what monitor ghosting is not:
- Image Retention: Image retention is when a past image leaves its reflection on your screen. The faded picture is not permanent. It often goes away when you turn off your monitor or PC for some minutes.
- Motion Blur: Motion blur is when an object and its surroundings become unfocused during movement, especially when the movement is fast-paced. It usually happens in games due to your in-game settings.
Monitors with a high refresh rate (Up to 120 Hz) have lower levels of motion blur.
Also, some monitor settings, such as ULMB (Mostly on NVIDIA G-Sync monitors), 1ms Motion Blur Reduction (On LG), and ELMB (On Asus) can help reduce motion blur.
Note: If Free-Sync or G-Sync is active on your monitor, you may lose motion blur reduction.
- Corona or Inverse Ghosting: Corona, also referred to as inverse ghosting or overdrive artifact, is when a bright halo appears on the borders of a character on your screen. It mostly occurs due to high levels of overdrive, which causes pixels to try changing color so quickly that they exceed the target color. You can fix it by lowering or turning off your overdrive settings.
- Burn-in: It is the permanent discoloration of your screen. The display panel retains an image, text, color, or other patches or patterns. The problem doesn’t go away when you turn off your monitor or PC. The discoloration is permanently ingrained on your screen. You’d have to change your hardware to fix it.
Go online and find resources that perform monitor ghosting tests. They’ll help you confirm the issue you are having.
Now that you are sure of the problem you are dealing with, we can go ahead and discuss how to fix monitor ghosting. Come along.
How to Fix the Monitor Ghosting Issue
The following issues could cause your monitor to ghost:
- A faulty monitor cable
- Interfering peripherals
- Non-optimal monitor settings
- Overclocking
- Outdated or corrupt graphics card drivers
- A low-quality or damaged monitor
The issue can be fixed quite easily. There’s no need to consider consulting a PC repair specialist just yet. Simply try the solutions below.
How to Get Rid of Monitor Ghosting:
- Perform some preliminary checks
- Conduct a monitor ghosting test
- Inspect your monitor cable
- Unplug connected devices
- Update your graphics card drivers
- Modify the display settings on your monitor
- Check the monitor’s refresh rate and response time
- Adjust your graphics card settings
- Disable Noise Reduction, Dynamic Contrast, Perfect Clear, and Motion Smoothing
- Overclock your monitor
- Check for monitor damage
- Upgrade to a better monitor
Let’s take the fixes one at a time until the issue is resolved. Let’s begin.
Fix 1: Perform Some Preliminary Checks
There are some prior checks you should make before modifying your monitor settings. These checks may resolve the monitor ghosting issue easily enough. You could only be experiencing a very minor problem. Try the suggestions shown below.
Conduct a Monitor Ghosting Test
As we mentioned, you need to verify that the display problem you are dealing with is in fact monitor ghosting. To be sure, there are several sites on the Internet that can test your monitor for ghosting. You can visit Google and type “Monitor ghosting test” (no quotes) and see what you come up with. Be careful not to visit malicious websites.
Some users suggest UFO Test/ Blur Busters UFO Motion Test. Running the test on the website will immediately show you whether your monitor is ghosting or not. If there’s no monitor ghosting, the result will show a green READY signal. However, if your monitor has an issue, the result displays an orange signal and shows you the problem(s) you have. It will also let you know if the issues are related to your monitor’s frames per second, pixels per second, refresh rate, and pixels per frame.
After performing the test, you can proceed to the preliminary fixes below. See if the monitor ghosting issue goes away.
Inspect Your Monitor Cable
The first thing you have to do is to check if your monitor cable is attached securely. A loose connection can cause display issues, including ghosting. If the cable is secure, the next thing you should do is inspect for damages. If the cable has any torn areas, is frayed, twisted, bent, or has rusty connection points, it can interfere with the signals. Consequently, your monitor’s response time will increase and cause the image artifact.
If you cannot find any visible damage, consider using a different cable to know whether there will be any difference.
Unplug Connected Devices
It’s possible for other peripherals to interfere with your monitor. Disconnect all devices, including your keyboard, mouse, printer, wired speakers and headsets, and so on. Don’t leave out any devices that are connected wirelessly. Remove them all and see if the ghosting issue will persist.
If it appears that one of your connected devices is triggering the monitor ghosting issue, inspect the cables for damages. Cables that have weak shielding can cause proximity interference, making your monitor misbehave when they are kept close by. Keep the devices away from your monitor and see if that helps. If any cables are damaged, replace them promptly.
Update Your Graphics Card Drivers
Gamers should never take their graphics device drivers for granted, and neither should any other PC user for that matter. Whenever your display is malfunctioning, one of the first things you should do is check if you have the latest graphics card drivers. Corrupt, missing, outdated, and incorrect drivers cause a myriad of issues that prevent you from gaining the best value from your PC.
Although ghosting is not a CPU or GPU problem, it is still a good idea to try updating your drivers. Before you even decide to search the web for how to fix monitor ghosting, you should get the latest drivers first.
There are several channels for updating your device drivers:
- Windows Update
- Device Manager
- The website of the driver manufacturer
- Third-party driver updater tools
How to Use Windows Update to Update Your Drivers
Windows 10 downloads and installs updates automatically. However, you can also initiate updates manually. Follow the steps below:
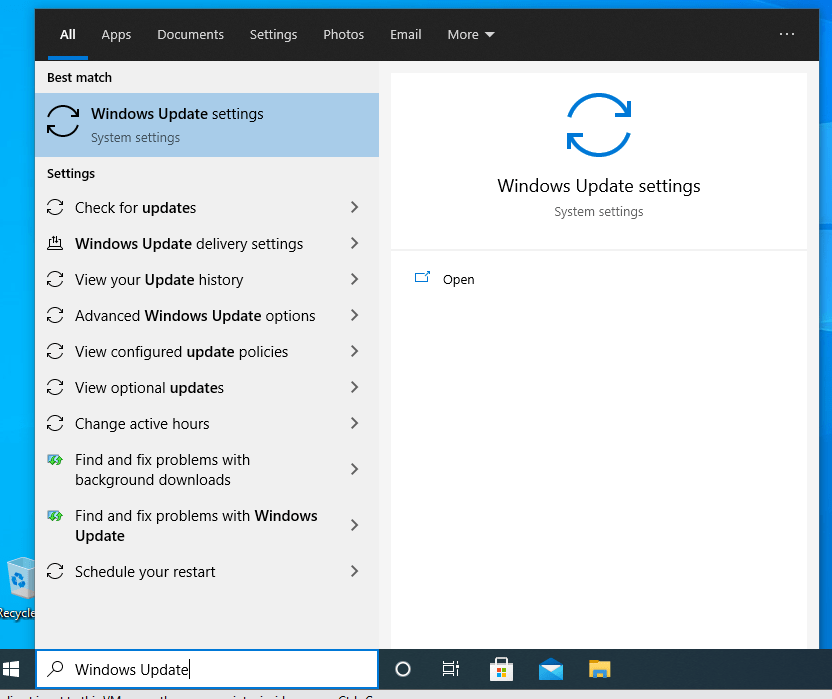
- Go to the Start menu by pressing the Windows key on your keyboard.
- Type “Windows Update” (no quotes) into the search box and click on the matching entry in the search results.
![Search for the Windows Update tool]()
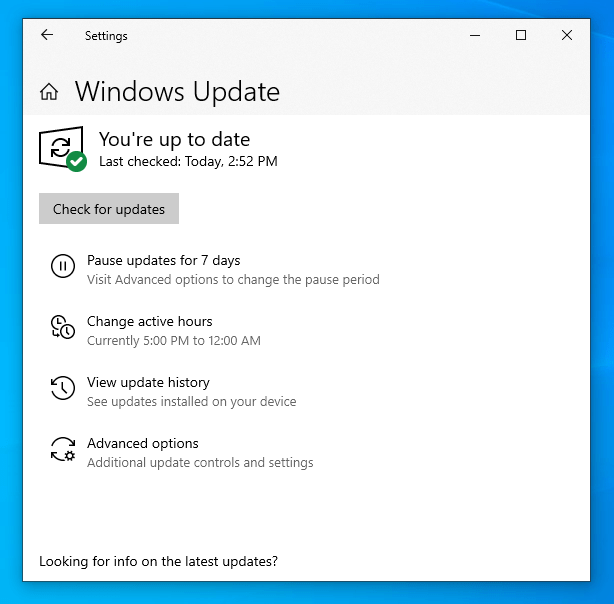
- Turn on your internet connection and click the ‘Check for Updates’ button. Wait for the system to find and install updates.
![Click on Check for Updates]()
- Restart your computer afterward.
How to Use the Device Manager to Update Your Graphics Card Driver
You can target the particular drivers you want to update using the Device Manager. Here’s how to update your graphics drivers:
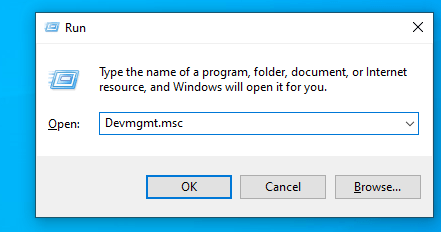
- Press the Windows + R keyboard combination to open the Run dialog box.
![Press Win+R to open Run]()
- Type “Devmgmt.msc” (no quotes) into the text field and press Enter or click the OK button to open the Device Manager.
![Open the Device Manager using Run]()
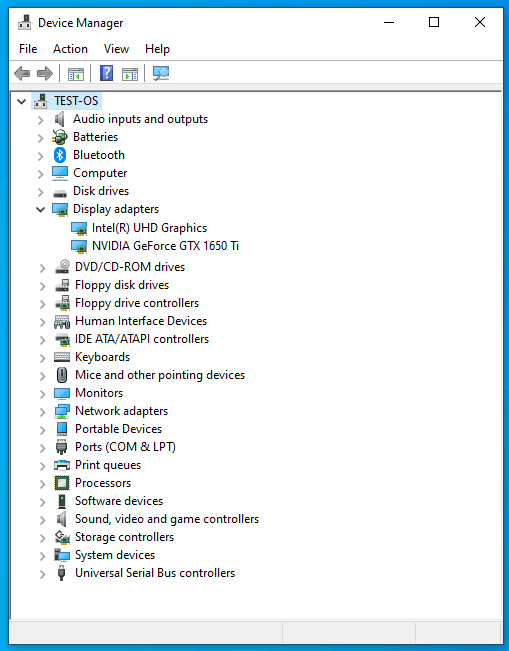
- Go to Display Adapters and click the drop-down arrow or double-click on the category to expand it.
![Navigate to Display Adapters in Device Manager]()
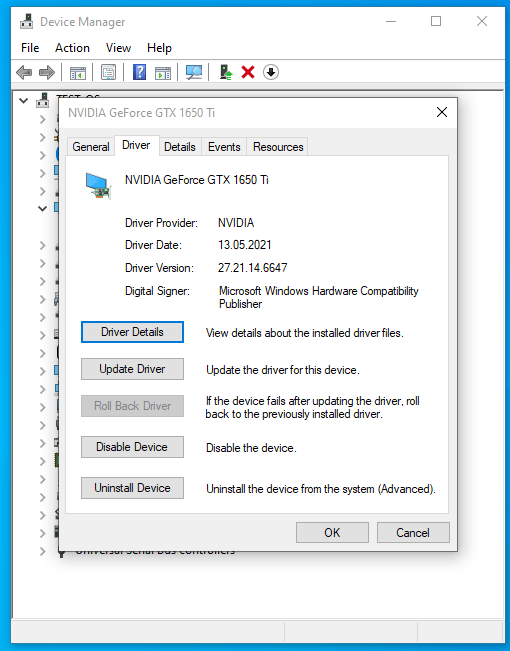
- Right-click on your display device in the list (i.e., NVIDIA or Intel), and click on Update Driver in the context menu.
![Click the Update Driver button]()
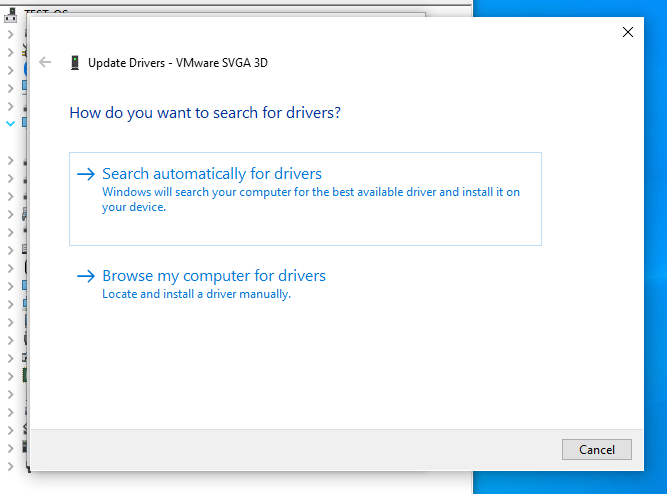
- Turn on your internet connection and select the ‘Search automatically for drivers’ option. The system will search for the latest driver version for your graphics card and install it.
![Search for new drivers automatically]()
- Restart your computer when the process is complete.

How to Update Your Graphics Card Drivers from the Website of the Driver Manufacturer
Windows Update and the Device Manager do not guarantee getting the most recent driver for your graphics card. You may be better off going directly to the Intel, NVIDIA, AMD, or your computer manufacturer’s website to get the latest driver software.
If you decide to use this method, it is crucial that you get the correct software for your device. Try finding out the exact specs of your PC, including the operating system details. To make things easier, you may want to use your graphics card’s control panel to download the latest drivers.
How to Use Auslogics Driver Updater to Update All Faulty Drivers on Your PC
Auslogics Driver Updater is a third-party app that can update your drivers automatically. Once installed, Driver Updater reads the specifications of your PC, including your operating system version and processor type. It then performs a scan to detect drivers that are missing, corrupt, outdated, faulty, or incompatible.
After the app is done scanning for driver issues, you can click the update button next to the item whose driver you want to update. In this case, it is your graphics card driver. It is mostly preferable to press the Update Drivers button on the interface. That option downloads and installs the latest software for all the devices on the list.
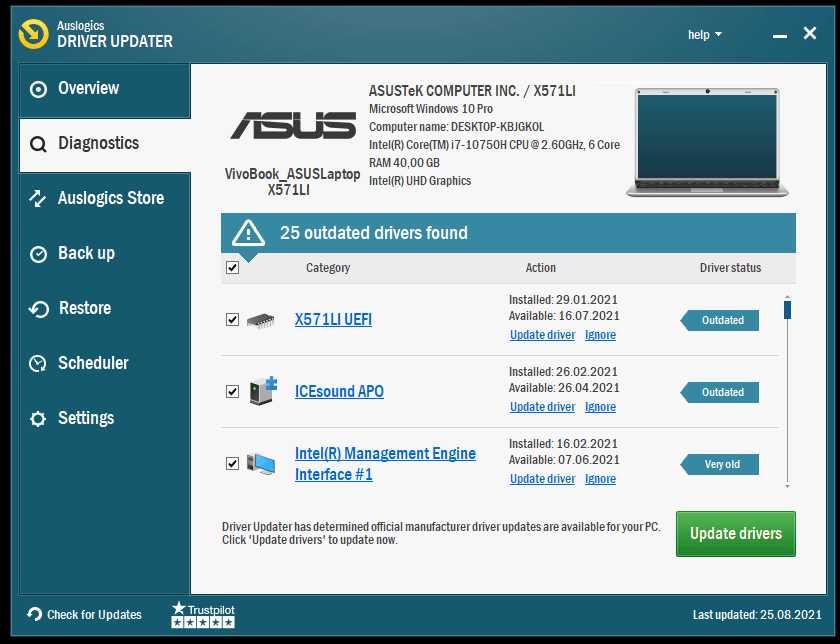
Driver Updater also keeps a backup before installing the new updates. The backup makes it possible to revert to older versions of your drivers if it ever becomes necessary.
If the graphics driver update didn’t correct your display issue, we can then go ahead and modify the settings on your monitor. Proceed to the fix below.
Fix 2: Modify the Display Settings on Your Monitor
The settings on your monitor are probably suboptimal. Adjusting them will help resolve the ghosting issue. There are a number of modifications that you can try. Find them below.
Check the Monitor’s Refresh Rate and Response Time
As we previously mentioned, a high response time and low refresh rate will cause ghosting on your monitor. You need to check those settings and ensure that they are set right. First, let’s go for the refresh rate.
How to Increase Your Monitor’s Refresh Rate
If your monitor has a higher refresh rate than what it is currently set to, then you should definitely turn it up. Follow the steps below to get it done:
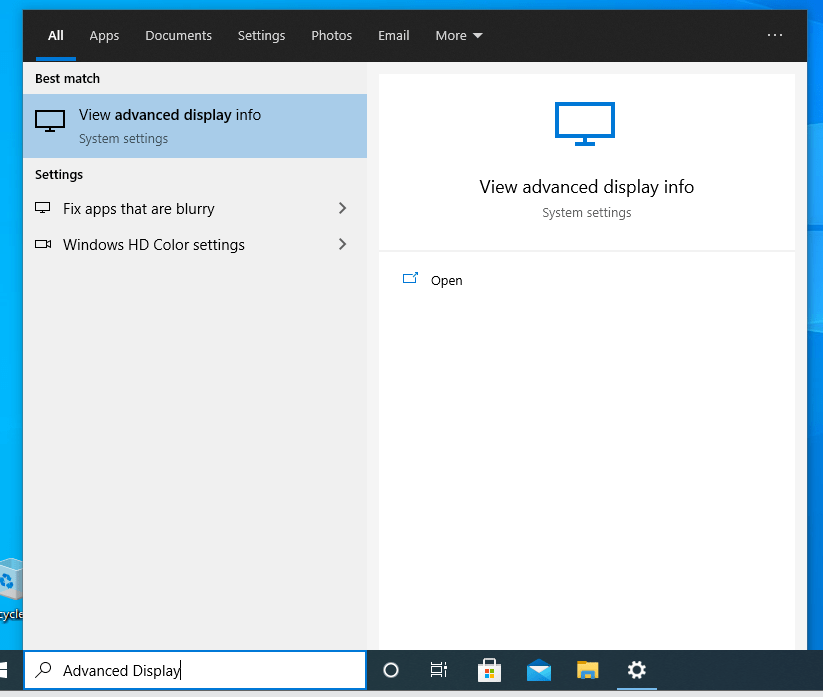
- Press the Windows button on your keyboard to open the Start menu.
- Type “Advanced Display” (no quotes) into the search box and click on the matching item in the search results. It will lead to the Settings app.
![Type Advanced Display into Search]()
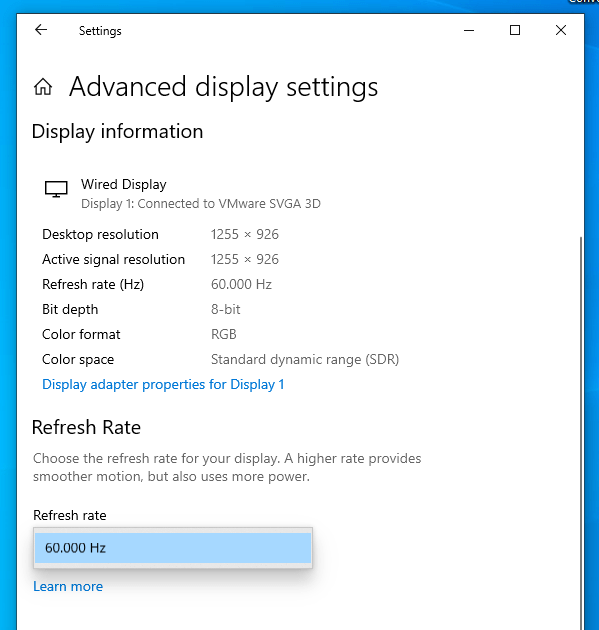
- On the Advanced Display Settings page, you will see your current refresh rate. If the option is available for modification, expand the drop-down and select the highest value in the list.
![See your refresh rate]()
- Afterward, close the Settings page and restart your computer. Then, check whether the ghosting problem is gone for good.
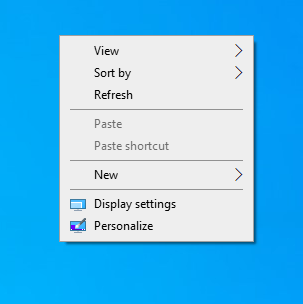
If you are using an earlier version of Windows, here’s how to adjust your display’s refresh rate:
- Right-click on a blank area of your desktop and click the Screen Resolution option in the context menu.
![Right-click on a blank area on your desktop]()
- When the Control Panel window opens, click the Advanced Settings link.
- In the Monitor tab of the box that opens, you’ll find your current refresh rate under Monitor Settings.
- Click the drop-down arrow and select a higher value. The higher the better.
- Click the Apply button.
- Click the OK button.
- Restart your computer.
Note: If you cannot change the refresh rate on your computer, it could be because you are using an HDMI cable. Most monitors will only allow you to adjust the refresh rate if you are using a DisplayPort cable rather than HDMI. If you have HDMI, make sure it’s High-Speed. If you are using an older HDMI cable, upgrade it. Also, your DisplayPort cable should be of high quality, having a 1.2 minimum rating.
How to Adjust Your Monitor’s Response Time
You’d likely experience ghosting if your monitor has a response time of 10 milliseconds or above. The recommended setting should be 5 milliseconds or lower, especially for a gaming PC. On some computers, there is a setting, known as overdrive, that affects your display’s response time.
Overdrive is also known as Advanced Motion Acceleration on LCD monitors. These monitor panels are known for switching liquid crystal molecules to different alignments. The action produces and transmits different levels of lighting to create an image. Turning down the AMA value dispenses lesser liquid crystal molecules, helping resolve the monitor ghosting problem.
Configuring these settings will put your display in order.
Follow the procedure shown below:
- Press the Menu button on your monitor.
- Search for the Response Time option and set it to a lower value.
-
The Response Time setting goes by different names according to your PC brand:
- On HP and Acer monitors, look for Overdrive in the menu and turn on the option. Adjust the value if possible.
- On BenQ monitors, look for the Advanced Motion Acceleration (AMA) option and turn it on. Set the value from High to Medium.
- On ASUS monitors, locate Trace Free and enable it.
Disable Noise Reduction, Dynamic Contrast, Perfect Clear, and Motion Smoothing
There are other monitor settings you should look into. You may succeed in resolving the ghosting issue by modifying these settings, especially if the ghosting happens when the picture on your screen is dark.
Go to your monitor’s or graphics card’s menu and try adjusting the following settings. See the effect they’ll have on the following:
- Noise Reduction
- Dynamic Contrast
- Perfect Clear
- Motion Smoothing
Modify Your Graphics Card Settings
If you have an NVIDIA graphics card, go to the control panel and try modifying the G-sync or ULMB (Ultra Low Motion Blur) settings. Observe the effect they have on your display. If you are using an AMD graphics card, locate the FreeSync option and find out how it affects your display.
Overclock Your Monitor
Overclocking your display can increase its refresh rate and lower the response time, eliminating monitor ghosting. Use a trusted third-party app to get it done. Ensure that you do not exceed the proper settings, since overclocking can also cause harm to your PC when done incorrectly.
If you’ve already overclocked your GPU before the ghosting started, consider undoing the setting and see if it was triggering the issue.
Fix 3: Check for Monitor Damage
You have to consider the age of your monitor. If the parts have become weak, you will experience various display issues. Older monitors have a limit on the visuals they can support. Consider taking the device to a repair expert and see if they can find any hardware faults. It’s even possible that the video port is damaged, and replacing it could be all you need. Check if you are still under warranty. If yes, then contact the vendor and let them fix the issue for you.
Fix 4: Upgrade to a Better Monitor
If your monitor is dated, you should definitely go for an upgrade.
Here’s what to consider when shopping for a new monitor:
- Go for a monitor that has a high refresh rate, preferably 120 HZ and above.
- The response time of the monitor should not be more than 5 milliseconds.
- The display should have a low input lag, preferably 1 milliseconds or less. Input lag is the time it takes for your monitor to record data input.
- Consider a Free Sync monitor if you are using an AMD graphics card or a G-Sync monitor if you are using NVIDIA.
- Go for IPS or TN panels rather than vertical alignment (VA) displays. The screen resolution should be 1920 x 1080 and above.
-
You can also ask your vendor for an anti-ghosting monitor so that they know the product to recommend to you.
Conclusion
Although monitor ghosting is not fatal, it greatly diminishes your user experience. It is particularly annoying if you use your PC for graphics-heavy tasks such as gaming, video creation and editing, image editing, and so on.
Hopefully, the suggestions in this guide will help you resolve the issue once and for all. Before purchasing a new PC or monitor, conduct your research to ensure that you buy the best product you can afford.
If you’ve benefited from this post, kindly drop us a comment in the section below. We would love to hear from you. You can also share further suggestions if you have any.
Make sure to visit our blog for more informative posts. See you there.


 Done! Great to see you among our subscribers!