- How to Fix the “Server DNS Address Could Not Be Found” Error
- Fix 1: Restart Your Router
- Fix 2: Run the Network Adapter Troubleshooter
- Fix 3: Resolve Network Adapter Driver Issues
- Here’s how to install Windows updates:
- Fix 4: Clear the Host Cache in Google Chrome
- Fix 5: Flush and Renew the DNS
- Fix 6: Configure Your DNS Server
- Fix 7: Delete Files in the ‘ETC’ Folder
- Fix 8: Restart the Internet Connection Sharing (ICS) Service
- Fix 9: Use a Virtual Private Network (VPN)
- Fix 10: Disable Internet Protocol Version
- Fix 11: Perform a DNS Client Service Reset
- Fix 12: Look Up the IP and Add It to the Hosts File
- Fix 13: Reinstall Google Chrome
![[FIXED] Server DNS address could not be found on Windows 10/11](jpg/server-dns-address-could-not-be-found.jpg)
Windows 8, Windows 8.1, and Windows 10 users have complained that when they try to access some websites on their browser, such as Google Chrome, they are presented with an error message that says, ‘Server DNS address could not be found.’
If you have encountered this issue on your PC, you may wonder what it means and how to get rid of it.
As you may well know, every website has a domain name and a numerical IP address. The IP (Internet Protocol) address is a series of numbers that represent a website. However, since it is difficult to memorize and enter a URL, the domain name, such as example.com, is used instead as it is more readable and easy to remember. Thus, whether you enter the numerical IP address or the human-readable domain name of a website, you will still arrive at the associated web page.
What DNS servers do is match the domain name of the website you want to visit with its associated IP address. This process happens quickly. However, if the DNS server fails to retrieve the IP address, then you get the error message that is being discussed here.
This problem often occurs in the following scenarios:
- The domain you are trying to access is down.
- The DNS server is not accessible.
- There is an IP address change at the server level, and your local cache is still returning the old IP address.
In this article, we’ll show you how to fix the “Server DNS address could not be found on Windows 11 and Windows 10” error.
How to Fix the “Server DNS Address Could Not Be Found” Error
The error might not prevent you from accessing all websites. Sometimes, it may appear on random pages, so you could still be able to perform searches on Google, but other sites, such as YouTube and Facebook, will fail to load.
The solutions we’ve presented below will help you resolve the issue. However, there is nothing you can do if the problem is due to a server misconfiguration of the web page you are trying to visit.
How to Fix the “Server DNS Address Could Not Be Found” Issue in Windows 10:
- Restart Your Router
- Run the Network Adapter Troubleshooter
- Resolve network adapter driver issues
- Clear the host cache in Google Chrome
- Flush and renew the DNS
- Configure your DNS server
- Restart the Internet Connection Sharing (ICS) Service
- Use a Virtual Private Network (VPN)
- Perform a DNS client service reset
- Disable Internet Protocol Version 6
- Look up the IP and add it to the Hosts file
- Reinstall Google Chrome
You can attempt these fixes in the order presented or according to your discretion.
Fix 1: Restart Your Router
The “server DNS address could not be found” error message may be showing because of a malfunctioning router or modem.
Sometimes, your router or modem may get stuck because its memory is clogged up. That’s why it’s recommended to restart your internet device from time to time. Rebooting it may free up the memory and allow it to function normally again.
You should reboot your computer while at it.
Unplug the router or modem from their power source. Then completely turn off your computer and unplug it from the wall socket.
Wait for about 2 minutes before turning your devices on again.
Fix 2: Run the Network Adapter Troubleshooter
Windows 10 and 11 come with built-in troubleshooters designed to fix different issues. Since you’re experiencing Internet connection problems, the issue may lie with your network adapter.
So, you can run the network adapter troubleshooter to fix conflicts and issues related to the device driver that may be triggering the issue.
Let’s start with running the troubleshooter on Windows 10:
- Open the Settings app.
- Head to the bottom of the Settings home page and click on Update & Security.
- Click on Troubleshoot in the left pane of the next page that shows up.
- Click on Additional Troubleshooters on the Troubleshoot page.
- On the Additional Troubleshooters page, go to “Find and fix other problems” and click on Network Adapter.
- Next, click on “Run the troubleshooter” and allow the tool to find and fix issues that may be causing the error.
Follow these steps to run the troubleshooter on Windows 11:
- Start the Settings app using the Win + I shortcut.
- Scroll through the System options and click on Troubleshoot.
- Once the Troubleshoot page appears, select Other Troubleshooters.
- Go to the Other section and click on the Run button beside Network Adapter.
- Allow the tool to check for issues with the network adapter and fix them.
Fix 3: Resolve Network Adapter Driver Issues
The first thing you have to do is to make sure your network adapter driver is not missing or faulty. This driver is responsible for establishing communication between your computer and your network connections. Therefore, the DNS error can occur if your network adapter driver is corrupt, incorrect, outdated, or not properly installed.
You can proceed by updating the driver. We will look at the different methods you can use to get that done.
Perform a Windows Update
Windows Update is a Microsoft service that provides patches, service packs, and other updates for your operating system, ensuring that it keeps functioning optimally. It also updates driver software for your hardware devices, including the network adapter driver. Therefore, installing Windows updates is one way to get the latest drivers that are compatible with your device.
Here’s how to install Windows updates:
- Open the Settings app on your computer by pressing the Windows icon + I combination on your keyboard.
- Click on Update & Security on the page that opens and then click on Windows Update in the left pane of the subsequent page.
- Now, click on the ‘Check for updates’ button on the right-hand side. The operating system will detect new updates and then download and install them.
- Restart your PC to complete the process.
You can also check for drivers using the Windows Update client. Follow these steps:
- Once you open the Windows Update client, click on the View Optional Updates link.
- After the Optional Updates window appears, expand the Drivers section to display the list of available driver updates.
- Scroll to your network adapter’s driver and mark its checkbox.
- Click on the Download and Install button.
Follow these steps to update your Windows 11 PC:
- Head to the Start menu and click on the Settings icon or right-click the Start menu and select Settings.
- After you see the Settings page, head to the top-right corner and click on Windows Update. You can also go to the left pane and click on Windows Update.
- Click on the Check for Updates button once the Windows Update screen appears.
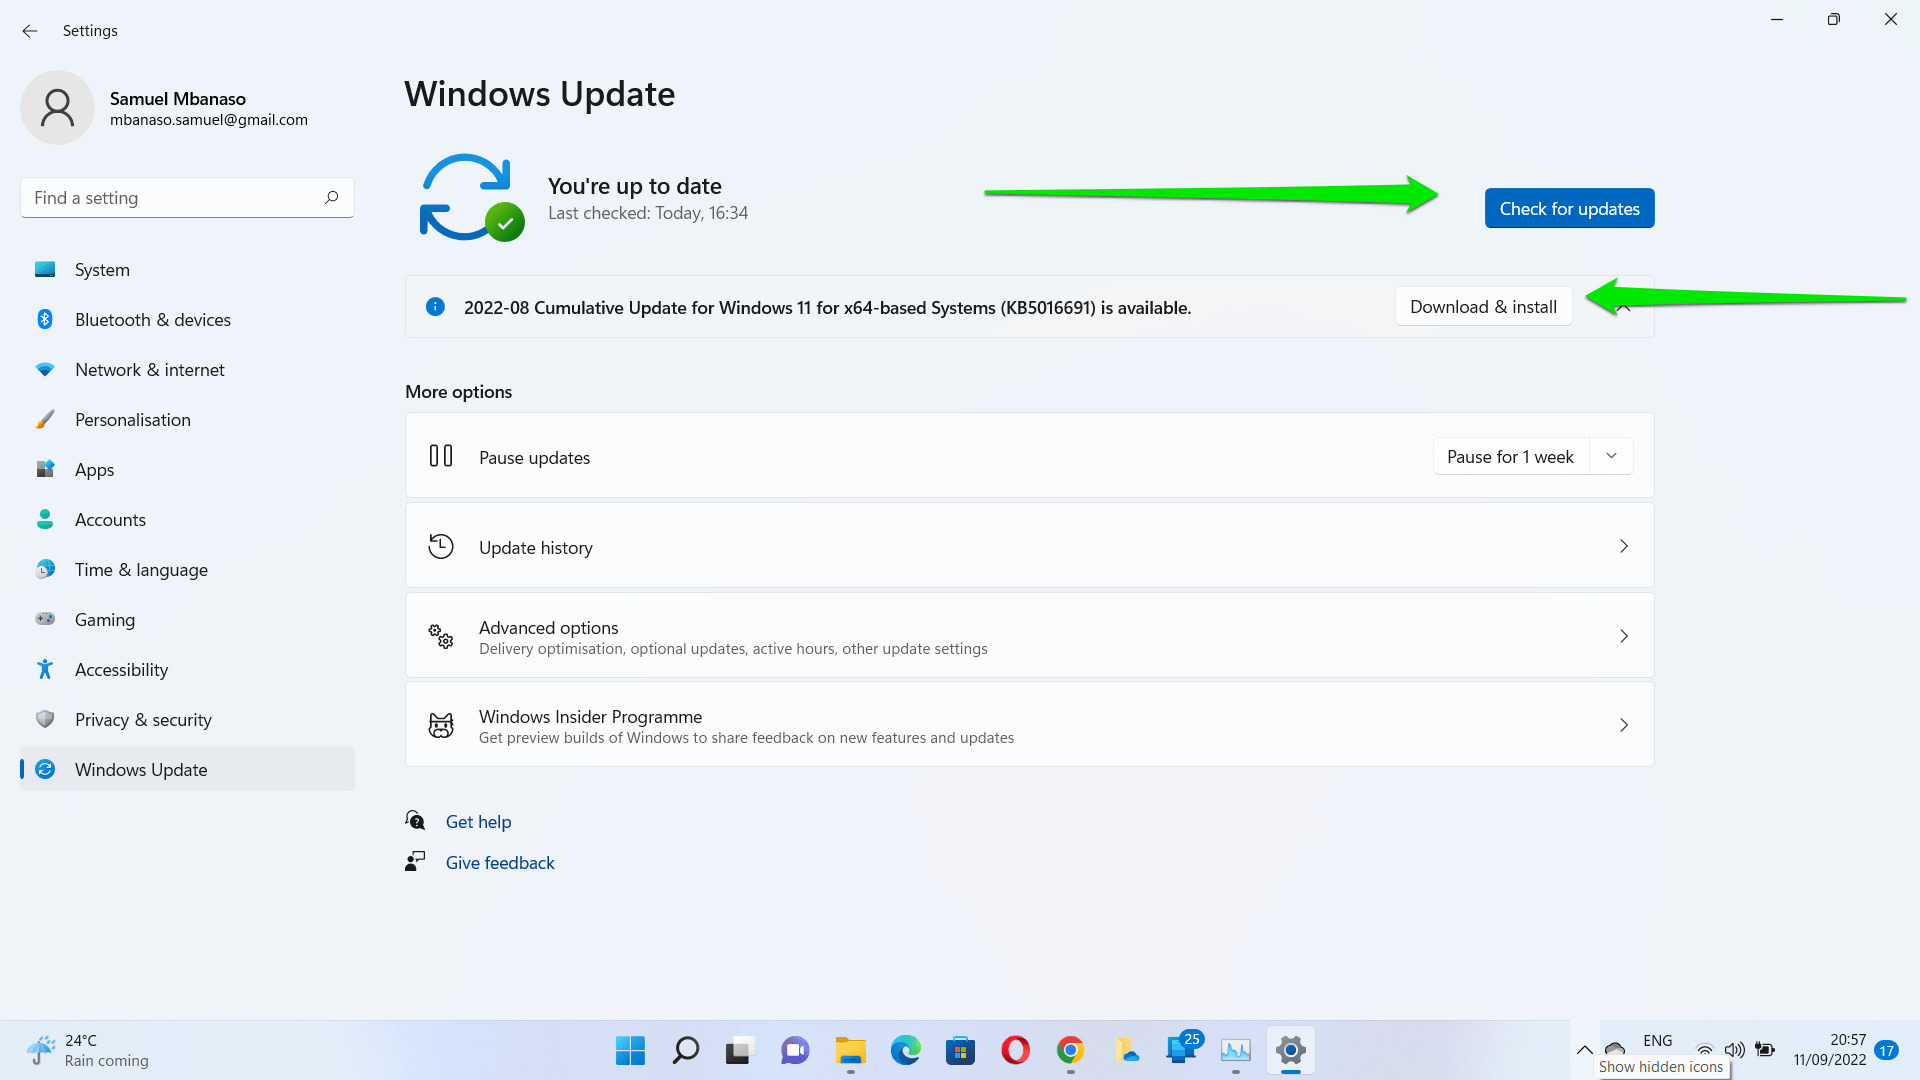
- Windows update will now search for the latest available updates for your PC and download them.
- The client may ask you to click on the Download and Install button if the downloads are large.
- Windows update will attempt to install the updates once it completes the downloads. That said, you may have to restart your PC to complete the installation.
To look for optional updates in Windows 11, follow these steps:
- Go to the Windows Update page and click on Advanced Options under More Options.
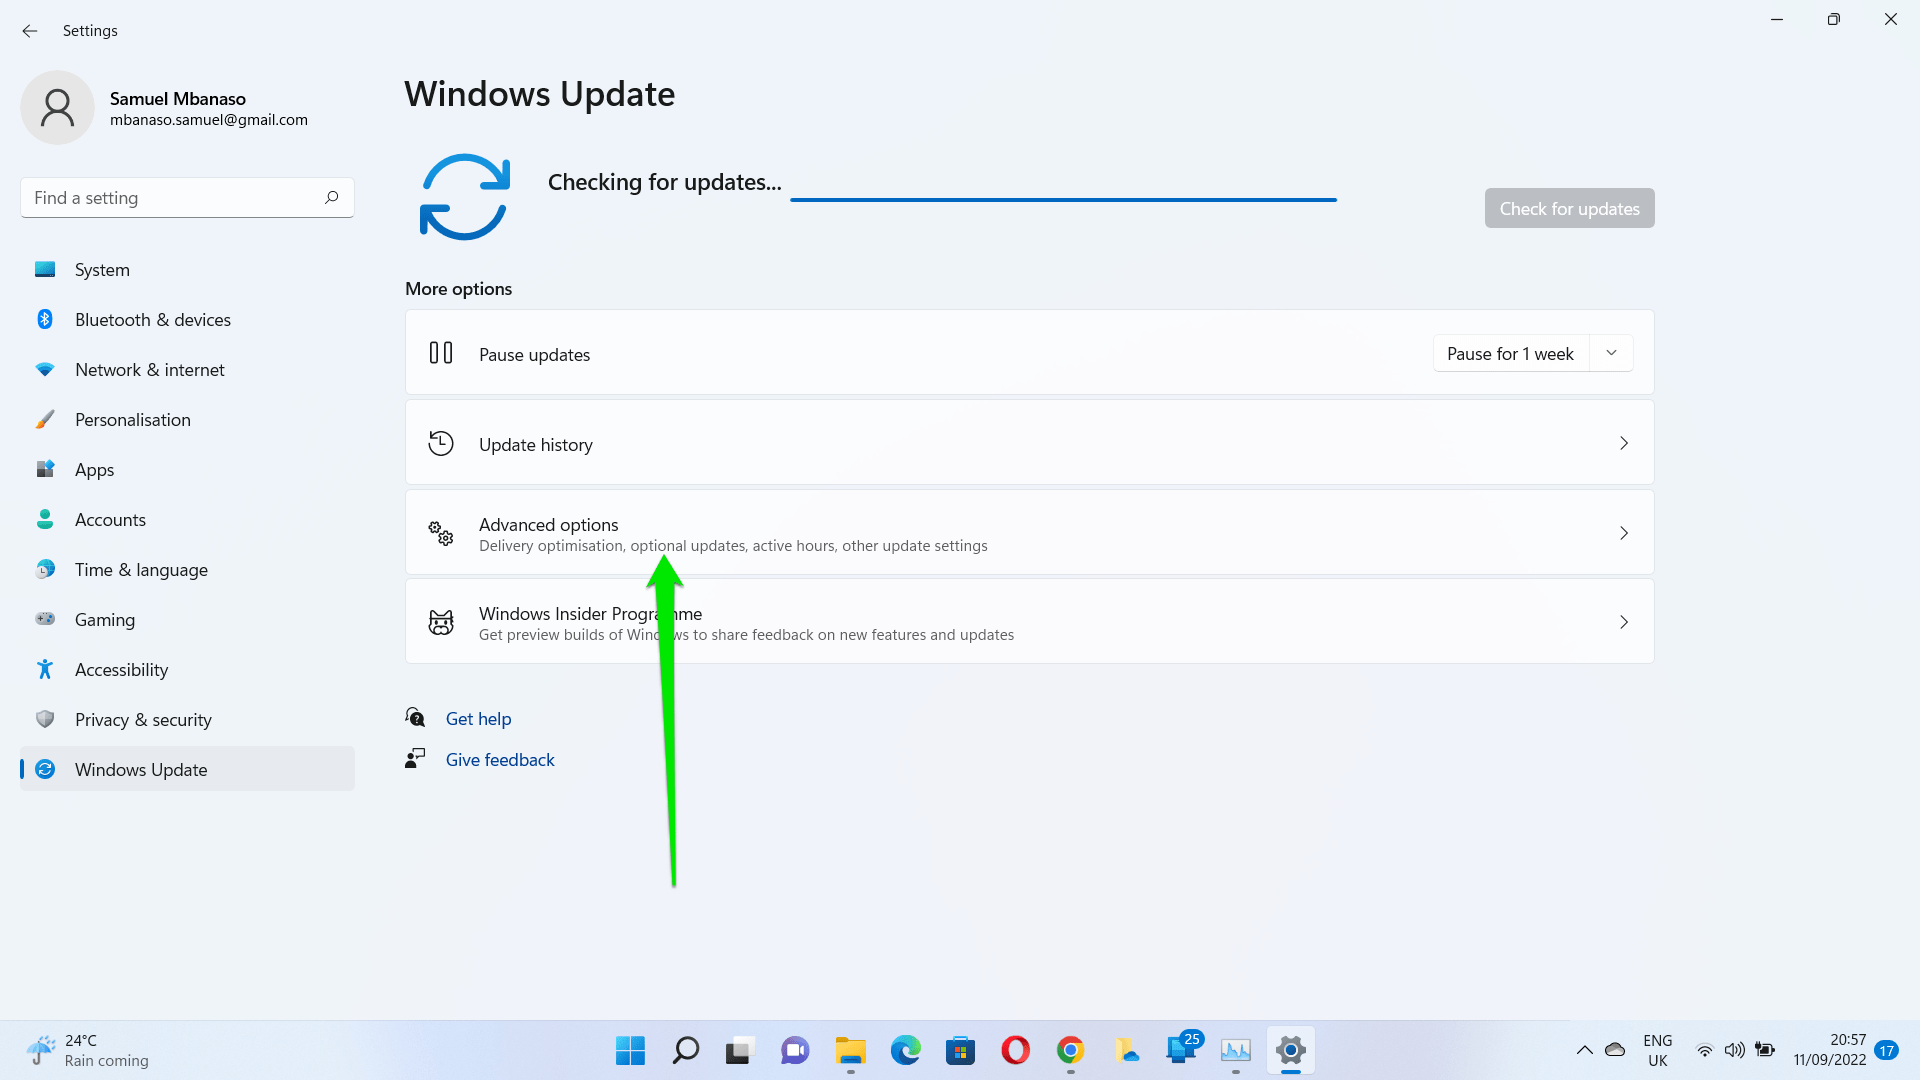
- On the Advanced Options page, go to the Additional Options section and click on Optional Updates.
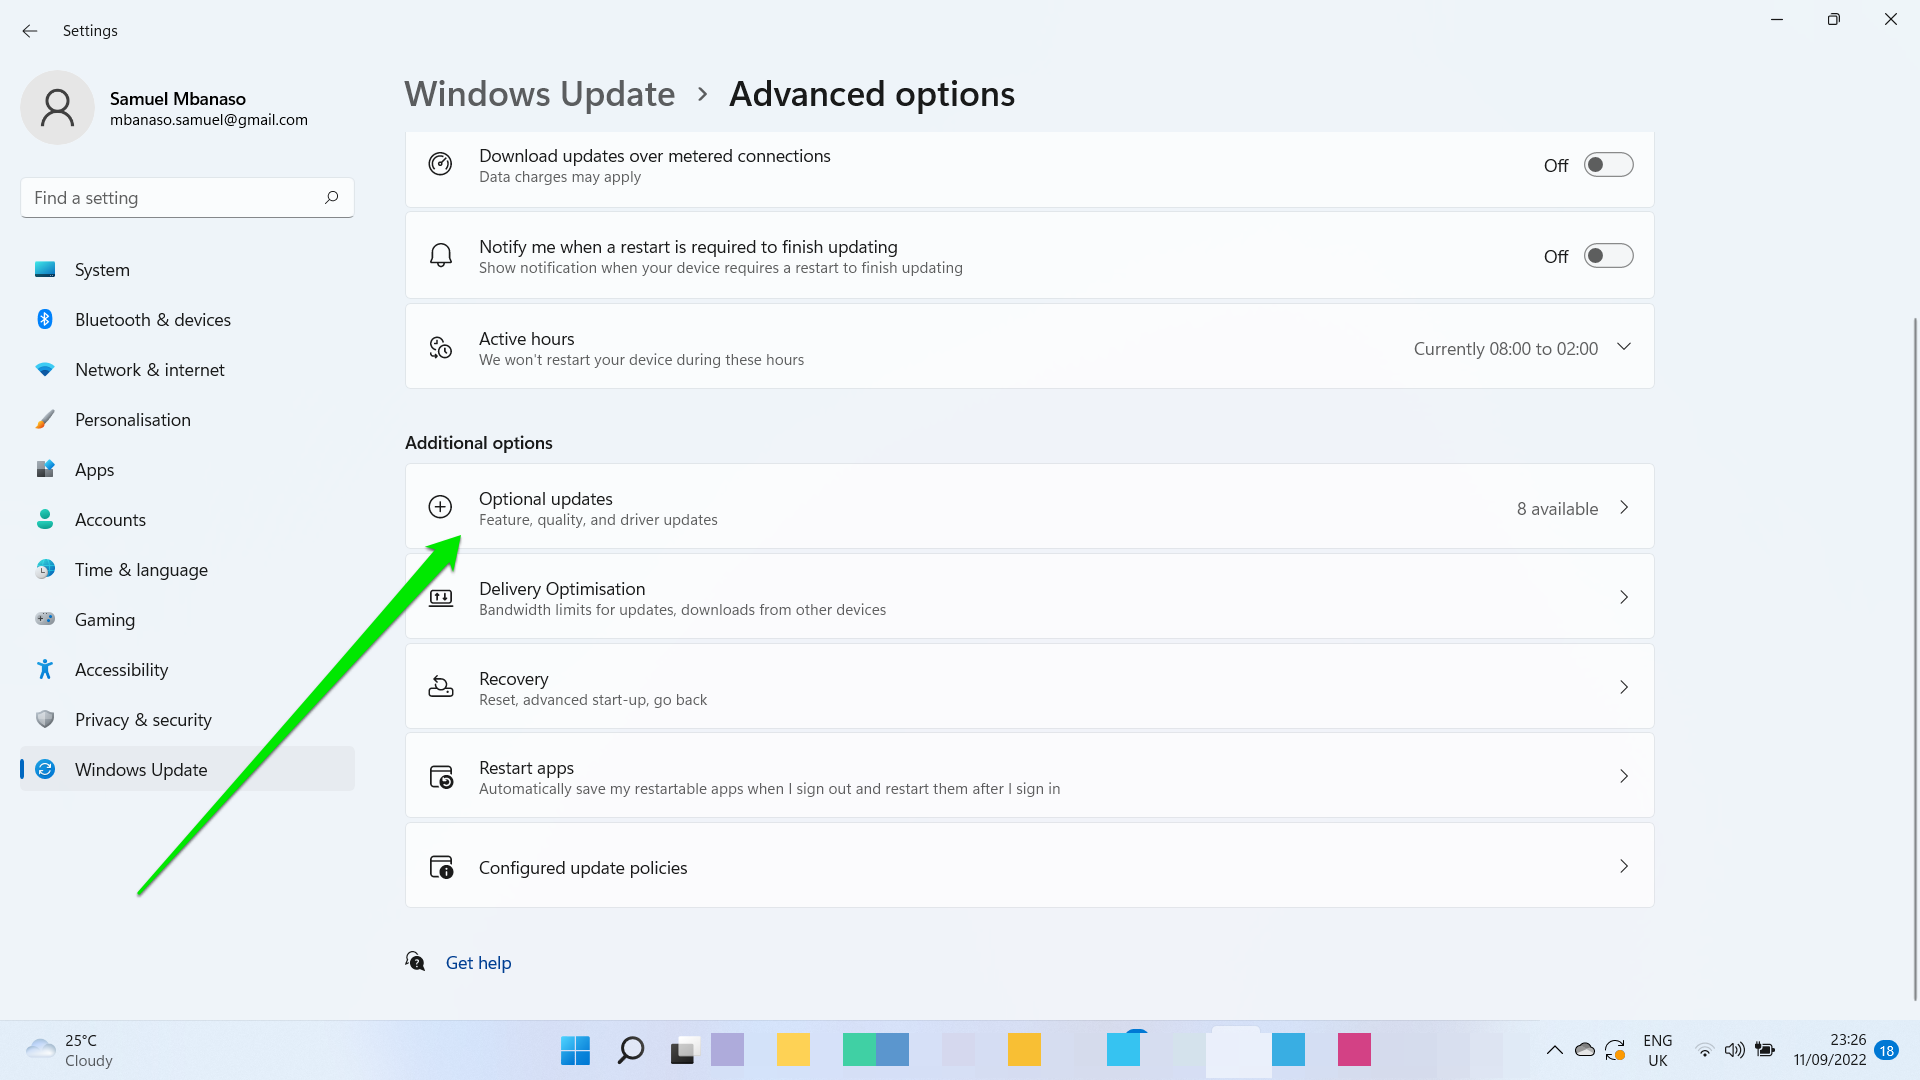
- Expand the Driver Updates list to see the available driver updates.
- Search for your network adapter and select its checkbox.
- Click on the Download and Install button.
Update the Network Driver through the Device Manager
Since you are only interested in updating your network adapter driver and might not care about updating other Windows components, you can go straight to the Device Manager and update the desired driver right away. Follow the easy steps below:
- Open the Run accessory by pressing the Windows icon + R keyboard combination.
- Type ‘Devmgmt.msc’ into the search field and hit Enter on your keyboard or click the OK button on the Run accessory.
- Once the Device Manager window opens, locate ‘Network Adapters’ and expand it by double-clicking on it or clicking the arrow next to it.
- Right-click on your network adapter device and select ‘Update Driver Software’ from the context menu.
- Opt for ‘Search automatically for updated driver software.’ The system will search your computer and the internet for the updated version of your driver and then download and install it.
- Restart your computer when the process is complete.
If the driver is already updated, you can try reinstalling it. When you right-click on your device in Step 4, click on Uninstall Device. After you restart your computer, the system will reinstall the driver.
Visit the Website of Your Device Manufacturer
Another option is to visit your PC manufacturer’s official website, search for the latest version of your network adapter driver, and download it. Then go to the location where the file was saved on your computer and run it.
Keep in mind that this method requires that you know the specifications of your computer in order to ensure that you get the correct driver. It is likely that the website will have a wizard that will detect the specs automatically. However, if you are not confident about this method, you can always use an automatic driver updater to handle your driver issues.
Update Your Drivers with an Automatic Tool
This is the easiest and most efficient method of updating your device drivers. Using a tool such as Auslogics Driver Updater ensures that you won’t run into driver-related problems on your computer. Driver Updater runs a complete scan of your system and detects missing, corrupt, incorrect, and outdated drivers, allowing you to update any or all of them. Since it automatically detects the specifications of your device, you are sure of getting the correct drivers that are required for the proper functioning of your computer. It also runs a backup before the update so that you can readily roll back to the previous versions of your drivers if ever necessary.
Roll Back Your Driver
If you performed an update just before the ‘Server DNS address not found’ issue started, you can try rolling back your network adapter driver. The new driver version might be faulty, thus causing the error.
Fix 4: Clear the Host Cache in Google Chrome
The error message that appears when you try to visit a website could be caused by third-party extensions and plug-ins in Chrome. So, in this case, the best way to resolve the issue is to clear the host cache, which is probably corrupt or full.
Follow the steps below to complete the procedure:
- Launch your browser.
- Click the hamburger menu (the vertically arranged three dots in the top-right corner of your browser page) and select “New incognito window” from the context menu.
Tip: The shortcut for opening a new incognito window is to press Ctrl + Shift + N on your keyboard.
- Once the incognito window opens, type “chrome://net-internals/#dns” (the quotation marks are not included) into the address bar and hit Enter.
- You will find the ‘Clear host cache’ button on the page that opens. Click on it.
- Afterward, try again and see if you can now browse the web normally. The ‘Server DNS address could not be found’ error message will no longer appear. However, if it still does, there are other fixes yet to try.
Fix 5: Flush and Renew the DNS
When you visit a website, Windows automatically stores its IP address, allowing you to access the website faster next time. However, you encounter issues, such as the ‘Server DNS address could not be found’ error, when the cache gets corrupt or outdated. Flushing and renewing the DNS resolves this. You will have to run a couple of commands in an elevated command prompt. Simply follow the steps presented below:
- Press the Windows icon key on your keyboard to bring up the Start menu. You could also click the Windows icon on your screen.
- Type ‘Command prompt’ into the search bar. The option will appear in the results. Right-click on it and then click on ‘Run as administrator.’
Alternatively, you can open the Command Prompt (Admin) option through the WinX menu. To do so, press the Windows logo key + X combination or right-click on the Windows icon on your screen. When the menu appears, locate and click on Command Prompt (Admin).
- You will be presented with a User Account Control (UAC) prompt that requests you to confirm letting Windows Command Processor make changes to your computer. Click the ‘Yes’ button to proceed.
- Now, enter the following commands in the CMD window and press enter after you type or paste each one:
- ipconfig /flushdns
- ipconfig /renew
- ipconfig /registerdns
- netsh int ip reset
The above command lines will flush the DNS and renew/reset TCP/IP.
- Afterward, restart your computer and see if the server DNS address issue has been resolved.
Fix 6: Configure Your DNS Server
Ensure that your DNS (Domain Name System) server settings are configured correctly. Otherwise, you won’t be able to connect to the internet. Follow the steps below to configure the DNS server settings on your computer.
Here is how to change the DNS server settings in Windows 10:
- Call up the Run accessory by using the Windows icon + R keyboard combination.
- Type ‘Control Panel’ into the search field on the dialog box and then click the OK button or press Enter on your keyboard.
- Expand the ‘View by:’ drop-down menu that is displayed in the top-right corner of the Control Panel page. Select ‘Small icons’ on the menu.
- Scroll through items on the list. Locate and click on ‘Network and Sharing Center.’
- Click on ‘Change adapter settings.’ It is displayed in the left pane.
- On the page that opens, right-click on your connection (whether Wireless Network Connection or Local Area Connection) and select Properties.
- Locate and click on ‘Internet Protocol Version 4 (TCP/IPv4)’ under the ‘This connection uses the following items’ category. Make sure that the checkbox beside the item is marked. Then click on the ‘Properties’ button.
- See that you are in the General tab once the Properties box opens. Select the ‘Use the following DNS server address’ option.
- Try using Google’s public DNS. The service and servers are owned and maintained by Google. Enter the settings as presented below:
- Preferred DNS server: 8.8.8.8
- Alternate DNS server: 8.8.4.4
Alternatively, you could use the following settings:
- Preferred DNS server: 208.67.222.222
- Alternate DNS server: 208.67.220.220
- Click the OK button to effect the changes.
- Launch your browser and see if you can now visit a website without the ‘Server DNS address could not be found’ error popping up.
Note: You can also carry out the above procedure through the Windows Settings app:
- Press the Windows icon button + I combination on your keyboard to invoke the Settings page.
- Click on Network & Internet. Then click on your connection type in the left pane of the new page.
- Now, click on the ‘Change adapter options’ link in the left pane.
- Right-click on your connection and select Properties in the context menu.
- Locate ‘Internet Protocol Version 4 (TCP/IPv4)’ under the ‘This connection uses the following items’ list. Ensure that the checkbox for it is marked. Select it and then click the Properties button.
- Select the ‘Use the following DNS server addresses’ option in the General tab and enter the following addresses:
- Preferred DNS server: 8.8.8.8
- Alternate DNS server: 8.8.4.4
- Click the OK button to save the changes.
Follow these steps on Windows 11:
- Press the Windows icon button + I combination on your keyboard to invoke the Settings page.
- Select Network and Internet in the left pane and click on Advanced Network Settings.
- Once the Advanced Network Settings page opens, scroll down to Related Settings and click on “More network adapter options.”
- Right-click on your connection and select Properties in the context menu.
- Locate ‘Internet Protocol Version 4 (TCP/IPv4)’ under the “This connection uses the following items” list. Ensure that the checkbox for it is marked. Select it and then click the Properties button.
- Select the “Use the following DNS server addresses” option in the General tab and enter the following addresses:
- Preferred DNS server: 8.8.8.8
- Alternate DNS server: 8.8.4.4
- Click the OK button to save the changes.
Afterward, open your Google Chrome browser and see if the error message will still appear when you try visiting a website. The issue will have been resolved. However, if it persists, move on to the next solution.
Fix 7: Delete Files in the ‘ETC’ Folder
The Hosts file is a text-based file (which means that you can make changes to it by using a text editor) that was designed to serve the purpose that DNS servers now serve, i.e. to map IP addresses to their domain names. Another use for the Hosts file is that it speeds up your browsing. If your DNS server is down or not fast enough, you can choose not to rely on it and instead manually enter the domain name and IP address mappings in your Hosts file so that your computer can quickly find the addresses.
The Hosts file is contained in the etc folder on your computer. Some users have reported that deleting the contents of the etc folder helps resolve the ‘Server DNS address not found’ issue. Follow the easy steps below to get it done:
- Press the Windows icon button + I button on your keyboard to open File Explorer on your computer.
- Navigate the following path to get to the etc folder:
C: > Windows > System32 > drivers > etc
Tip: To get to the folder quickly, copy the path and paste it into the bar at the top of the File Explorer window. Then hit Enter.
- Now, once you are in the etc folder, click on a blank area and press Ctrl + A to select all the items. Then press Delete on your keyboard or right-click on one of the highlighted items and select Delete from the context menu.
- When prompted, click the ‘Yes’ button to confirm the deletion.
Afterward, close File Explorer and launch Chrome. Try visiting a website and see if the error message has been resolved.
Fix 8: Restart the Internet Connection Sharing (ICS) Service
The internet connection sharing service is a Windows service responsible for name resolution, network address translation, and intrusion prevention, especially if you use an office or a home network.
The error may be showing up because this particular service is malfunctioning or not running. So, restarting the service should potentially resolve the problem.
Thus, follow these steps to restart the service on Windows 10 and Windows 11:
- Open the Start menu and search for “Services.”
- Click on the Services app in the search results.
- After the Services app shows up, scroll to the Internet Connection Sharing (ICS) service and click on it.
- Go to the upper-left corner of the Services window and click on the Stop button.
- After the service stops, click on Start.
Fix 9: Use a Virtual Private Network (VPN)
If you encounter the server DNS address issue when trying to visit a website, using a VPN could help resolve it. The Internet Service Provider (ISP) may have blocked the website’s DNS. You can get some reputable VPN software and bypass the restriction. Make sure to obtain it from a trusted source to avoid infecting your computer with viruses and other malware.
Fix 10: Disable Internet Protocol Version
IPv6 is the most recent version of the Internet protocol. However, IPv4 is still commonly used today.
As it turns out, some DNS servers and websites are not yet compatible with IPv6, which could be the cause of the DNS error you’re experiencing.
You can fix the problem by disabling IPv6 from your network adapter settings.
Follow these steps:
- Call up the Run command dialog box by using the Windows icon + R keyboard combination.
- Type ‘Control Panel’ into the search field of the dialog box and then click the OK button or press Enter on your keyboard.
- Expand the ‘View by:’ drop-down menu that is displayed in the top-right corner of the Control Panel page. Select ‘Small icons’ on the menu.
- Scroll through items on the list. Locate and click on “Network and Sharing Center.”
- Click on “Change adapter settings.” It is displayed in the left pane.
- On the page that opens, right-click on your connection (whether Wireless Network Connection or Local Area Connection) and select Properties.
- Locate and untick the checkbox for “Internet Protocol Version 6 (TCP/IPv6)” under the “This connection uses the following items” category.
- Now, click on the OK button and check for the error.
Fix 11: Perform a DNS Client Service Reset
Windows services serve the purpose of managing your system resources and system settings. They also run the programs on your computer. You can modify these services through the “Services” accessory on your computer. This allows you to troubleshoot problems and also improve security and performance.
You may be able to resolve the issue you are facing with the server DNS address by restarting the DNS client service on your computer.
The DNS client service registers a name for your computer and caches Domain Name System identifiers. If the service is deactivated, your computer’s name will not be registered and the DNS name query results will not be cached, although DNS names will continue to be resolved.
Also, if the service is stopped, other services that are explicitly connected to it will not be able to start. Therefore, follow the steps below to restart the DNS client service:
- Invoke the Run dialog box. You can search for its name in the Start menu search box, or you can press the Windows icon + R keyboard combination to open it quickly.
- Once the Run dialog box comes up, type ‘Services.msc’ into the search field and click the OK button or press Enter on your keyboard.
- Locate ‘DNS client’ in the Services list and right-click on it. Then click Restart in the context menu that opens.
- Close the Services window and check whether the server DNS address issue has been resolved.
Fix 12: Look Up the IP and Add It to the Hosts File
Some users reported that this solution had worked for them. However, it may not be effective since it still requires using DNS servers to query the IP. Nevertheless, it can give you more insight into the Chrome error. If you are still able to visit some websites, then follow the steps below; otherwise, move on to the next fix:
- Visit https://www.whatsmydns.net/#A/com.
Note: Type the domain you cannot visit in place of ‘domain.com’ in the above link.
- Copy the IP address as listed on the resulting page. Note that the IPs listed will generally be the same. Otherwise, copy the one that is mostly used.
- Go to the Start menu by pressing the Windows button on your keyboard or clicking the icon on your screen.
- Type ‘Notepad’ into the search bar. Right-click on it and select ‘Run as administrator.’
- Click ‘Yes’ when the UAC prompt is displayed.
- Once Notepad opens, click the File tab and click on Open in the menu.
- Navigate the following path: C:\Windows\System32\drivers\etc.
- Select All Files > Hosts and open it.
- Go to the bottom of the file and use the format 0.0.1 domain.com to enter the IP address you copied earlier, i.e. replace ‘127.0.0.1’ with the IP address you copied and replace ‘domain.com’ with the domain you queried in Step 1.
- Press Ctrl + S to save the file.
Afterward, try visiting the problematic website again. The procedure we applied above will help look up the route locally before your DNS is queried. The domain to the IP address has already been pointed.
However, if the website still doesn’t open, then the fault is not from your computer. You can try opening the site on your mobile device just to confirm.
Fix 13: Reinstall Google Chrome
Another option you have is to try reinstalling your Chrome browser. You can do that through the Control Panel or through the Settings app. Here’s how:
Uninstall Google Chrome via Windows 10 Settings:
- Open the Windows Settings app by heading to the Start menu and clicking on the Settings icon. You can also open the Settings app quickly by pressing the Windows icon + I keyboard combination.
- Click on Apps on the Settings page that opens.
- Under the Apps & Features page, use the search bar to call up Google Chrome.
- Now, click on Chrome and select the Uninstall button to remove the app.
Uninstall Google Chrome via Windows 11 Settings:
- Open the Windows Settings app by heading to the Start menu and clicking on the Settings icon. You can also open the Settings app quickly by pressing the Windows icon + I keyboard combination.
- Click on Apps in the left pane of the Settings window.
- Go to the right side, on the Apps page, and click on Apps & Features.
- Next, go to the Apps List section and use the search bar to locate Google Chrome.
- Once Chrome shows up, click on the three dots to the right of the app and select Uninstall from the menu.
- Follow the prompts to remove the browser from your computer.
Uninstall Google Chrome via the Control Panel
- Open the Run dialog by right-clicking on the Windows icon to bring up the Power User menu. Then click on Run in the list. You could also use the Windows logo key + R keyboard combination to invoke the accessory.
- Type ‘Control Panel’ into the text area and hit Enter or click the OK button.
- Select ‘Category’ in the ‘View by:’ drop-down displayed in the top-right corner of the page.
- Now, click on Programs > Programs and Features.
- Locate Chrome in the list of apps, right-click on it and select Uninstall from the contextual menu.
Afterward, visit the official website of Google Chrome and download the latest version of the browser. Then try and see if the error message will still appear.
Pro Tip: To make sure that your Windows registry is free of leftovers from uninstalled apps, use Auslogics Registry Cleaner to run a scan. The tool ensures that your computer remains stable and continues to perform optimally. It keeps your computer from slowing down, hanging, or crashing due to invalid entries and corrupt keys in your registry. Registry Cleaner has been tested by PC manufactures and proven to be safe for your computer. It uses precise techniques to resolve issues. The tool is recommended by experts. Auslogics is a trusted name and certified Microsoft Silver Application Developer.
That’s how to fix “DNS server might be unavailable” on Windows 11 and Windows 10.
We hope our guide has been of help in resolving the annoyance posed by the ‘Server DNS address could not be found’ message. Feel free to reach out to us if you need more help. You can also leave us a comment to let us know the fixes that worked for you. If there are any solutions that are not included in this guide but that helped you resolve the issue, please don’t hesitate to share them in the comments section.


 Done! Great to see you among our subscribers!