
Gamers and regular users alike have switched to Windows 11 since Microsoft introduced the new operating system through the Windows Insider Program. Everyone has had to deal with one bug or the other since the OS is still going through its experimental phase.
However, gamers dealing with significant FPS drops and high ping while running online games don’t want to wait too long for Microsoft to fix these problems.
If you’re one such gamer, we’ll show you some tips and tricks on how to get rid of FPS drops on Windows 11. You’ll also find out how to fix latency issues in games after upgrading to Windows 11.
Why is my ping so high all the time in Windows 11?
High ping is something gamers never want to come across. It can cost you a competitive multiplayer stand-off and make the entire gaming experience terrible.
A ping is a signal sent out by your computer and returned by the receiving server. The total time for each round trip is measured in latency (milliseconds).
If you have high ping (or high latency), it means your connection is slow. This causes poor feedback and terrible lags during gameplay.
A poor internet connection primarily causes high ping. However, the Internet connection problem could result from other underlying issues, such as a stuck router, Windows 11’s Wi-Fi troubles, incorrect VPN connection or proxy settings, multiple apps dragging your computer’s bandwidth, and an overprotective firewall program, among others.
Why is FPS so low in Windows 11?
As we mentioned, users are still running Windows 11’s preview builds. Unfortunately, these versions are unstable and bound to cause performance glitches. The known causes of performance drops in gaming include Game DVR, problematic drivers, and a bug involving the mouse’s polling rate.
Since we’re covering high latency and FPS drops, you should not conflate the two. While FPS drops are a direct consequence of your system’s performance, high latency (or ping) is a network issue. Though different, they can both ruin your gaming experience. If you have a perfect network connection but terrible FPS, you won’t enjoy your game, hence the need to get rid of both problems in Windows 11.
How to check your game’s latency
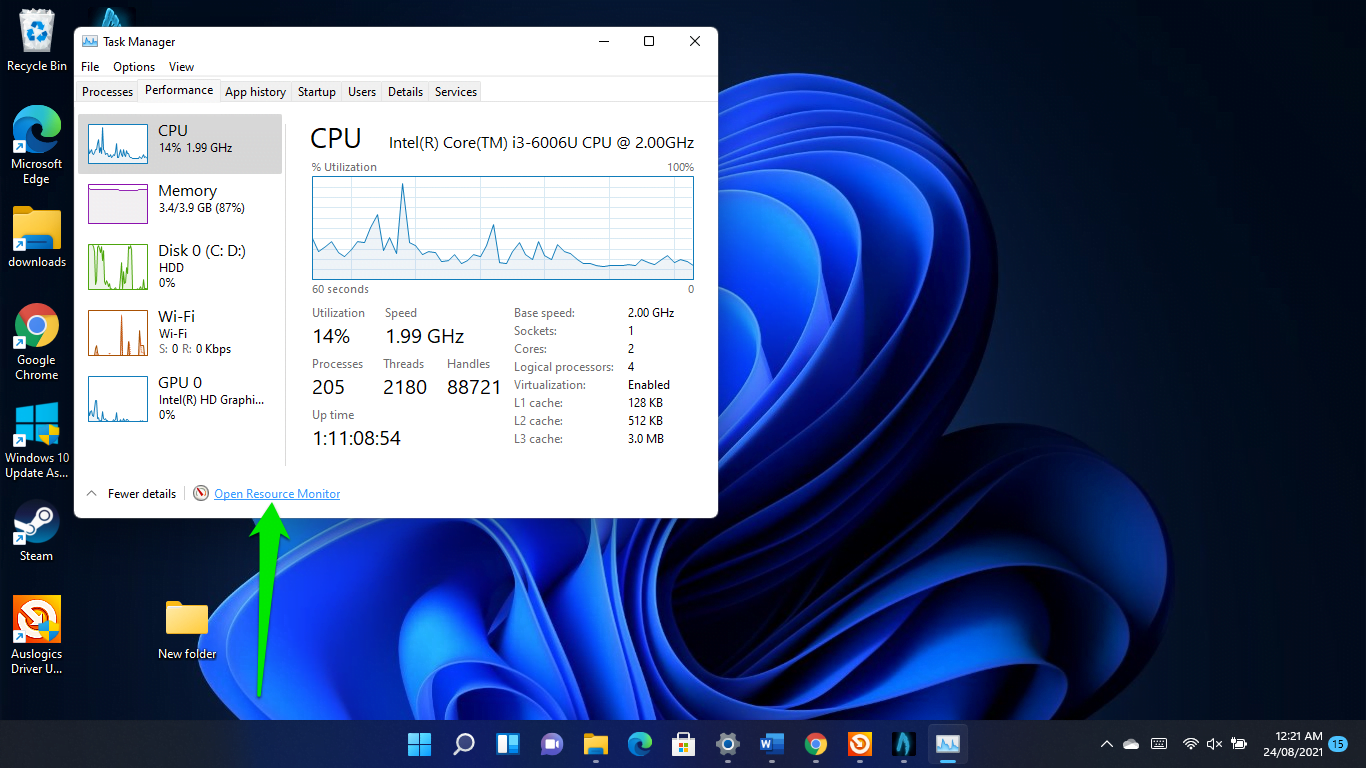
You can check your game’s latency through Windows 11’s Resource Monitor. Tap the Windows logo and X keys and select Task Manager in the menu.
After the Task Manager opens, go to the Performance tab and click on Open Resource Monitor at the bottom of the window.
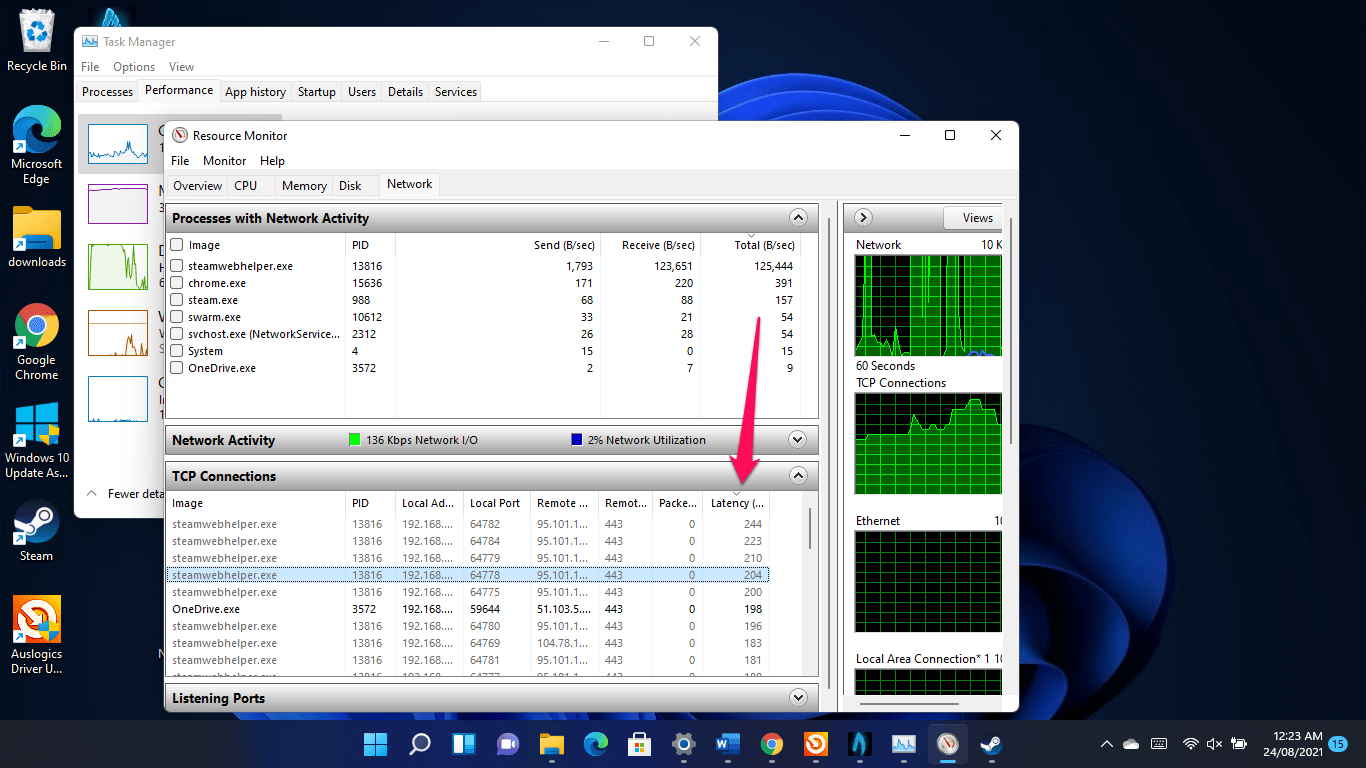
After the Resource Monitor window opens, switch to the Network tab and expand the TCP Connections section to check your game’s latency.
Apply the workarounds that follow to get rid of the latency issue.
How to fix high ping on Windows 11
Let’s start with the latency problem. These solutions will help you eliminate the underlying issues that are increasing your game’s ping time.
Use an Ethernet cable
One reason gamers lament high ping in Windows 11 is the operating system’s numerous Wi-Fi problems. Users have complained about seeing errors such as “Unidentified Network” and “Limited access”, which slow down their internet connection.
Using an Ethernet connection will help you escape Windows 11’s Wi-Fi troubles.
Even if you don’t suffer from Wi-Fi issues, a wired connection will boost your browsing speed. Wireless connections suffer from frequency range and router-PC proximity limitations.
Reset your network adapter
A known remedy to the Windows 11 Wi-Fi bug is resetting your network adapter.
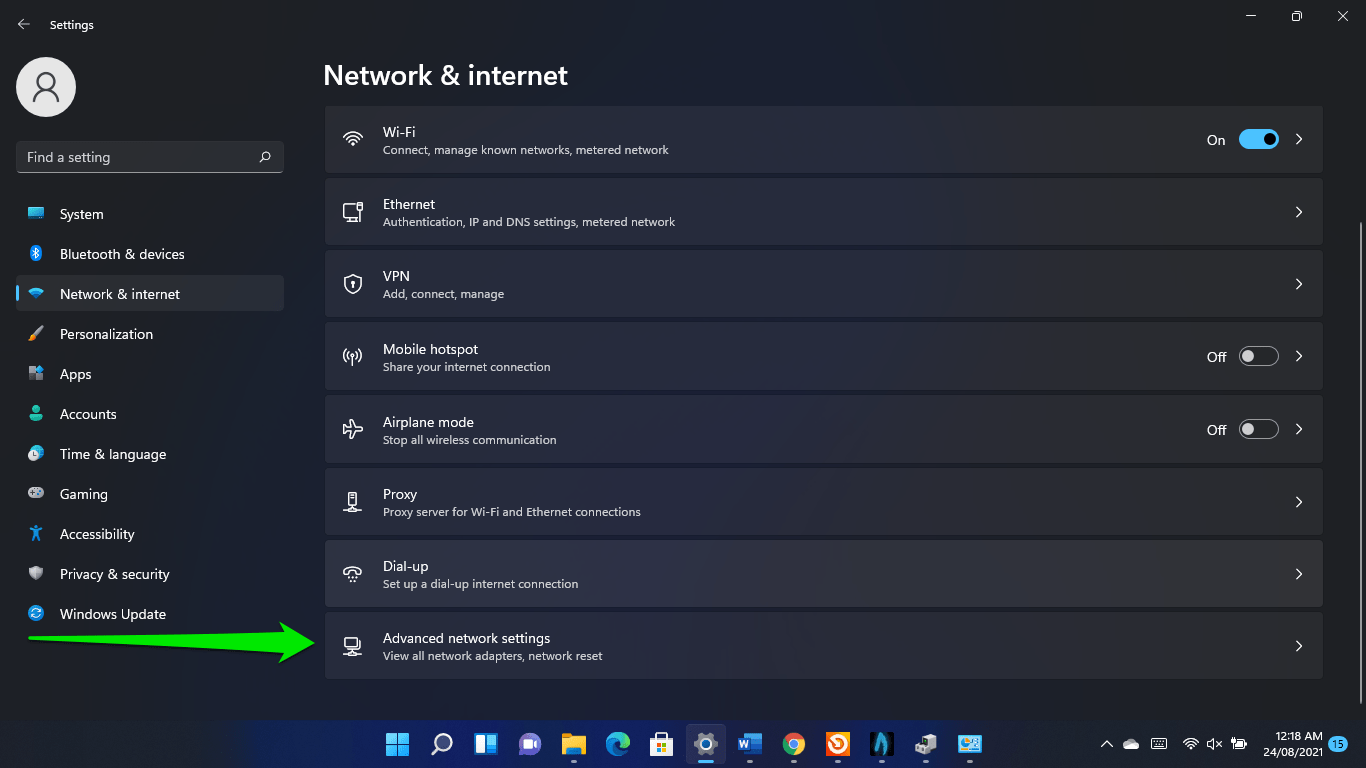
To do that, start by launching the Settings app (press the Windows logo + I shortcut).
- After Settings appears, go to the left side of the window and click on Advanced Network Settings.
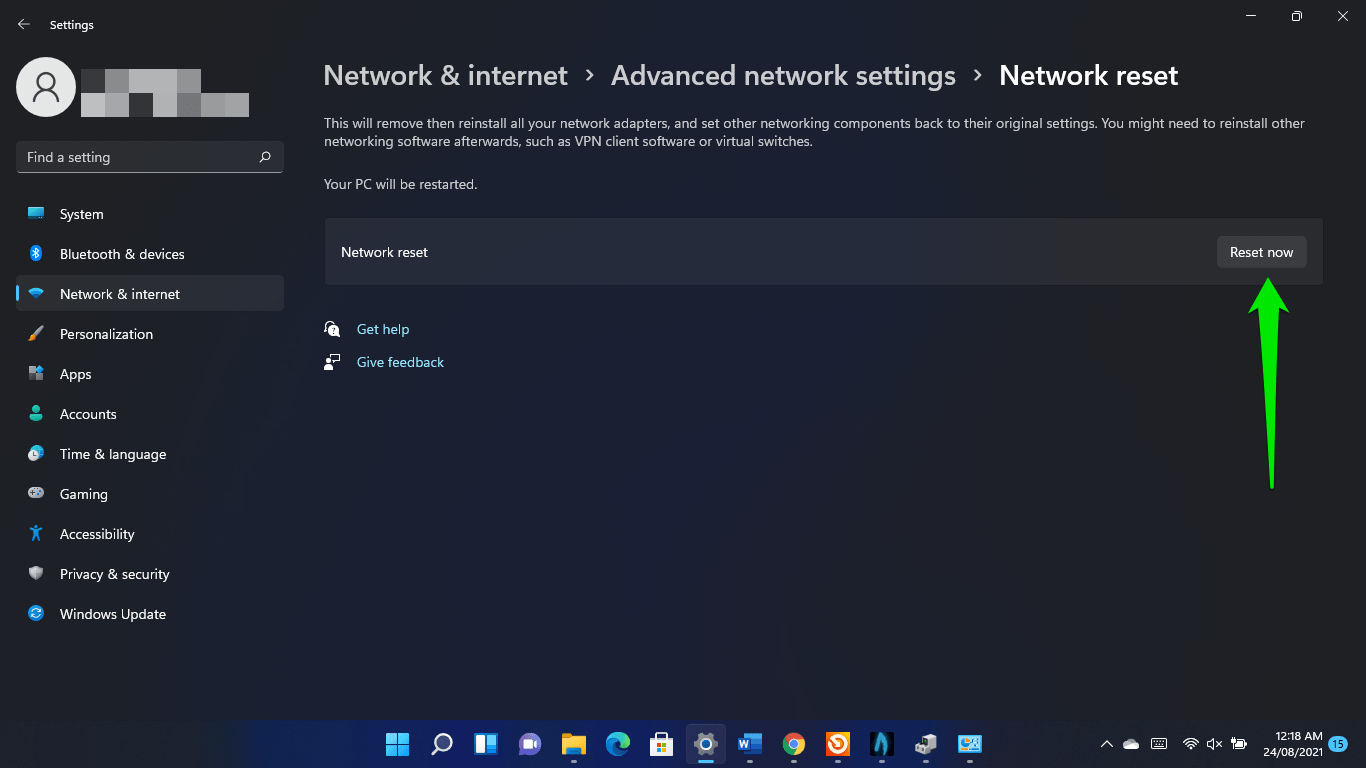
- Click on Network Reset.

- Click on Reset.
Close background applications
Some programs running in the background might be monopolizing your computer’s network bandwidth, limiting the resources available to your game.
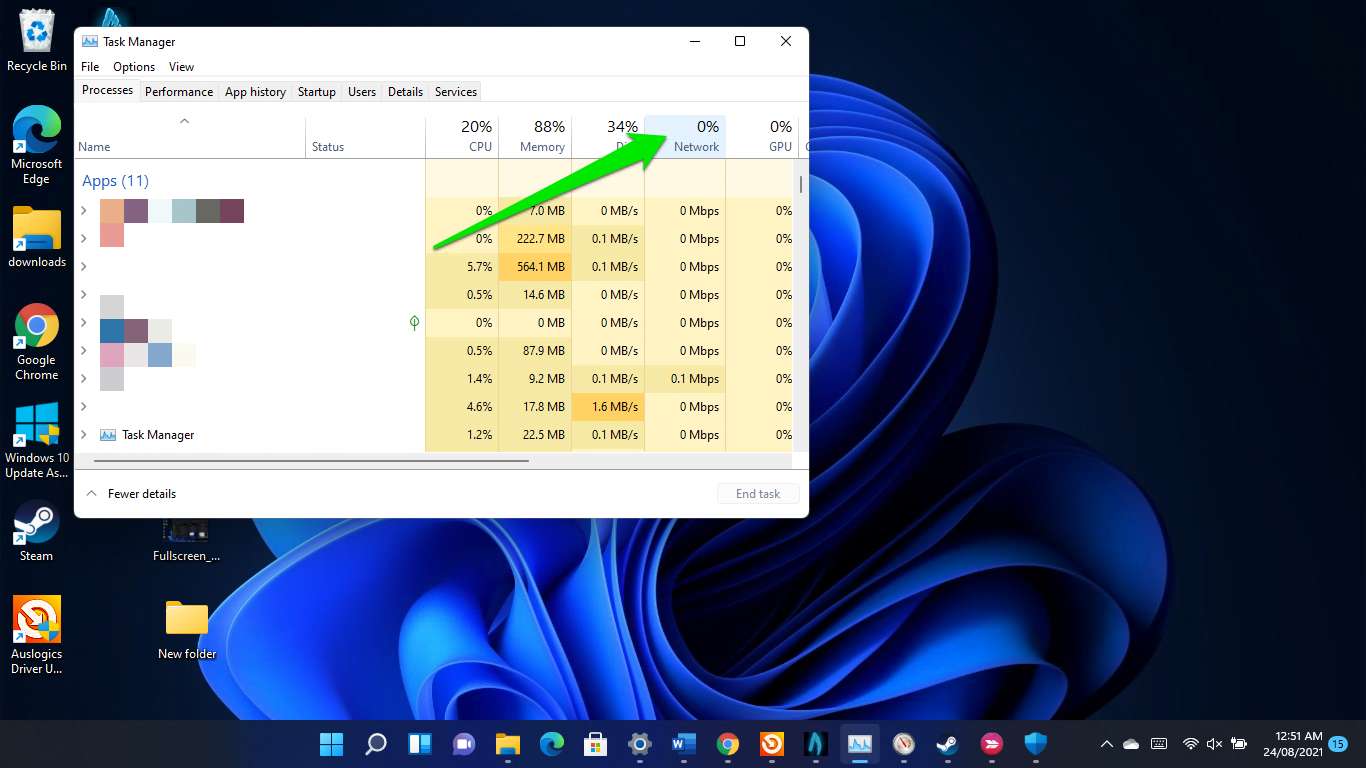
So, head to the Task Manager to shut down these apps and check if that fixes the high ping issue.
Tap the Windows logo and X keys and select Task Manager in the menu. After the app shows up, look out for programs increasing your network usage and shut them down. Go to the Processes tab and look under Network to find out how programs use your system’s bandwidth.
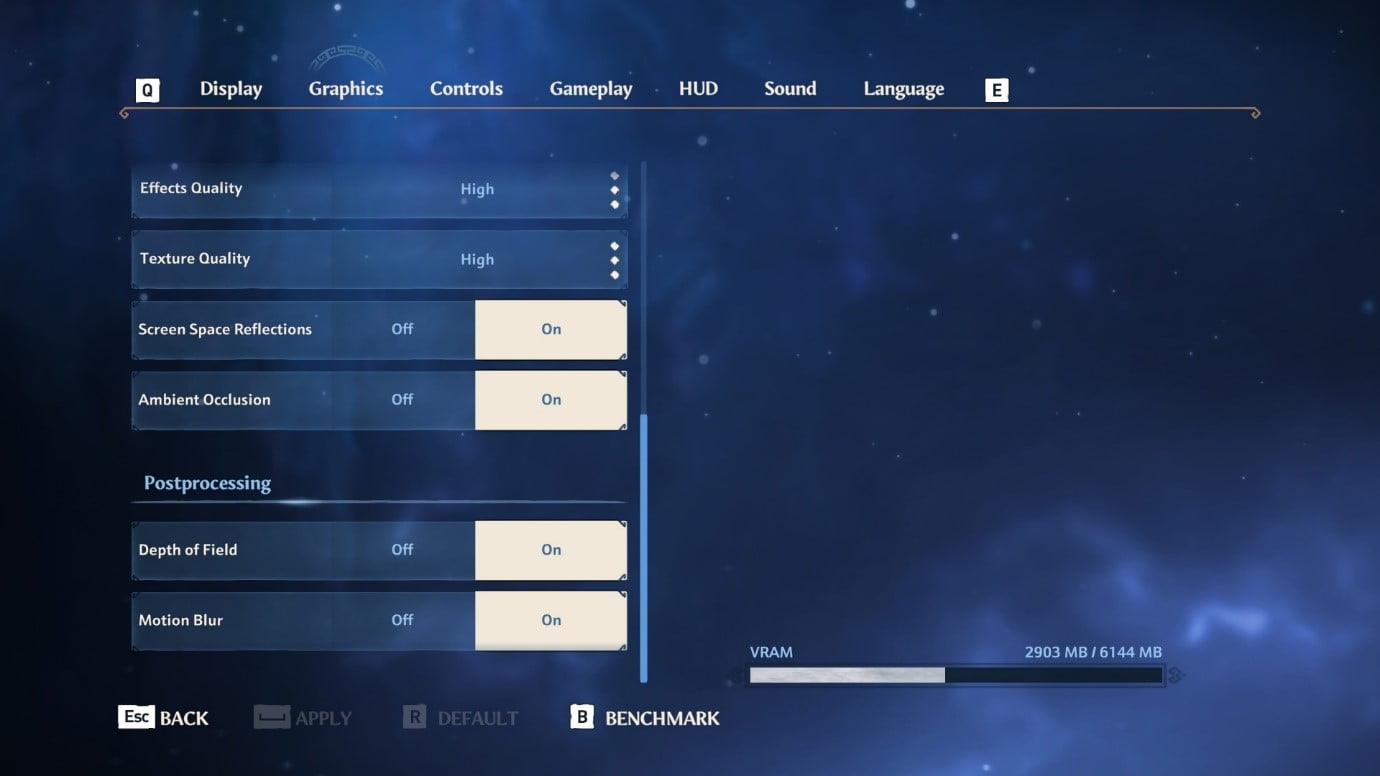
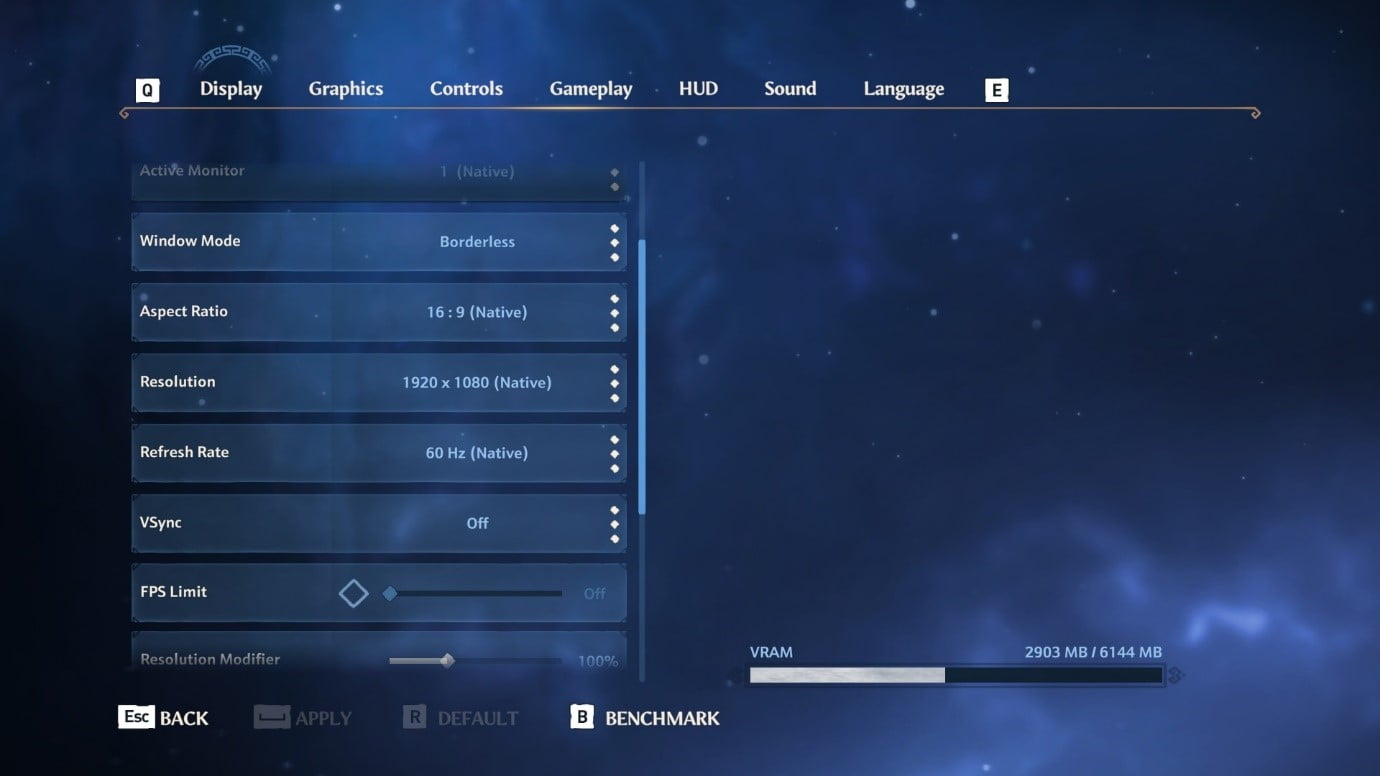
Reduce your frame rate
Your game’s visuals have a bearing on your latency. While higher frame rates make for better animations, they can negatively impact your ping, depending on the strength of your internet connection.
So, head to your game’s preferences and optimize its frame rate settings. You could also reduce your graphics settings from high to low.
Use a faster DNS server
The DNS server has to resolve connection queries made by any application on your system, and your ISP provides your default DNS. However, that server might not be fast enough to handle your games. Using Google’s or Cloudflare’s public DNS will help speed things up:
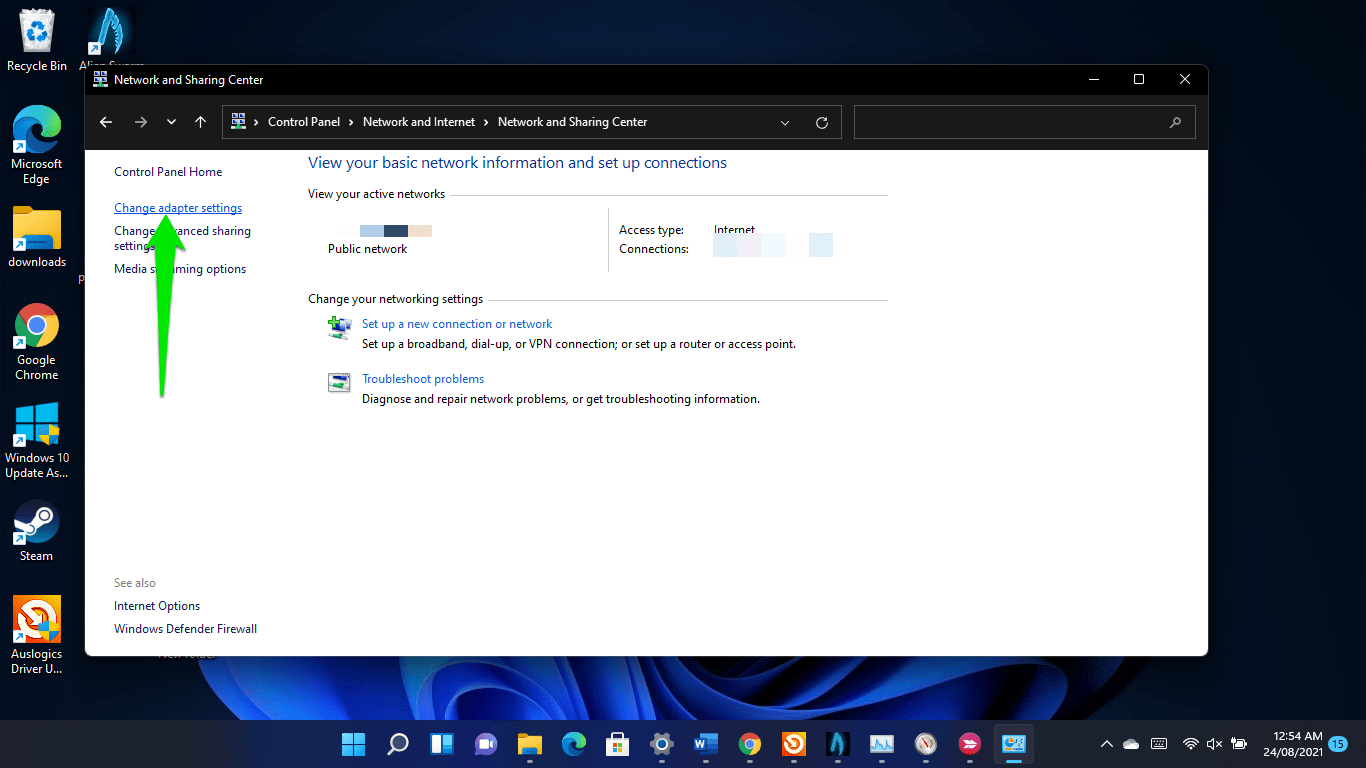
- Open the Run dialog window, type Control Panel, and click OK.
- Head to Network and Internet in the Control Panel window and select “View network and tasks.”
- Select the Change Adapter Settings link on the next page’s left pane.
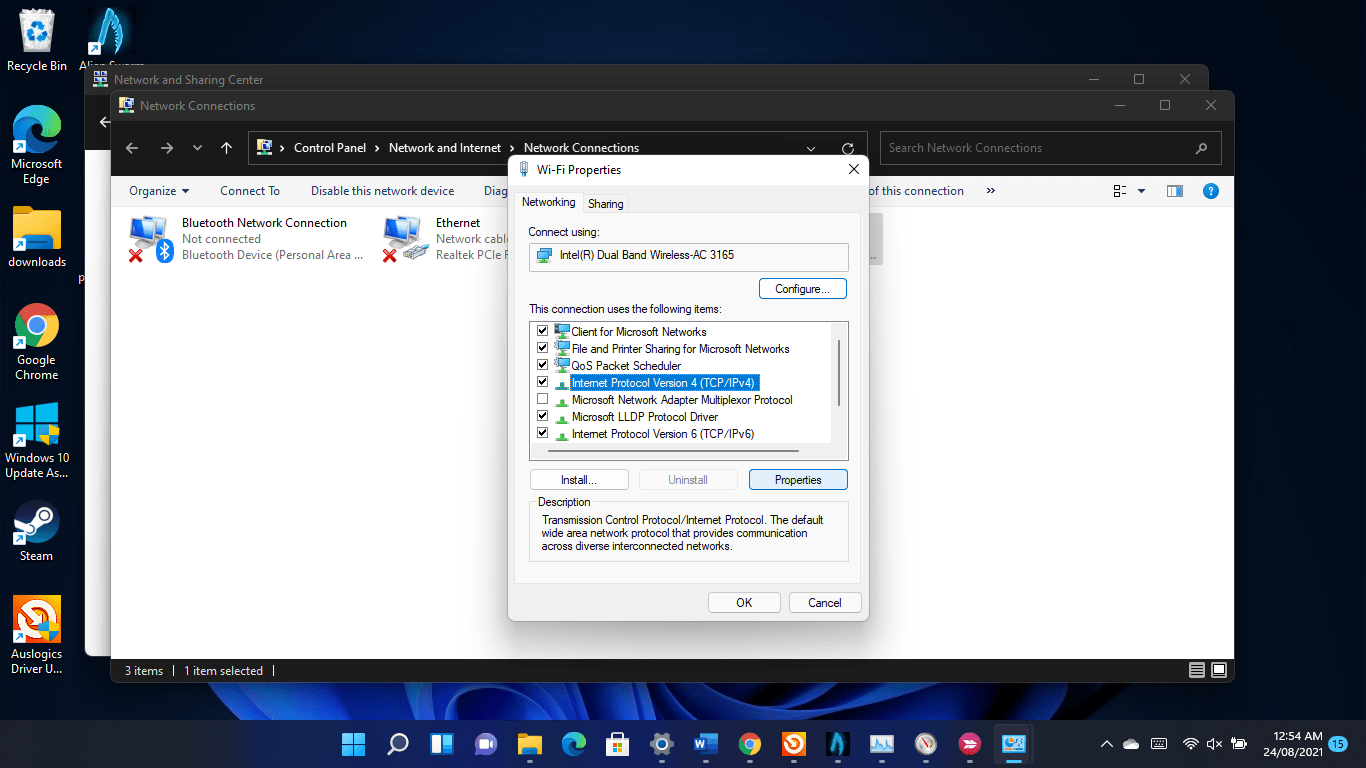
- Right-click on your Wi-Fi or Ethernet card, depending on which you use, and click on Properties.

- When you see the Properties dialog window, click on Internet Protocols TCP/IPv4 and click on Properties.
- Single-click the “Use the following DNS server addresses” radio button.
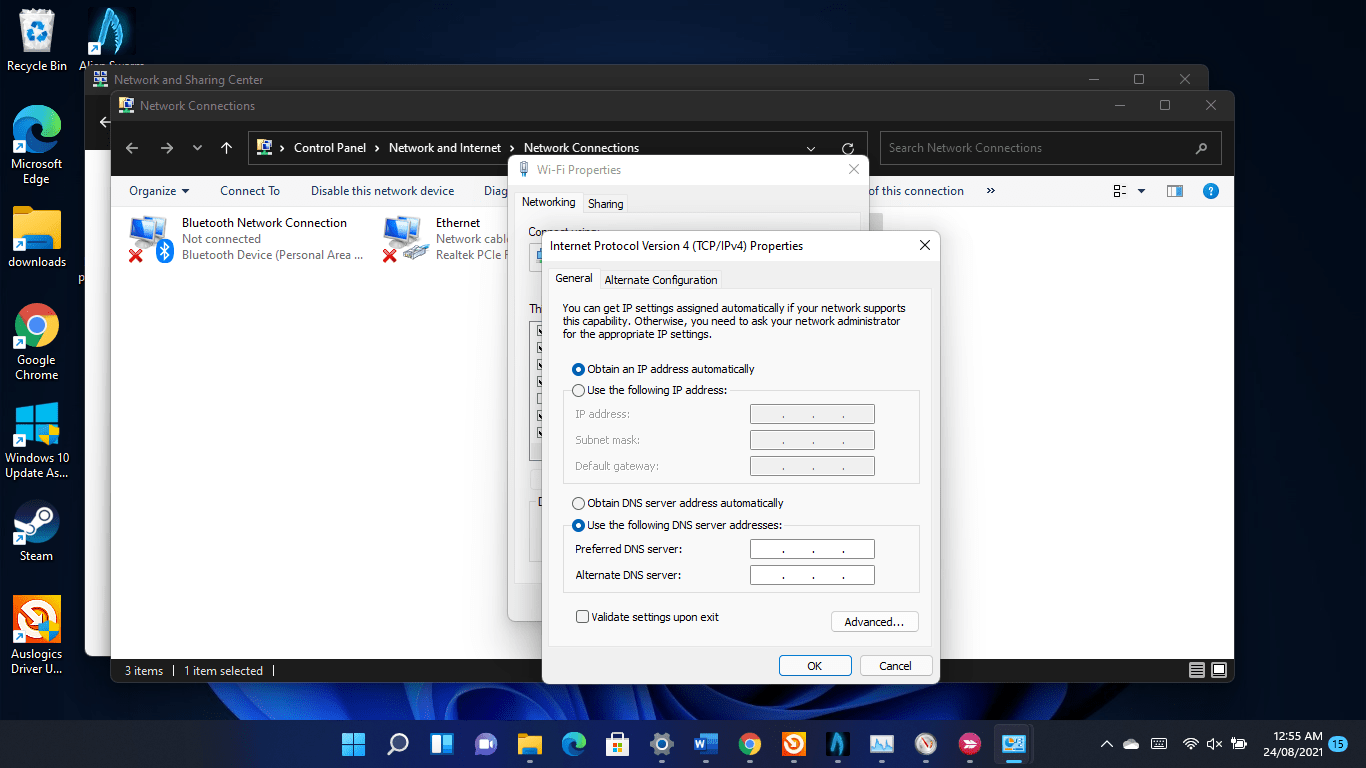
- Next, enter 8.8.8.8 into the “Preferred DNS server” box and 8.8.4.4 into the “Alternate DNS server” box to use Google’s public DNS server.
- To use Cloudflare’s public DNS server, enter 1.1.1.1 into the “Preferred DNS server” box and 1.0.0.1 into the “Alternate DNS server” box.
- Click on the OK button.
- If you’re on an IPv6 network, return to your adapter’s Properties dialog, click on Internet Protocol Version 6 (TCP/IPv6) and click on Properties.
- Now, use 2001:4860:4860::8888 (Preferred DNS server) and 2001:4860:4860::8844 (Alternate DNS server) for Google.
- For Cloudflare, use 2606:4700:4700::1111 and 2606:4700:4700::1001 for “Preferred DNS server” and “Alternate DNS server” respectively.
Allow your games through your firewall
Make sure your firewall program isn’t blocking your games and causing the high ping issue. As it turns out, Windows 11’s built-in firewall can be a nuisance to online games.
Allow these games through the firewall if they’re not allowed already.
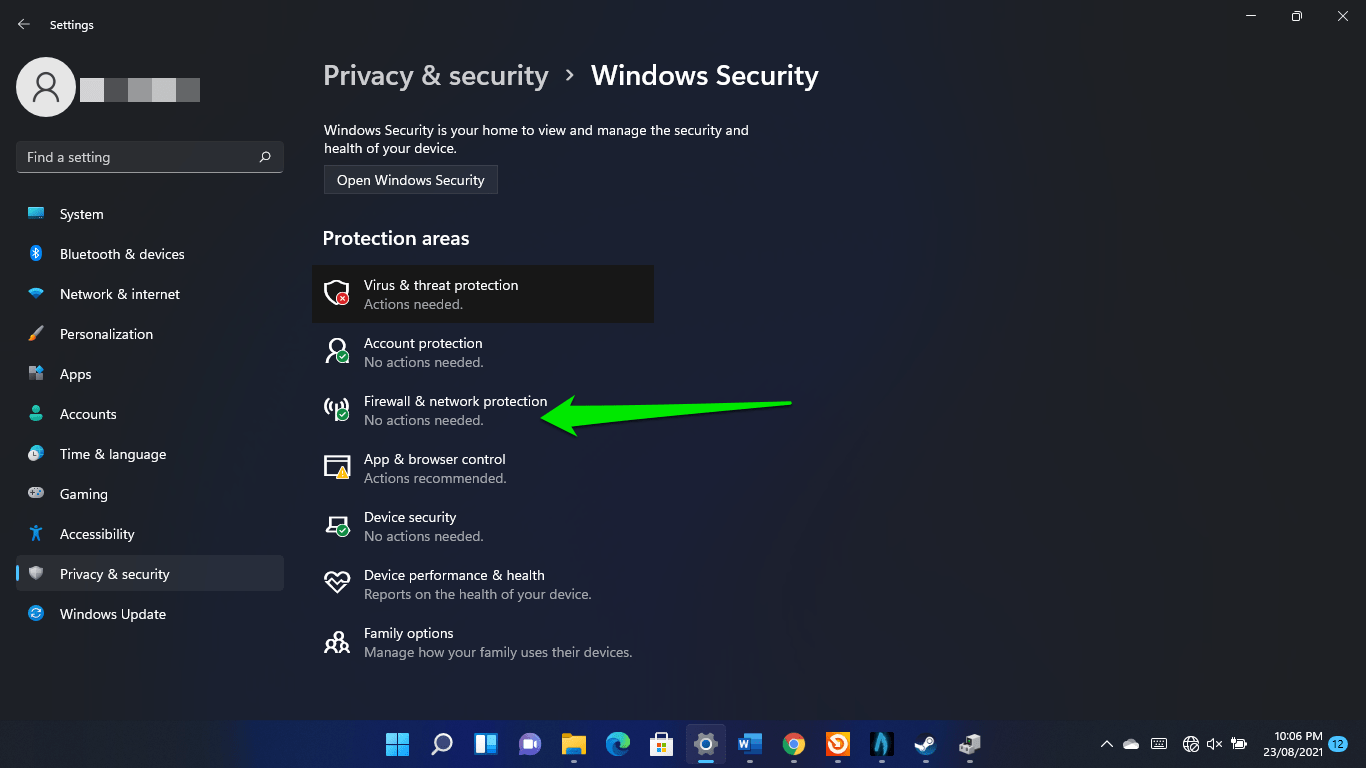
To do that, start the Settings app, click on Privacy and Security in the left pane, and click on Windows Security on the right-hand side of the window.
- Click on Firewall & Network Protection under the Windows Security page in the Settings app.
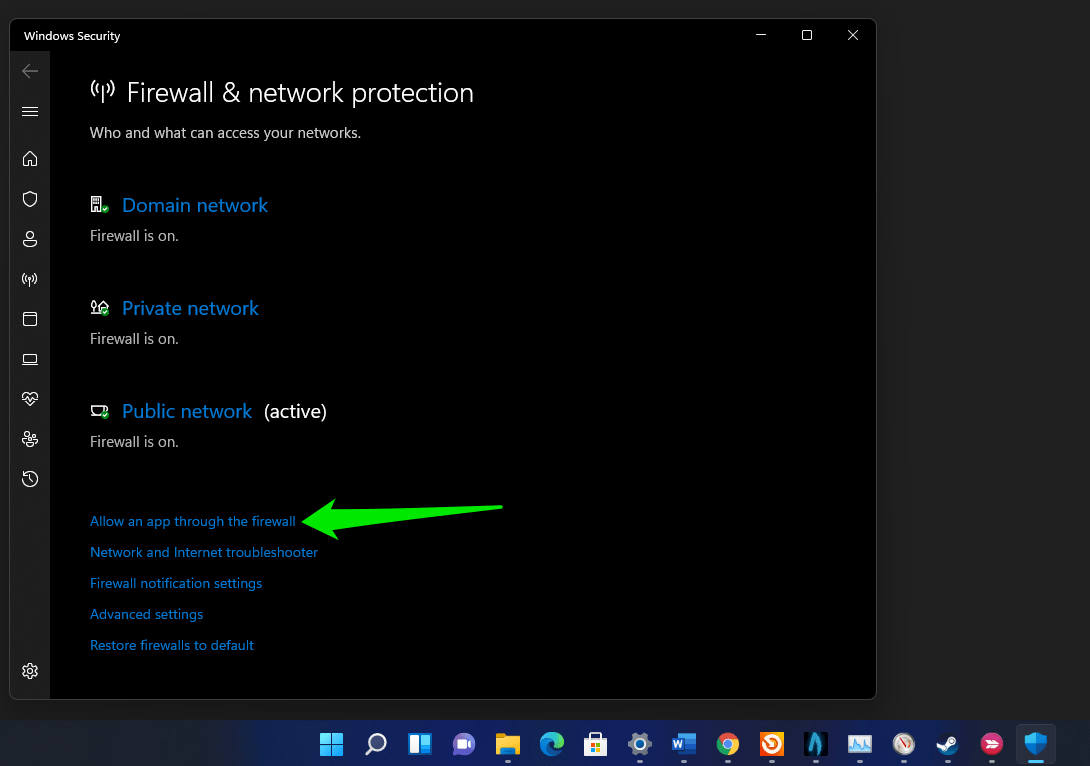
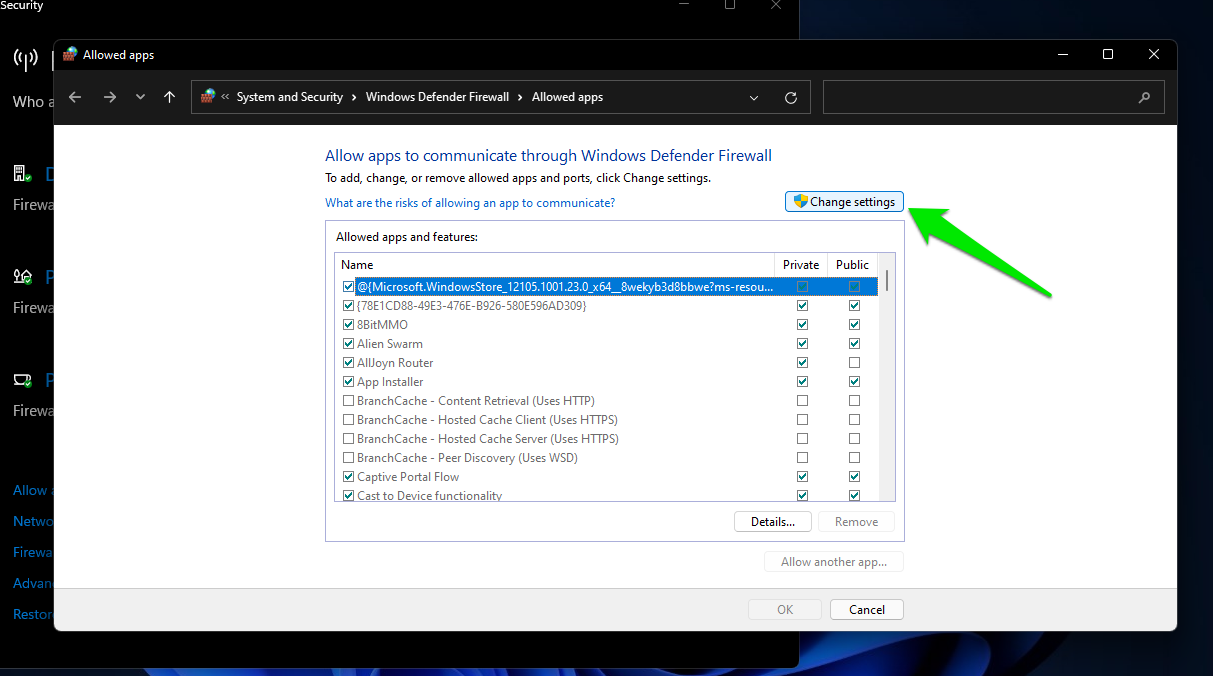
- When the Firewall & Network Protection interface opens, select the “Allow an app through the firewall” link.
- Click on the Change Settings button when you see the Allowed Apps interface, go to the “Allowed apps and features” list, and check the boxes beside your games.
Now, if you don’t see a game on the list, you can add it manually. Click on “Allow another app” and click on Browse beside the Path text box in the “Add an app” window.
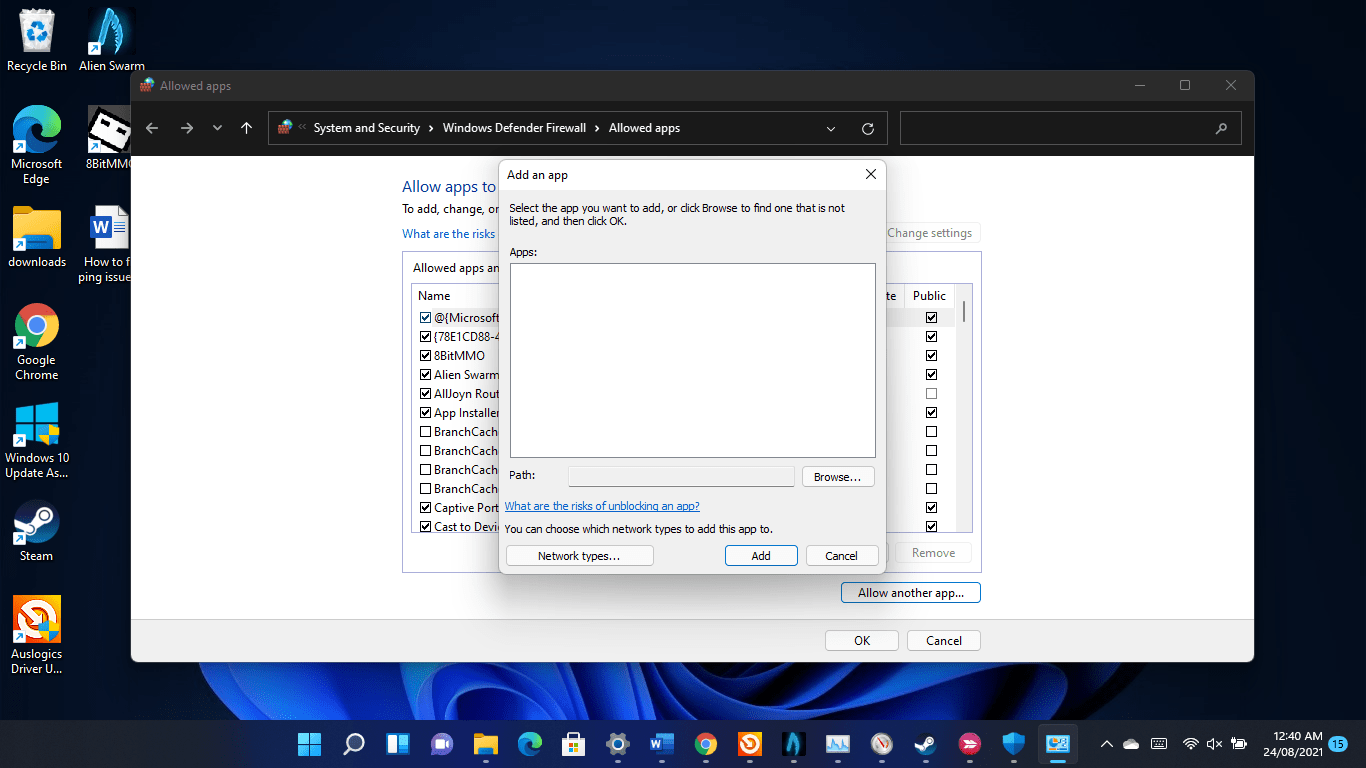
After the Browse window opens, go to the game’s folder and double-click its .exe file. Then, after the app’s icon appears in the “Add an app” box, click on the Add button.
If allowing the game doesn’t fix the issue, disable your firewall and check for the problem. Open the Firewall & Network interface, then turn off the Domain, Private, and Public networks. You’ll have to click on each network and toggle off the switch under Microsoft Defender Firewall.
How to fix low FPS when gaming on Windows 11
There are different workarounds to the low FPS problem in Windows 11. While there are Windows 11 bugs that you have to get around, some cases require basic troubleshooting, such as changing your game’s graphics settings.
First, we’ll show you how to get your FPS counter running so that you know when your FPS is low and how low it is.
How to check your FPS while gaming
Seeing your game’s FPS will help you know when to tweak some settings and make improvements. The game can show you real-time FPS rates while you’re playing, but other tools can also be used.
Using Steam
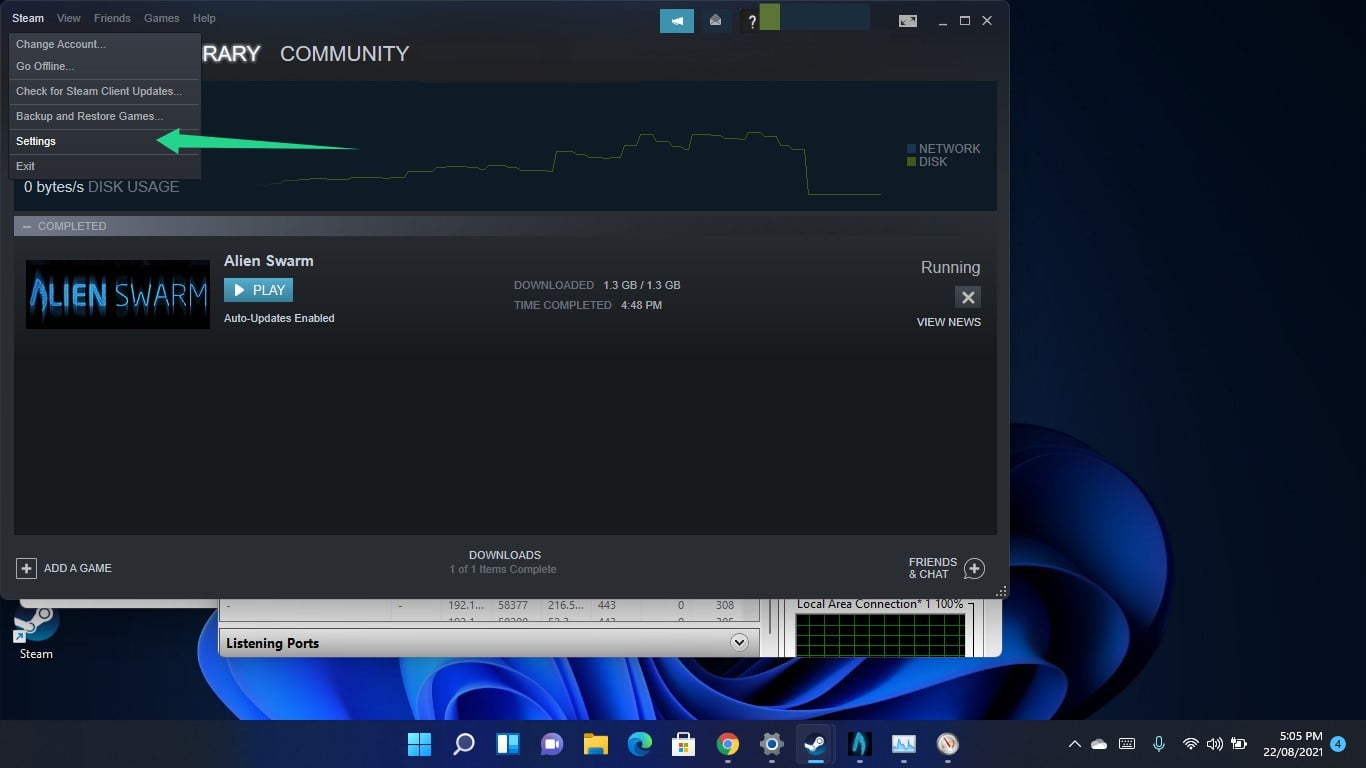
- Launch the Steam client, click on Steam in the window’s top-left corner, and click on Settings in the context menu.
Once the Settings window shows up, head to the left pane and click on In-Game. After that, go to the “In-game FPS counter” drop-down menu and select where you’d like to see the counter.
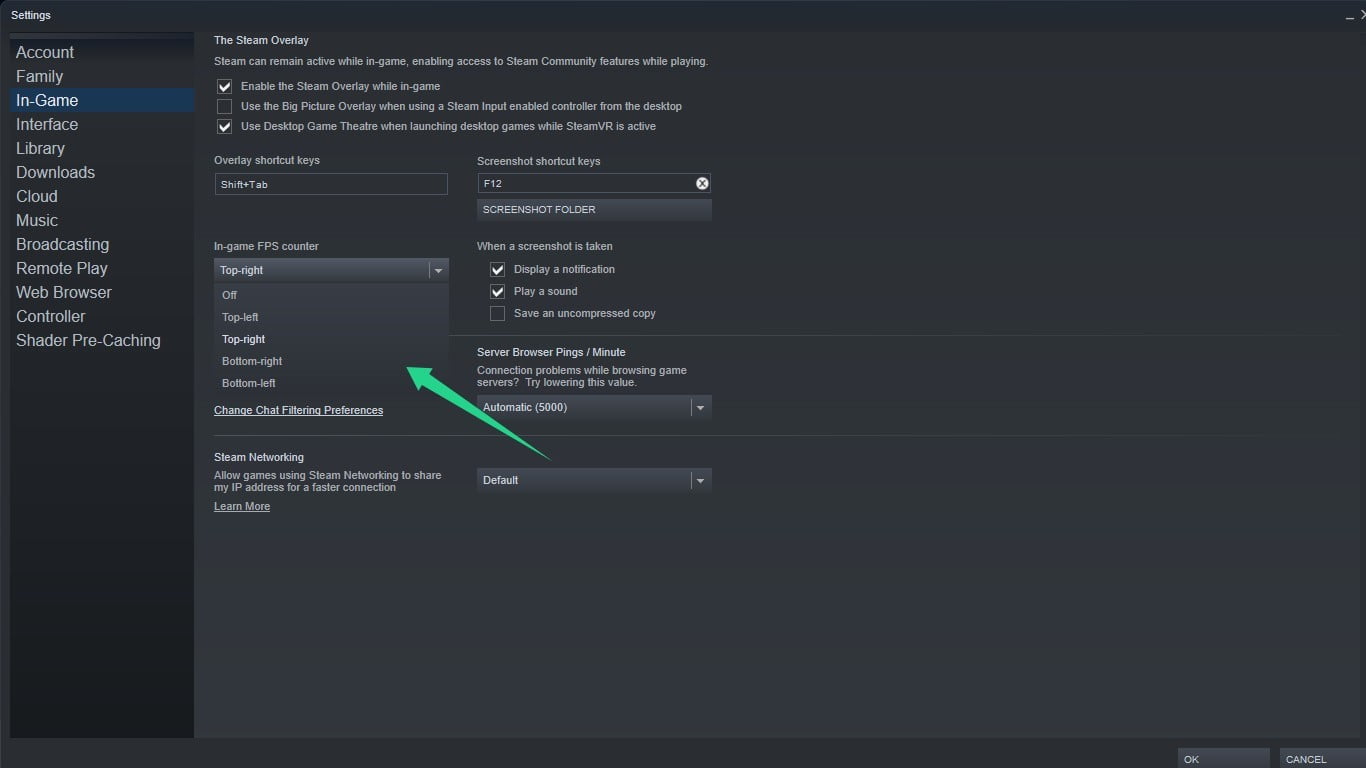
- Click on OK.
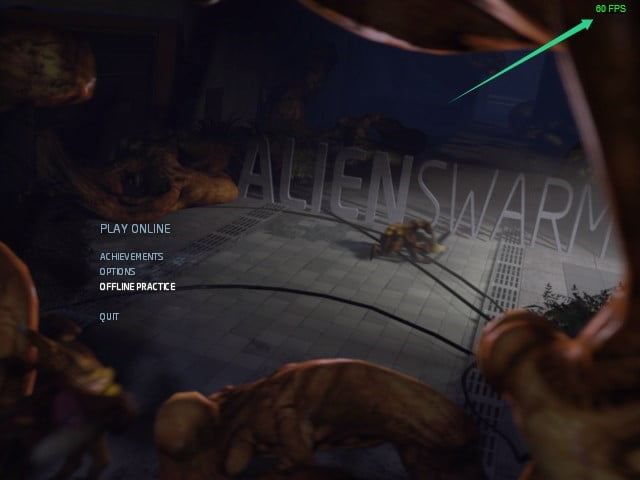
- You’ll now see the FPS counter in your game.
- You’ll notice the FPS counter in the top-right corner of Alien Swarm in the screenshot below:
Going through your game’s settings
Most modern games come with built-in FPS counters. The process of turning on the counter is different for each game. You may have to go through the game’s video options, use a keyboard shortcut, enter a console command, change the game’s startup options, or adjust the configuration file.
How to fix low FPS when gaming on Windows 11
The fixes here will show you how to get rid of the underlying problems causing the FPS drops on Windows 11. We’ll also show you other tips that you can apply to improve your game’s performance.
Disable GameDVR
Windows 11’s screen recording feature, GameDVR, could be the cause of the problem. Disabling the feature can fix the FPS issue for good. You’ll have to use the Registry Editor to turn it off.
Before you go ahead, you should back up your system registry. Making the wrong changes in the Registry Editor could cause severe problems with lasting effects, and the backup could reverse those changes.
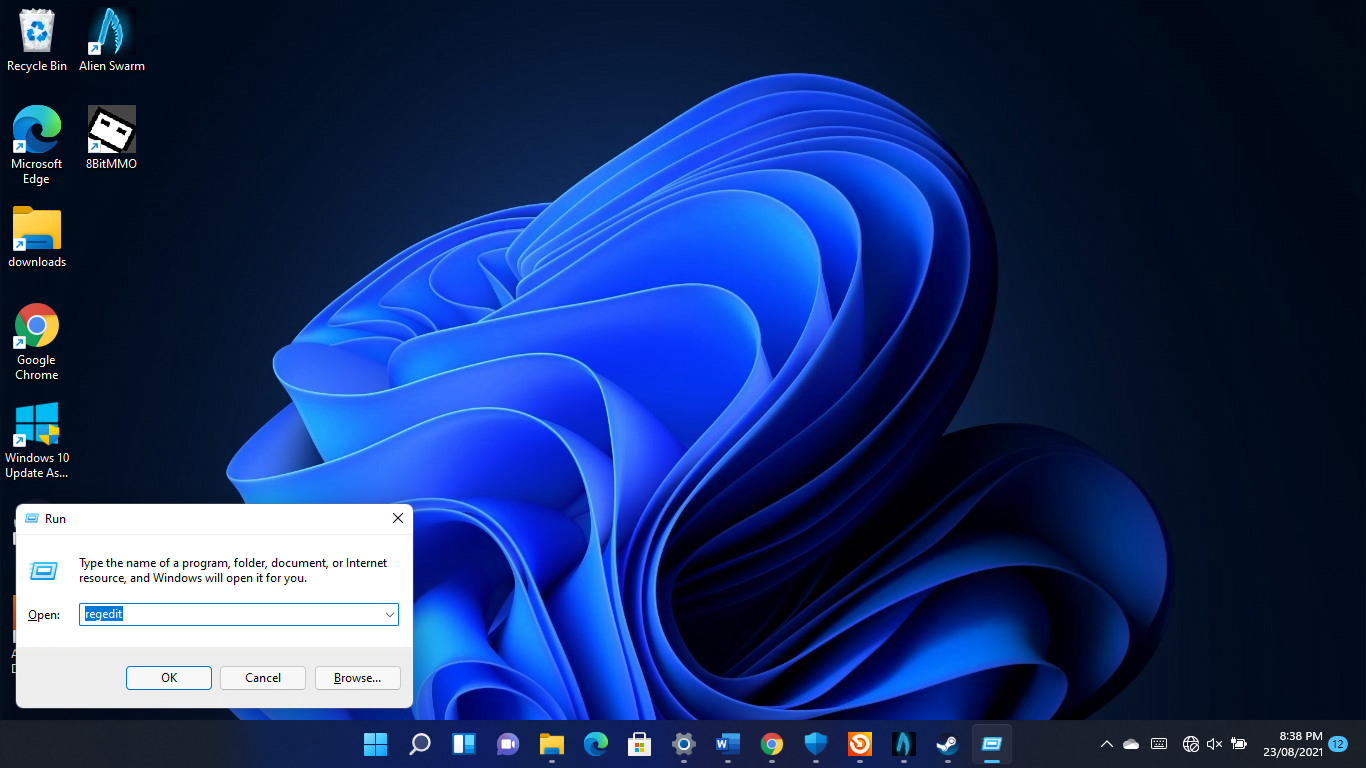
- Open the Run dialog box using the Windows logo + R shortcut.
- Type “regedit” after Run opens and tap Enter. Next, click on Yes in the UAC pop-up.

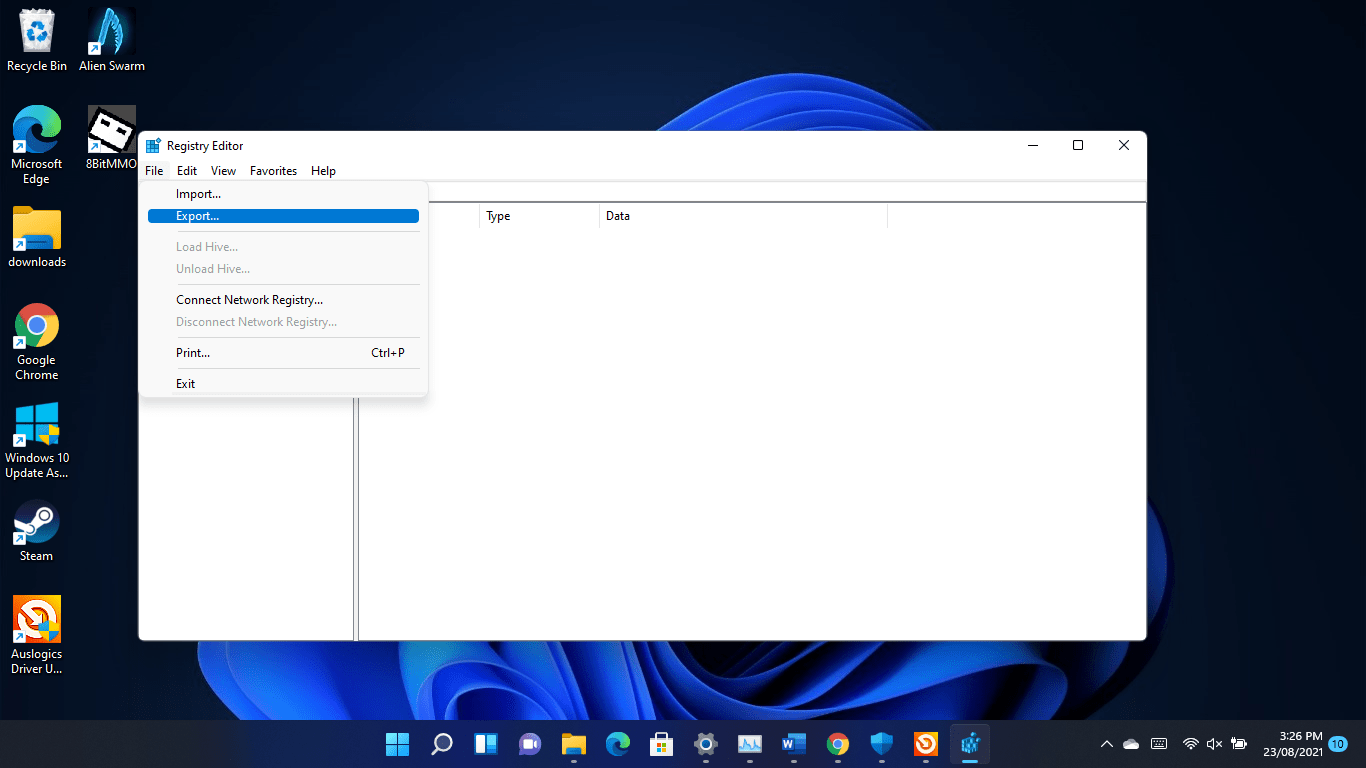
- After the Registry Editor opens, click on File in the top-right corner and click on Export.
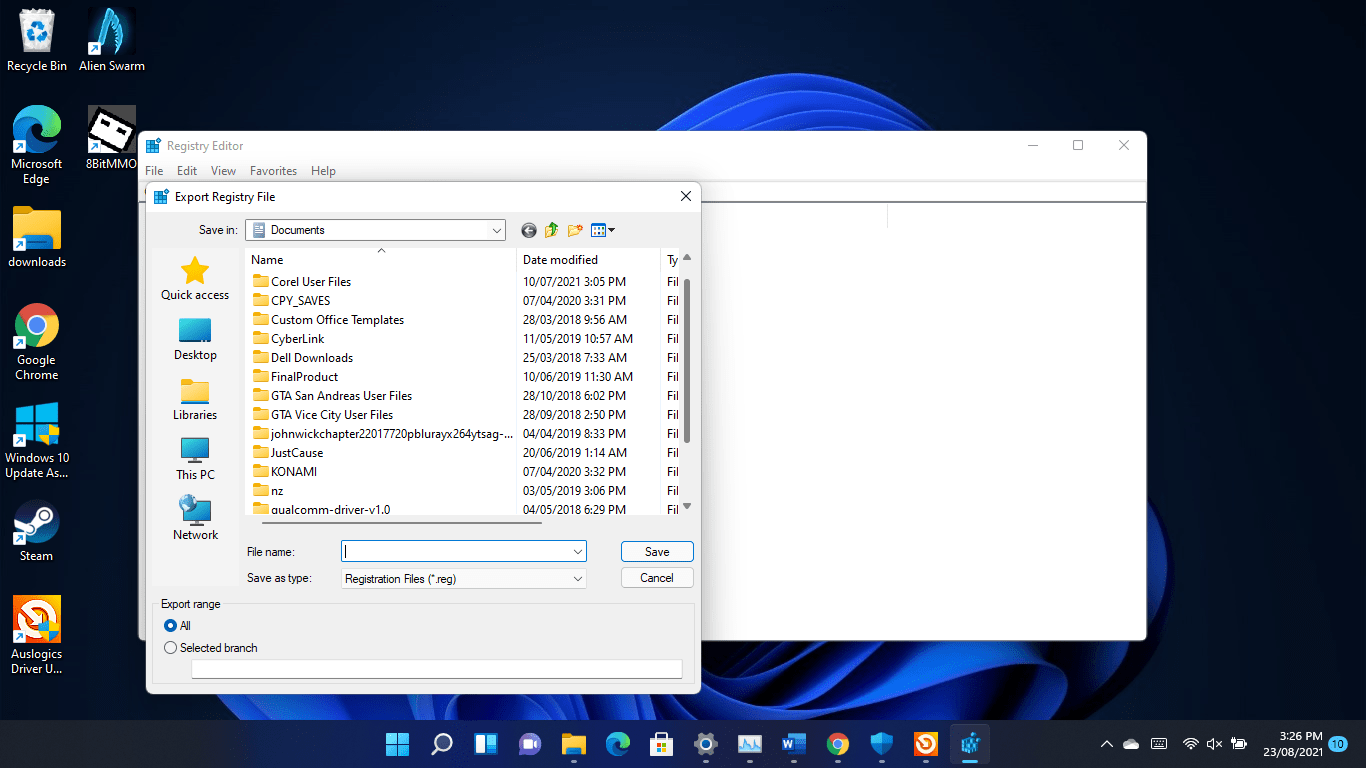
- Go to the Export Range section in the Export Registry File dialog window and select All. Next, enter a name for the backup file, choose a folder, and click on Save.
- Now, return to the Registry Editor, go to the left pane, and navigate to Computer\HKEY_CURRENT_USER\System\GameConfigStore.
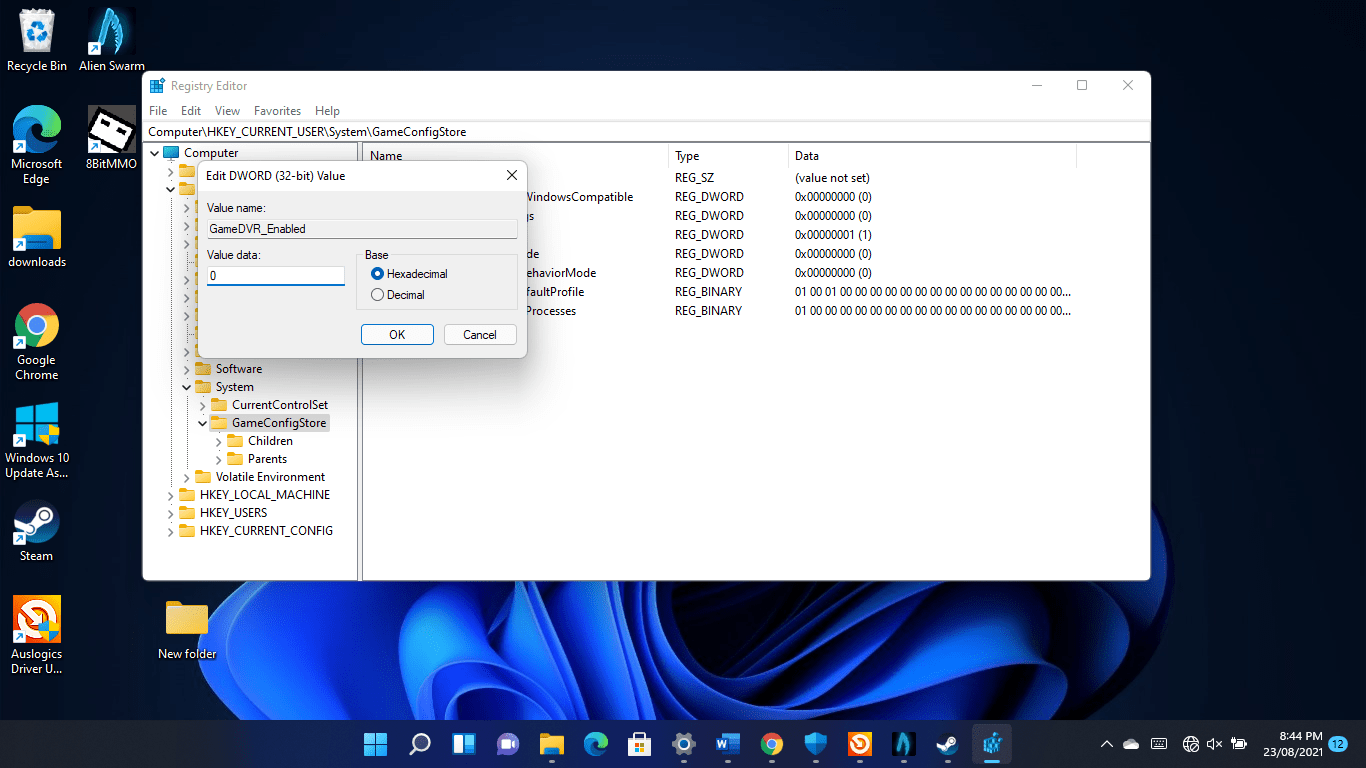
- Right-click on GameDVR_Enabled and click on Modify.
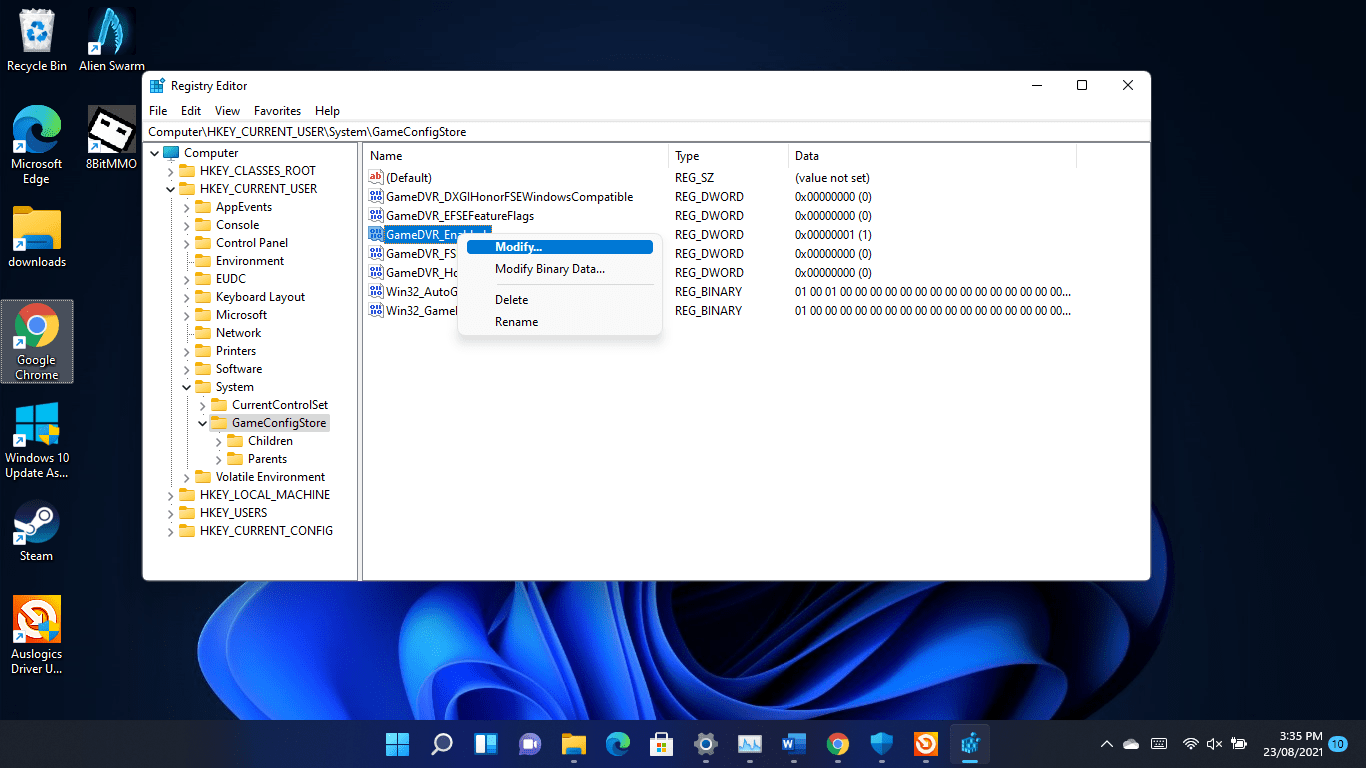
- Ensure the base is set to Hexadecimal, enter 0 in the Value Data box and click on the OK button.
- After that, right-click on “GameDVR_FSEBehaviourMode” and click on Modify.
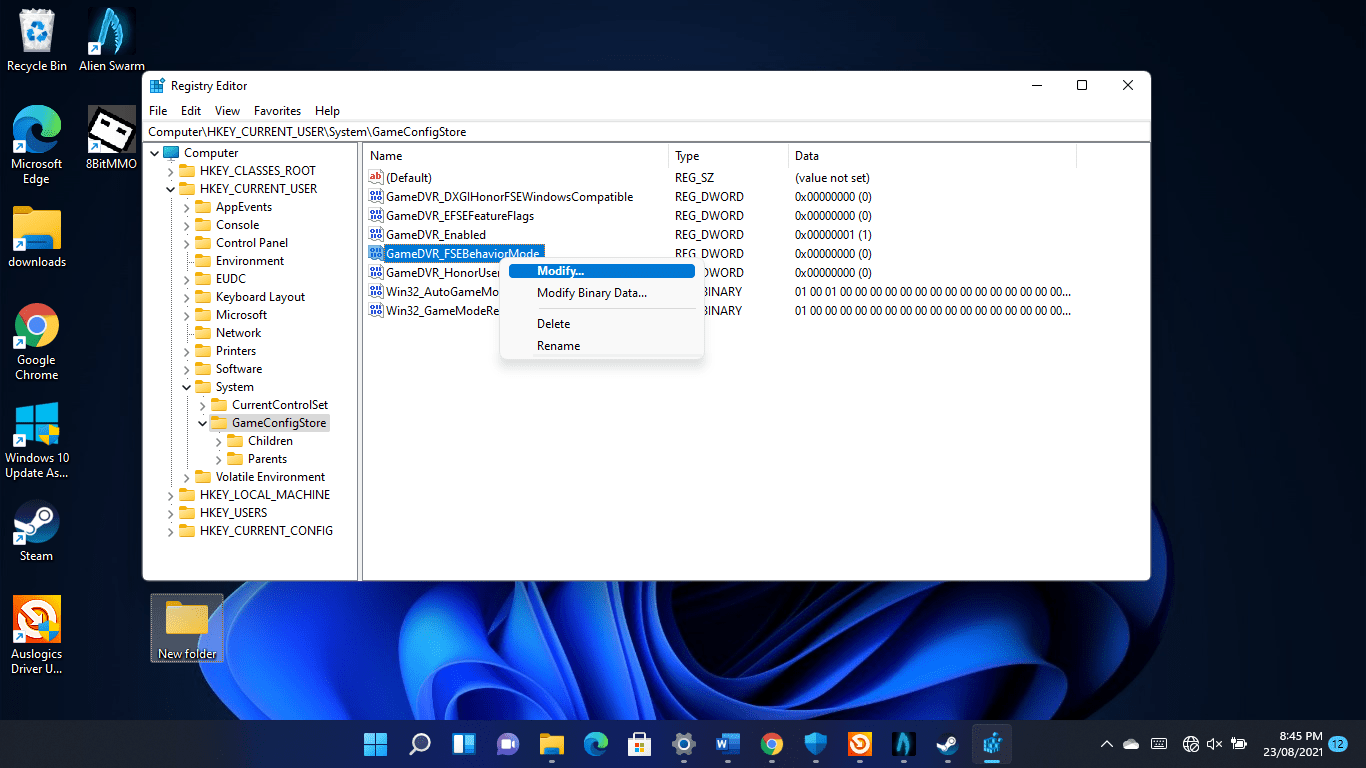
- Ensure the base is set to Hexadecimal, enter 2 in the Value Data box and click on the OK button.

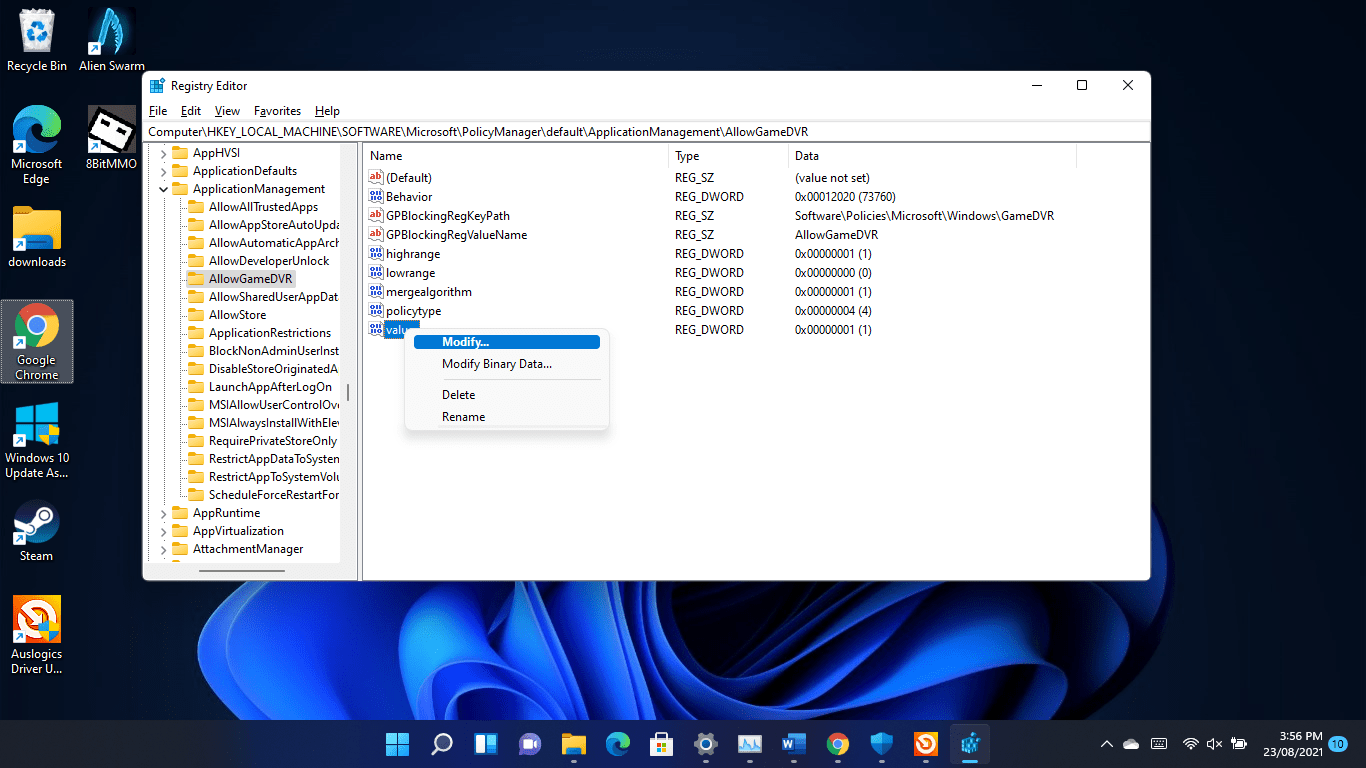
- Next, head to the left pane of the window and navigate to Computer\HKEY_LOCAL_MACHINE\SOFTWARE\Microsoft\PolicyManager\default\ApplicationManagement\AllowGameDVR.
- Switch to the window’s right-hand side, right-click on Value and click on Modify.
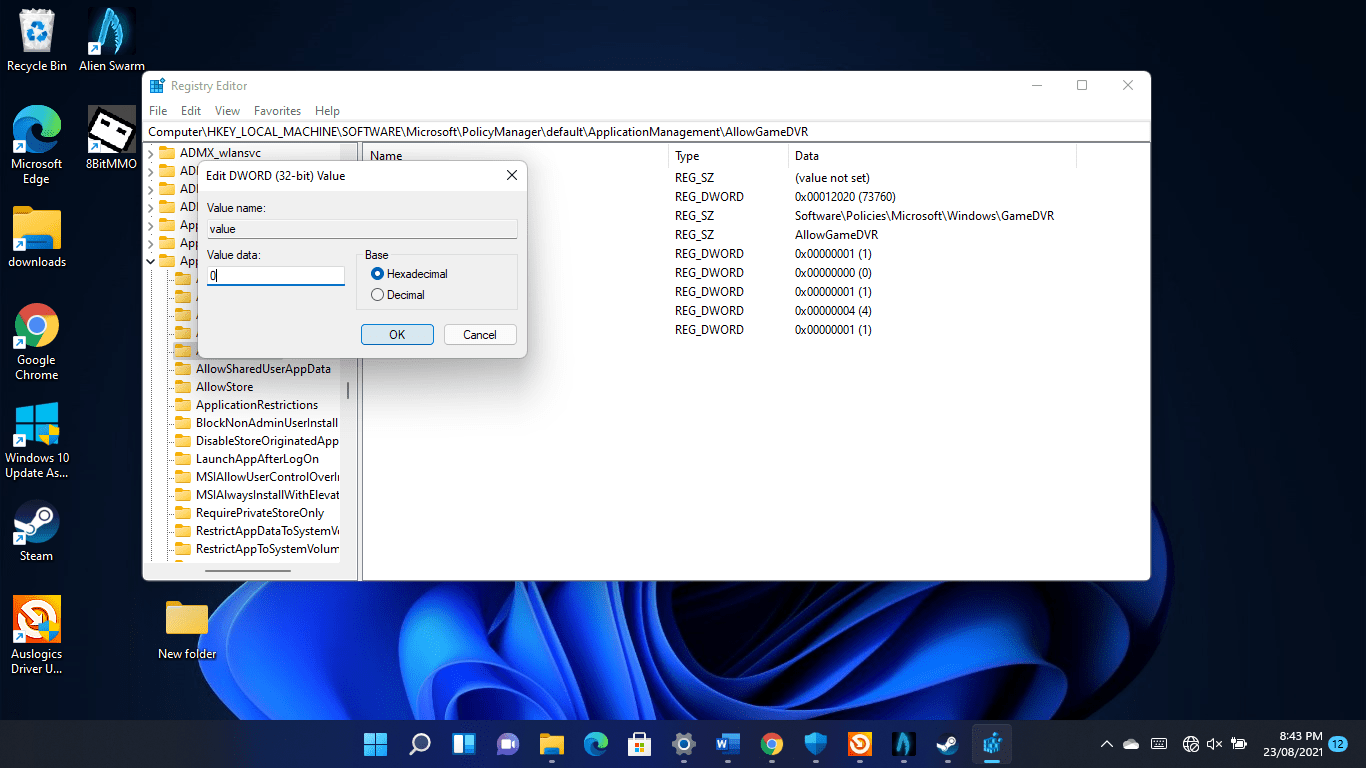
- Once the Edit DWORD (32-bit) Value dialog opens, enter 0 under Value and click OK.
Update your graphics card driver
Your graphics card is one of the main hardware components that determine your FPS. If its driver software is faulty or out of date, it will have a negative impact on your game’s performance. This is why driver updates are among the most important aspects of gaming.
While installing the card’s latest driver is the way to go, doing it from scratch is best practice. This way, you won’t be risking complications from the driver you’re replacing, especially if it’s corrupt.
So, you have to start by uninstalling the current display driver.
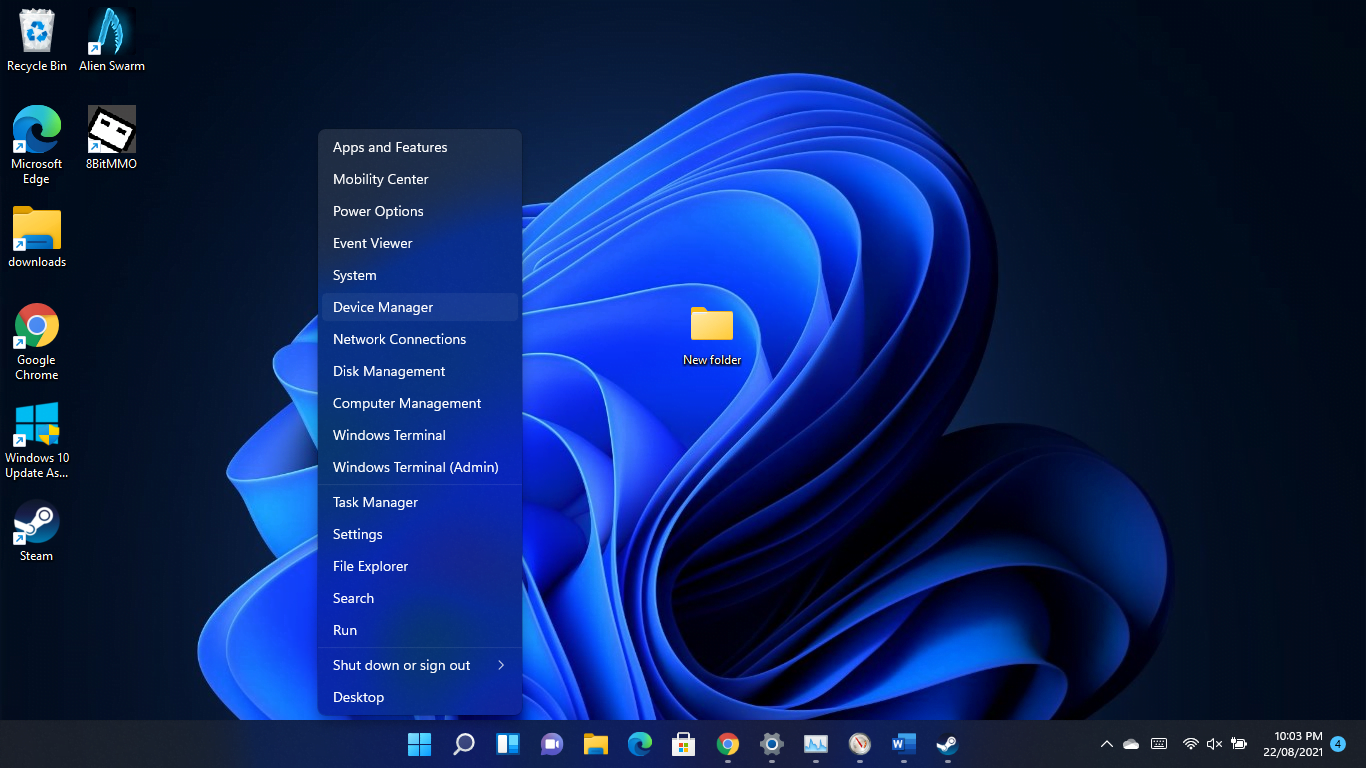
- Press the Windows logo and X keys and select Device Manager from the menu.
- After the Device Manager window shows up, expand the Display Adapters category.

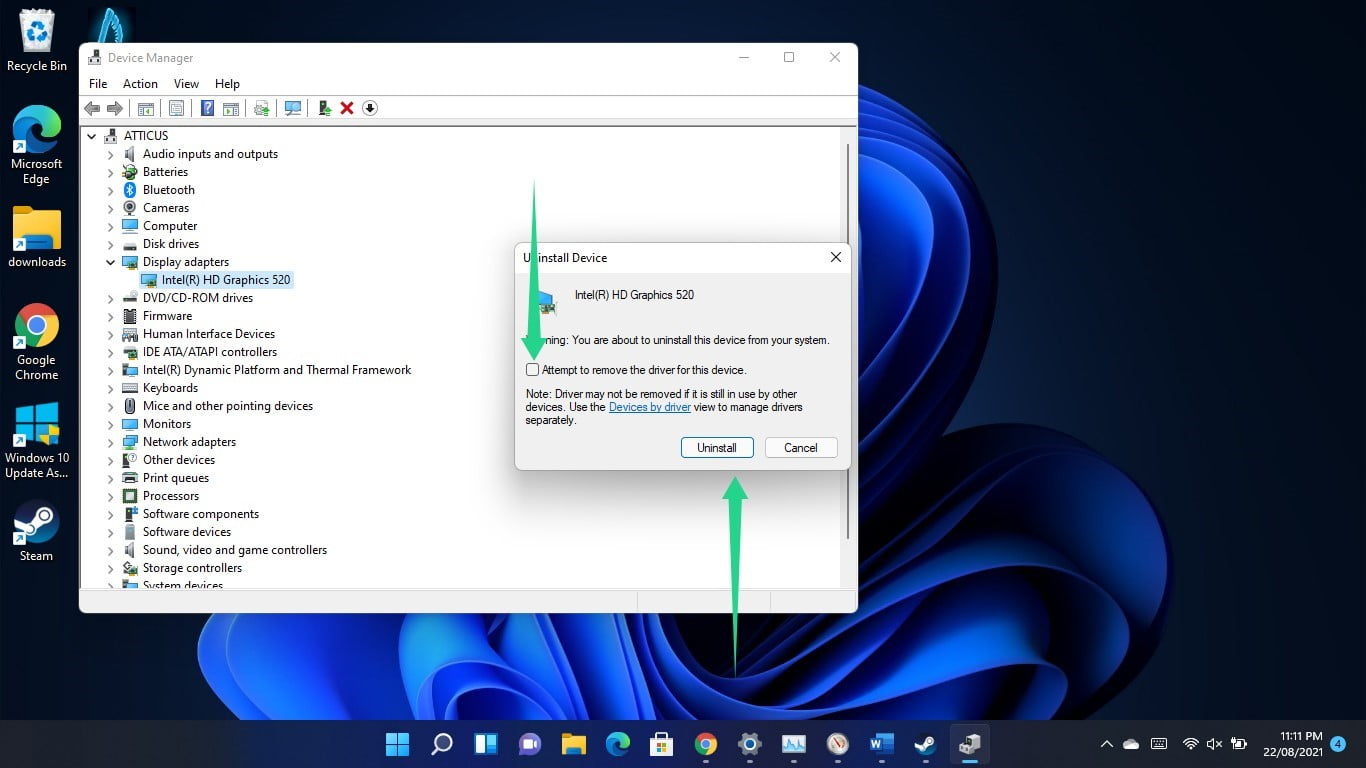
- Right-click your dedicated graphics card and click Uninstall Device once the context menu appears.
- Check the “Attempt to remove the driver for this device” box and click on Uninstall.
- Restart your computer.
Windows will install a generic graphics driver after your PC restarts. So you can now install your graphics card’s latest official driver.
You can go through the Device Manager, use a third-party driver updater, or use your graphics card’s proprietary program to install the updated driver.
Let’s start with the Device Manager.
Using the Device Manager
This method starts with you going to the website of your GPU’s manufacturer. Once you get there, search for your card’s updated driver by entering its make and model.
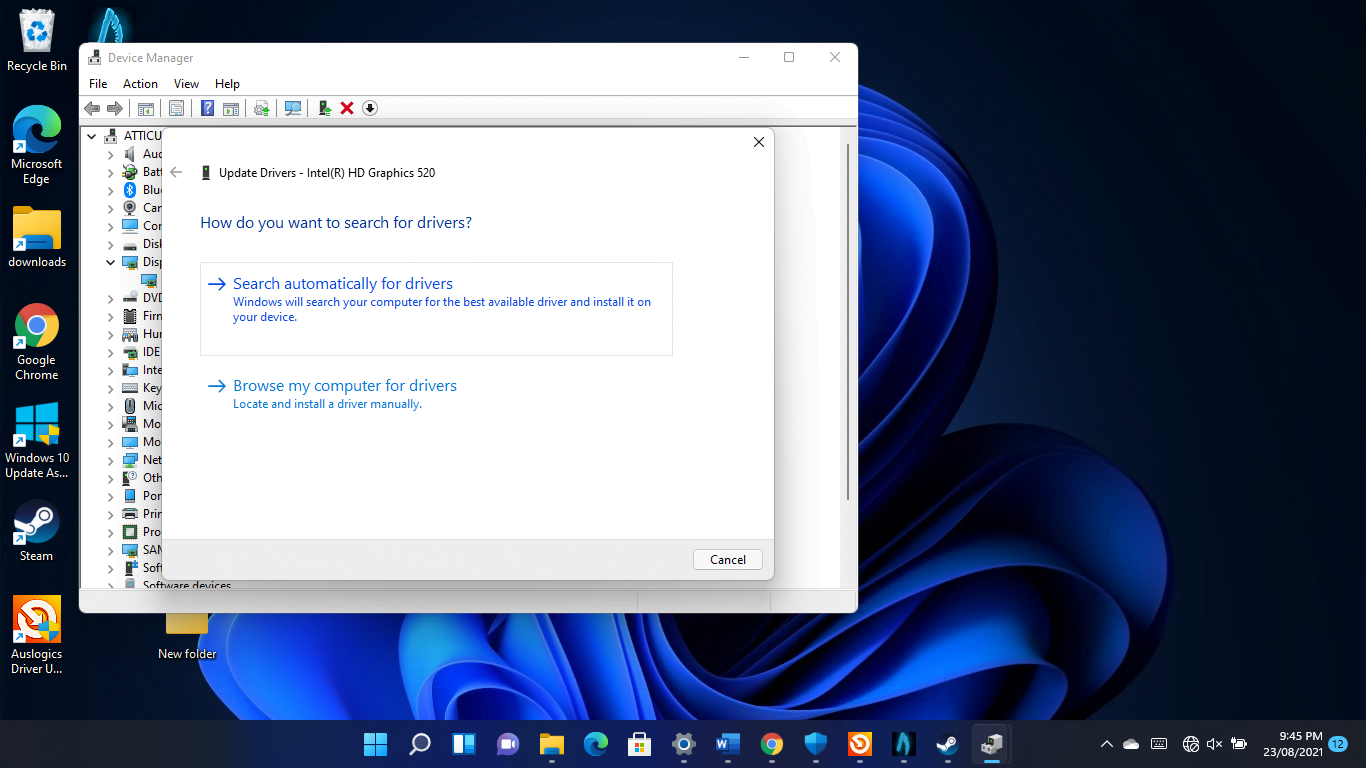
- Once you’ve downloaded the driver, head to the Device Manager window, expand the Display Adapters category, and right-click on your graphics card. Pick the Update Driver option, and after the Update Driver window appears, click “Search Automatically for drivers.”
Windows will now search for the GPU driver on your computer and install it automatically.
- You can also go for the “Browse my computer for drivers” option and use the Browse button to narrow the search to the folder where you saved the package you downloaded.
You can now check if the game runs smoothly.
- The Device Manager method works, but it can be stressful and risky. For example, if you download a driver package that isn’t designed for and compatible with your graphics card, you could find yourself dealing with worse problems.
Head to the next step for a better solution.
Using a third-party driver-updating program
You can simplify the driver-updating process by using Auslogics Driver Updater. The program detects problematic drivers and automatically updates them. Once you install the tool, you no longer have to worry about driver problems.
-
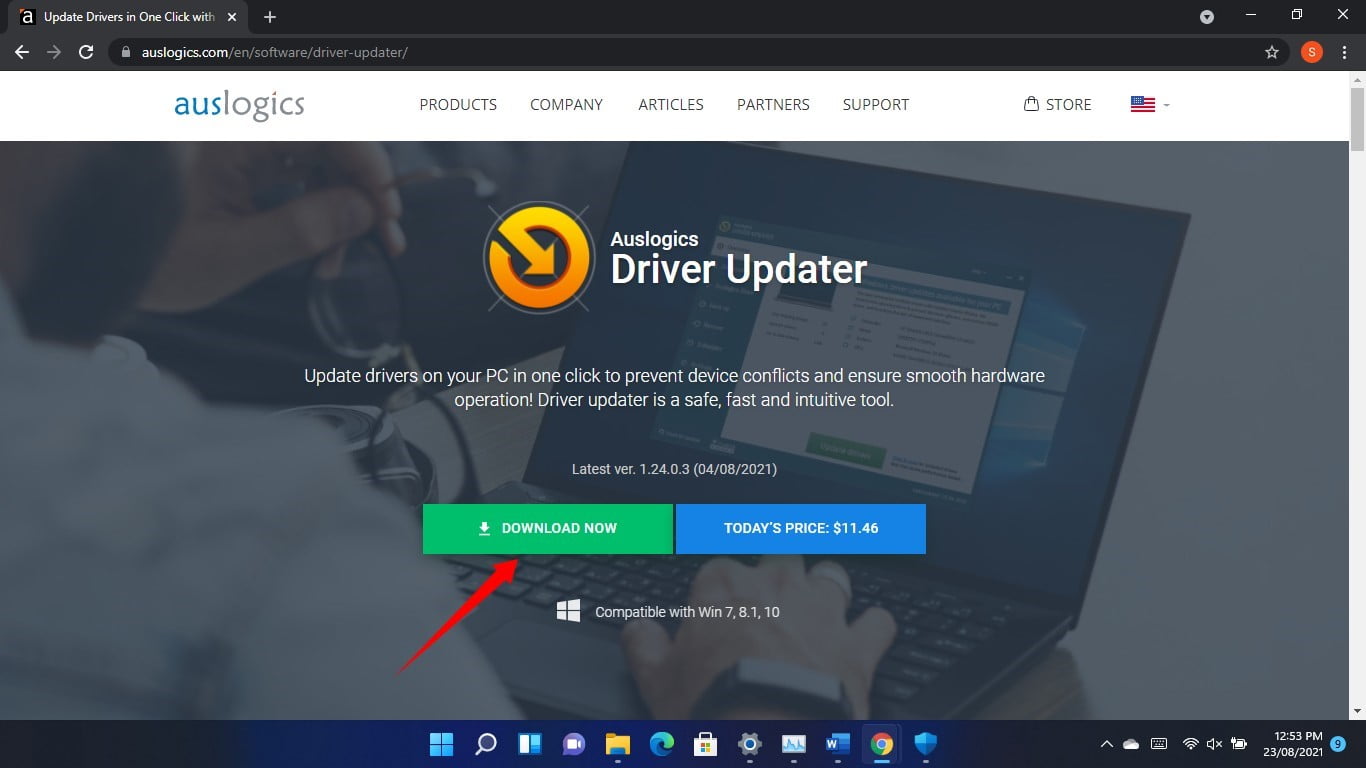
- Open this link to download the program’s setup file.
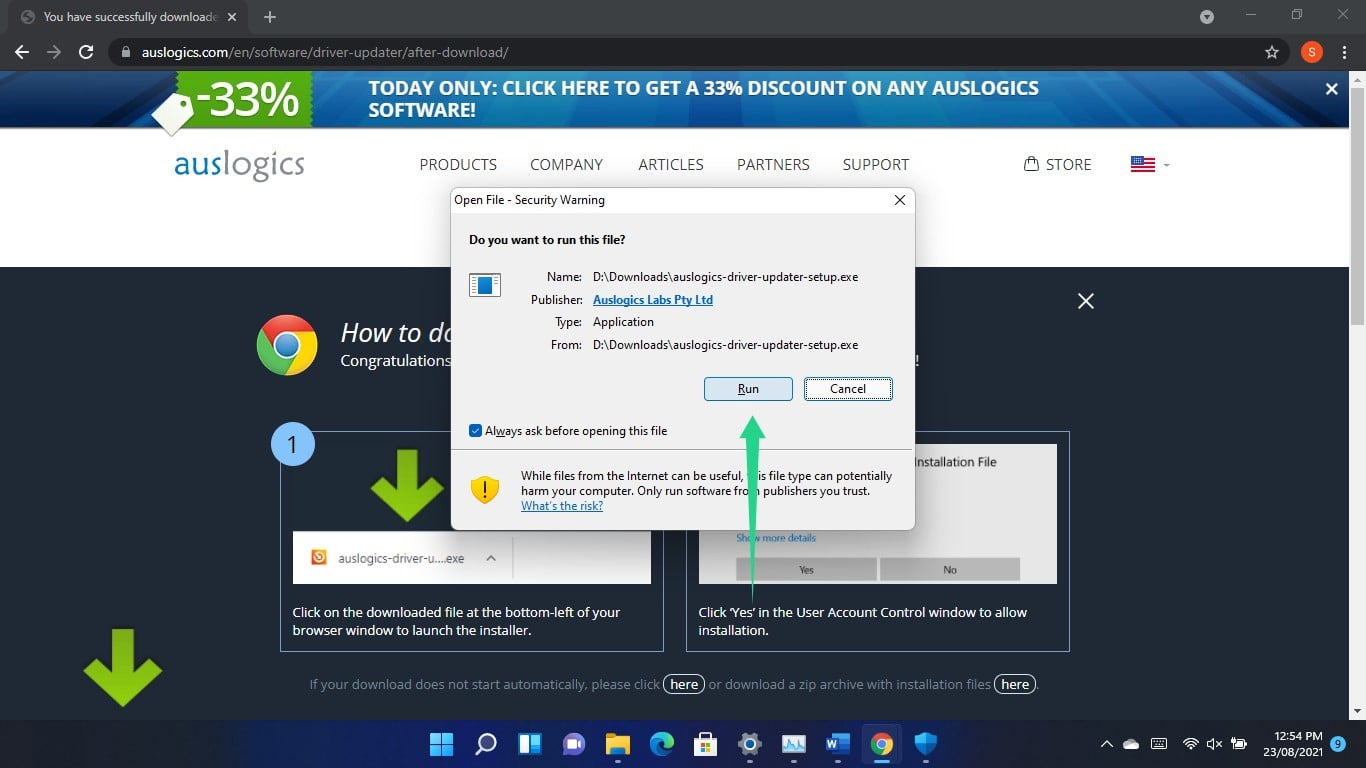
- Open the installation package once the download completes.
- Click on Run in the warning dialog window and select Yes in the User Account Control window.
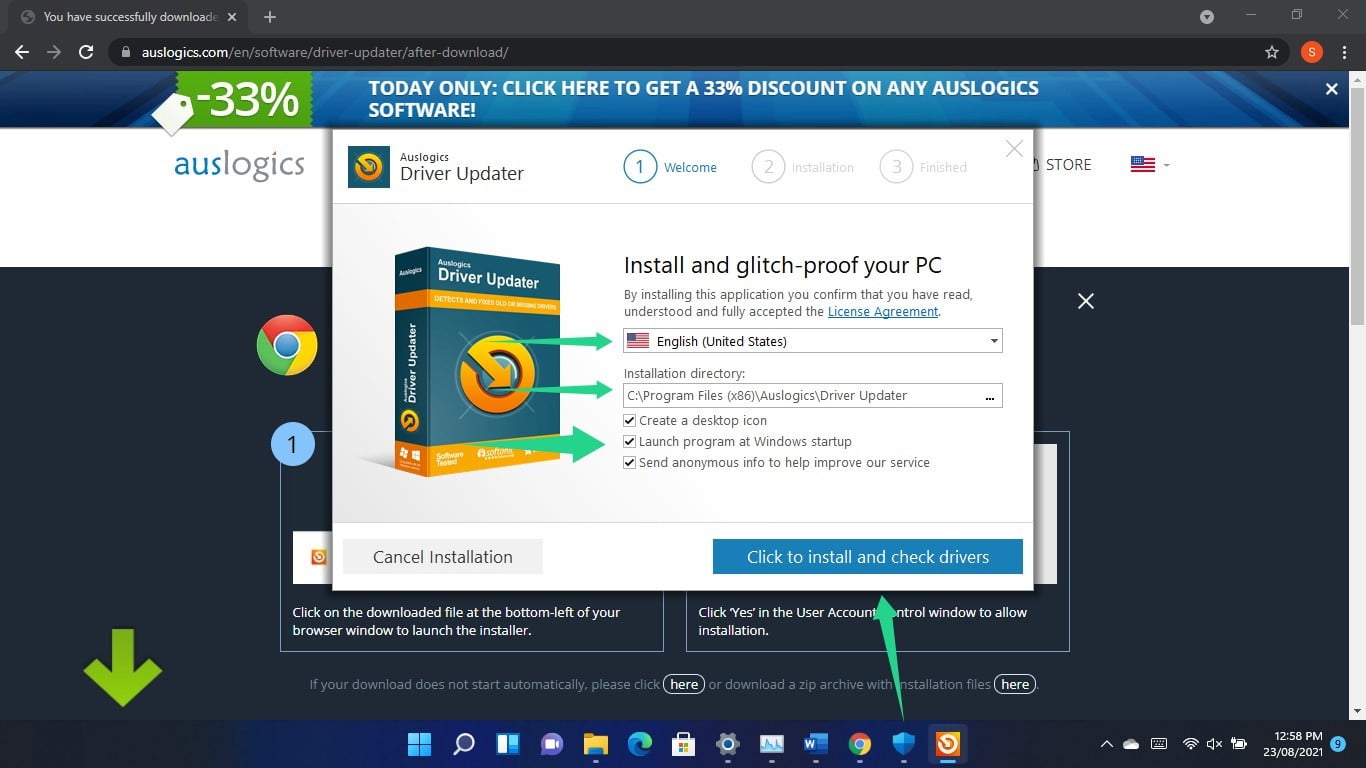
- After the setup wizard opens, choose your language and your preferred installation folder. Next, choose whether to allow the program to start up automatically whenever your computer comes on and whether you want it to send anonymous crash reports to its developers.
- After that, click on the “Click to install and check drivers” button and allow the installation process to run its course.
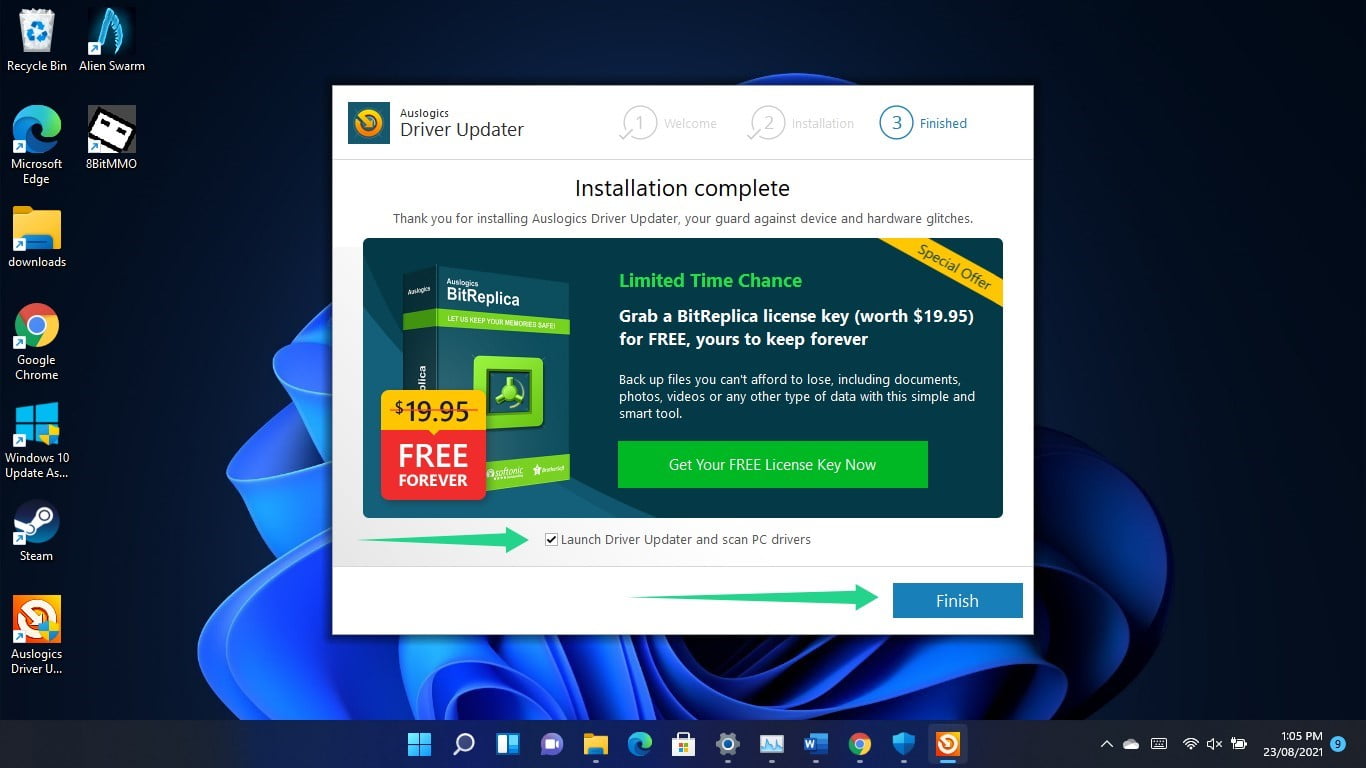
- After the installation process completes, leave the “Launch Driver Updater and scan PC drivers” box checked and click on Finish.
- The tool will now start checking your computer for driver issues, and you’ll be able to see it in the taskbar. If it doesn’t open automatically, launch it and click on the Start Scan button.
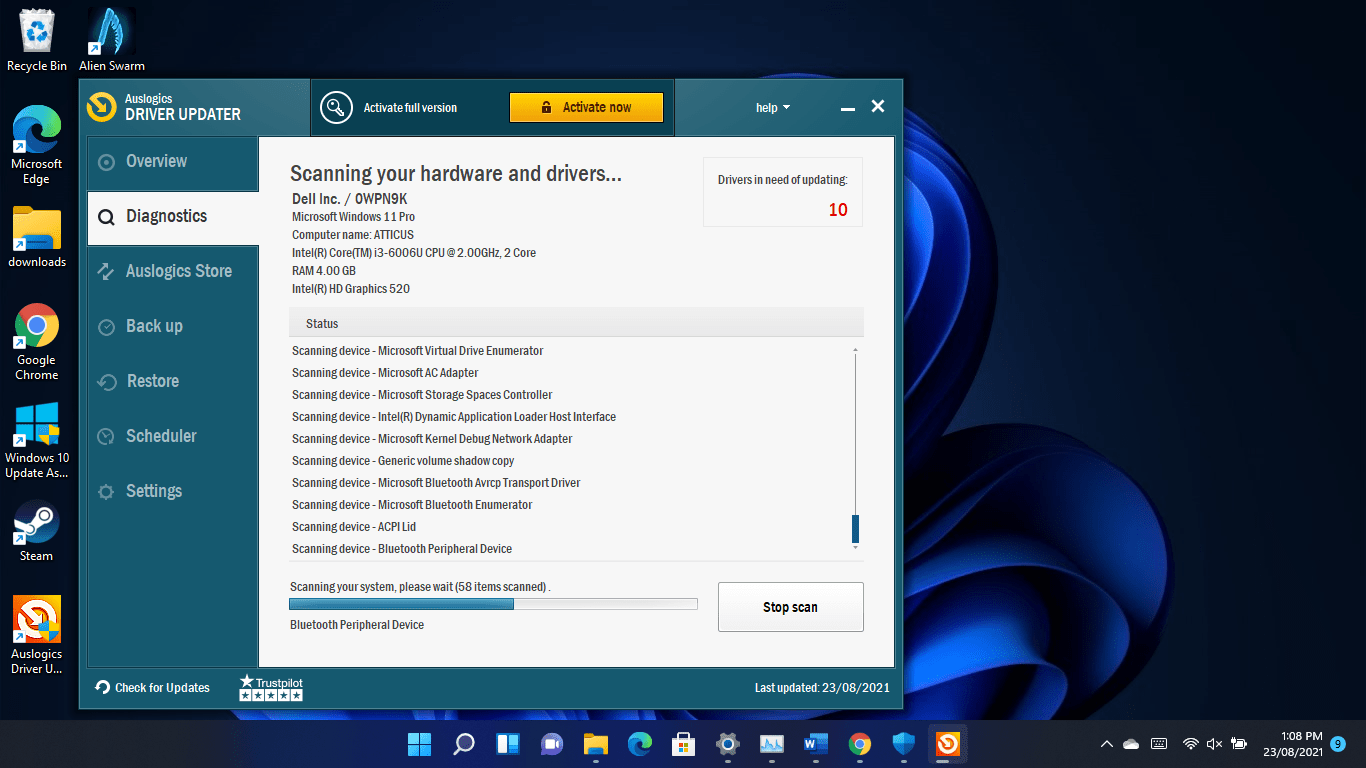
- Once the program completes the scan, it will list the outdated drivers on your computer. Your display driver will appear on the list if it has issues.
- Now, scroll through the list of drivers and click on the Update button to download and install the driver’s latest version.
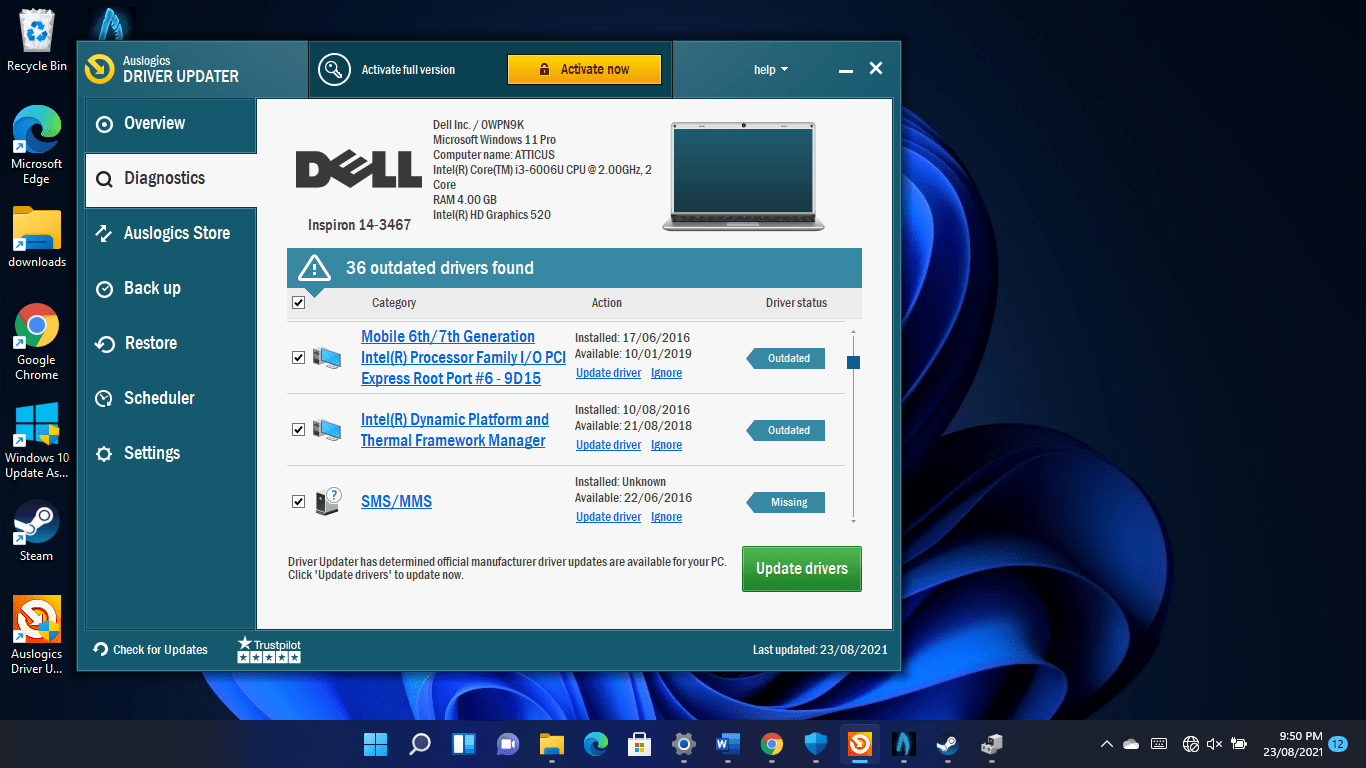
- You can update multiple drivers at once if you’re on the full version.
- Reboot your PC.
Using your dedicated GPU’s proprietary program
You can use NVIDIA’s Control Panel or AMD’s Radeon Settings to download and install your latest graphics card driver, depending on the GPU you use. The process is almost similar to going through the card manufacturer’s website. The only difference is that these apps will detect your GPU’s make and model and automatically direct you to the correct driver, saving you the stress of a manual search.
That said, using these apps will only help you update your graphics card driver. With Auslogics Driver Updater, you can easily download and install updates for other device drivers that also affect your gaming performance.
Always make sure you run your games on your dedicated GPU
Windows 11 might be switching your games to run on your integrated graphics card to save power. Although heavy processes are meant to activate your dedicated card, it doesn’t always work that way.
You have to manually force your game to run on your dedicated GPU, whether you’re running on battery or your system is plugged in. There are two ways to do that: you can use the Settings app or your graphics card’s proprietary program.
Using the Settings program
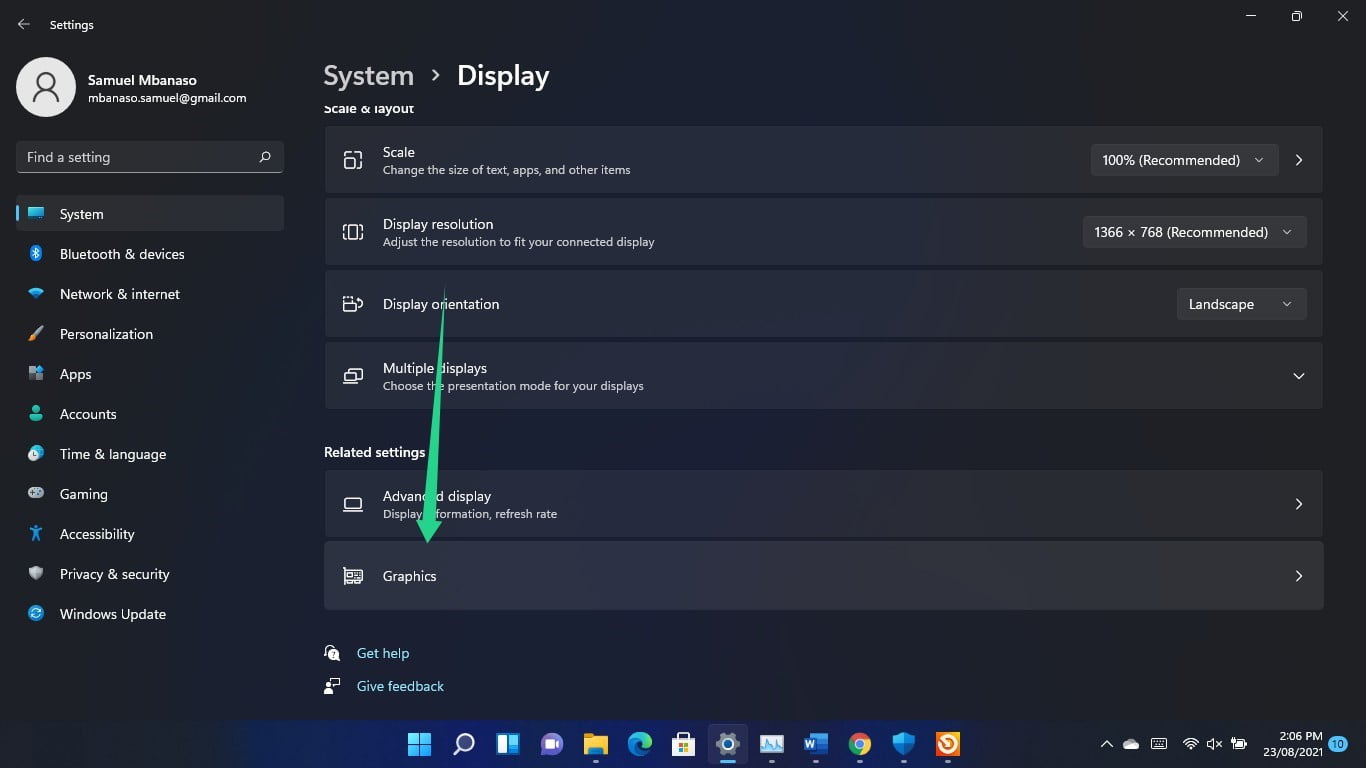
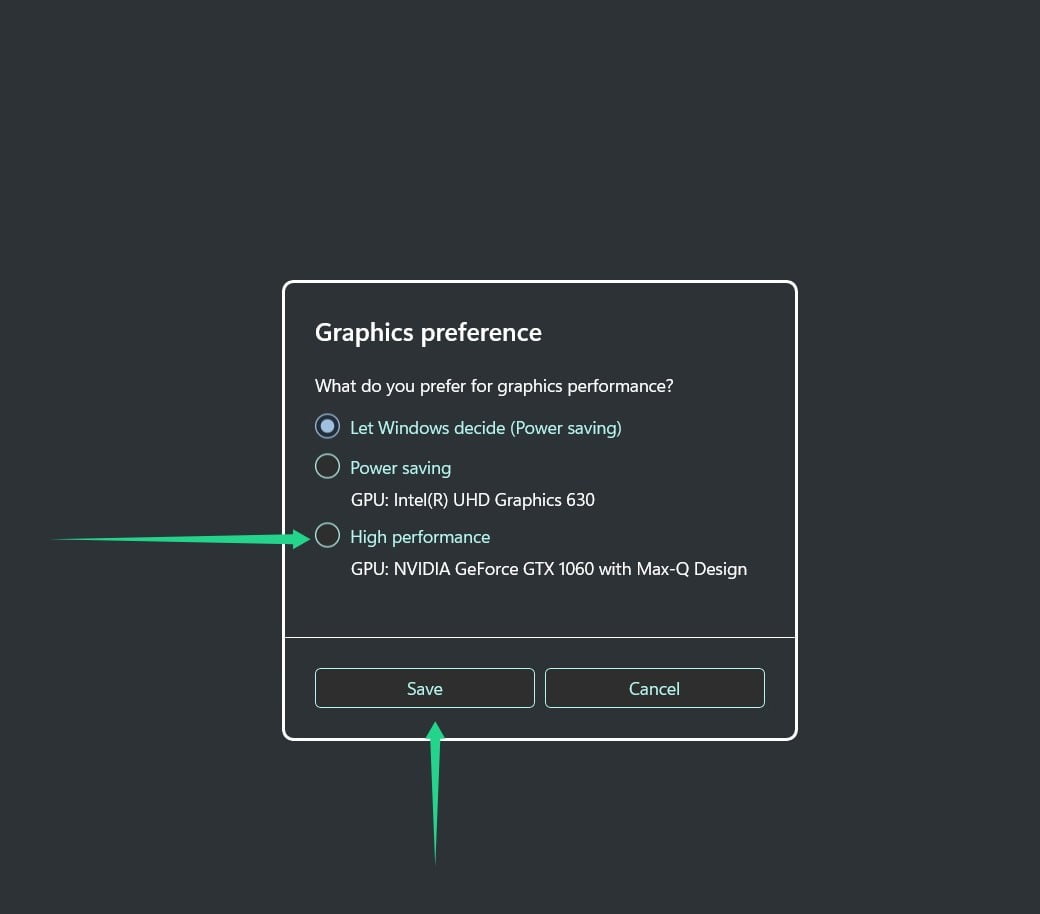
- Open the Settings application (Windows logo + I) and click on Display.
- After the System > Display window opens, go to the Related Settings section and click on Graphics.
- Use the search box to find the game.
- Once the game’s icon shows up, click on it and click on Options.
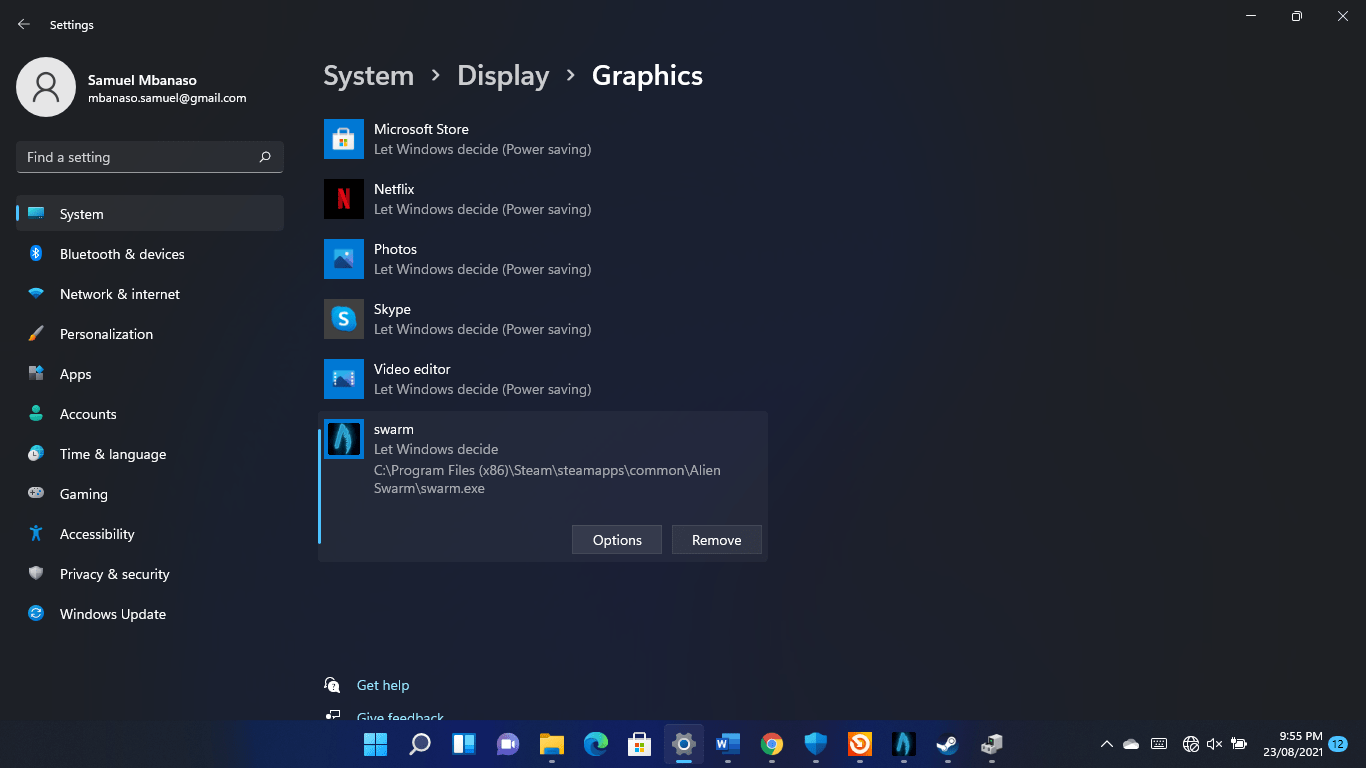
- Select High Performance and click on Save.
Assign the game to all your CPU cores
You can boost your game’s performance by pinning it to all your computer’s cores. Going through the Task Manager and using the Steam client are two ways to do that.
Using the Steam client
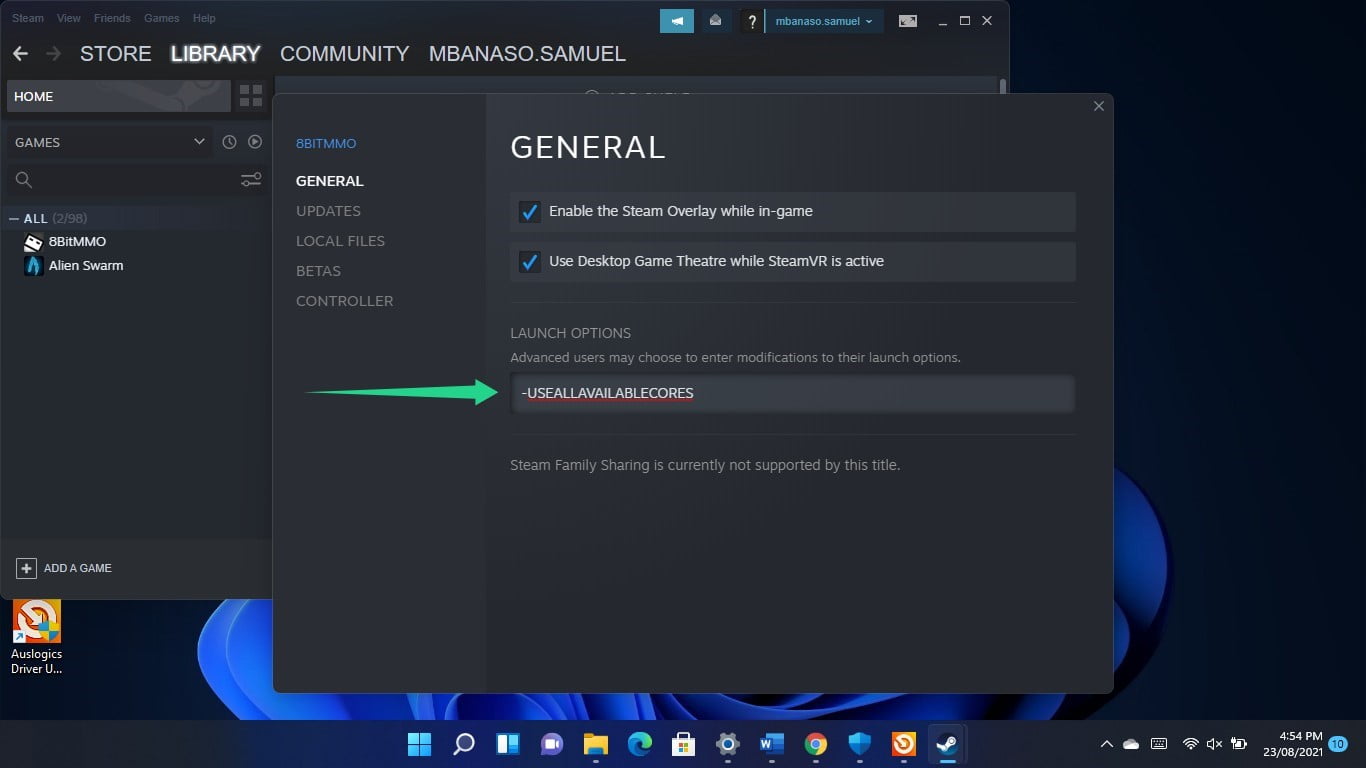
You’ll have to change the game’s launch options. Open the Steam client, head to your game library, right-click on the game, and click on Properties.
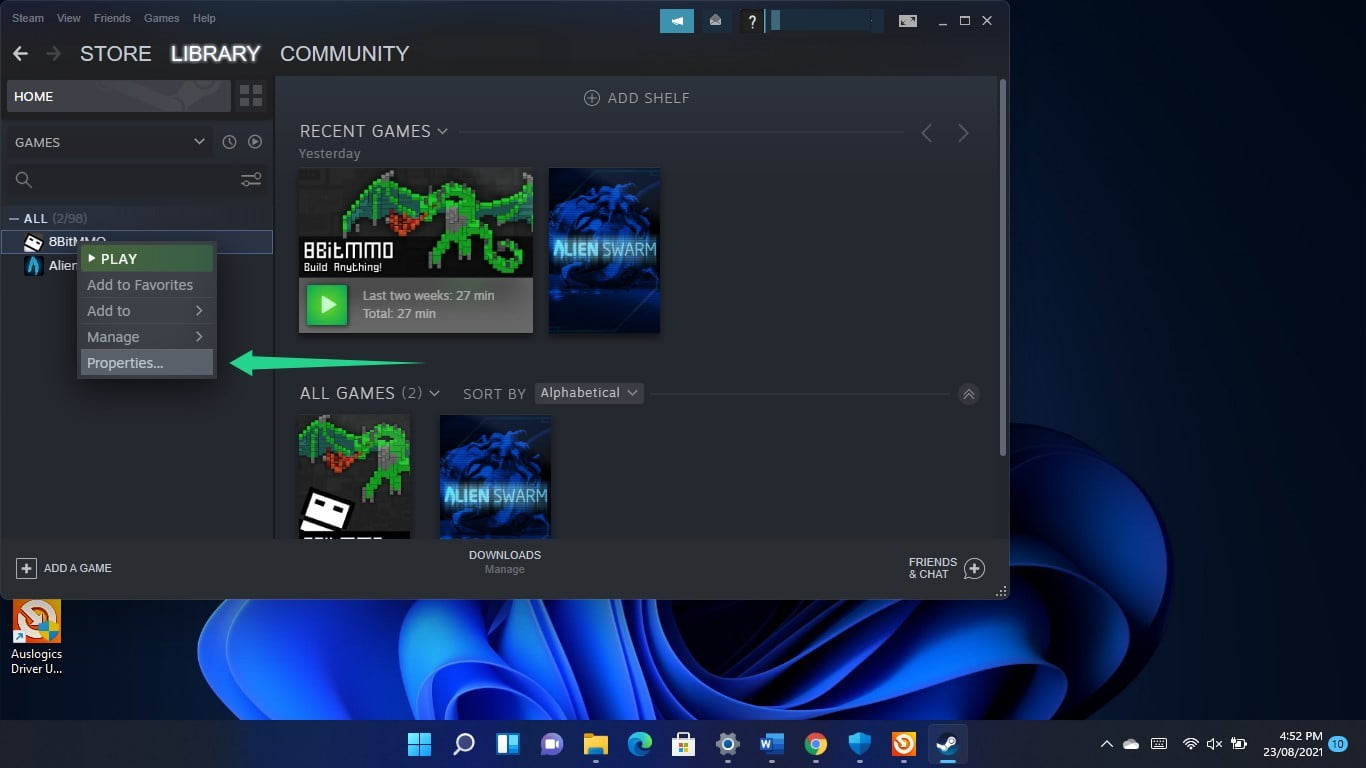
After the General interface of the Properties window opens, go to the Launch Options text box and enter the following text:
-USEALLAVAILABLECORES
Using the Task Manager
- Tap the Windows logo and X keys together and select Task Manager in the menu. After the Task Manager opens, head to the game, right-click it and choose Go to Details in the menu.
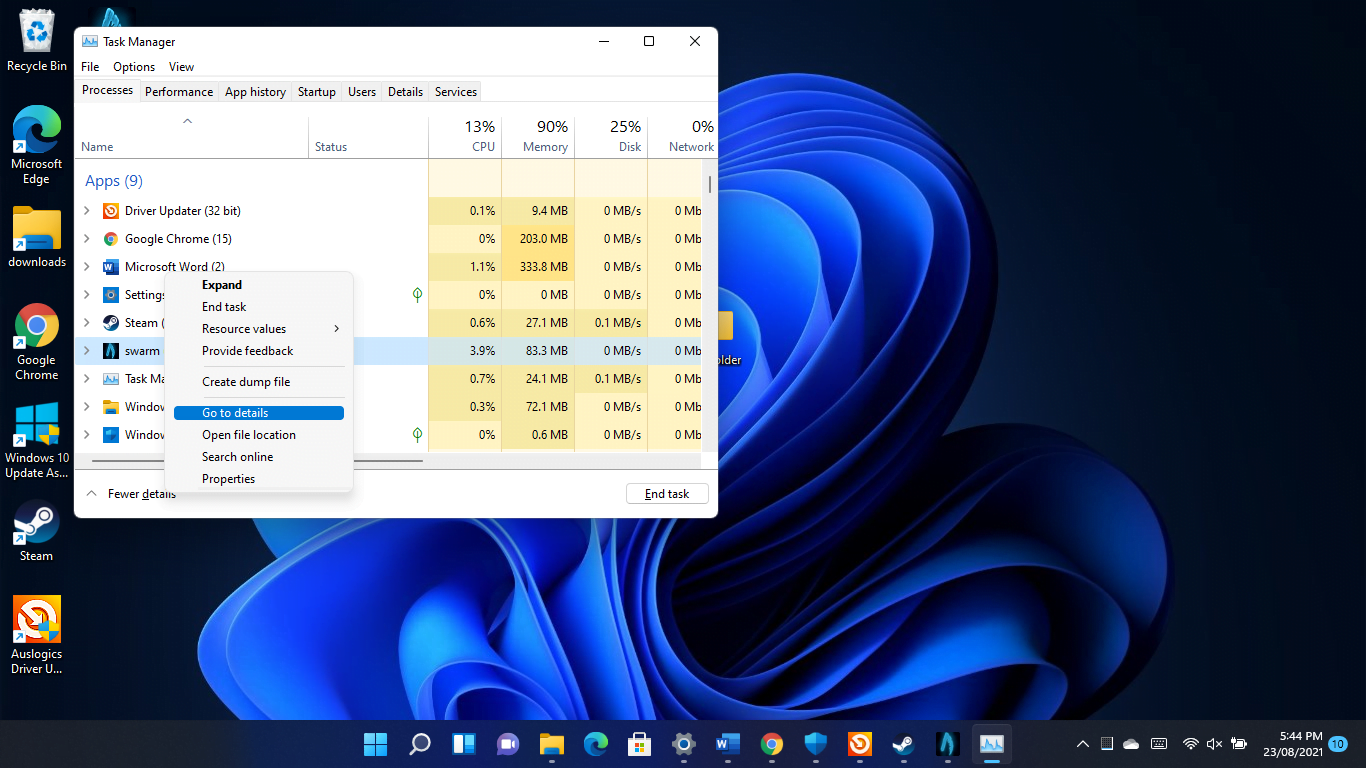
- As soon as you see the Details tab, right-click the game and select CPU Affinity from the context menu.
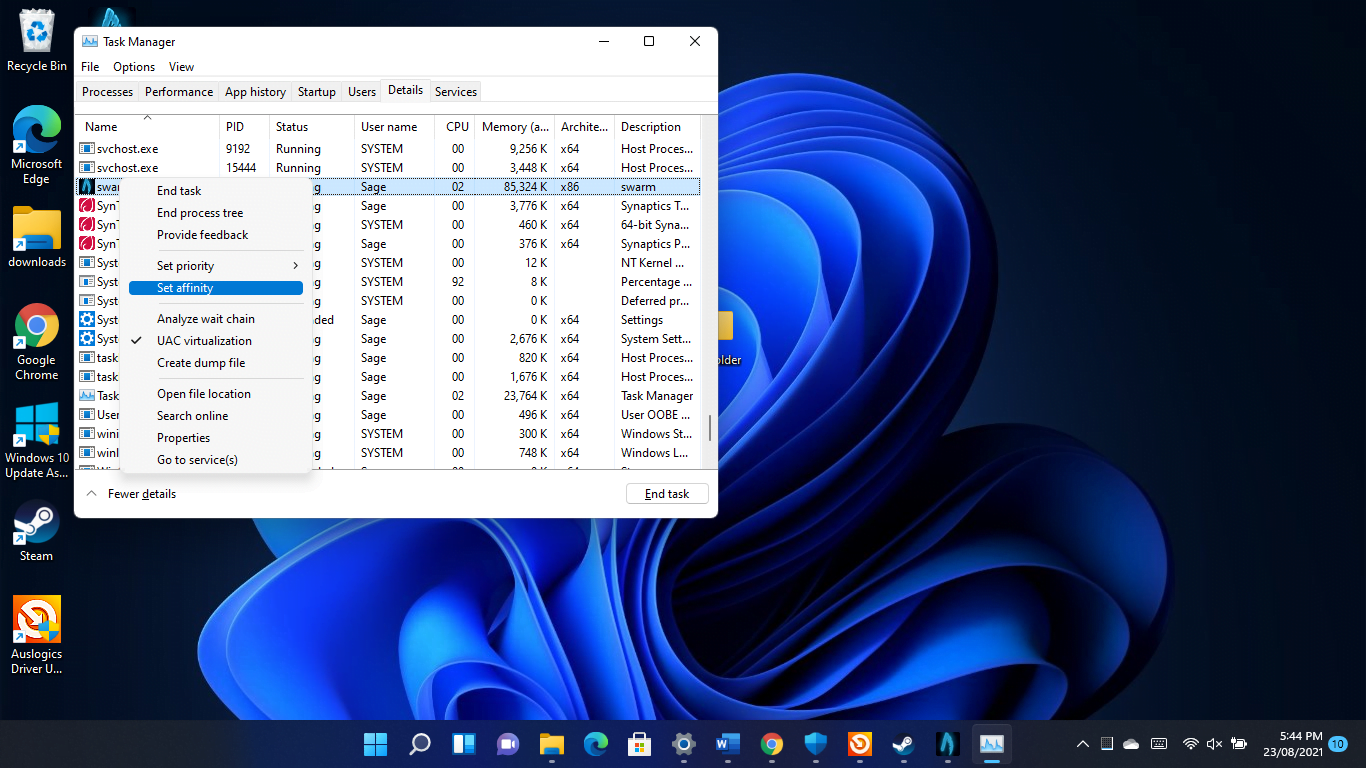
- Now, tick every box in the Processor Affinity window and click on OK.

Add your games as exclusions in your antivirus program
Antivirus programs can drag your gaming performance down when they scan your game files and even block them. Many security applications are guilty of blocking legitimate games because they see them as threats due to their resource-demanding nature.
- If you’re still suffering from low FPS in Windows 11, consider adding your games as exclusions or exceptions in your system protection program.
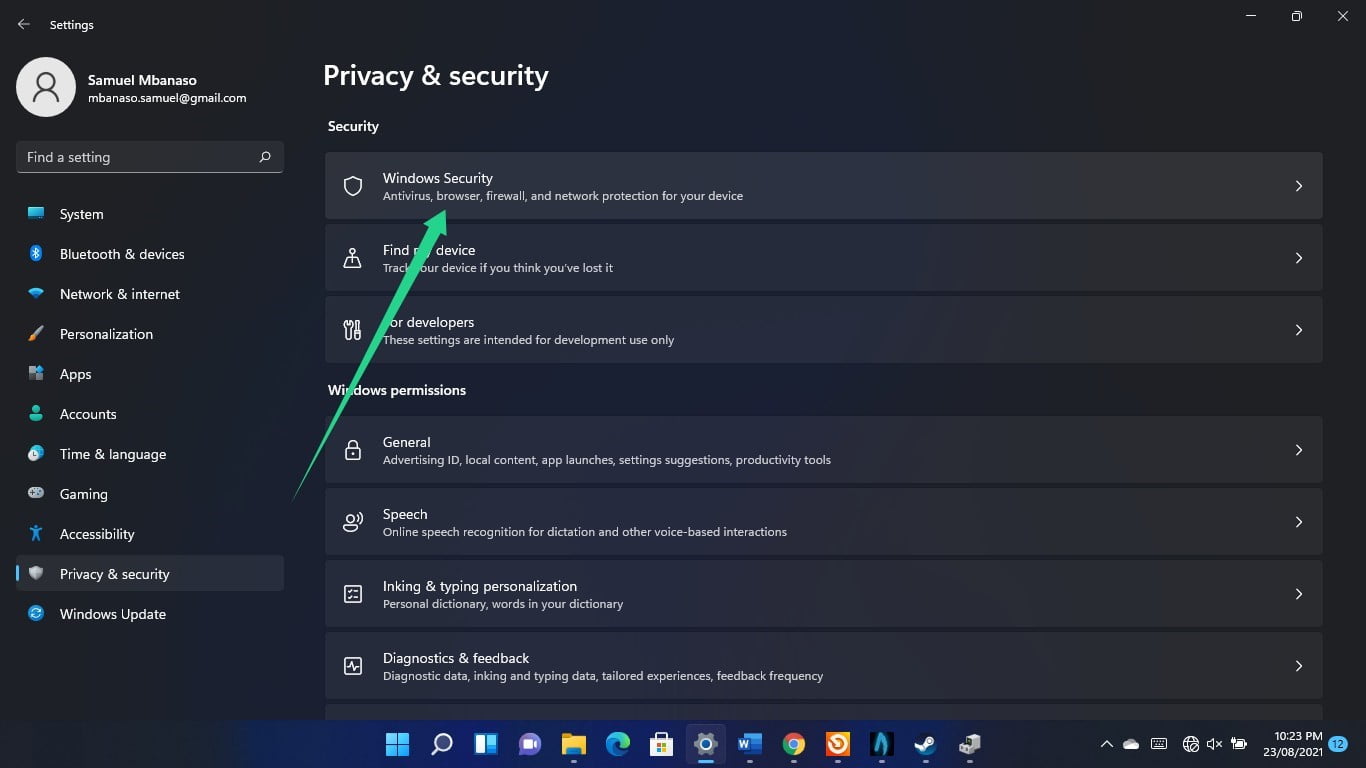
- If you use Windows Security as your primary protection tool, head to the taskbar, open the Settings app, click on Privacy and Security in the left pane of the Settings app, and click on Windows Security on the right side of the window.
- After the Windows Security page opens, go to Virus & Threat Protection and click on it.
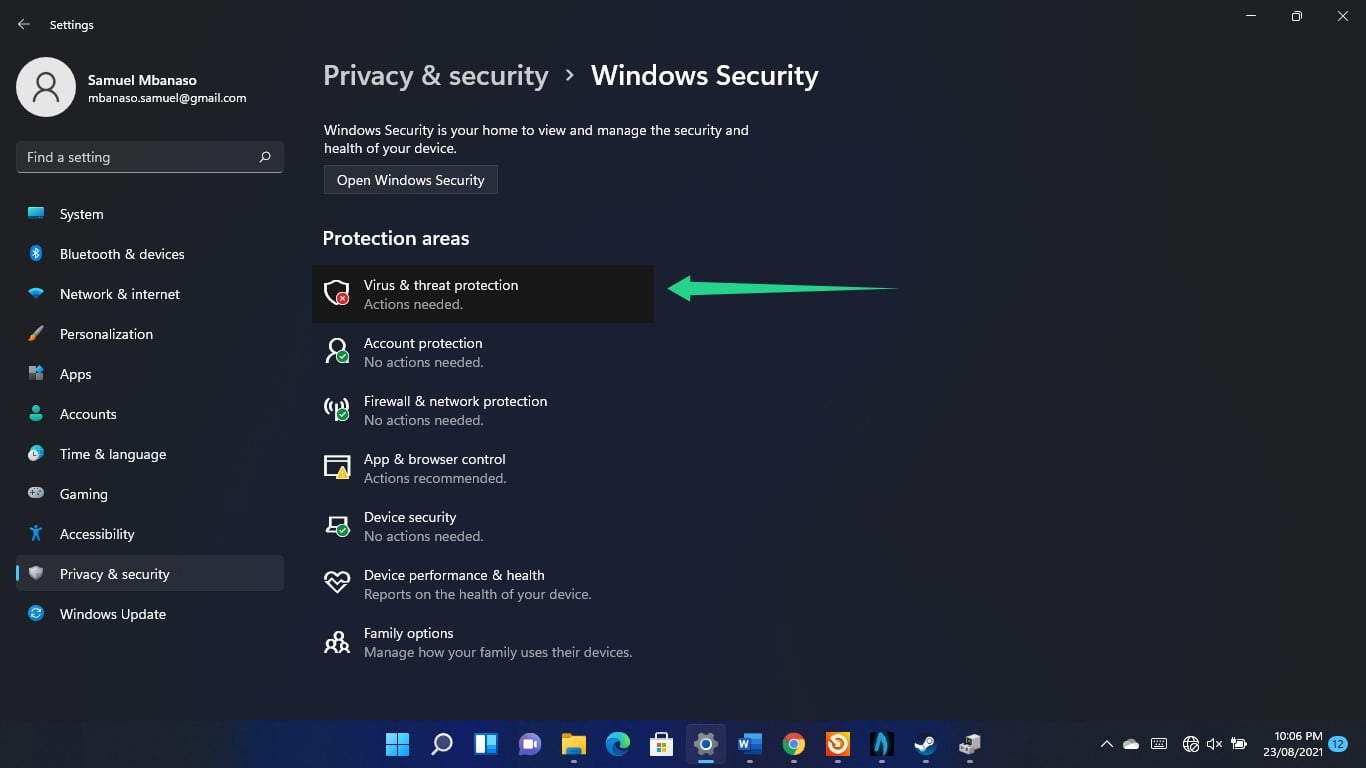
- Scroll down and click on Manage Settings when the Virus & Threat Protection window appears.
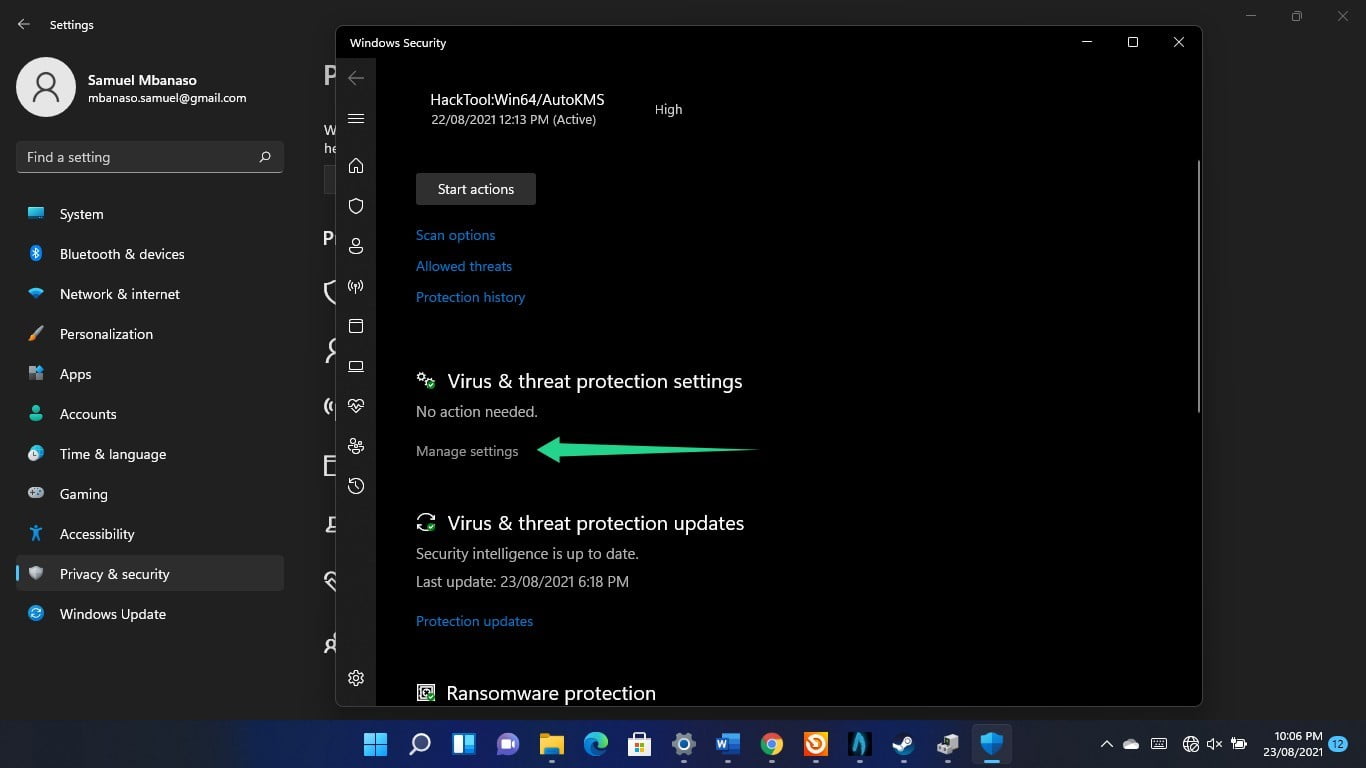
- After seeing the Virus & Threat Protection Settings page, scroll down and click on Add or Remove an Exclusion.
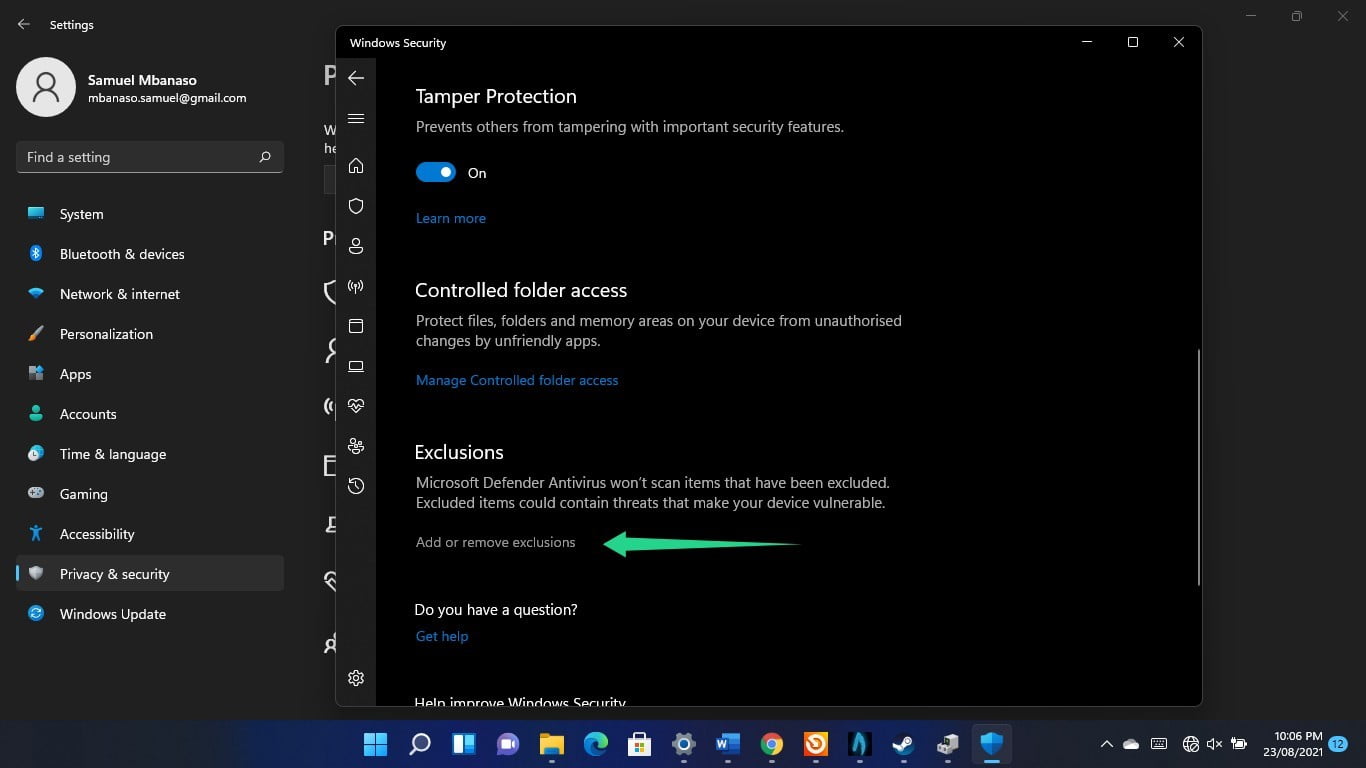
- Click Yes in the UAC pop-up.
- Now, click on Add an Exclusion and click on Folder.
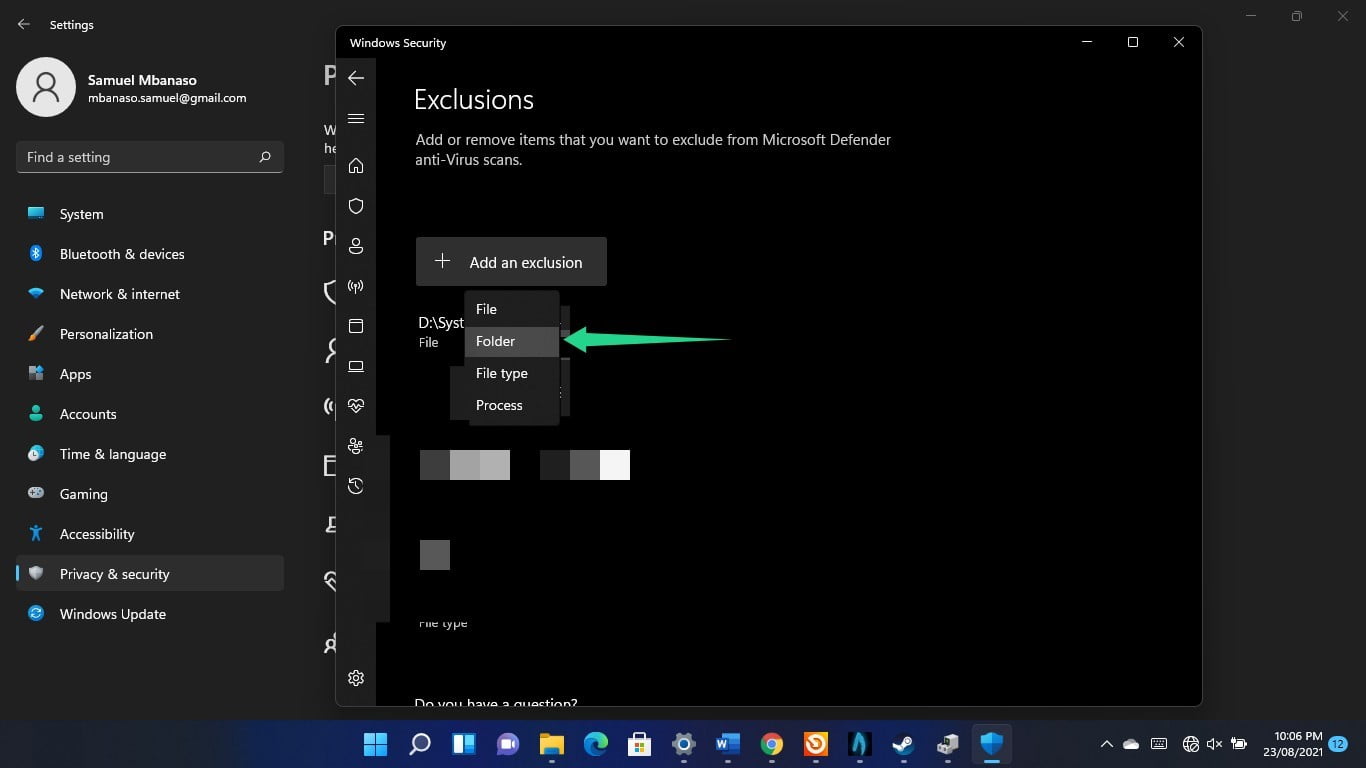
- After the Folder dialog opens, browse to the installation folder of the game you want to remove and double-click its executable file.
- Repeat the process for other games.
Conclusion
That’s how to lower gaming ping time in Windows 11 and fix FPS problems. In addition, you can use Auslogics BoostSpeed to make your system run faster. The tool gets rid of bad files and registry keys that cause performance glitches in the operating system. So far, Auslogics BoostSpeed works with Windows 11 without issues. That means your system will enjoy all the enhancements and benefits that keep millions of Windows users loyal to the app.


 Done! Great to see you among our subscribers!