- Why Is Rockstar Games Launcher Not Working in 2021?
- How to Fix Rockstar Games Launcher Not Working on Windows 10
- Open the Launcher in Administrator Mode
- Update Your Graphics Card
- Flush Your DNS Cache
- Change Your DNS Server
- Add Rockstar Games Launcher to Your Antivirus Program’s Exclusions
- Allow the Launcher Through Your Firewall
- Follow these steps if you use the Windows Defender Firewall program:
- Perform a Clean Boot
- First, start by disabling startup programs:
- Secondly, disable startup services through the System Configuration dialog window:
- Conclusion

Rockstar’s announcement of a launcher didn’t sit well with gamers considering the already saturated game launcher market. The prospect of adding another launcher to Steam, Epic Games, Origin, and more seemed exhausting. However, the game developers made up for it by porting Red Dead Redemption 2 to PCs, a move that’s been long awaited and sought for.
The frustrations, however, came back when the GTA Trilogy launch was riddled with issues and the Rockstar Games Launcher started exhibiting problems.
If you’re experiencing Rockstar Games Launcher problems, this article will show you how to fix them on Windows 10.
Why Is Rockstar Games Launcher Not Working in 2021?
Since systems come with different configurations, your problem could be the result of varying PC issues. However, the possible causes are narrowed down to specific glitches.
Your GPU could be outdated or faulty, your operating system might lack critical updates, and the launcher might need access to specific advanced system resources.
Other issues include faulty DNS cache and DNS servers, application conflicts, and antivirus interference.
We’ll show you how to fix these problems and get the launcher to work again.
How to Fix Rockstar Games Launcher Not Working on Windows 10
Once you resolve the underlying glitches affecting the program, the launcher should work correctly. So, follow the steps below to fix the possible causes of the launcher’s startup problem.
Make Sure the Launcher Isn’t Already Running
The launcher might currently be running in the background but not showing in your taskbar. This could be the case if it’s configured to launch at startup. So, you’ll have to head to the Task Manager to close it entirely and relaunch it.
Press the Ctrl, Shift, and Esc keyboard buttons together to open the Task Manager. After the program appears, head to the Processes tab (click on More Details if you can’t see the tabs). Next, locate the launcher, click on it, and select End Task.
After that, restart the program.
If you want to prevent this from happening in the future, stop the launcher from opening automatically at startup.
Here’s how:
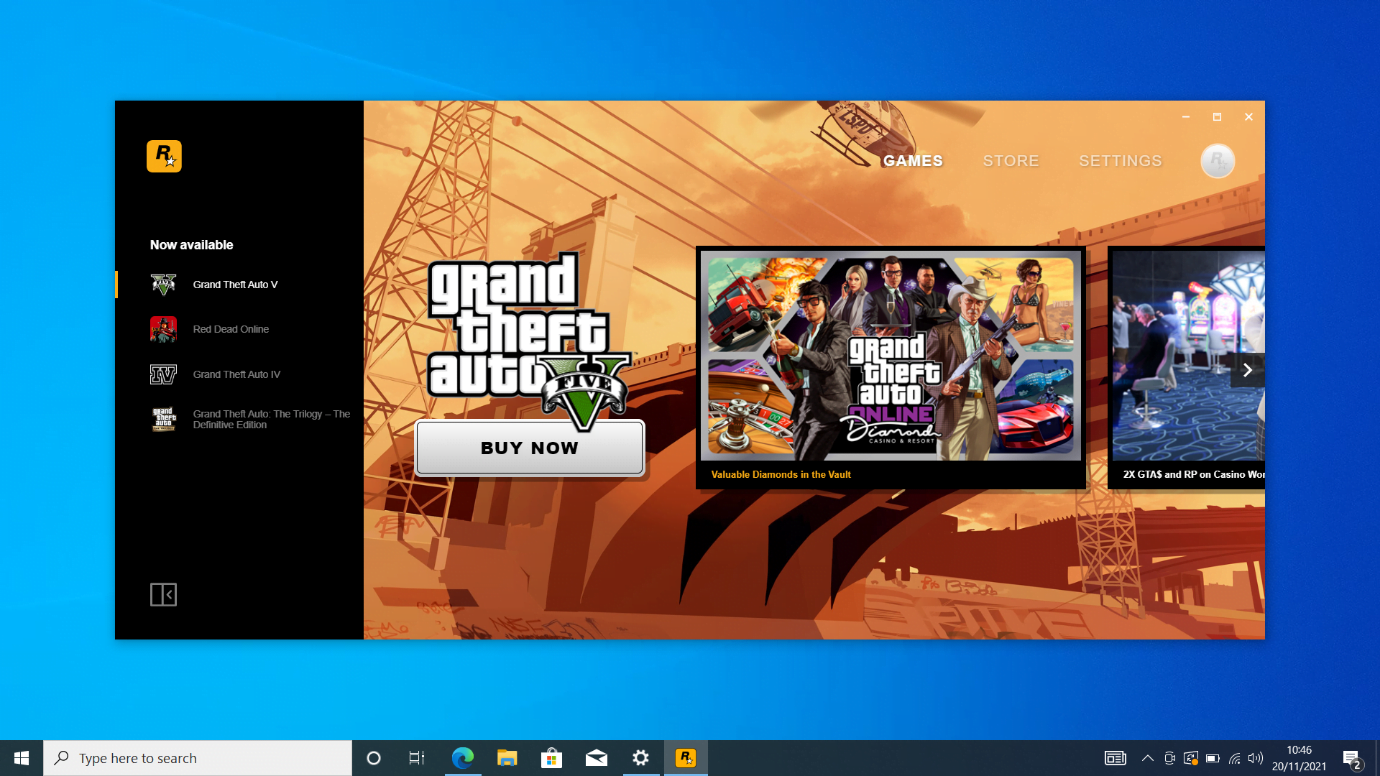
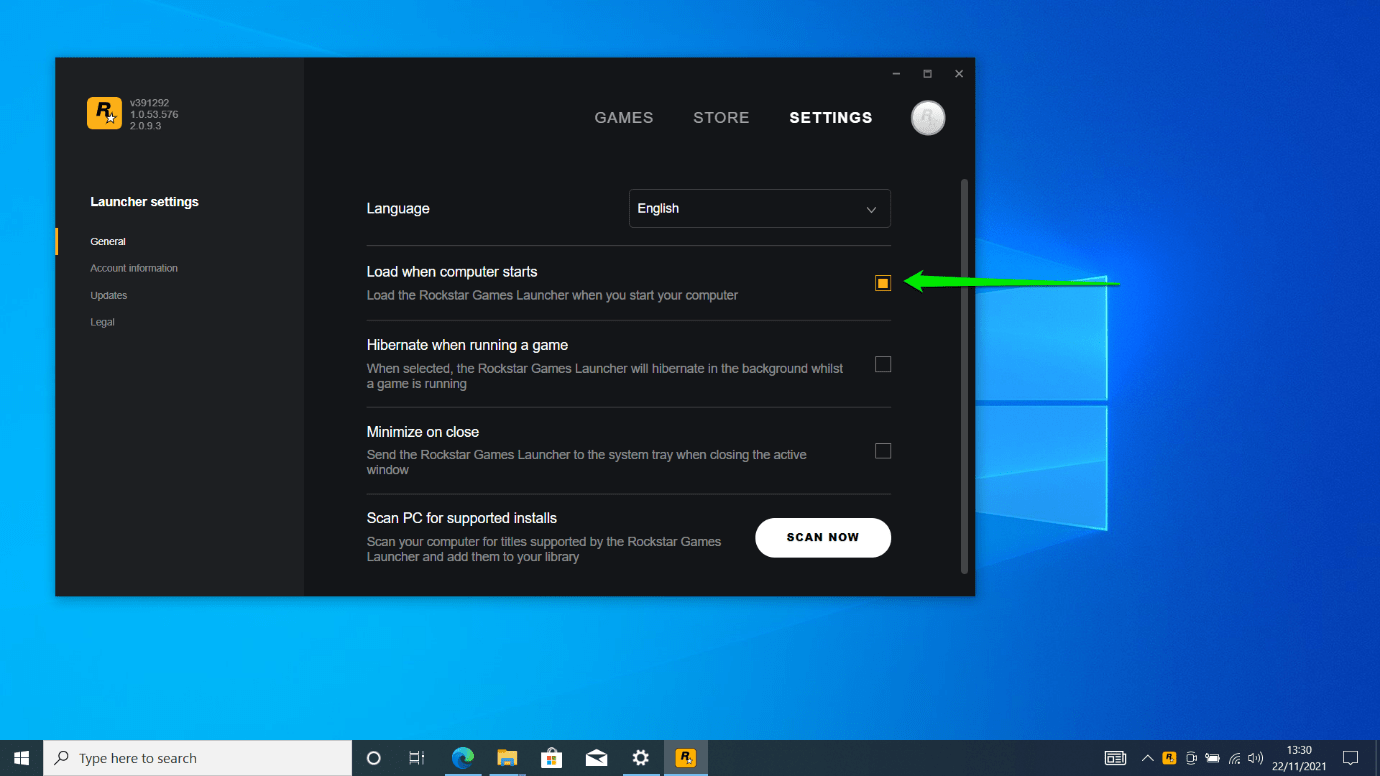
Open the Rockstar Games Launcher and click on Settings in the top-right corner.

Once the Settings page opens, uncheck the box for “Load when computer starts.”
Open the Launcher in Administrator Mode
Without admin privileges, most applications don’t have access to the system resources they need to run. This could be why the launcher isn’t coming up. So, head to the program’s compatibility settings and allow it to run with administrative privileges whenever you start it.
Follow these steps:
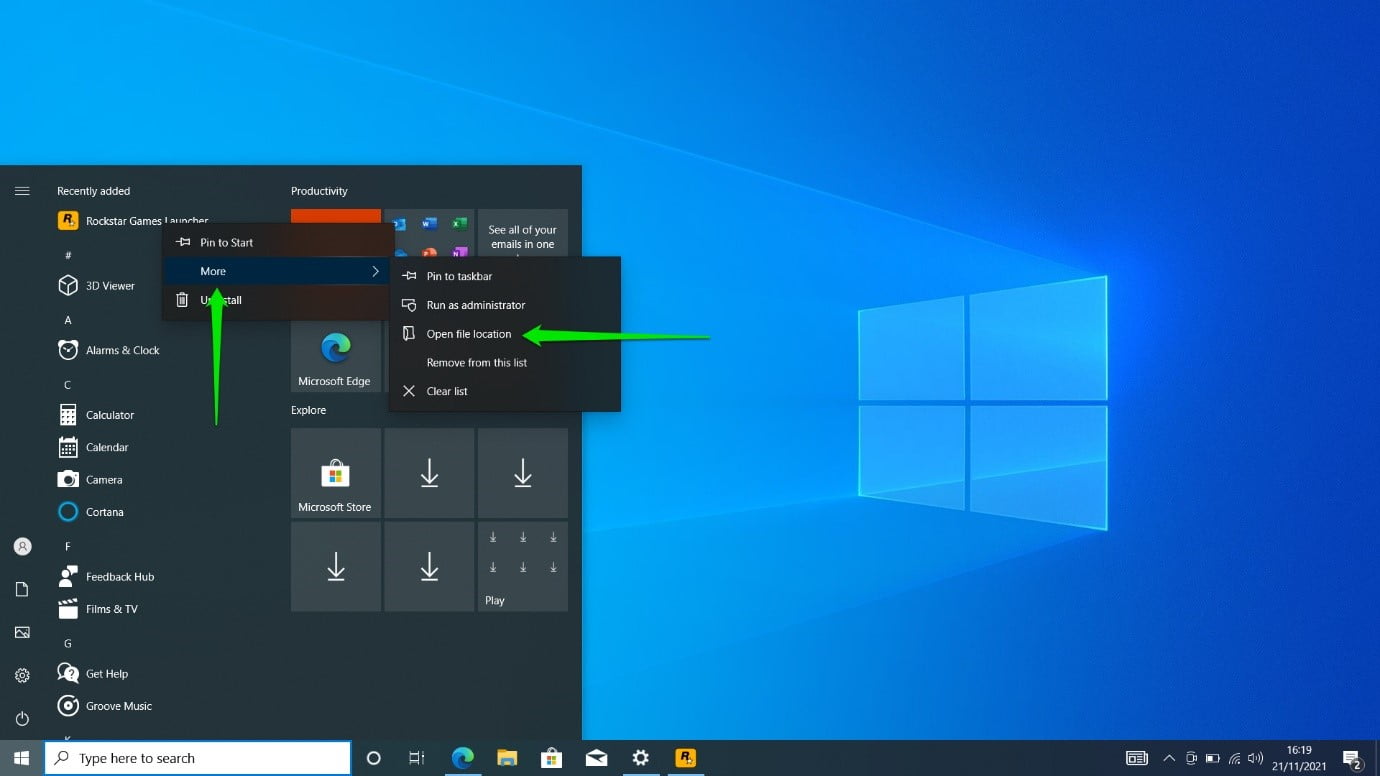
- Open the Start menu, search for the Rockstar Games Launcher, and right-click it.
- Click on More > Open File Location.
- After the Rockstar Games Launcher’s Start menu shortcut appears in the File Explorer window, right-click it and select Open File Location in the context menu.
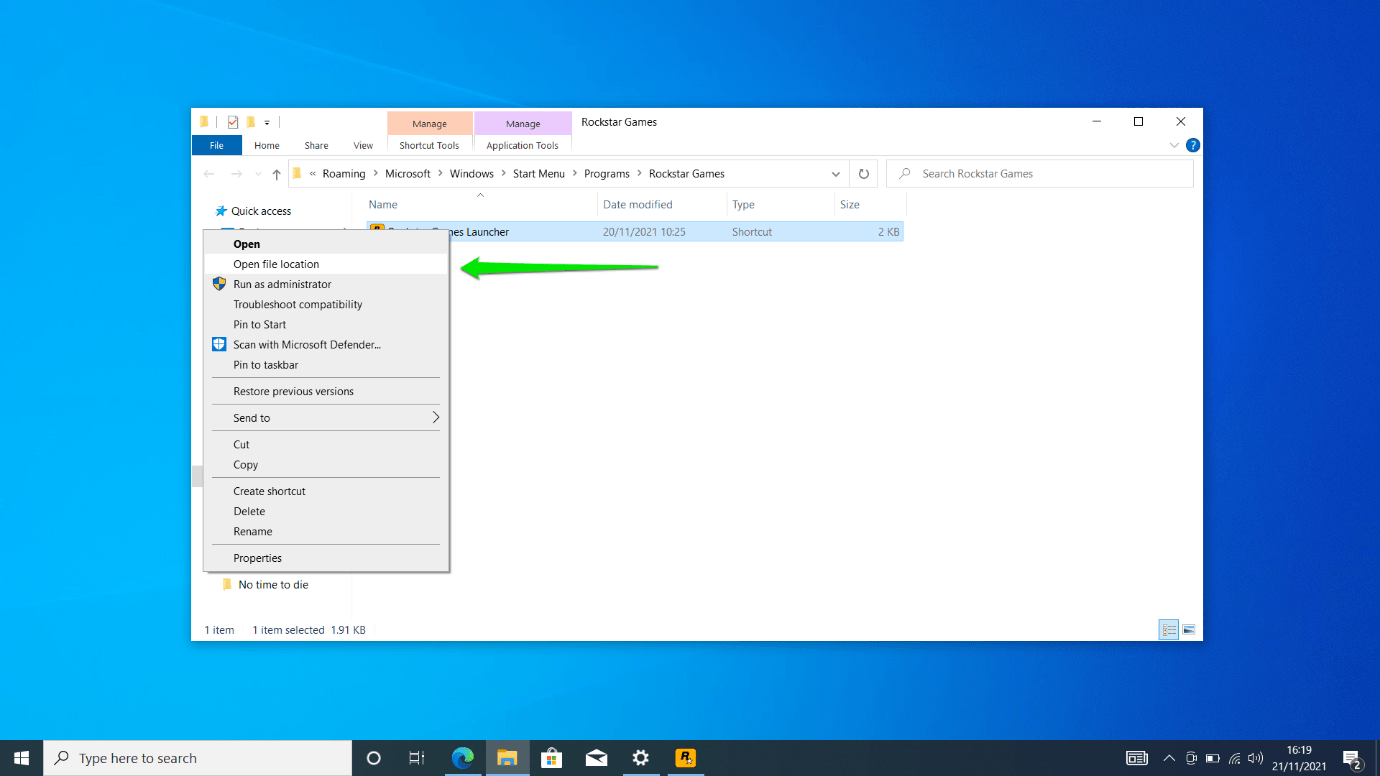
- Next, right-click on the LauncherPatcher application and select Properties.
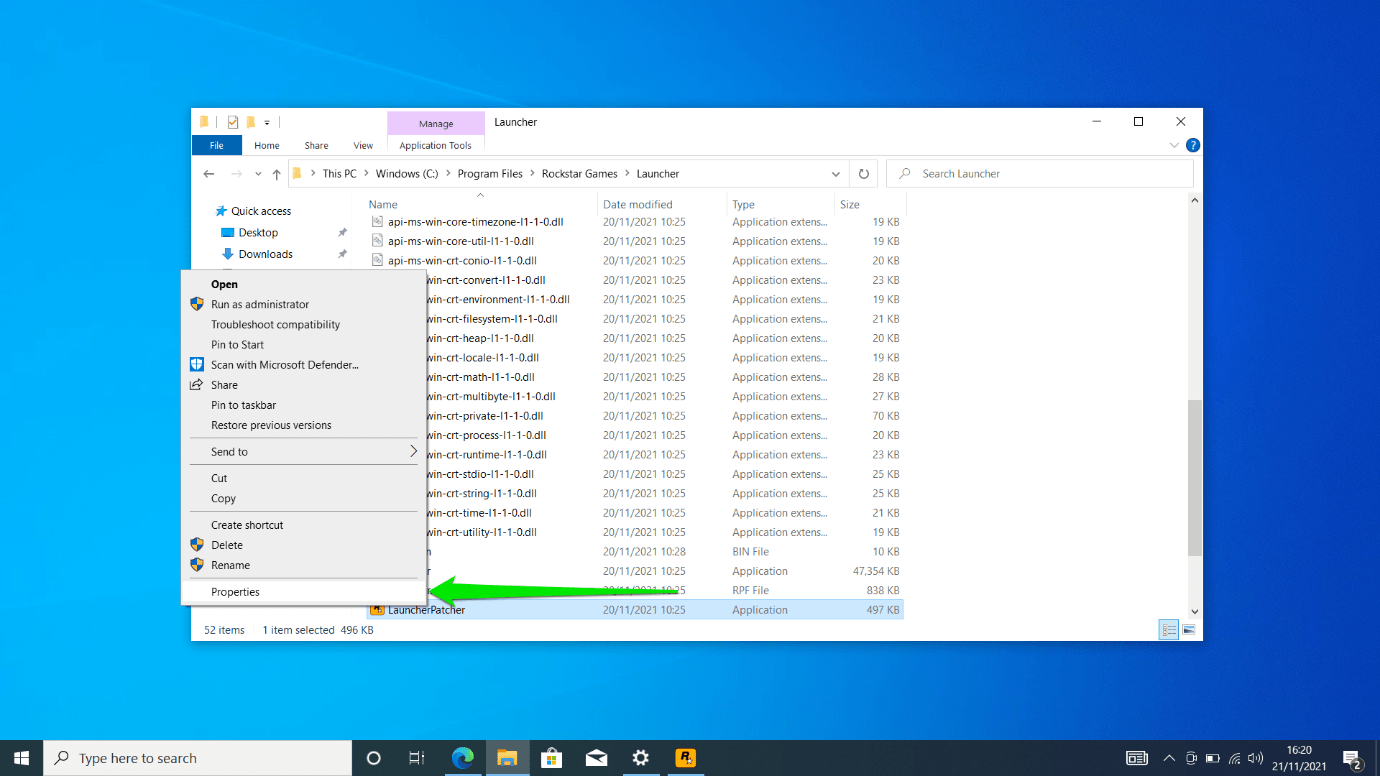
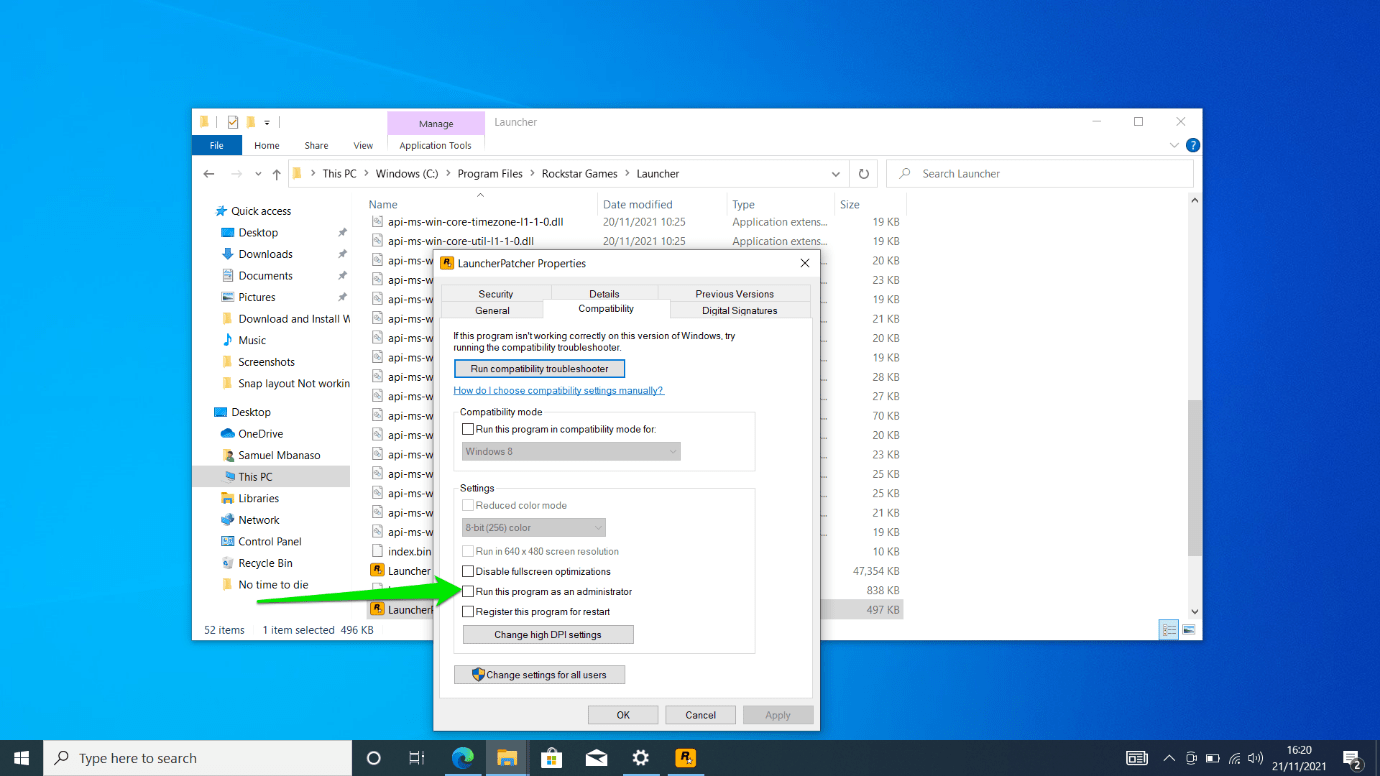
- Switch to the Compatibility tab after the LauncherPatcher Properties dialog opens.
- Go to the Settings section and mark the box for “Run this program as an administrator.”
- Click on Apply and OK.
- Check if the launcher now works.
Update Your Graphics Card
Every game developer will always stress the importance of your graphics card and its driver. Apart from hurting gaming performance, the wrong device and driver could also prevent your programs from running. So, if you’re still running an old GPU driver, that could explain the cause of the problem.
Update the driver and check if the launcher works correctly after that. Now, there are different ways to update your driver. For example, you can go through the Windows Update client, download the driver from your card manufacturer’s website, or update it automatically using dedicated software.
Let’s start with Windows Update:
- Open the Start menu and click on the Settings application.
- Click on the Update & Security icon at the bottom of the Settings home page.
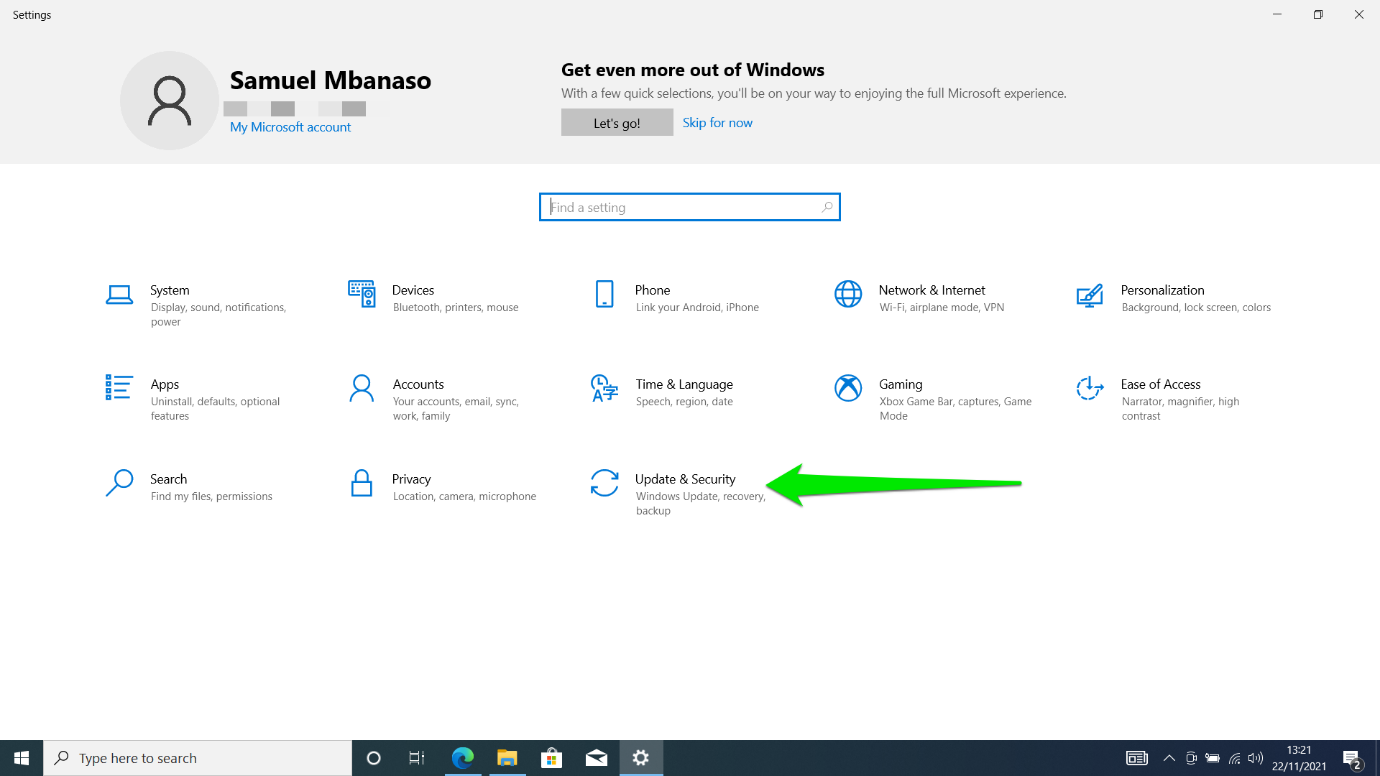
- Click on View Optional Updates when you see the Windows Update interface.
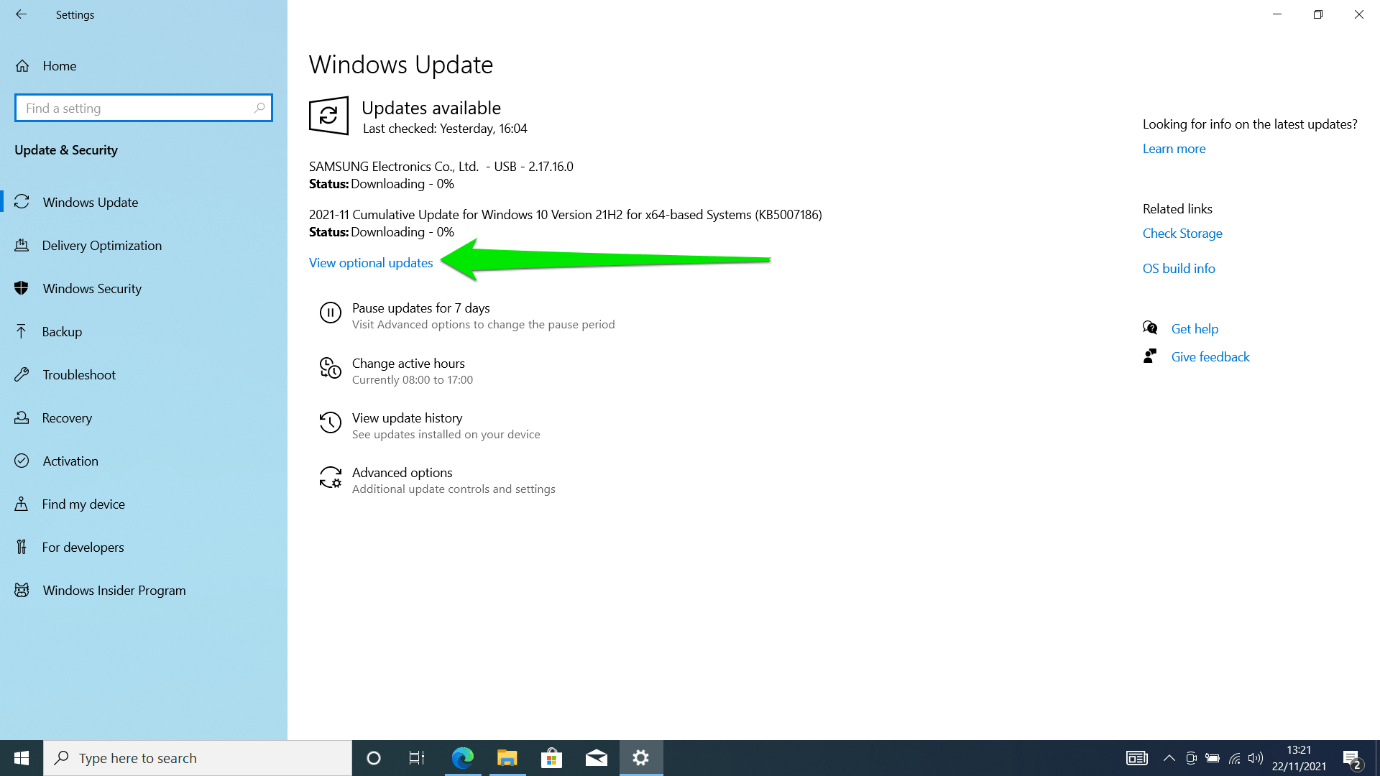
- Once you see the Optional Updates page, expand the Driver Updates section and check for your driver.
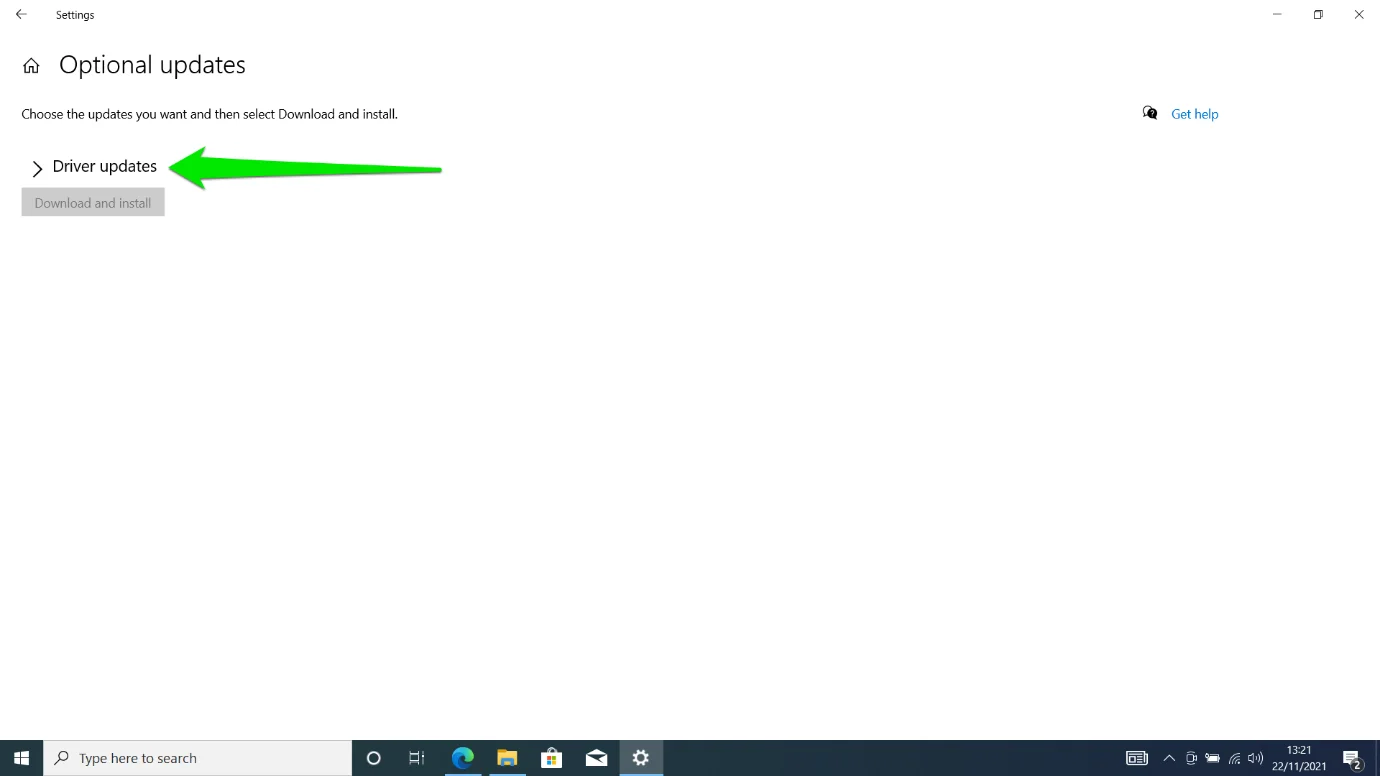
- If your latest driver appears under the section, check its box and click on Download and Install.
- It will also be wise to download other updates for your system as Microsoft releases them to fix common PC glitches, including those that could cause the issue you’re currently facing.
If you use an NVIDIA card, follow the instructions below to update your driver manually:
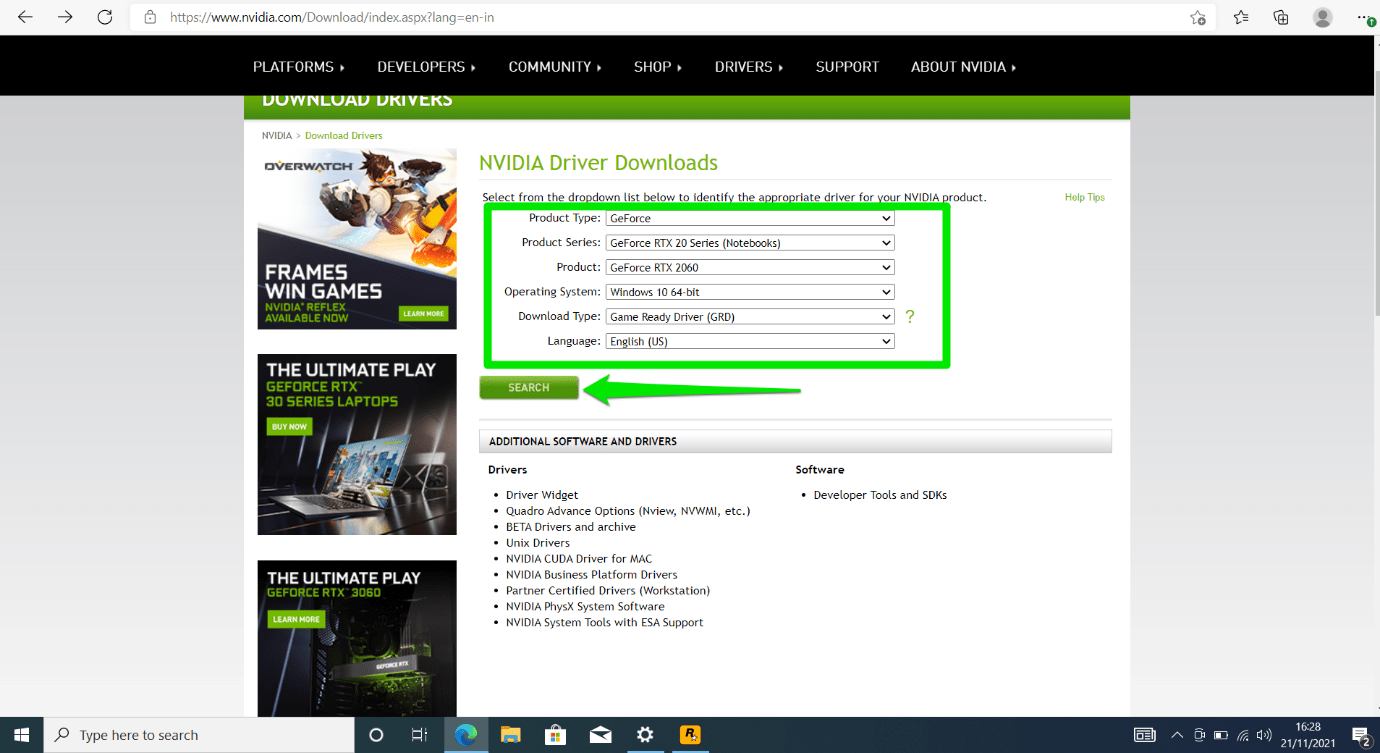
- Head to NVIDIA’s website.
- Now, enter your graphics card’s model and choose Windows 10. Remember to select the correct architecture: 32-bit or 64-bit.
Note: GeForce RTX and NVIDIA RTX/Quadro series are different.
- Click on the Search button.
- Once your driver shows up, select Download.
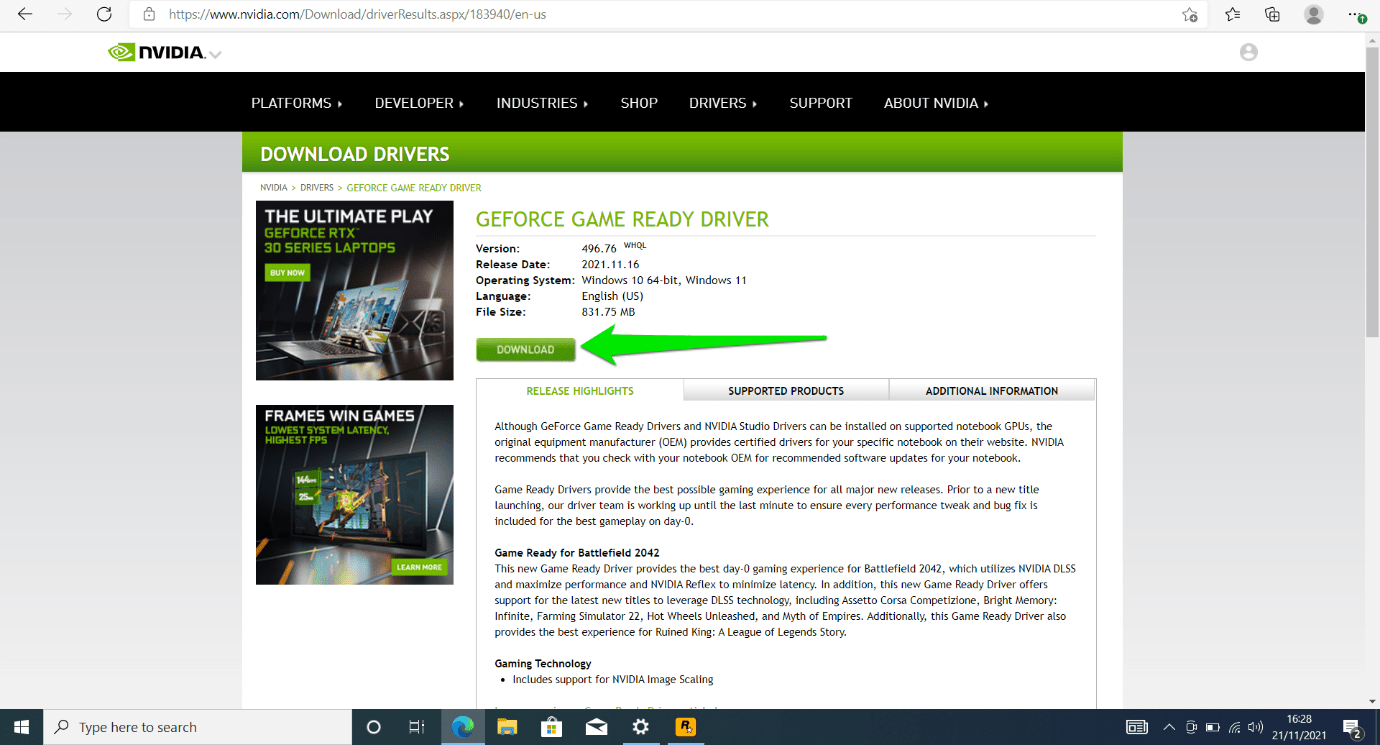
- After the file is downloaded, run it.
- You can allow the installer to set up GeForce Experience while it updates your driver.
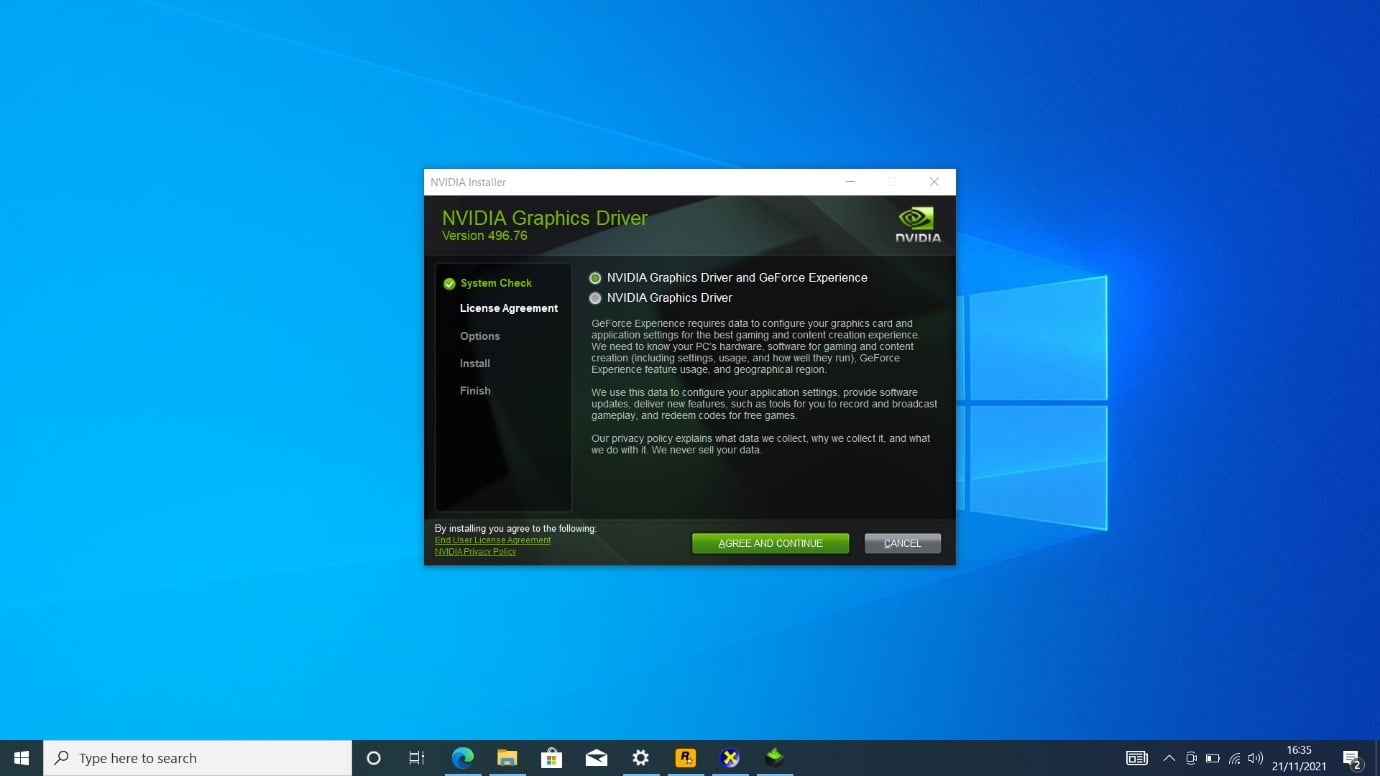
- Restart your PC after the installation completes and check if the launcher now works correctly.
Here is how you can manually update your driver if you use an AMD graphics card:
- Head to the AMD Driver and Support page.
- Click on the Download Now button to download and install the AMD driver installer.
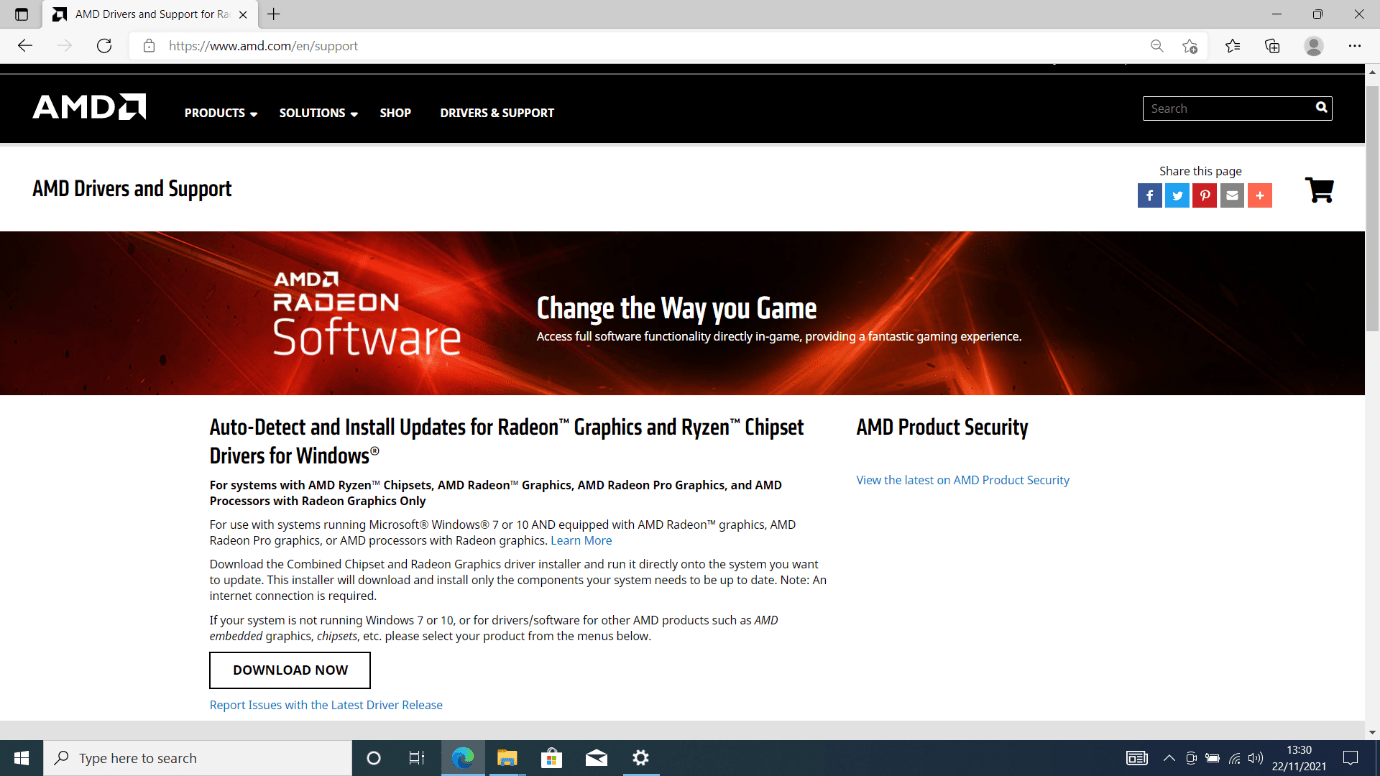
- After installing the program, it will automatically detect your graphics card and current driver. If there’s an update, it will help you download and install it automatically.
You can also use the AMD Radeon Settings program to check your driver information and install up-to-date drivers. Right-click on your desktop and select AMD Radeon Settings. Next, click on the Updates button in the bottom-left corner of the Radeon Settings program. On the next page, click on Check for Updates. Go for the New Recommended option and select Express Install.
Update Your Drivers Automatically
Instead of going through different processes to download and install different device drivers, you can do everything from one place. With a program like Auslogics Driver Updater, it’s easy to scan for outdated drivers and automatically update them.
This way, you don’t have to wait for your outdated drivers to cause issues before looking for updates. Instead, you can configure the program to scan your drivers once in a while and notify you when updates become available.
Head to the program’s download page and click on Download. Next, open the installer after your browser downloads it, choose your preferences in the installation window, and click on the “Click to install and check for updates” button.
The tool will automatically launch and check your drivers once the installation is complete. You’ll see your graphics card driver among the outdated drivers on the Scan Results page. Click the Update button to download and install its update. The program’s full version will allow you to download and install multiple updates simultaneously.
Flush Your DNS Cache
The games on your PC are tied to your Social Club account. As a result, the Rockstar Games Launcher must log into your account to access your games. This means you need a working internet connection for the program to work. Otherwise, you won’t access your games, and the program will display the “Couldn’t establish a connection” message.
One of the main causes of this issue is a problematic DNS cache. The cache saves the domain name server information of the websites and servers your computer regularly connects to. This way, it saves the time needed to resolve DNS queries through DNS servers. Sometimes, information in the cache could be outdated, or the cache could be corrupt.
You have to flush the cache and force your system to rebuild it using up-to-date info to fix the problem. Follow these steps:
- Tap and hold the Windows logo key, then hit the R key on your keyboard.
- In the Run dialog box, type CMD.
- Now, hold the CTRL and Shift keyboard buttons, then hit the Enter key.
The keyboard shortcut will help you run the Command Prompt as an administrator.
- Click on Yes in the UAC security window.
- Now, type “ipconfig /flushdns” when the Command Prompt window opens in admin mode.
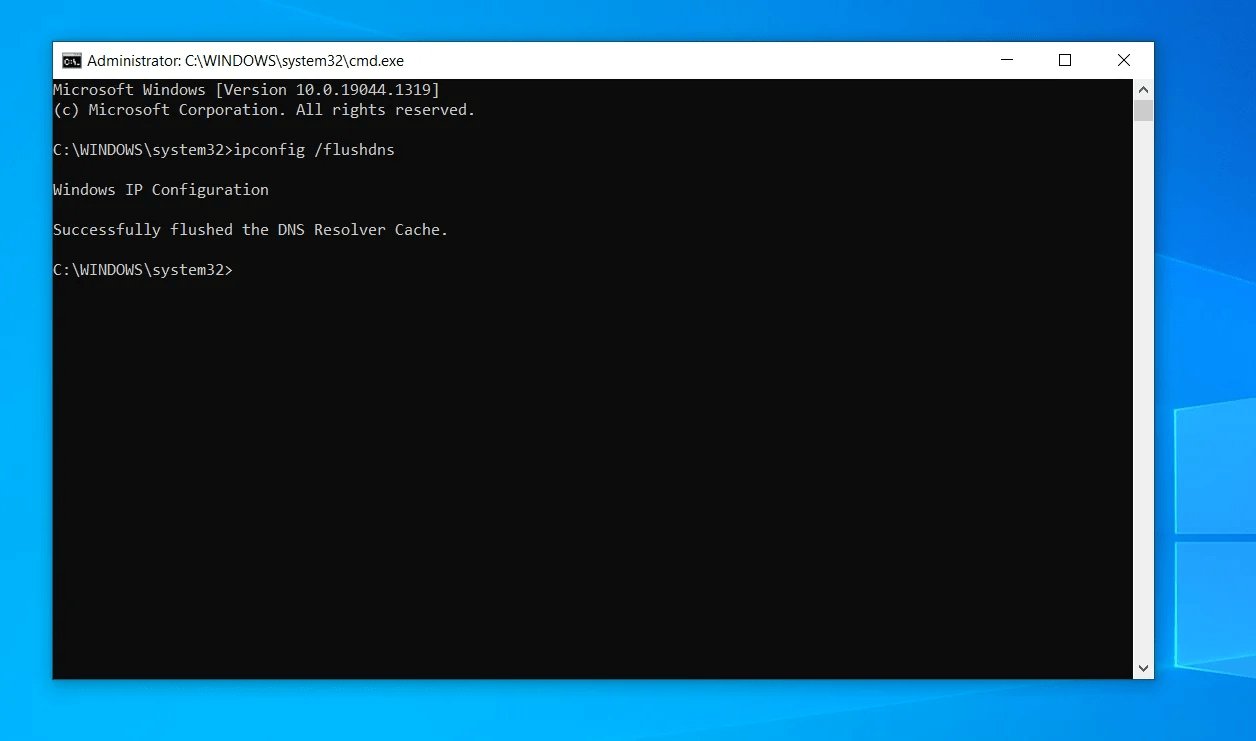
- Run the launcher and check for the problem.
Change Your DNS Server
DNS servers are another cause of connection problems. They’re responsible for matching URLs to IP addresses that your computer needs to establish connections. Usually, the default DNS servers your ISP provides don’t deliver consistently. This could result in connection issues that prevent the Rockstar Games Launcher from opening correctly.
Using a more reliable DNS server will resolve the problem in this case. We recommend that you go for Google’s public DNS server. Follow these steps:
- Tap and hold the Windows logo key, then hit the R key on your keyboard.
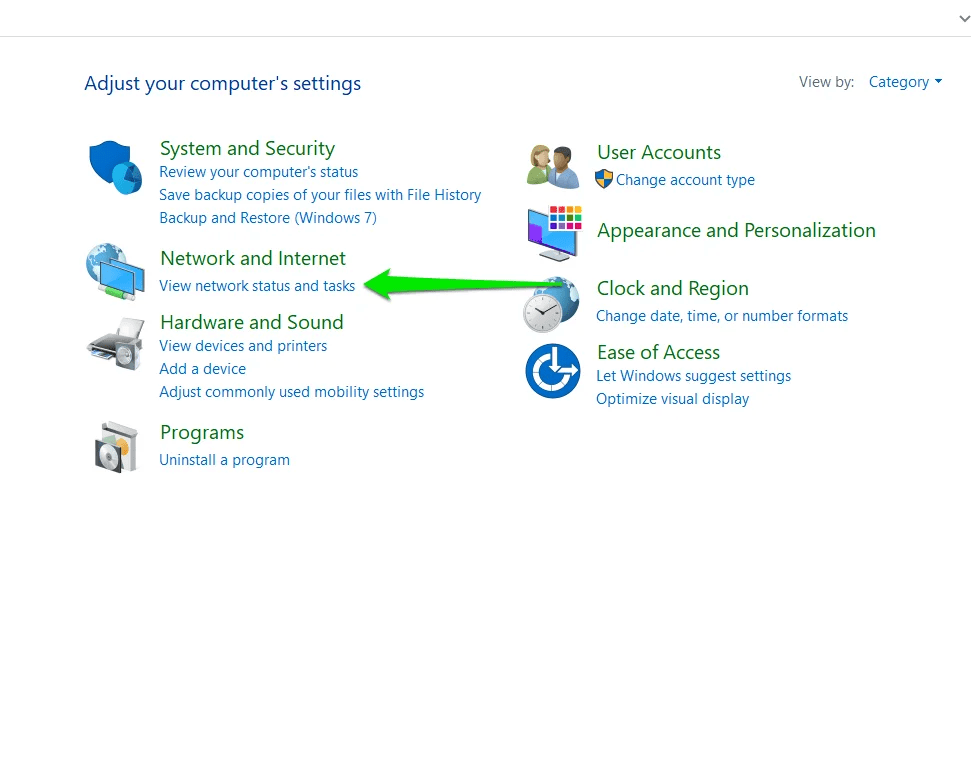
- In the Run dialog box, type Control Panel and punch the Enter keyboard button.
- Click on View Network Status and Tasks under Network and Internet to open the Network and Sharing Center.
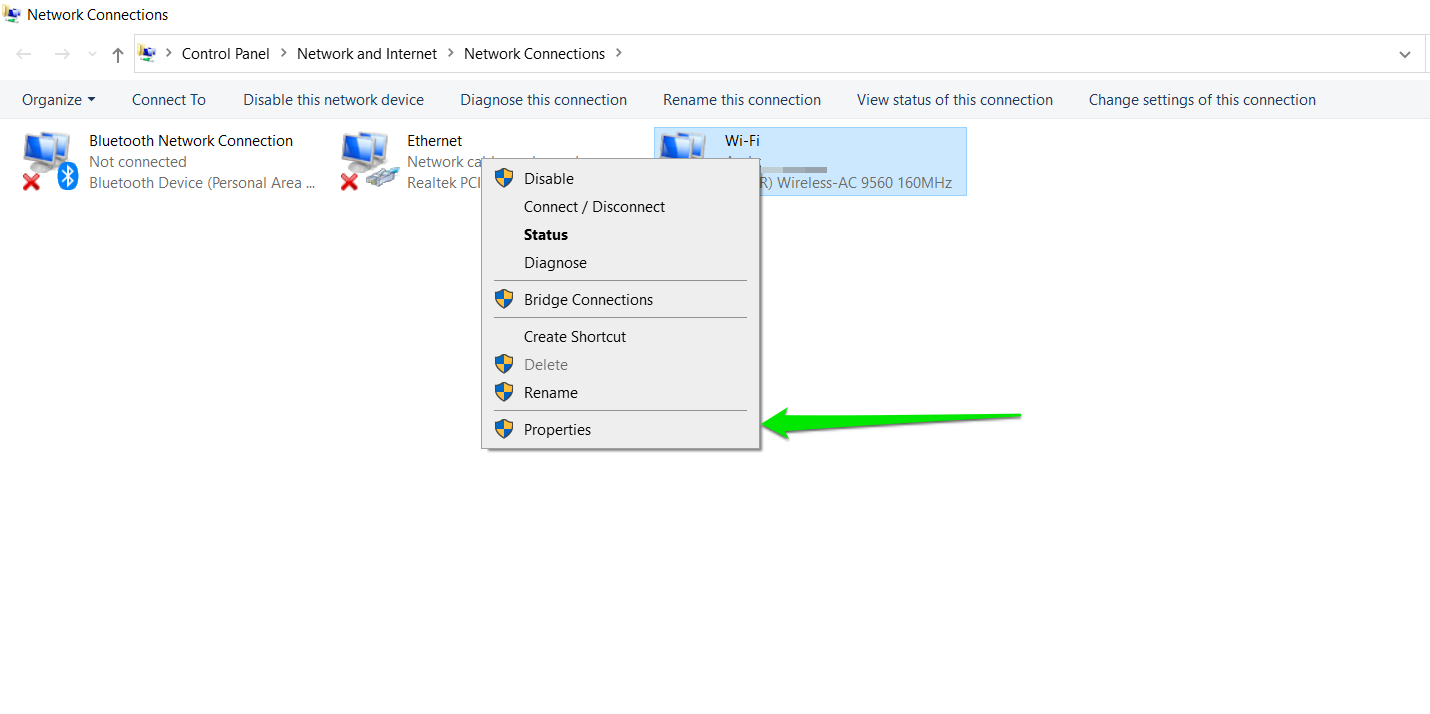
- Go to the left side of the Network and Sharing Center and click on Change Adapter Settings.
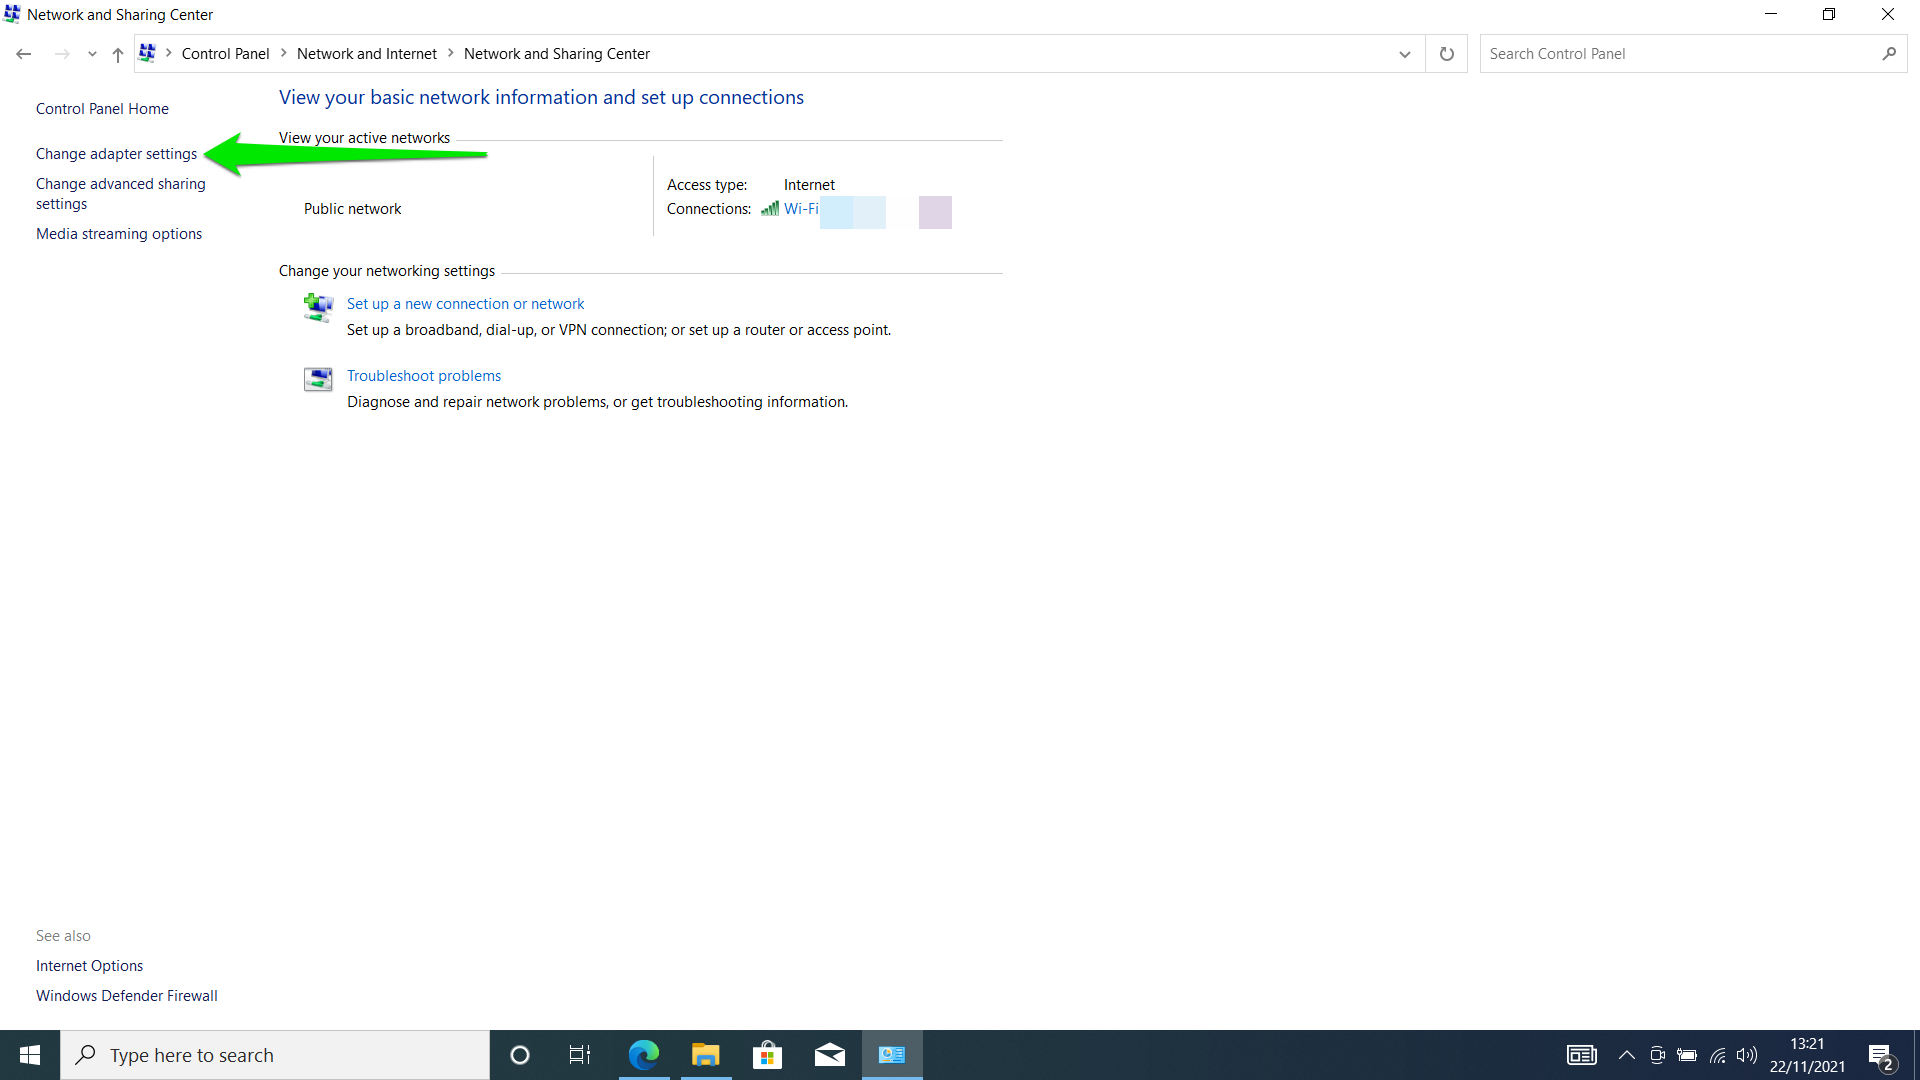
- Right-click on your network card and click on Properties. Note that you have to choose the card responsible for your internet connection, whether it’s the Wi-Fi, Ethernet, or Bluetooth card. If you use more than one, make sure you perform this action for all of them.
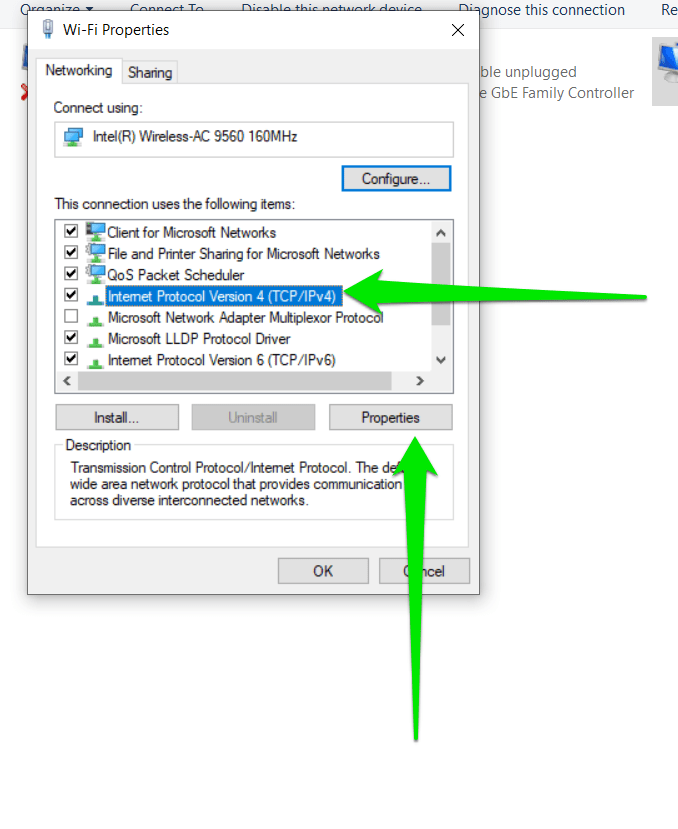
- After the Properties window shows up, please scroll down to Internet Protocol Version 4 (TCP/IP 4) and click it.
- Click on the Properties button.
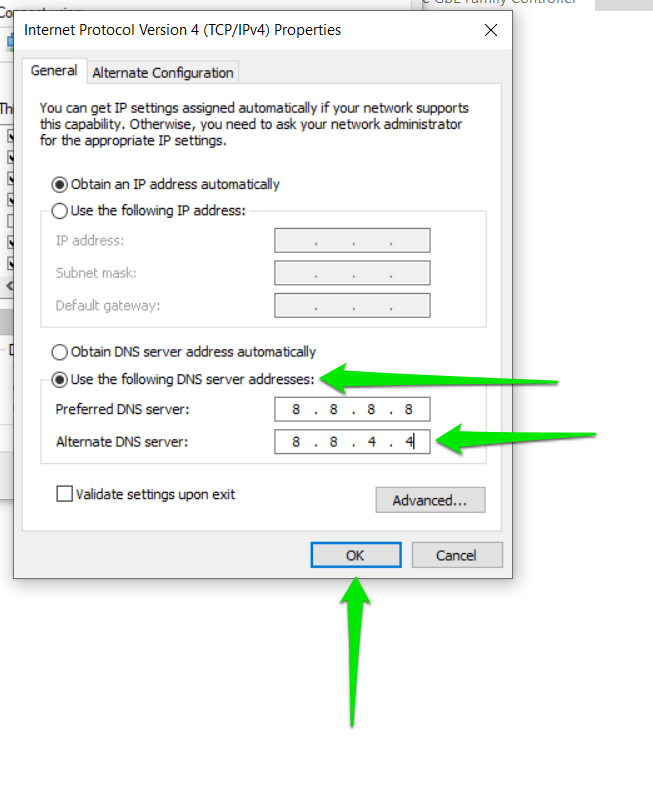
- After the next window opens, click on “Use the following DNS server address.”
Next to Preferred DNS Server, type 8.8.8.8.
Next to Alternate DNS Server, type 8.8.4.4.
- Click on the OK button and open the Rockstar Games Launcher.
- If you use IPv6, click on Internet Protocol Version 6 (TCP/IPv6) under the Networking tab of your card’s Properties dialog.
- Select Properties, then click on “Use the following DNS server address” and input the following:
DNS Server: 2001:4860:4860::8888
Alternate DNS Server: 2001:4860:4860::8844
- Click on OK and check for the problem.
Add Rockstar Games Launcher to Your Antivirus Program’s Exclusions
Your antivirus program could be preventing the launcher from running because it’s mistaking it for a security threat. Unfortunately, this often happens in cases where the security program is not up to date.
To prevent this from happening again, add the launcher as an exclusion in your security program. It would be best if you started by installing the latest version of your antivirus. If you use Windows Security, head to Windows Update and install the latest updates for your PC.
Now, follow these steps to add the launcher as an exclusion in Windows Security:
- Head to the right side of the taskbar and click on the “Show hidden icons” arrow beside the Date and Time display.
- Click on the white shield in the system tray to open Windows Security.
- After Windows Security shows up, click on the Virus & Threat Protection label.

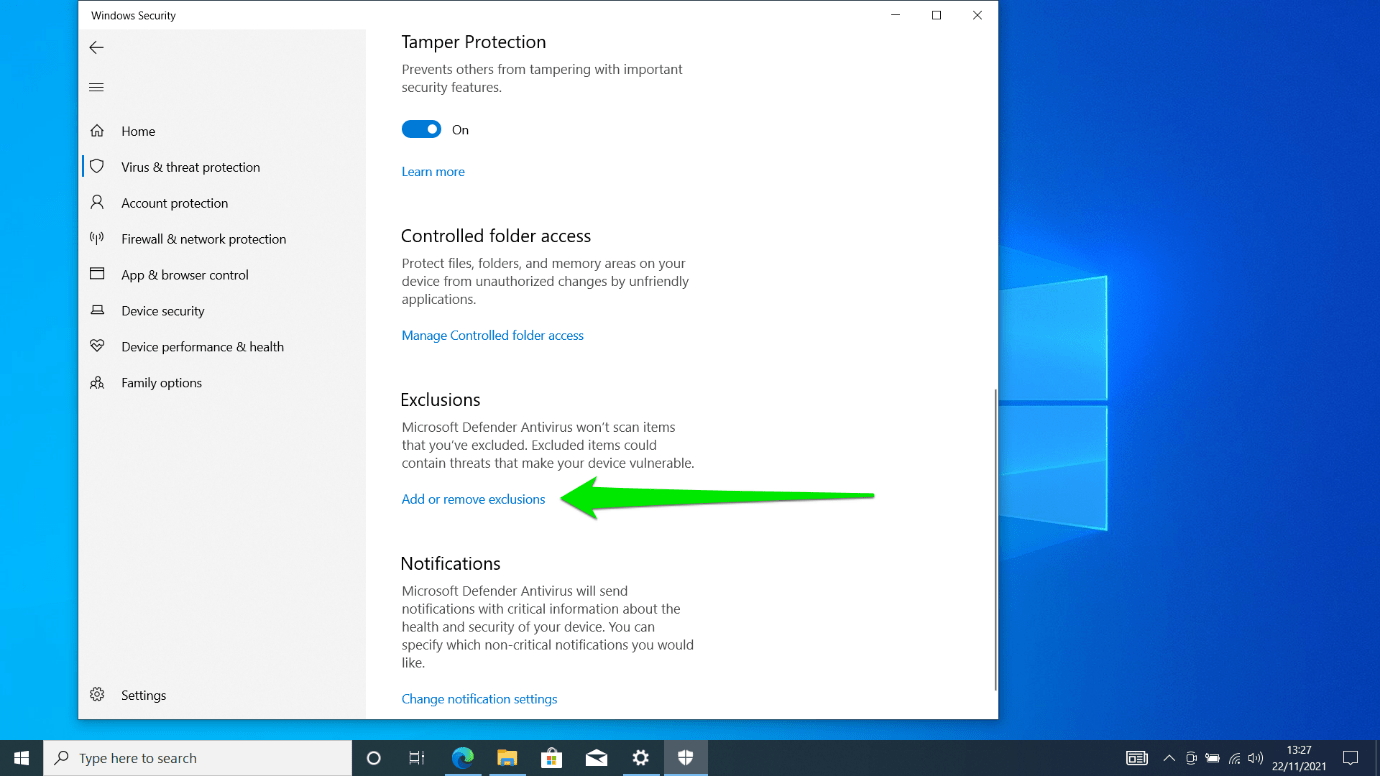
- Now, scroll down and click on Manage Settings just beneath Virus & Threat Protection Settings.
- When the Settings interface opens, go to the Exclusions section and select “Add or remove exclusions.”
- Next, click on “Add an exclusion” and select Folder.

- Once the dialog window opens, navigate to Rockstar Games Launcher’s installation folder and select it.
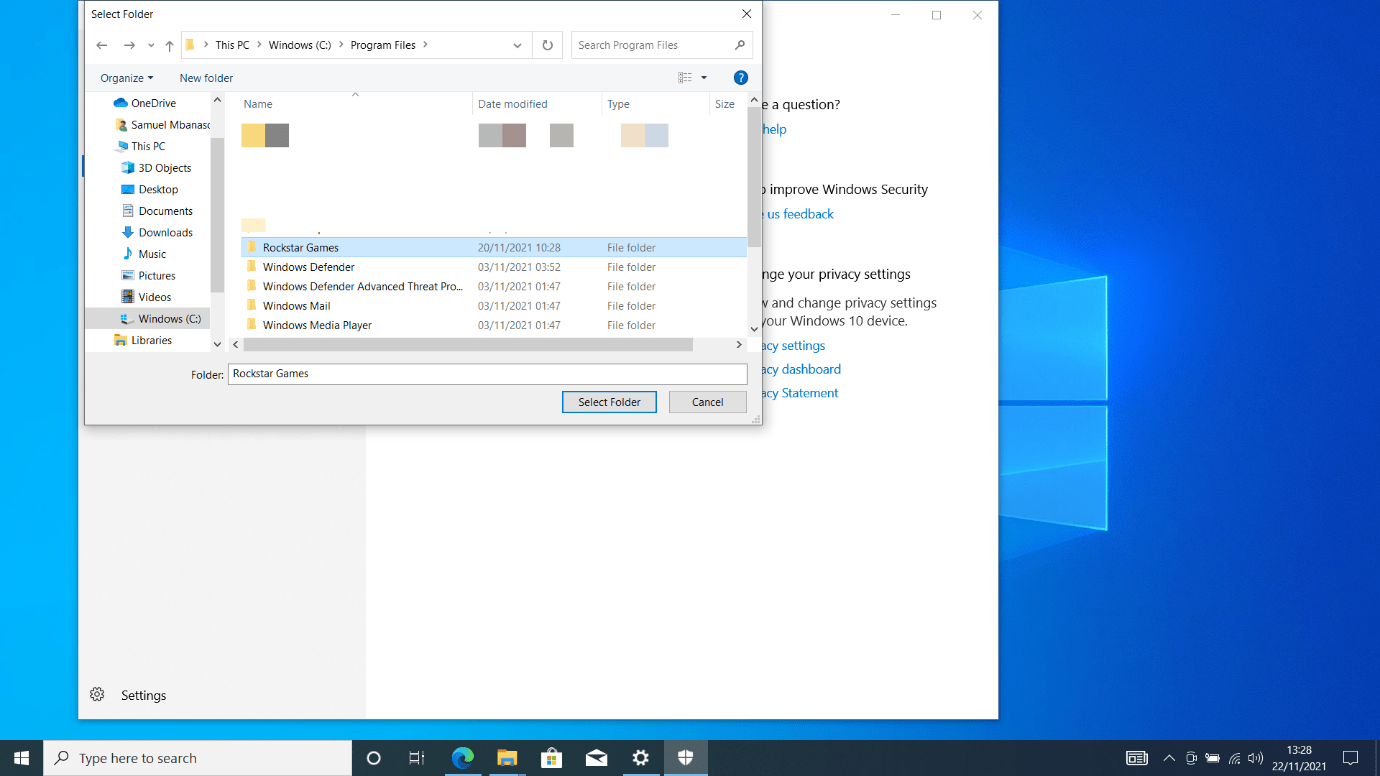
- Open the launcher to see if it now works.
Allow the Launcher Through Your Firewall
Your Firewall is another security program that might be erroneously blocking the Rockstar Games Launcher. Fixing this particular problem involves allowing the launcher through the Firewall.
Follow these steps if you use the Windows Defender Firewall program:
- Head to the right side of the taskbar and click on the “Show hidden icons” arrow beside the Date and Time display.
- Click on the white shield in the system tray to open Windows Security.
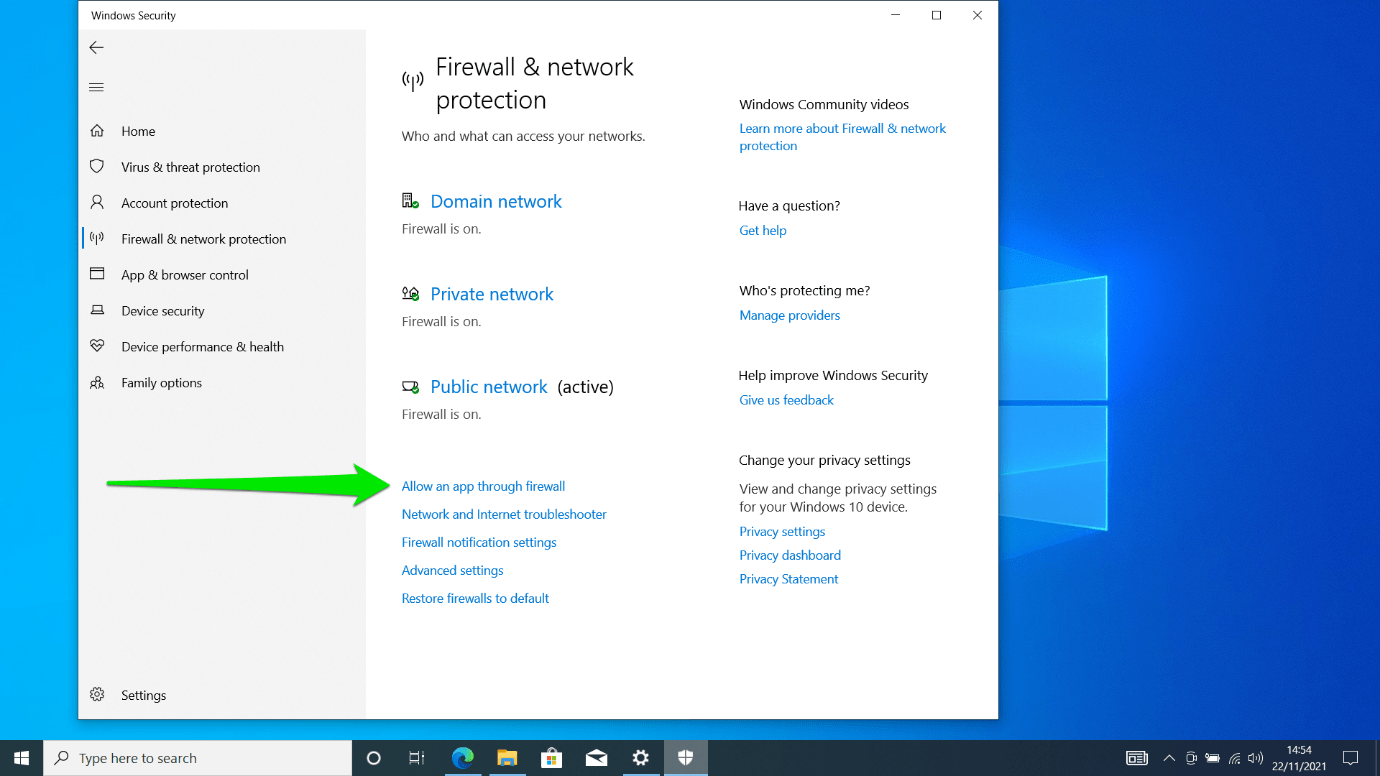
- After Windows Security shows up, click on the Firewall & Network Protection label.
- Click on “Allow an app through firewall.”
- The Allowed Apps Control Panel window will now pop up.
- Click on Change Settings.

- Go to the “Allowed apps and features” list and check the boxes next to the Rockstar Games Launcher.
- Select OK.
- If the program isn’t on the list, you’ll have to add it manually.
- Click on Allow Another App.
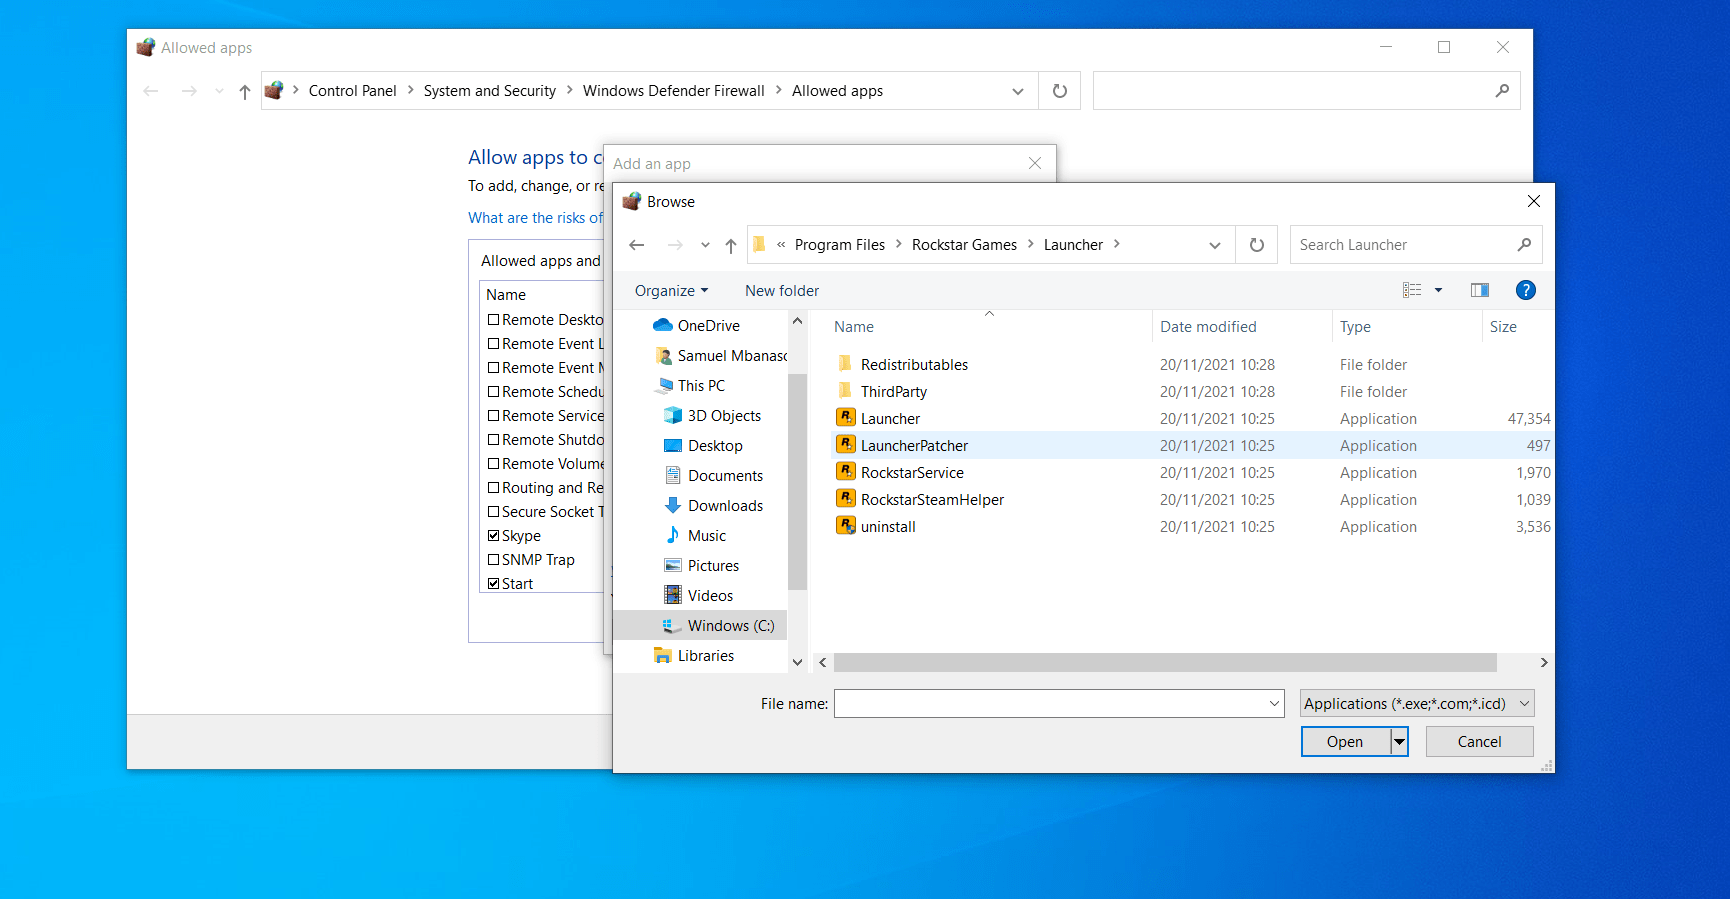
- Click on the Browse button in the “Add an app” window.

- Browse to the Rockstar Games Launcher’s install location and double-click the app.
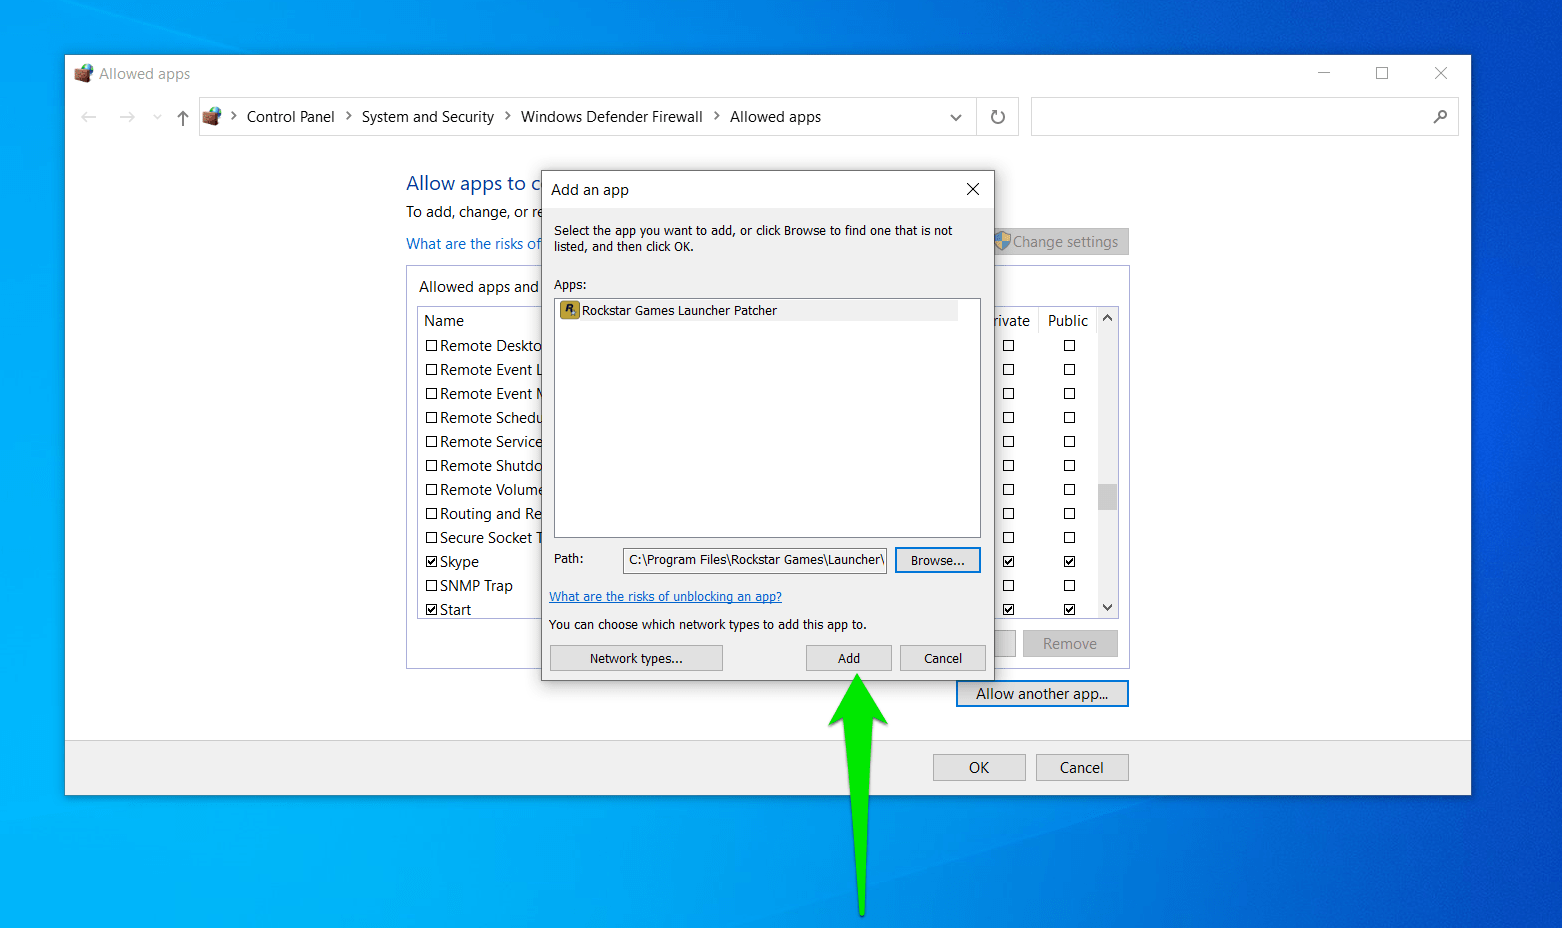
- Click on the Add button.
Perform a Clean Boot
Performing a clean boot allows you to resolve app conflicts that may be preventing the launcher from running. The process involves disabling apps that run at startup. After disabling them, you’ll have to run the launcher to confirm if it opens correctly.
If the program runs without problems, the next step is to find the conflicting app. While the process can be lengthy, it’s pretty simple. We’ll break it down for you and show you how to make it quick.
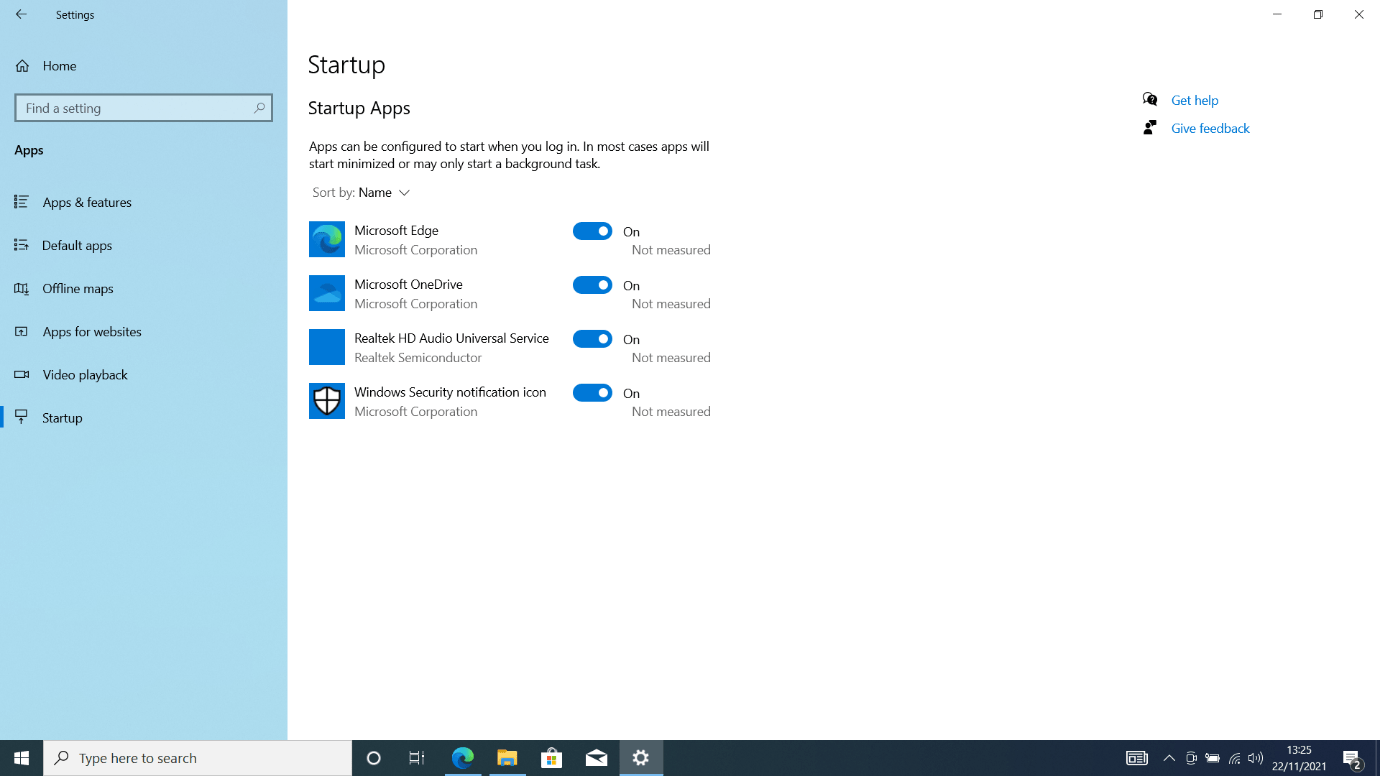
First, start by disabling startup programs:
- Open the Start menu and click on the Settings icon.
- After the program opens, head to the Apps icon and click on it.
- Next, go to the left side of the Settings interface and select Startup.
- Now, turn off the switch for every startup application.
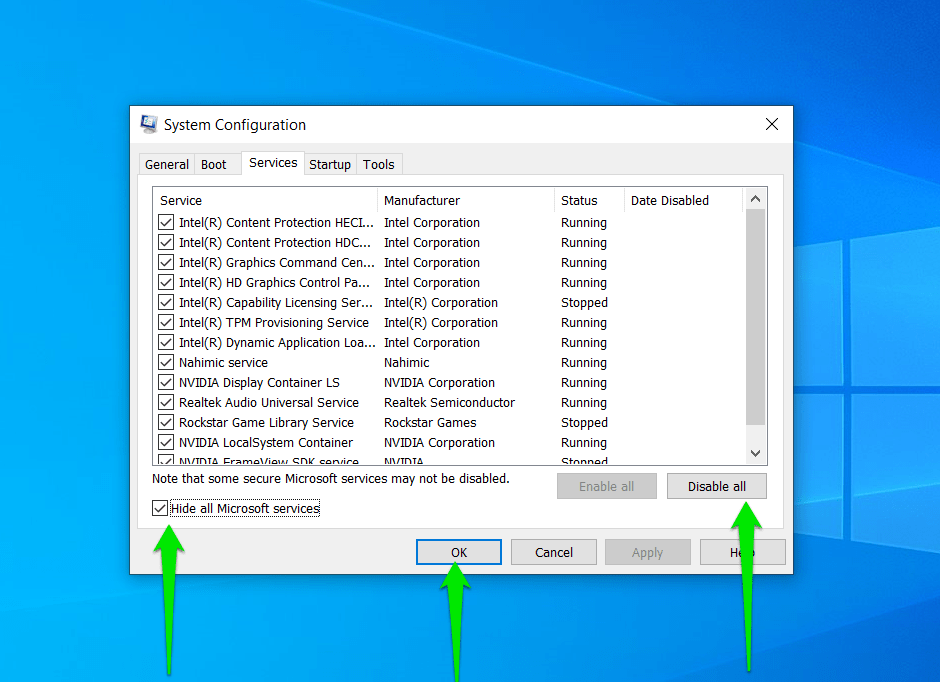
Secondly, disable startup services through the System Configuration dialog window:
- Press and hold the Windows logo key and tap the R keyboard button immediately.
- After Run shows up, type “msconfig” and hit the Enter button.
- Navigate to the Services tab after you see the System Configuration window.
- Tick the checkbox that hides Microsoft apps, and then click on Disable All.
- Click on Apply and select OK.
Now, restart your PC and run the Rockstar Games Launcher.
If the launcher works correctly, you’ll have to identify the startup service or program causing the problem. To do that, re-enable the programs and applications you’ve disabled, then start disabling them one after the other to check for the one responsible for the conflict.
You can also follow this process to find the conflicting app:
- Launch the System Configuration window and head to the Services tab.
- Check half of the startup services from the top and click on Disable All.
- Restart your system and launch the app.
- If the launcher opens correctly, it means one of the services you’ve disabled is the culprit. All you have to do in this case is to enable the services you’ve disabled one after the other until the launcher stops working again.
- However, if the launcher doesn’t open, disable the remaining half of the services and check for the problem.
Conclusion
That’s how to troubleshoot the Rockstar Games Launcher not responding. If the program doesn’t open after applying these fixes, reinstall it. In this case, some of its installation files might be corrupt. Let us know if you have questions about the problem.


 Done! Great to see you among our subscribers!