
GoPro enables you to capture quality landscape, underwater, and fast-paced action videos. However, recording videos isn’t enough since you still need to do some editing to help make the videos more appealing, especially for social media. So, how do you connect your GoPro to your computer to transfer the videos? If that’s your worry, then you are in the right place. In this article, you’ll find several approaches to connect GoPro to a computer and effectively transfer your files. Let’s get started.
How to Connect GoPro to Your PC
Below are several ways to import files from GoPro to a Windows PC.
Method 1: Manually Connect GoPro with USB Cable
One of the easiest and best ways to connect GoPro to your computer is manually through a USB cable.
Use this guide to do so:
- Connect the USB cable to the GoPro camera and PC.
- Turn your GoPro camera on.
- Go to “This PC” on the left sidebar, and you’ll see the camera under the listed devices.

- Double-click on it to access your files.
- To transfer the files, you could drag and drop or copy-paste them from your camera to your preferred PC location.
Method 2: Use the Auto Launch/AutoPlay Feature
Your Windows computer has an AutoPlay feature that lets you choose what to do with a device once you connect it. That way, you don’t have to directly open the File Explorer to locate the GoPro device.
Here’s how this method works:
- Connect your GoPro camera to your PC using a USB cable
- You will see a pop-up on the left side of the screen. When it appears, choose the Open device to view files option.
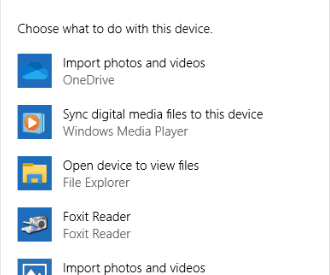
- Windows will automatically connect the GoPro enabling you to transfer your files.
If the AutoPlay feature does not work on your device, use these steps to enable it:
- Open your Windows Start menu by pressing the Windows button.
- Click on the Settings icon, then select Devices.
- Choose AutoPlay on the left menu pane.
- You will see the AutoPlay option on the right side of the window. Use the toggle button under it to enable AutoPlay.

Method 3: Use SD Card Reader
An SD card reader allows you to access all the files on your GoPro without manually connecting the camera to your machine.
Follow these simple steps:
- Remove the microSD card from your camera.
- Insert it into a USB card reader or SD card adapter, and let your PC map the drivers to recognize the external storage drive. If the drive isn’t automatically recognized, press the Windows logo key + E combination to open the File Explorer.
- Navigate to the SD card adapter.
- Open the DCIM folder to access your files. You can then copy-paste them from the SD card to your computer.
Method 4: Use GoPro Quik App
GoPro Quik is a recommendable program that organizes and edits GoPro files. Here are the steps for connecting GoPro to a PC using the Quik application:
- Connect the GoPro camera to your machine via USB cable.
- Launch the Quick software on your PC, and allow it to automatically detect recent GoPro camera footage.
- Choose the files you’d wish to transfer and import them to your computer.
Final Word
GoPro is renowned for adventure filming and photography. This guide discusses the different methods you can use to connect your GoPro to a Windows PC to help you transfer files more seamlessly. To ensure an even smoother connection and faster transfers, we suggest you install Auslogics BoostSpeed 12 on your machine. This simple app removes junk files from your computer and automatically resolves performance-affecting issues. That way, you can run your PC smoothly and quickly complete crucial tasks such as file transfers without any hassle.


 Done! Great to see you among our subscribers!