- What Is TPM 2.0?
- Is TPM 2.0 Required for Windows 11?
- How to Enable TPM 2.0 on a PC
- 1. Use Microsoft’s PC Health Check App
- 2. Run the Tpm.msc Command
- 3. Clear the TPM Keys
- 4. Fix TPM Driver Issues
- How to Install Windows 11 Without a TPM 2.0 Chip
- 1. Bypass the TPM Requirement
- 2. Buy a compatible module for your motherboard
- Keep Your PC Protected

Did you run into the “The PC must support TPM 2.0” error when trying to upgrade to Windows 11? If so, then this article is for you.
Microsoft has a new and exciting operating system in the pipeline for its users, and you can sign up for the Insider beta program to try it out. The official rollout is scheduled to start later this year and continue into 2022. According to Microsoft, some devices may receive the upgrade earlier than others.
While the Windows 11 upgrade will be free (as long as you have a genuine license for your current Windows 10 OS), not all devices will support Windows 11. Your PC must meet specific requirements to be compatible with the new OS. Apart from having the usual minimum RAM and storage space, your system must support TPM 2.0.
Microsoft has been strict about this requirement ahead of the system’s official release to the public. In fact, it seems the company started preparing users for Windows 11 in 2016, when it required TPM 2.0 support on all new computers that ran any version of Windows 10. If you bought your PC after 2016, chances are it comes with TPM 2.0 and will support Windows 11.
If you’re getting the error “The PC must support TPM 2.0,” it may mean TPM is currently not enabled on your device.
In this guide, we lay out everything you need to know about this chip, why you need TPM 2.0 for Windows 11, and how to enable TPM 2.0 on a PC.
What Is TPM 2.0?
TPM, short for Trusted Platform Module, is a small chip in your PC’s motherboard, whose function is to provide security-related features at the hardware level. TPM 2.0 generates an integrated cryptographic key to protect data used to authenticate your PC.
Unlike software security, which is more malleable, hardware security is more effective. When you press the power button on your PC, the TPM chip communicates with other security features within the system and supplies a unique code (cryptographic key) that cannot be modified. If everything checks out, the computer will start up. If a problem with the key is detected, the PC won’t boot.
Think of TPM 2.0 as a security protocol intended to make the life of hackers a little bit harder.
Is TPM 2.0 Required for Windows 11?
Microsoft has made it clear that Windows 11 will only run on computers that have TPM 2.0 capabilities. In a blog post, Microsoft explains that PCs require this “modern hardware root-of-trust to help protect from common and sophisticated attacks.” The post adds that “requiring the TPM 2.0 elevates the standard for hardware security by requiring that built-in root-of-trust.”
The TPM also performs various authorization functions, including drive encryption and secure biometric sign-ins with Windows Hello. Put another way, if a hacker steals your drive and plugs it into another computer, they can’t simply decrypt it and access the files without the keys stored in the TPM.
TPM is tamper-resistant, making unauthorized access to your files nearly impossible.
How to Enable TPM 2.0 on a PC
There are several ways to check if your PC supports TPM 2.0.
1. Use Microsoft’s PC Health Check App
If you’re a Windows Insider, Microsoft makes it easy for you to check if your PC is compatible with Windows 11 through the PC Health Check app. Simply download the app and launch it.
You’ll see a list of your device’s specifications, including TPM 2.0 if it is enabled on your PC. You’ll also be able to see how old your machine is.
The PC Health Check app is currently only available to Windows Insiders, but it will be available to everyone soon. Meanwhile, you can visit the official Microsoft website to check the full list of system specifications required to support Windows 11.
2. Run the Tpm.msc Command
Alternatively, you can check if your system has a TPM chip for Windows 11 and if it’s enabled using the tpm.msc command:
- Open Search and type tpm.msc.
- Select the first result, which says “tpm.msc. Microsoft Common Console Document”. This command launches the “Trusted Platform Module (TPM) Management on Local Computer” page.
- Under Status, you should see the notification “The TPM is ready for use”.
- Also, you’ll be able to check if the TPM version says 2.0 under the TPM Manufacturer Information section.
If TPM is not supported, you’ll see the notification “Compatible TPM cannot be found” under Status. If it is supported but disabled in BIOS or UEFI, you’ll see the notification “The TPM is not ready for use.” Unfortunately, if your PC has TPM 1.2, that won’t do as Windows 11 requires TPM 2.0.
As noted, newer PCs should have TPM 2.0 support. If you’re getting the error “This PC must support TPM 2.0,” it could just be disabled by default, and you can activate it in your PC’s BIOS, otherwise known as UEFI on modern computers.
To enable TPM 2.0, follow these steps:
- Open the Settings app (Win + I), type Recovery into the “Find a setting” text field, and select “Recovery options”.
- Under “Advanced startup”, click on the “Restart now” button and choose “Troubleshoot” on the next screen.
- Choose “Advanced options” and click on the “UEFI Firmware Settings” option.
- On the UEFI Firmware Settings page, click on “Restart”.
- Locate Security Settings and enable TPM 2.0 if it is disabled. The option to activate TPM may sometimes be labeled TPM State, Security Device Support, Security Device, Intel PTT, Intel Platform Trust Technology, AMD fTPM switch, or AMD PSP fTPM. Keep in mind that TPM settings may vary from one manufacturer to another. So, check your device manufacturer’s website for information on how to locate the TPM settings.
- Once you are done, exit the settings and reboot your system.
3. Clear the TPM Keys
The problem could be that the Trusted Platform Module (TPM) is not properly initialized. There’s also a chance that your system may have multiple keys, causing all sorts of conflicts.
Windows does not support multiple active TPMs, especially if they have been toggled in the UEFI (BIOS) environment.
The solution to this issue is clearing your system’s TPM keys.
Microsoft also recommends using this troubleshooting step if you’re planning on installing a new operating system. That’s because clearing TPM keys allows the new OS to deploy its TPM-based functionalities without issues. These functionalities can include BitLocker and attestation.
Clearing the TPM keys makes your operating system lose ownership. But Windows will automatically take ownership again once it’s been cleared.
There are different ways to clear your computer’s TPM. You can go through the TPM window or through Windows Security.
Let’s start with Windows Security:
- Open your computer’s Start menu.
- Search for Windows Security.
- Once the Windows Security app shows up in the search results, click on Device Security under Protection Areas.
- Once the Device Security page of the Windows Security suite opens, head to Security Processor and click on Security Processor Details.
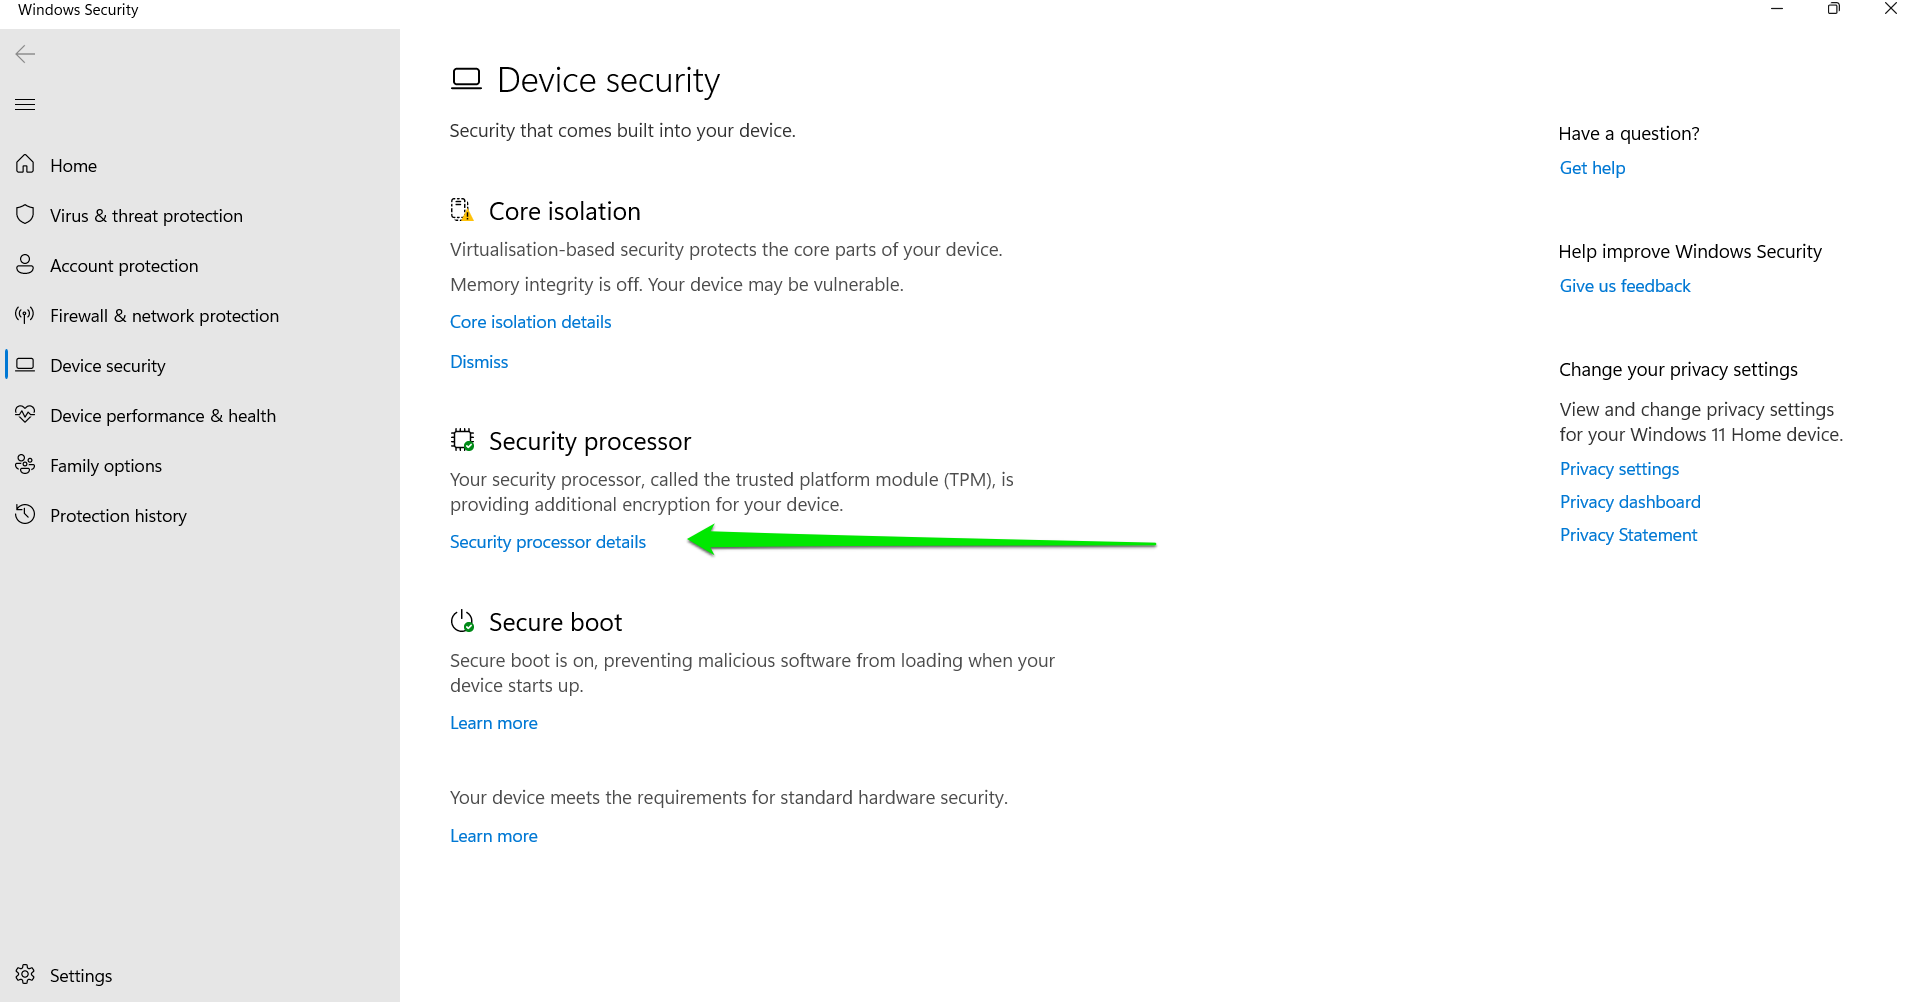
Note: If your system does not have the TPM, you’ll see a message that says, “Standard hardware security not supported.”
- The Security Processor Details page will now appear, displaying your TPM chip’s specification. You’ll see the name of the manufacturer and TPM version.
- Go under Status and click on “Security processor troubleshooting.”
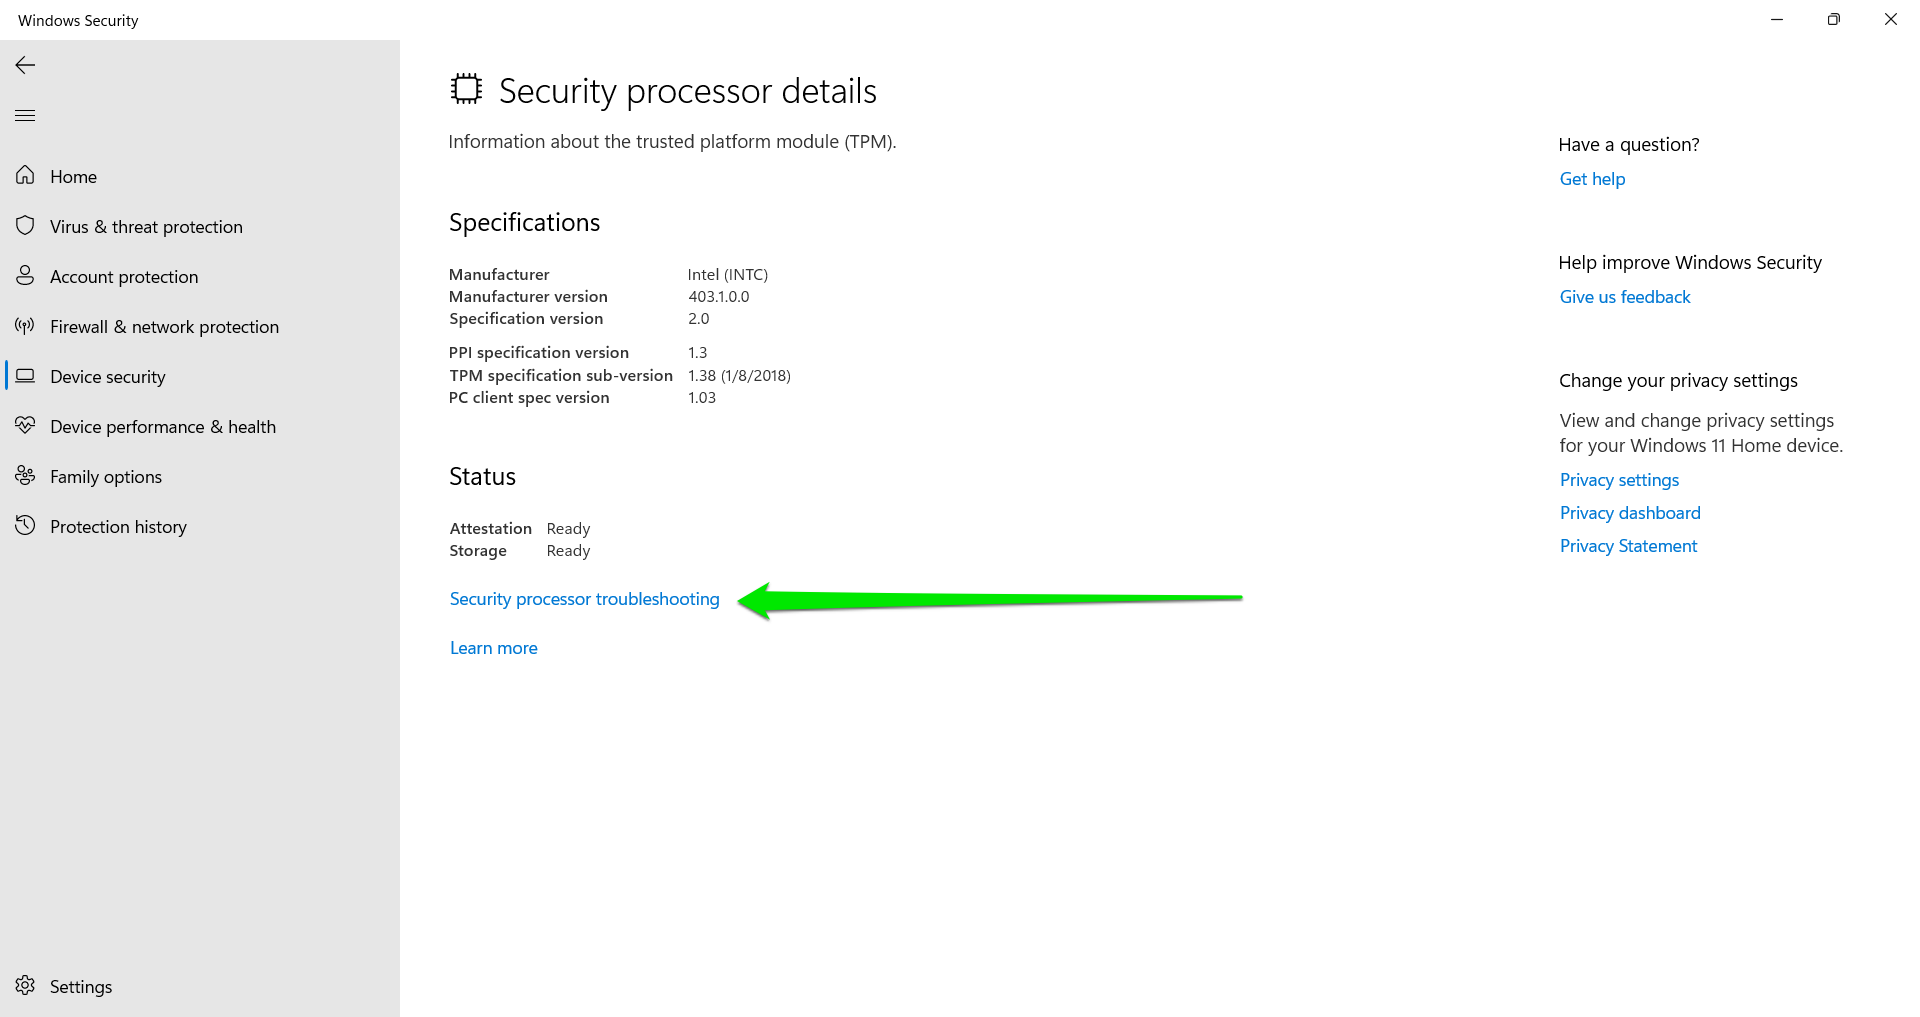
- After the Security processor troubleshooting page opens, head to the Clear TPM section and click on the Clear TPM button.
As Windows recommends, you should consider backing up your data before clearing the TPM.

- A confirmation prompt will now appear. Click on the Clear and Restart button.
- Once your computer restarts, you’ll likely see a prompt to complete the process. Confirm it to continue and Windows will clear the keys of your Trusted Platform Module.
- You can now try upgrading your operating system.
Using the TPM Management Window
The Trusted Platform Module (TPM) Management on Local Computer window shows the status of the TPM chip and carries other actions. You can use it to clear your system’s existing TPM keys. Follow these steps:
- Open Search and type msc.
- Select the first result, which says “tpm.msc. Microsoft Common Console Document.” This command launches the “Trusted Platform Module (TPM) Management on Local Computer” page.
- Now, go to the Actions pane on the right and click on Clear TPM. You can also click on Action in the toolbar and select Clear TPM in the drop-down menu.
- You’ll see a dialog warning you about the implications of clearing TPM. Click on the Restart button.
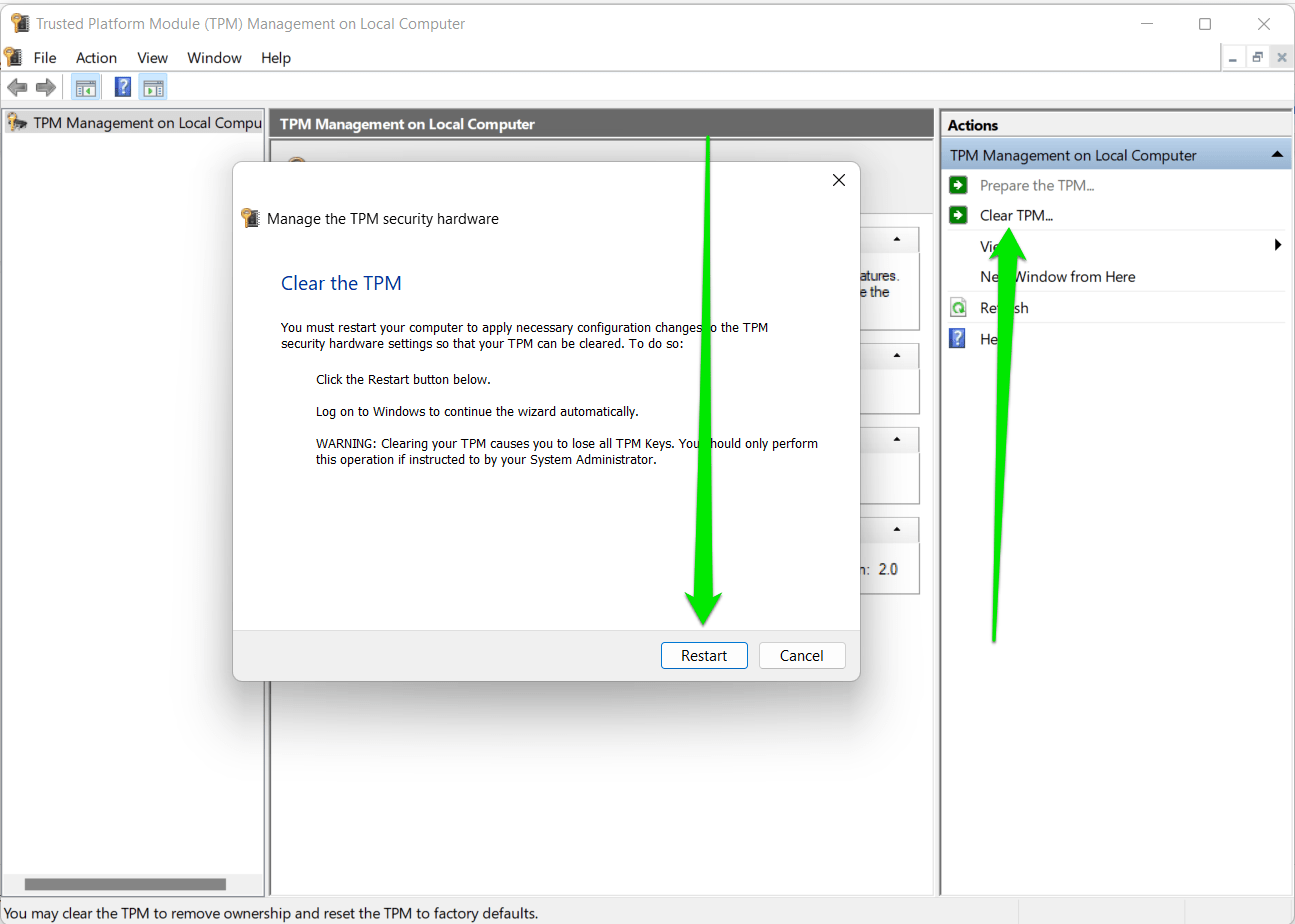
- After your PC restarts, accept any other confirmation prompt to complete the process.
- You can then check if you can now upgrade to Windows 11.
That’s how to clear the TPM keys to fix the TPM 2.0 error when installing Windows 11.
4. Fix TPM Driver Issues
In rare cases, your computer’s TPM may malfunction because the TPM driver you have installed may be corrupt, missing, or not compatible with BitLocker.
You can resolve the issue in this case by reinstalling the driver. Note that you must use a Microsoft-compatible driver for things to work. That said, the driver provided by the device manufacturer may be all you need.
First, uninstall the driver through Device Manager. Follow these steps:
- Right-click the Windows icon in the taskbar and select Device Manager in the menu that pops up.
- After the Device Manager opens, go to the Security Devices category and expand it.
- Right-click on Trusted Platform Module 2.0 and click on Uninstall Device.
- Click on Uninstall again in the confirmation prompt.
- Restart your PC.
After your computer boots, Windows will attempt to automatically reinstall the driver. This may resolve the issue once and for all and you can now upgrade your computer.
That said, you may need to manually download and install the device’s driver. You can go to Microsoft’s page to learn more about updating your TPM driver.
You could also go to the website of the TPM manufacturer to download and install the firmware.
To confirm your TPM’s manufacturer, launch the Windows Security app, then go to Device Security >> Security processor details.
How to Install Windows 11 Without a TPM 2.0 Chip
There has been a lot of confusion concerning Windows 11 not working on a PC without TPM 2.0. Some reports show that you can indeed install Windows 11 on an older PC, but Microsoft warns that the OS will run in an unsupported state.
Note that unsupported Windows 11 PCs won’t be entitled to Windows updates and could miss out on crucial security and driver updates. Therefore, only proceed if you’re willing to risk installing Windows 11 on unsupported devices.
Furthermore, the upgrade only works by installing Windows 11 manually using an ISO file rather than directly via Windows itself.
There are two ways to install Windows 11 without a TPM 2.0 chip:
- Bypass the TPM requirement
- Buy a compatible module for your motherboard
1. Bypass the TPM Requirement
You can bypass the TPM requirement in two ways:
a) Copy Files from a Windows 10 ISO File to a Windows 11 ISO File
- Go to the official Microsoft website and download the Windows Media Creation Tool. After that, use the Media Creation Tool to download a Windows 10 ISO file.
- Once you are done, right-click on the Windows ISO file and select “Mount”.
- Launch File Explorer and select “This PC”. You should see the mounted file.
- Open it and locate the Sources folder.
- Copy all the contents of this folder using the Ctrl + A shortcut – except install.esd (to deselect it, hold down the Ctrl key and click on the file).
- Now, paste the copied items into the Source folder of your Windows 11 ISO file. If it requests permission to replace the files, select “Yes” and wait for the files to be copied.
b) Edit Your Registry
Before you proceed, we should point out that this process can affect the performance and stability of your system. Therefore, do so at your own risk. It’s advisable to create a restore point and back up all your files before you begin.
- Download the Windows 11 beta version. You must join the Windows Insider Program to do so.
- Restart your PC and try installing it. Since your PC obviously doesn’t meet all the requirements to support Windows 11 (there is no support for TPM 2.0), you’ll see the error notification “This PC can’t run Windows 11.” Don’t close the “Windows setup” page just yet. We’ll be coming back to it later.
- When the error appears, press the Shift + F10 shortcut. This action will launch a Command Prompt window.
- Type regedit into the Command Prompt and hit “Enter”. This command opens the Windows Registry Editor, where you’ll navigate to HKEY_LOCAL_MACHINE\SYSTEM\Setup.
- You should see the Setup key. Right-click it and select New > Key.
- Assign the new key the name LabConfig and press “Enter”.
- Right-click “LabConfig” and select New > DWORD (32-bit) Value.
- Name it BypassTPMCheck and set its value to 1.
- Repeat the same process to create the BypassRAMCheck and BypassSecureBootCheck values, setting their data values to 1.
- Now, after creating the three values, exit the Registry Editor and close the Command Prompt window.
- Go to the “Windows setup” page with the error “This PC can’t run Windows 11” and click on the “Back” button.
- Select Windows 11 and follow the prompts. You should now be able to install Windows 11 without TPM 2.0.
2. Buy a compatible module for your motherboard
If the above process doesn’t work, you can add a TPM to your PC by purchasing one of the TPM-supported chipsets. However, the process is more complicated than it sounds, and you must ensure that the new chipset is properly configured in the BIOS/UEFI for the Windows OS to recognize it.
Keep Your PC Protected
While TPM 2.0 is a security feature that comes with your PC, it’s not a replacement for a software security tool, nor does it function like one. You still need to invest in a robust and reliable malware removal tool, and Auslogics Anti-Malware can be your best bet here. This program is highly advanced and designed to detect and remove all kinds of threats, especially those that operate discreetly.
It works alongside your primary security tool, like Windows Defender, offering extra protection from malicious items that may otherwise go undetected. Auslogics Anti-Malware lets you schedule automatic scans to give your device continuous protection.
Among other things, the software scans browser extensions to prevent data leaks, checks your system’s memory to detect malicious programs that could be running, and identifies cookies that could track your activity.
Using this tool is straightforward, and you can easily customize it to your needs.


 Done! Great to see you among our subscribers!