
Windows 11 started rolling out to eligible Windows 10 computers on October 5. It’s a phased release, and the OS will receive regular updates, just like its predecessor. Here’s how to download and install it.
Some users are already enjoying the new operating system’s bells and whistles. But others are not so happy as they see something scary on the installation page. It’s the dreaded “This PC can’t run Windows 11” message, which shows up on machines that fail to meet some basic requirements.
The error screen rocked the Windows community when Microsoft released the OS through the Insider Program in early 2021. Some affected users were hoping the issue would go away after the official release, but that’s not the case.
Nowadays, the message reads:
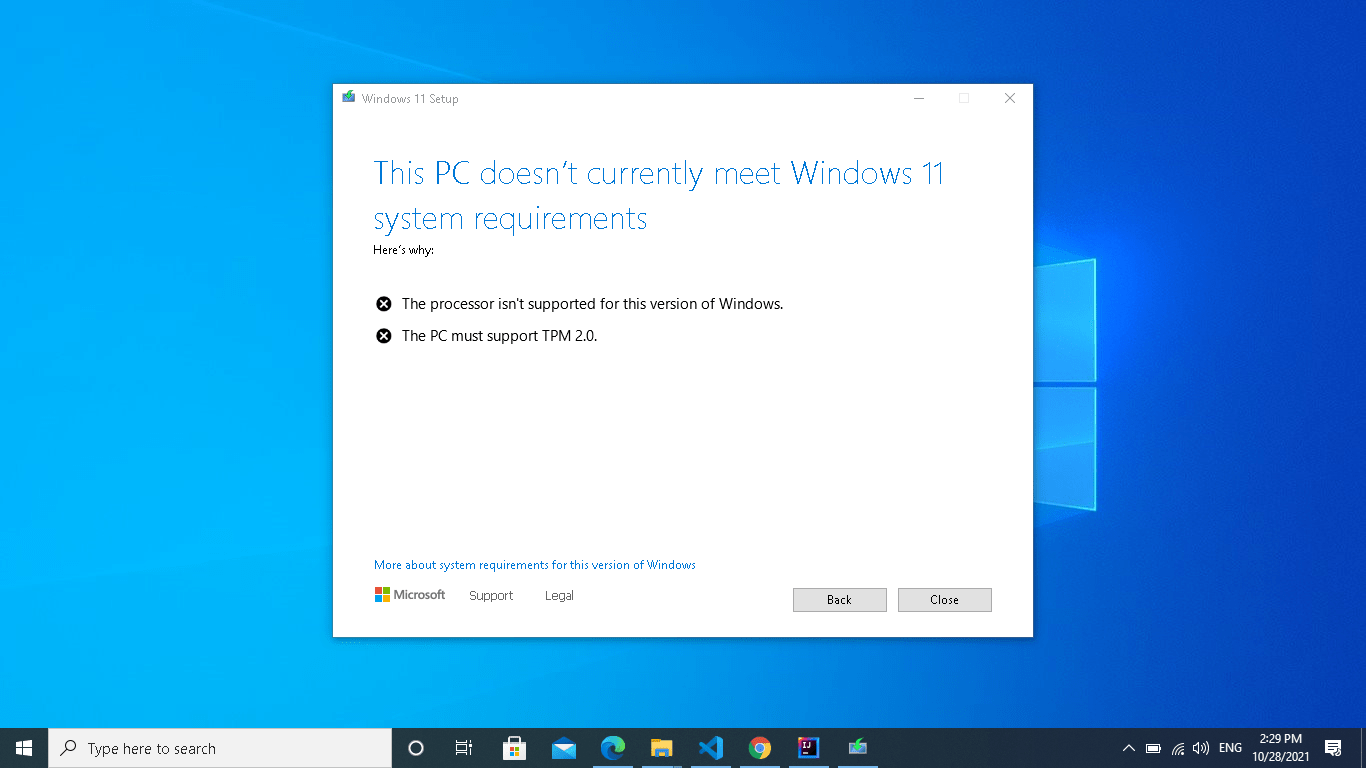
This PC doesn’t currently meet Windows 11 system requirements
It also shows you the requirements that are not met.
Why Does This Message Say That the PC Can’t Run Windows 11?
Windows 11 comes with strict security requirements. For example, a PC must have Secure Boot and TPM turned on to run the OS. Of course, modern PCs have these security features out of the box, but it wasn’t a strict requirement for running Windows 10.
That said, the problem isn’t limited to TPM and Secure Boot. Microsoft reported other issues, like the lack of free storage space (at least 64GB) and the wrong processor type, as possible causes of the error message.
You can use the free PC Health Checker app provided by the company to confirm whether your computer meets these requirements. However, the application could report the wrong info, especially if the security features are turned off at the BIOS level.
Enabling both security features should be easy if you know your way around your BIOS or UEFI. However, if you don’t, keep reading as we will walk you through the process step by step in this article.
Secure Boot and TPM: What Are They?
TPM devices are tiny microchips built into your computer’s motherboard at the manufacturing level. Sometimes, they are separate from the main memory and CPU. On the other hand, some TPMs are installed on your motherboard as firmware or a virtual device that leverages your CPU’s resources.
The TPM unlocks your computer at the boot process. You can see it as a two-factor authentication module. It is equivalent to the app that opens your email or bank account after entering your login details.
The chip will supply a unique cryptographic code to verify that nothing has been modified whenever you turn on your PC. If something suspicious is happening, such as malicious code trying to access your encrypted drive, your PC won’t start.
TPM has been required for specific Windows 10 features such as Windows Hello and BitLocker and the Outlook and Thunderbird clients. So while the OS doesn’t need the security feature to run, these programs depend on it.
As a result, Microsoft requires at least TPM 1.2 installed on modern PCs to access the encryption features of these applications on Windows 10. TPM 2.0 is the updated version of the feature and is required on Windows 11 computers.
Secure Boot is another security feature that protects your PC. It mainly locks out operating systems deemed illegitimate from loading on your device. However, depending on how you look at it, Secure Boot can be pretty restrictive.
On the good side, it can protect your computer against ransomware and other classes of invasive malware. However, it can prevent you from dual-booting your system. For example, you won’t be able to run an operating system such as Linux if Secure Boot is turned on.
Also, it prevents bootable drives created using apps like Rufus from running.
How to Check Whether a PC Supports Secure Boot and TPM 2.0
The easy way to check whether your computer has these security features is by running the PC Health Checker from Microsoft. However, it might erroneously report that your PC can’t run the OS, especially if the features are turned off.
You can check manually to confirm that TPM 2.0 and Secure Boot are supported.
There are two ways to check for TPM compatibility. You can use either Windows Security or Trusted Platform Module (TPM) Management on Local Computer.
Follow these instructions to go through Windows Security:
- Click the Start button and type Settings into the search box or press the Windows logo and I keyboard buttons together.
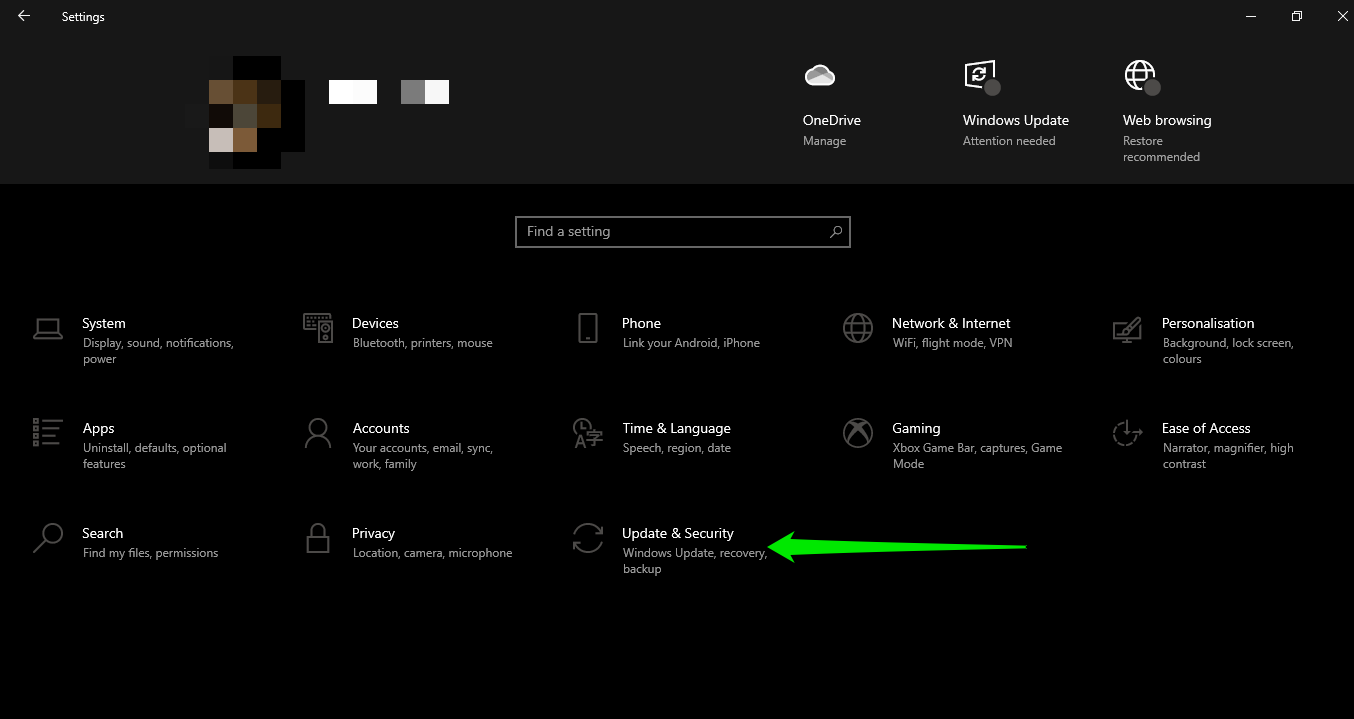
- Click on the Update & Security icon at the bottom of the Settings home screen.
- Next, you have to go to the left pane of the following interface and click on Security.
- The next page shows you the different protection features of Windows Security. Click on Device Security.
- You’ll find sections such as Security Processor and Secure Boot on the Device Security interface. For example, if your computer supports TPM, you’ll find details under Security Processor. Clicking on “Security Processor Details” will show you the chip’s version, manufacturer, and other information.
- You’ll see a message saying, “Standard Hardware Security Not Supported” if your PC doesn’t have TPM installed.
Here is how to go through the TPM management window:
- Go to your keyboard and tap the Windows logo and R keyboard buttons simultaneously.
- After the Run dialog window appears, go to the text field, type “tpm.msc,” and hit the Enter keyboard button.
- The Trusted Platform Module (TPM) Management on Local Computer window will now show up.
- If your computer has the security module installed, the window will display the following sections:
- Overview
- Status
- Available Options
- TPM Manufacturer Information
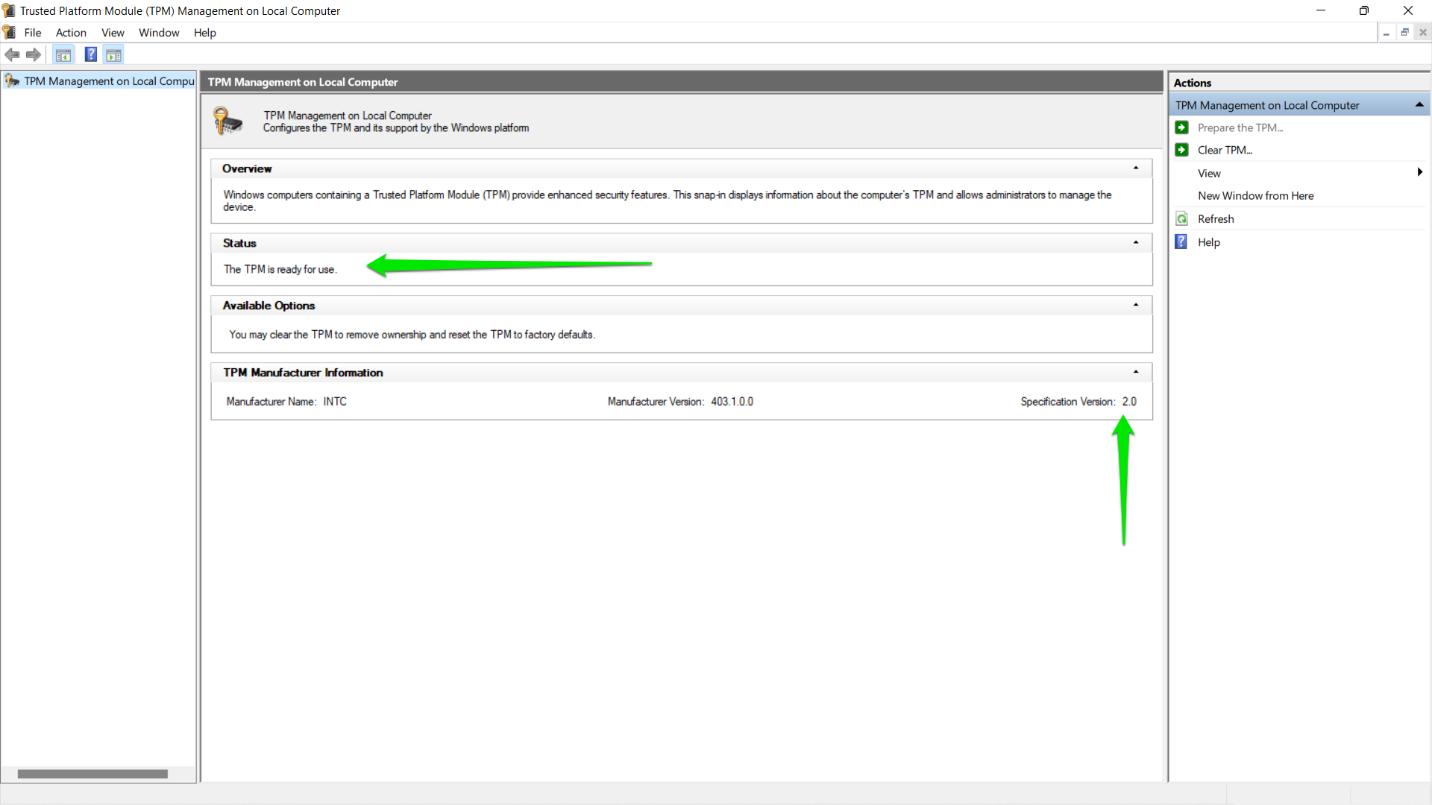
- Now, expand the Status section to check whether TPM is ready for use.
If the TPM security feature is available for your system, it most likely also supports Secure Boot. However, you can check that by going through the System Information window. Here’s how:
- Go to your keyboard and tap the Windows logo and R keyboard buttons simultaneously.
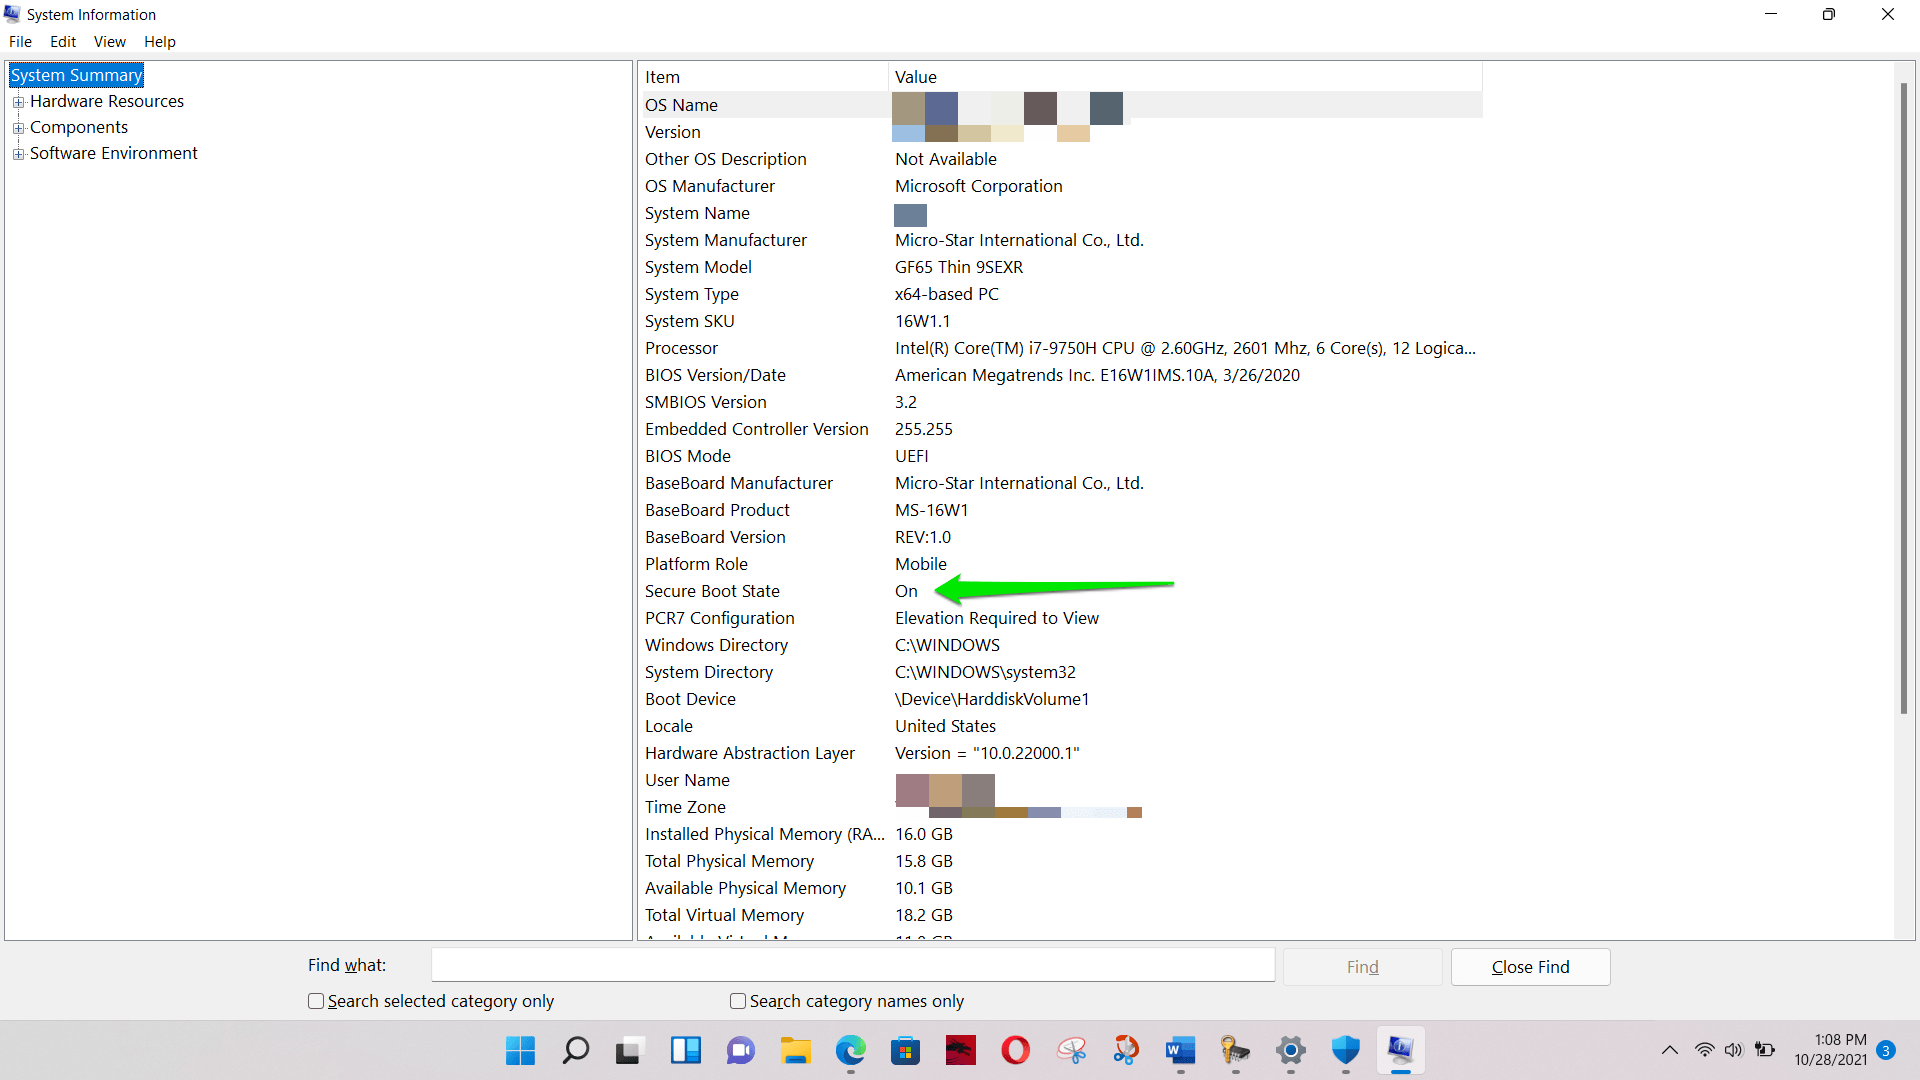
- After the Run dialog window appears, go to the text field, type “msinfo32,” and hit the Enter keyboard button.
- Once you see the System Information window, look for the Secure Boot State entry. You’ll find out if it’s On or Off.
How to Fix the TPM 2.0 Error When Installing Windows 11
You have to turn on the TPM feature if you see the TPM 2.0 error after running the PC Health Checker app. However, that’s if your PC is compatible. It’s also important that you turn on Secure Boot. That’s how to fix the “Windows 11 installation failed” problem.
Now, let’s go through the process together.
Before You Start
You’re likely eager to head over to the UEFI environment, turn on TPM, and hop on Windows 11. But before you jump right in, there are a few things you should understand and probably do.
Check for Other Problems
As we mentioned earlier, Microsoft noted two other problems that could be preventing you from running Windows 11. They include your processor and storage space. If you have less than 64GB of free storage, Windows 11 won’t install. So, check your storage space to ensure your system meets the storage requirement.
You can also head over to Microsoft’s website to check if your CPU is supported. If you confirm that you have TPM support, then your CPU should work. But it won’t hurt to confirm.
Consider Staying on Windows 10
If your system does not support TPM and you can’t find your processor on Microsoft’s list of supported CPUs, it’s okay. You can continue using Windows 10 until you decide to upgrade your PC. Microsoft intends to support the OS for another five years.
The TPM and processor compatibility requirements are hardware limitations that you can’t just bypass.
However, there are instances where a lack of TPM doesn’t mean your system won’t ever support the tech. On rare occasions, motherboard manufacturers include support for the chip without actually installing it. In this case, you can return your system if you’re under warranty or hunt down a TPM 2.0 chip compatible with your motherboard.
Note that the chip might set you back up to a hundred dollars or more depending on your motherboard’s configuration.
Speak to Your Manufacturer
If you have TPM installed, you should consider contacting your manufacturer before making changes to your BIOS or UEFI settings. Doing this will prove helpful if you’re still under a valid warranty. You don’t want to apply changes that will void the warranty. Speaking to your PC’s manufacturer should be easy. Just head over to its website and use the integrated chat function or send it an email.
Back Up Your Files
It always makes sense to back up important files whenever you want to make impactful modifications – more so when you’re trying to install a new OS – even if you’re not using the “Delete everything” option. So, take our word for it and back up your PC. You’ll be glad you did.
Follow the Instructions Carefully
The instructions here will walk you through opening the BIOS or UEFI on your computer and turning on the security features in question. The screenshots below show the environments of a particular PC, and you should note that every computer is different. It would be impossible to cover all variations in this article. So, where necessary, we’ll point you in the right direction on what to do.
Don’t get off track while navigating the UEFI interface. Make sure you’re absolutely sure about the setting you want to modify. If there’s any shred of doubt, pause and ask for guidance from an expert.
Turning On TPM and Secure Boot
Note: TPM 2.0 could be active and Secure Boot could be turned off on some computers. This is the case with some Windows 10 machines running applications that don’t work properly with Secure Boot.
For example, if you’ve ever recovered or reinstalled your OS using a bootable USB drive created with Rufus, Secure Boot is likely turned off.
So, if the TPM Management console reported that “TPM is ready to use,” you can skip the TPM guide and head over to the Secure Boot process.
Opening the BIOS Environment
There are two main ways to get to the UEFI or BIOS interface. They include going through the Advanced Startup environment or pressing key combinations during startup.
The first method is ideal if you use a modern computer. Your system could be so fast that you won’t be able to press the necessary combinations in time at startup.
With that said, let’s start with the first method:
- There are other variations to this workaround. For example, while going through Settings is the standard method, you can also use a simple keyboard shortcut.
- Launch the Start menu and click on the Power icon. Now, when you see the power options, go to your keyboard and hold down the Shift key.
- While pressing Shift, return to the power options and select Restart. When your system boots up, you’ll be redirected to the Advanced Startup environment.
- Now, here’s how to go through Settings if the Restart + Shift combination doesn’t work:
- Launch the Start menu and click on the Settings icon. Alternatively, you can head to your keyboard and tap the Windows logo and I keys in quick succession. That should launch the Settings application.
- After the window jumps out, go to the bottom and select Update & Security.
- Now, on the following interface, go to the right pane and click on Recovery.
- After opening the Recovery page, drive your mouse pointer to the Advanced Startup section and select Recovery.
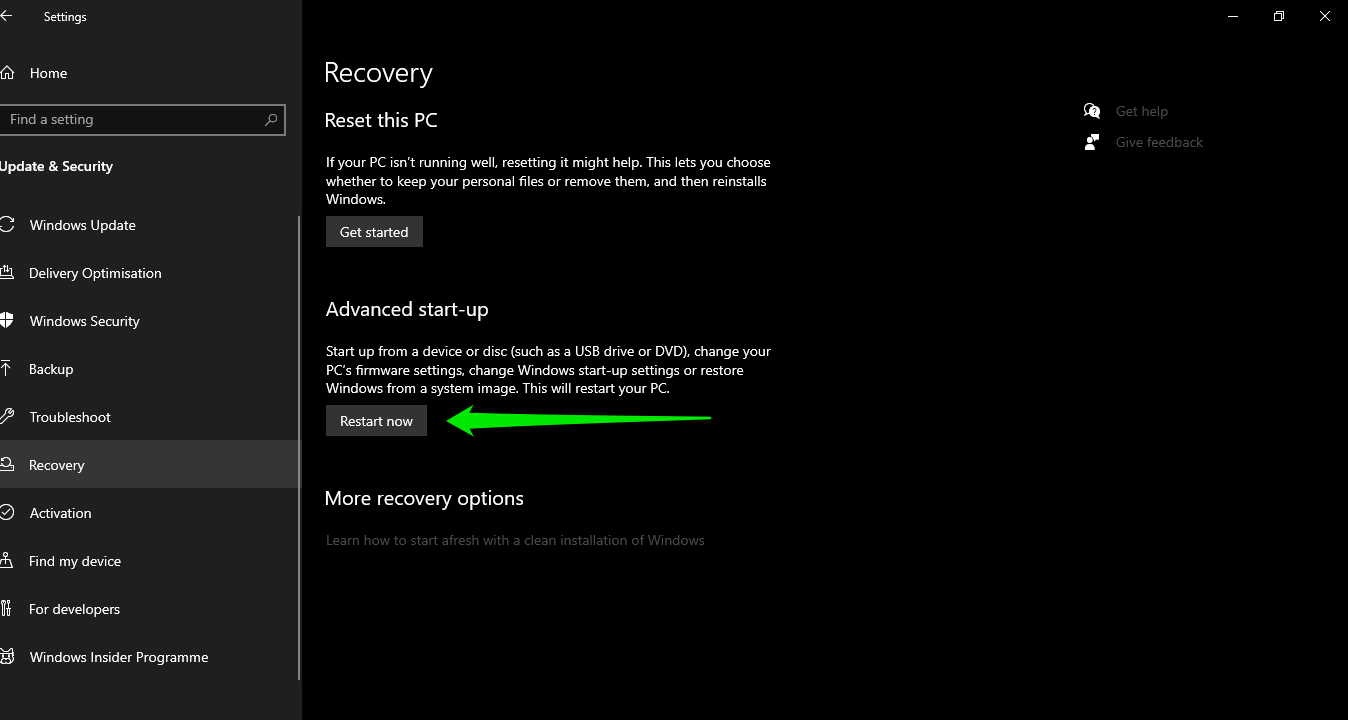
- That’s it. You’ll now be taken to the blue interface that asks you to choose an option.
- So, select Troubleshoot, then click on Advanced Options, and then select UEFI Firmware Settings.
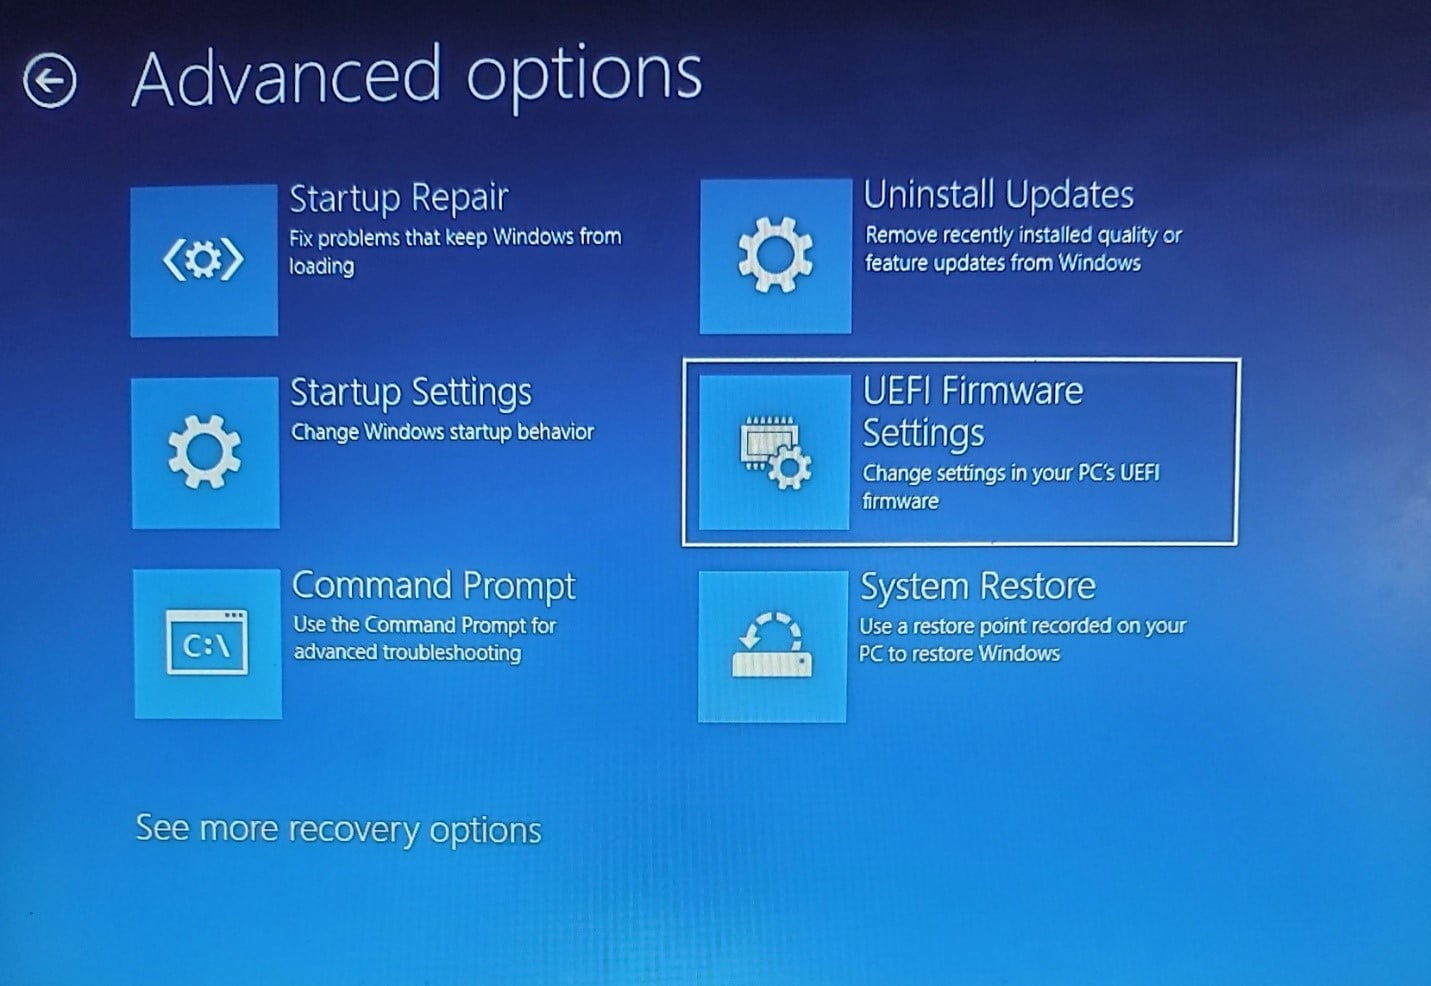
- This will reboot your computer again. However, this time, you’ll be redirected to your BIOS or UEFI environment.
As mentioned, the second method involves pressing some key combinations before your system goes too far in the boot process.
The boot process is a series of steps a computer has to follow to ensure everything is in place before it loads up the operating system. Generally, it involves initiating the CPU, checking the state of devices, and loading the boot file.
You’ll have to be fast about pressing the keys we show you. This is because once the boot process has loaded your OS, you’ll have to restart your computer and try again.
Now, follow these steps:
- Restart your PC.
- Pay attention to the first thing you see on the screen. In most cases, you’ll see a message on a page with the manufacturer’s logo, telling you to tap a key to enter your BIOS or UEFI. Of course, the message will vary depending on your system.
The keys should also vary. For some computers, you’ll be told to tap F2, F8, F11, or F10. For others, it’ll be a combo, like Ctrl + Alt + Del.
In some cases, though, there won’t be an instruction. So, you’ll have to hit the correct button when you see the manufacturer’s logo and before your PC loads up the operating system. You can check online for your system’s BIOS key.
- After tapping the key, the setup interface, which will be nothing like your fancy Windows GUI, will pop up.
Turning On TPM
You should see the Security tab in the UEFI or BIOS menu. The menu could be on the left side of your screen or at the top. Switch to the Security tab using the arrow keys on your keyboard. Some UEFI and BIOS interfaces allow you to use your mouse, though. However, you might need to expand the submenu using the + key on some systems.
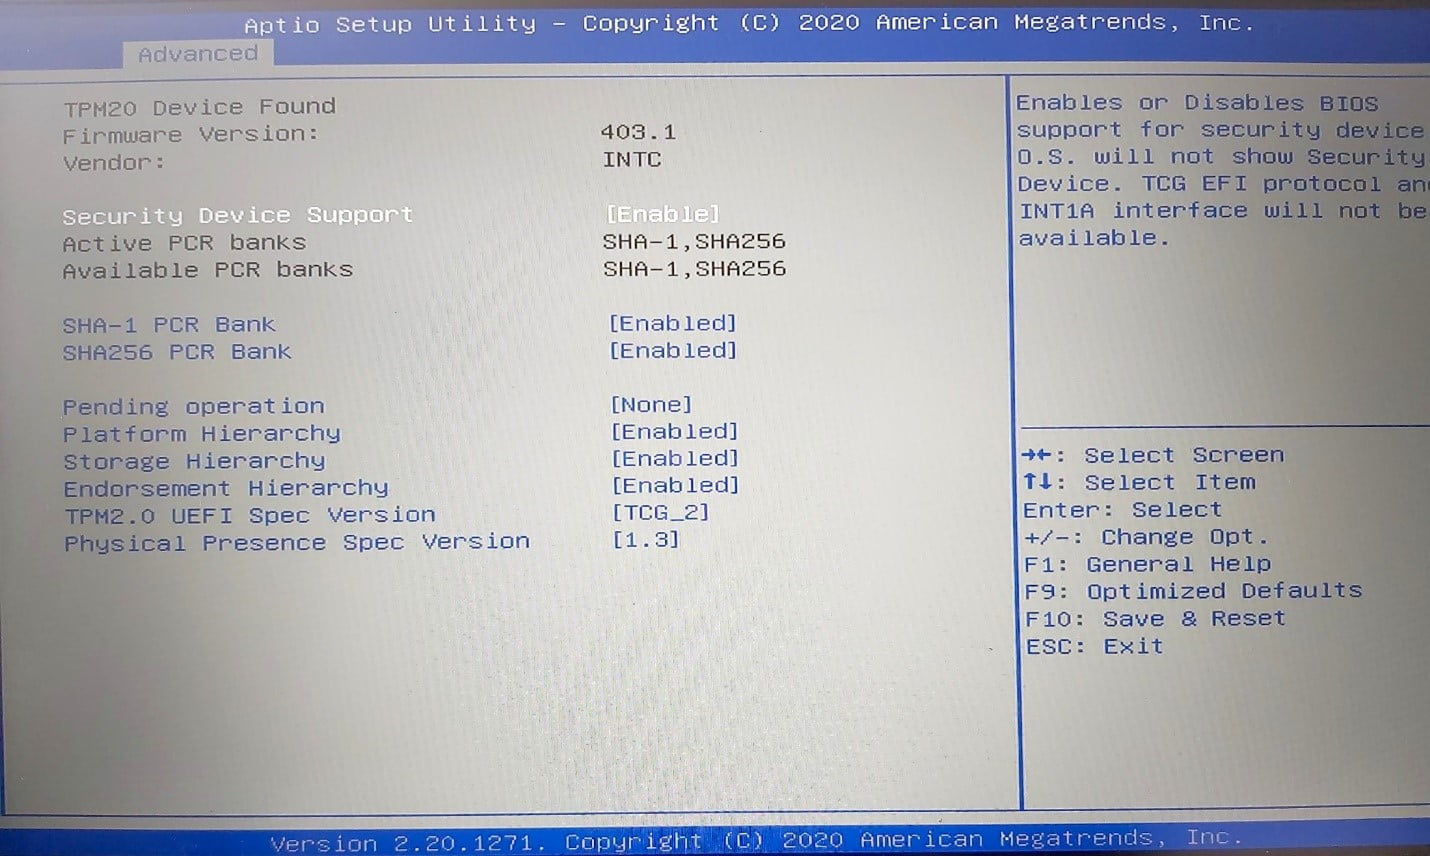
The next thing to do is look for the TPM setting under the Security tab.
You should note that there are different variations of the TPM setting. For starters, the setting you’re looking for might not be explicitly labeled TPM. You should look out for PTT, Intel Trusted Platform Technology or Trusted Computing on Intel computers. Other variations include AMD CPU fTPM and AMD fTPM.
If you can’t find the TPM setting under the Security tab, it should be under Advanced.

Now, for some PCs, the TPM switch should be right beside the security feature’s name. However, in some cases, it opens a new interface where you’ll have to turn off options like Security Device Support or simply TPM.
After selecting your option, press Enter or the related button as indicated in the BIOS to exit. A pop-up will show up. Choose the option that saves your changes. Some BIOS and UEFI interfaces allow you to tap a button such as F9 or F5 to save and apply your changes before exiting.
How to Turn On Secure Boot
Unfortunately, Secure Boot doesn’t work well with some applications. If you have such programs, your system’s boot process could become irregular. However, you shouldn’t panic if that happens, as you can rectify the problem by going back to the BIOS and turning off the feature.
Now, open the BIOS using any of the methods above. Once you’re in the Setup window, look for the Secure Boot setting and turn it on. It could be under the Security, Boot, or Authentication tab. Use the navigation buttons indicated in your BIOS environment to move around and select your options.
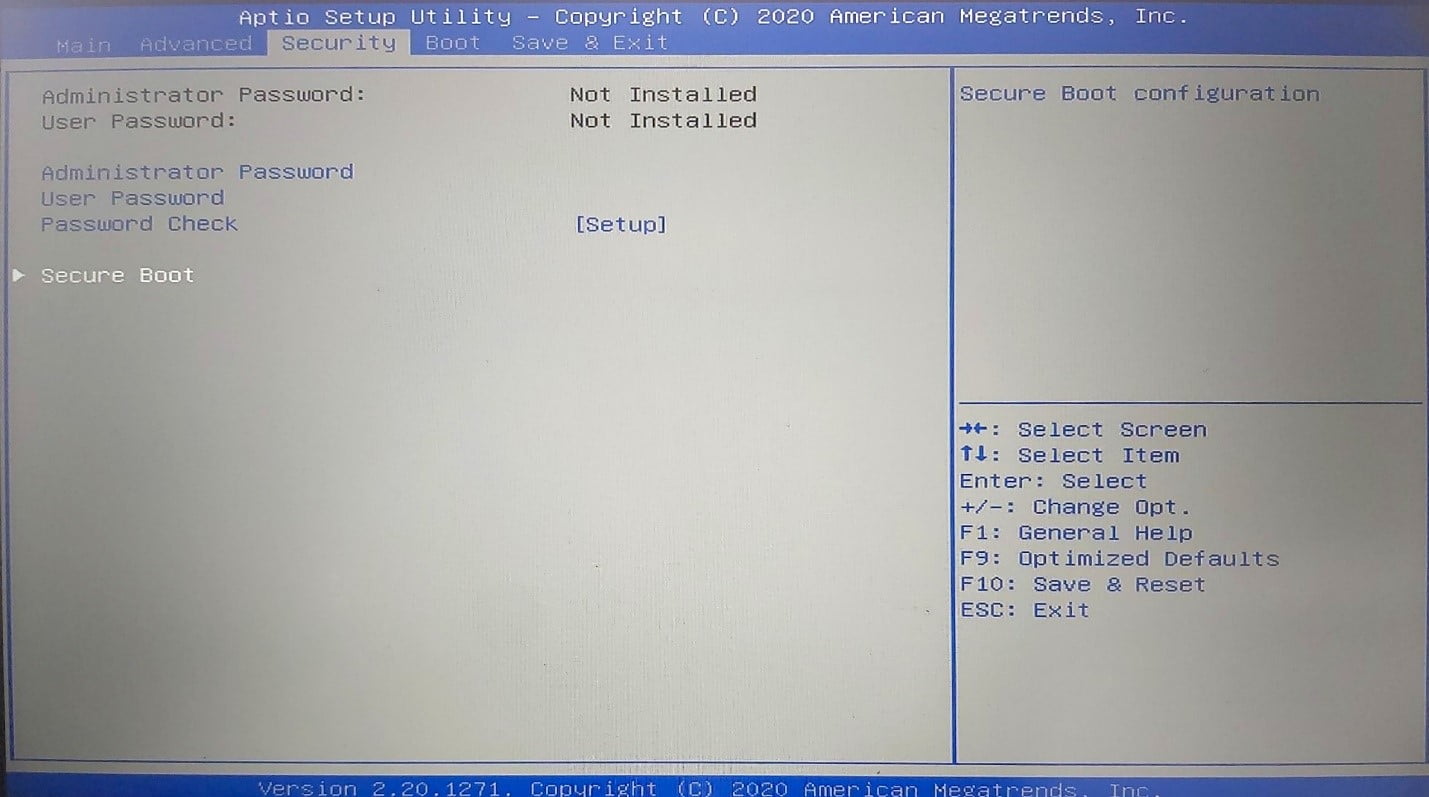
After turning on Secure Boot, exit the BIOS and save your changes.
Conclusion
Remember that you can always use Windows 10 if your computer does not have the required hardware components to run the new OS.
One more thing:
You can improve your experience on Windows 11 by installing Auslogics BoostSpeed. The program has been optimized for the new OS to help you make things run smoothly. For example, it gets rid of temporary and junk files and leftover registry keys that build up over time and slow down your PC. It also optimizes your system settings for the best user experience.
Head to the comments section below to tell us about your Windows 11 experience.


 Done! Great to see you among our subscribers!