
You have probably realized that every time you turn on your computer, it does a disk check, something that it never used to do before. Should this be a cause for alarm? While disk scanning does not always mean harm, it is mostly trying to communicate about an underlying problem.
This used to be an issue in Windows 10. However, many users are also experiencing it in Windows 11. As it turns out, your operating system may be detecting possible issues with your drive that it needs to check to confirm that everything is alright.
What is chkdsk.exe?
This is pronounced as “check disk”, and it is basically a command that checks drives. It works by displaying the status report of the disk and can even fix the issues found. However, to use this tool, your computer should have Autochk.exe in its system.
The computer hard disk stores all the files in folders. Also, it contains some security information on who can access those files. The hard disk carries so much information, and CHKDSK’s work is to ensure that all the information about the folders, data, and security status is correct. Unfortunately, an error might occur when the computer shuts down abruptly or when you eject or remove a USB device unsafely. It could also be as a result of hardware issues or malware. These problems are reflected in the hard disk’s administrative information, thus forcing the CHKDSK command to run in order to detect and fix those issues.
The CHKDSK command scans the hard disk and fixes any file issues on the drive. There is a range of possible reasons why the Check Disk command is triggered, some of which include:
Incorrect shutdowns
The primary trigger of the check disk process is if the system shuts down inappropriately. You are supposed to switch off the computer via the Start menu and give it time to shut down completely. If the computer goes off abruptly or if you shut it down by pressing the Start button, you are likely to experience data losses and file system issues that force it to go through a check disk routine when booting. Also, you should not make the mistake of shutting the computer down by unplugging it from the power supply. The check disk command is triggered to check if the hard disk is okay after undergoing the improper shutdown. This could also happen if you experience a power failure.
A malware attack
A check disk scan could also be an indication that your computer is under a malware attack, which might include viruses and other foreign programs that undermine the file system’s functionality. You probably opened an unsecured link that threatened the safety of the computer system, and this triggers the check disk utility to run to ensure that there are no threats. The best way to avoid this is by ensuring that you have a quality antivirus program installed at all times. In this case, you should invest in reliable anti-malware software to keep malware away.
Hard drive issues
Chances are that some problems with the drive have been detected. This is the leading cause of Windows 10 running CHCKDSK every time you turn your PC on. It does so to check for any file system issues like bad sectors that put the entire computer system at risk and could even result in hard drive failure. It is recommendable that you give the program time to run, hoping that it will fix the problem. It will indicate if it found any issues and show how they should be solved. The report is in Check Disk’s log file, which you can access by going to the Start menu and then typing ‘event viewer.’ Click on it and select the application. You will find comprehensive information on any found issues, and you can also do that by checking the system logs for any sources listed as the cause of the underlying problems. If you notice that the check disk utility keeps running after every startup, it means that the hard drive is failing, and that should cause alarm.
How to cancel check disk in Windows 10
The check disk command is handy as it continually checks for bugs and failures in the computer system, but you do not need it to run every time after starting the computer. If you have enabled the command, it is easier to stop it since you only need to click on any key to skip this step. You will have about 8 seconds to quickly skip checking, after which the process will automatically run. The issues come in when you have a scheduled disk check and have no time to wait for the process to finish running. In such scenarios, you have no choice but to cancel the disk check.
Before doing so, you should determine if any of the drives have a scheduled check so you can cancel it by pressing skip on the next reboot.
That said, there are steps you can take to prevent the utility from running at startup. You don’t have to wait to hit a key to skip the automatic check desk routine whenever you turn on or restart your PC.
You can edit your system registry on Windows 10 or Windows 11 or use a command in the Command Prompt. We’ll walk you through both steps.
Using the System Registry
The system registry controls many different processes in Windows. Whether you’re running Windows 10 or 11, the process is pretty much the same, and you have to be careful about how you adjust settings in the registry. That’s because one wrong turn or adjustment could cause severe damage to your operating system.
So, it’s advisable that you create a backup of the entire registry before attempting to run this fix. This way, if you make a mistake, you can roll back the changes and undo the damage.
That said, you should look for an expert to handle this if you’re uncomfortable using the Registry Editor or don’t know how to navigate it.
Follow these steps to back up the System Registry in Windows 11 and Windows 10:
- On your keyboard, press the Win + R shortcut to summon the Run dialog window.
- Type “regedit” into the Run text box and hit the Enter key.
- Click on Yes when you see the UAC confirmation box.
- After the Registry Editor appears, click on File and select Export from the context menu.
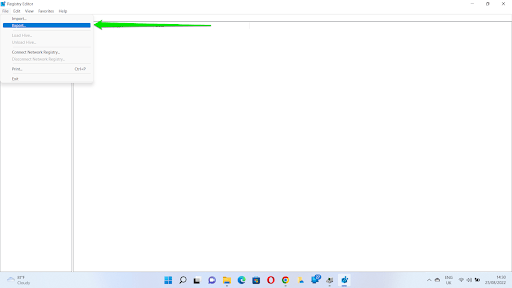
- Go to the File Name text box and enter a name for the backup file.
- Head to the Export Range section and select All. That means you’re backing up the entire system registry.
- Browse to the folder where you’d like to save the file, then click on the Save button.
- Whenever you want to recover the backup, click on File once you open the Registry Editor and select Import. Then, go to the folder where you saved the backup and double-click the file.
Now, follow these steps to prevent the system from running the CHKDSK utility at Startup:
- Launch the Registry Editor and expand HKEY_LOCAL_MACHINE in the left pane.
- Next, expand the SYSTEM folder.
- After that, click the arrow beside CurrentControlSet to expand it.
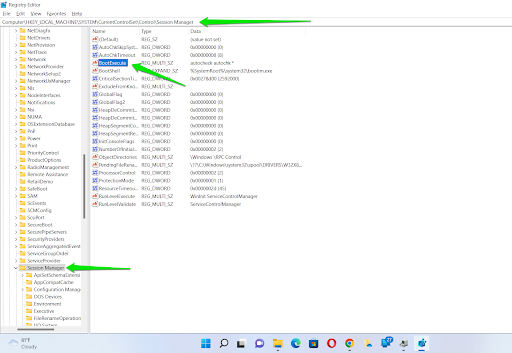
- Under CurrentControlSet, expand Control and scroll down to click on Session Manager.
- Go to the right side of the screen after clicking on Session Manager to locate the BootExecute string and double-click it.
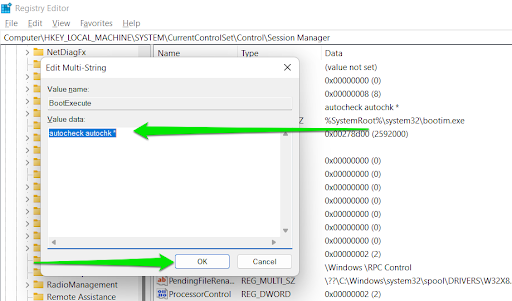
- After the Edit Multi-String dialog appears, go to the Value Data box and change the value to “autocheck autochk *” (Don’t add the quotes). Remember to add the space before the asterisk (*).
- Now, click on the OK button.
This should stop the CHKDSK utility from running on Windows startup whether you’re running Windows 10 or Windows 11.
Using the Command Prompt
You can also enter a series of command lines in the Command Prompt window to stop Windows from checking your disk whenever you turn on your computer or restart it.
Follow these steps:
- Firstly, open the Command Prompt in admin mode. To do that, head to the Start menu, search for CMD, then click on Run as Administrator once you see the Command Prompt result. In some versions of Windows 10, you can right-click the Start button and select Command Prompt (Admin).
- Click on Yes in the UAC confirmation box.
- Once the Command Prompt opens, type “fsutil dirty query C:” (without the quotes) into the Command Prompt and hit the Enter key.
Note:
- The command helps you confirm if Windows has marked the hard drive with a dirty bit value. That’s because the CHKDSK utility automatically checks drives that are marked dirty.
- The “C:” part of the command should be replaced with your hard drive’s drive letter. So, if you want to query drive E’s dirty value, use “E:” instead.
- After that, type “chkntfs /x c:” (don’t add the quotes) and hit the Enter key. This command will prevent the Check Disk tool from checking the drive on startup.
- You can also prevent the utility from scanning more than one drive on startup. To do that, use the following command:
chkntfs /x c: d: e:
Note: Always add a space after entering a drive letter and the column.
- That’s it!
Do I need check disk in Windows 10?
The answer to this question is a simple yes. You may have noticed that disk checking in Windows 10 is a bit different from that on other Windows versions, but it offers great help in getting rid of bugs and other issues that could be slowing down the system. The check disk command helps in correcting any problems that could have been caused by corrupted software, sudden or improper shutdowns, or malware attacks. This, in return, helps in improving the computer’s performance.
Windows 10 has a disk checker, which is a tool meant for detecting and fixing disk issues automatically. This means that you do not have to run the traditional disk check to identify any underlying problems and fix them. The command periodically checks the hard drive for any bad sectors and system errors and automatically performs maintenance, so you do not have to run it.
To run chkdsk in Windows 10 and Windows 11, you should:
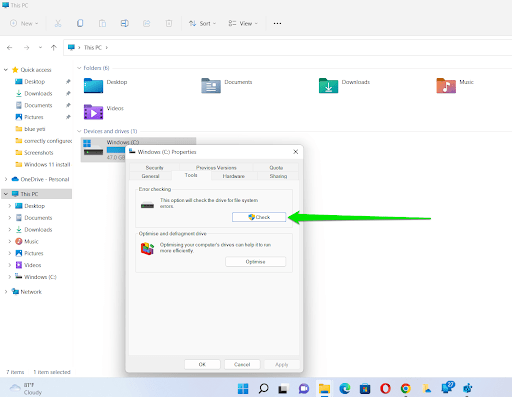
- Open File Explorer and go to This PC.
- Right-click on the drive that you wish to scan.
- Click on Properties.

- Click the Tools tab.
- Press the Check button.
You can also run the CHKDSK tool, using the Command Prompt. Here’s how:
- Firstly, open the Command Prompt in admin mode. To do that, head to the Start menu, search for CMD, then click on Run as Administrator once you see the Command Prompt result.
- Click Yes in the UAC confirmation box.
- After the Command Prompt opens, type the following and tap the Enter key:
chkdsk C: /f /r /x
Note:
- The /f parameter attempts to fix any error that the utility finds
- The /r option locates bad sectors with recoverable information and attempts to recover those files.
- The /x switch dismounts the drive or partition you want to scan before CHKDSK begins to check it. If the drive is in use, you’ll have to tap the Y keyboard button to start the check after your PC restarts.
- That’s how to run the utility using the Command Prompt on Windows 10 or Windows 11.
With this, the chkdsk utility will check for any errors on the file system.
If there are any errors detected, the system will ask you to check the disk, and if there are no errors, then a message will pop up, showing that you do not need the scan. However, when the chkdsk tool keeps running after every computer startup, this could be a sign of an underlying problem, and you should have the issue checked.
Should one disable check disk?
It depends on how the system behaves or operates. As mentioned earlier, the check disk process is crucial for detecting and fixing disk-related errors. However, if it becomes a nuisance, then you should disable it. The most annoying part of running a disk checker is when it keeps running when not needed. This mostly happens when you do not switch off the computer properly. The blue screen may appear, and this means danger. On booting the computer, it says that it’s checking the file system or that one of the disks needs to be checked. Although you may cancel the command and go ahead to boot the computer, it is recommendable that you let it finish the scan.
Pressing any key will stop the check disk process, but once you restart the computer, the command is likely to run again. If this happens, it means that your computer has an underlying issue that you should stop ignoring. It means that Windows still wants the drive to be scanned. If you ignore it, it will keep reminding you until you have it checked.
Letting the disk checker do its job is the best thing to do, but it can sometimes be time-consuming, and you do not have all that time to wait. Also, you may realize that even after letting it run the scan, it will still want to run after the next booting session. If you eject a USB flash before the system has finished running or if the system shuts down improperly, probably due to a power failure, Windows automatically detects the issue and will force another check disk scan. In such a case, you can disable it.
Final Verdict
From this information, it is evident that CHKDSK is a crucial aspect of your computer as it helps in keeping bugs at bay. However, it is most efficient when scheduled or when you run it manually. If you realize that it keeps running at startup, that means that your computer is experiencing some hard disk errors that need to be checked. You should let the disk checker finish the scan and identify the problems. If there are any issues detected, then let the tool fix them before continuing with the booting. If it shows that there are no errors, then you are good to go.
However, if you let it run the scan and it runs the same command during the next booting session, this could be a sign that your computer system has been attacked by malware and you should check to ensure that you have up-to-date antivirus software. If the issue continues, it is best if you let an expert look into the problem as it could be an indication of a bigger underlying issue.


 Done! Great to see you among our subscribers!