- Why Is there a Red X on my Sound Icon?
- First Fix: Restart Your System
- Second Fix: Run the Windows Audio Troubleshooter
- Third Fix: Disable and Enable the Audio Device in the Device Manager
- Fourth Fix: Set Default audio Output Device
- Fifth fix: Make sure the audio service is running
- Sixth Fix: Fix the Audio Driver
- Use Windows Update
- Use the Device Manager
- Update Your Audio Driver Automatically, Using a Third-Party Program
- Conclusion
You might think that your computer’s speakers are useless until they stops working. Even if your PC is mainly a workstation, there are notification sounds that you’ll realize are integral to the system. Also, if you’re on video calls and conferences, you still need the speaker when you don’t have a hold of your headphones.
Being on this webpage means that you’re seeing a red X mark on the speaker icon, which implies that your speaker isn’t producing sound. Many other Windows users have also complained about the same issue. Since you’re looking for ways to solve the problem, you’ve landed on the right page.
In this article, we’ll be showing you all the different ways to fix the red X on the volume icon.
Why Is there a Red X on my Sound Icon?
We understand that this question has been on your mind since you lost sound and found the dreadful mark on your volume icon. You should know that there are different possible causes of the problem. Here are some of the potential reasons:
- Your audio device is faulty or not connected properly
- The audio service isn’t running
- Your audio driver is outdated or corrupt
- Certain bugs and application conflicts are affecting the sound controller
Whatever happens to be the cause of the problem, you’ll get rid of it once you apply the right fix.
First Fix: Restart Your System
There’s plenty that a good old system restart can resolve. You must have experienced the magic of reboots before now. Restarting your system can clear a backlog of issues, including those that are affecting your audio device.
Some applications that may be using the audio service might have encountered issues, taking your system’s audio with them. In other cases, it could be that the processor can’t get to communicate with the audio adapter driver properly.
When you restart your system, these issues will be cleared and, hopefully, the red mark will be gone.
Second Fix: Run the Windows Audio Troubleshooter
The troubleshooter is a built-in tool designed to find and resolve problems affecting your audio output. It primarily checks for conflicts that are preventing the audio service from running properly and promptly gets rid of them. Although the troubleshooter can’t fix every issue that affects the device, it does a pretty good job in resolving common bugs and glitches.
In certain cases, when it finds a problem, it will notify you and ask for your permission to get rid of the problem. If you don’t know how to run the troubleshooter, the steps below will guide you.
On Windows 10:
- Go to the taskbar and right-click on the Start button.
- Once you see the Power User menu on top of the Start button, select Settings.
- This should open the Settings application. You can also use the Windows + I keyboard shortcut to summon Settings.
- After the home page of Settings is displayed on your screen, click on the icon for Update & Security.
- When the next window appears, go to the left pane and select Troubleshoot.
- Your next action should be going to the right side of the page (the Troubleshoot tab).
- Now, click on Playing Audio under Get up and Running.
- Once the Run the Troubleshooter button fades out under Playing Audio, click on it.
- The troubleshooter will now try to detect possible audio issues.
- If it finds any problem, it will ask you to apply the fixes.
- Agree to the solutions, and then check if the problem has been resolved.
On Windows 11:
- Simultaneously press the Windows key and X to bring up the Power User menu.
- Select Settings.
- Select System on the left hand pane once the Settings application opens.
- Scroll down the System menu on the right and select Troubleshoot.
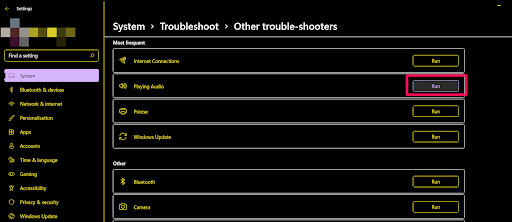
- When the Troubleshoot page opens, click on the “Other trouble-shooters” tab.
- Next, click on Run on the Playing Audio tab to launch the Windows Audio Troubleshooter.
- The troubleshooter will scan the system for possible audio issues.
- If it detects any issues it will ask whether you want to apply the fix.
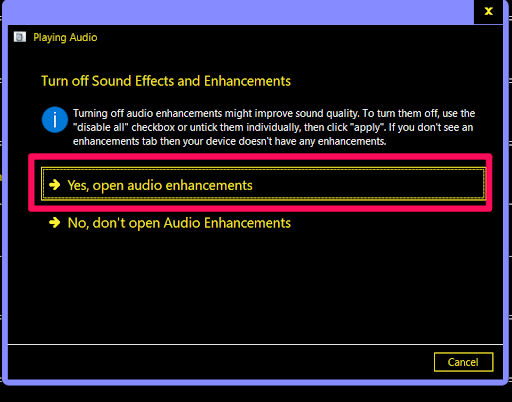
- Choose the option to apply the fix and check if the sound issue has been resolved.
Third Fix: Disable and Enable the Audio Device in the Device Manager
This is another case of a restart. However, in this solution, you’re restarting the audio device/driver. The reason this could work is that the driver might be stuck while trying to communicate with the device. Once you’ve performed this action, things will free up and return to normal. The process isn’t difficult. You just have to run the Device Manager and select a few options.
The steps below will show you what to do.
On Windows 10:
- Launch the Run dialog box by right-clicking the Windows logo in the taskbar and selecting Run once the Power User menu appears. Pressing the Win keyboard button and R together is another way to launch the Run dialog box.
- After run appears, type “devmgmt.msc” (make sure you don’t add the quotes), and then press the Enter keyboard button.
- Once the Device Manager opens, locate Sound, Video and Game Controllers, then click on the arrow beside it.
- Your audio devices will now appear.
- Right-click the audio device and click on Disable Device in the context menu. Do the same if you have other audio device entries in the menu.
- Now, right-click on the device again and, this time, select Enable Device from the context menu. Remember to do the same for the other audio devices.
- Once you’ve don that, reboot your PC, then check if the problem has been resolved.
On Windows 11:
- Use Win+X to open the Power User menu.
- Select Device Manager.
- Navigate to Sound, Video and Game Controllers option in Device Manager.
- Double-click the option to expand it. Your audio devices will appear here.
- Right-click a sound device and select “Disable device”. Do this for all the sound devices you see here.
- Wait a minute. Then right-click the sound device and select “Enable device”. Repeat this for the other sound devices previously disabled.
Reboot the machine and check if the sound issue is resolved.
If you find the red X mark still resting on the volume icon, move on to the next step.
Fourth Fix: Set Default audio Output Device
The X mark on your volume icon might be present because no device has been selected for audio output. The primary device might have been deselected after a major audio driver update or due to a rare system glitch. Some applications could also cause such problem. If you recently connected a different audio device and selected it as the default audio output device, removing it might cause this problem.
Resolving the issue, in this case, isn’t difficult. All you have to do is set your primary device as the default audio output device. There are different ways that you can do that, and we’ll be walking you through all of them.
Use the Sound Flyout
You can use the sound flyout where you adjust your volume.
On Windows 10:
Just head to the far-right area of your taskbar and click on the volume icon. Once the flyout appears, click on the audio device and select another device.
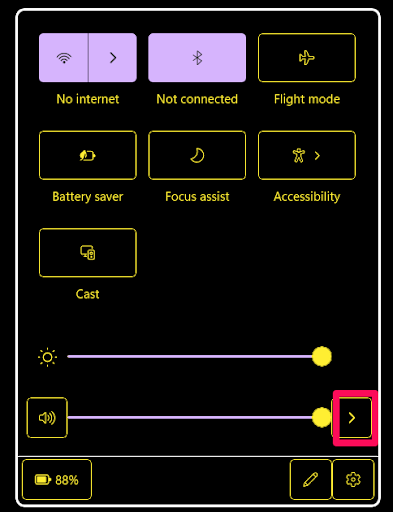
On Windows 11:
Navigate to the far right corner of your taskbar and click the volume icon. Click the arrow at the end of the volume indicator to display the list of available sound devices. Simply select the audio device you wish to use as your default sound device going forward.
Use Settings
On Windows 10:
- Go to the taskbar and right-click on the Start button.
- Once you see the Power User menu on top of the Start button, select Settings.
- This should open the Settings application. You can also use the Windows + I keyboard shortcut to summon Settings.
- After the home page of Settings is displayed on your screen, click on the icon for System.
- Go to the left pane of the next page and click on Sound.
- Next, navigate to the Sound tab on the right, go to Output, and then select your desired audio device from the Choose your Output Device drop-down menu.
Tip: You can go ahead to check the condition of the device. Follow these steps:
- Click on Manage Sound Devices.
- On the Manage Sound Devices page, click on your audio device, and then click on Test.
- If it makes a sound, then the speaker is fine.
On Windows 11:
- Use Win+I to quickly launch the Settings app in Windows 11.
- Select System on the left hand pane and select Sound on the right.
- On the Sound page, you will view all available devices grouped under Input Devices and Output Devices respectively.
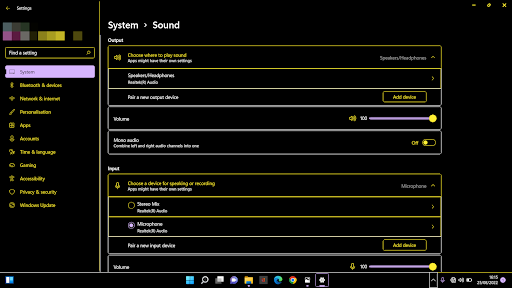
- Under Output, your current default sound device will be listed on the “Choose where to play sound” tab.
- To change the default audio device, simply tick the checkbox beside the device you wish to use going forward.
Tip: You can go ahead to check the condition of the device. Follow these steps on Windows 11:
- On the Sound page, click the device you’ve chosen to open its Properties page.
- Click the Test button under Output Settings.
- If it has the desired sound volume and quality, the speaker is alright.
Use the Control Panel
- Launch the Run dialog box by right-clicking the Windows logo in the taskbar and selecting Run once the Power User menu appears. Pressing the Win keyboard button and R together is another way to launch the Run dialog box.
- After run appears, type “control panel” (make sure you don’t add the quotes), and then press the Enter keyboard button.
- Once Control Panel opens, make sure Category is selected in the View By drop-down menu in the top-right corner of the screen.
- Click on Hardware and Sound.
- On the Hardware and Sound page, click on Manage Audio Devices under Sound.
- Once the Sound dialog window appears, select your system’s main speakers as the default device and click on the OK button.
Fifth fix: Make sure the audio service is running
The presence of the red X mark might be an indication that the Windows audio services aren’t functioning properly. You have to go to the Services application and run them. There are different services responsible for managing audio output on Windows 10 PCs. They have to be running for the audio device to put out sounds from different system applications.
The services you’ll be working with include:
- Windows Audio
- Windows Audio Endpoint Builder
- Multimedia Class Scheduler (not available for every PC)
Follow these steps to run the services:
- Launch the Run dialog box by right-clicking the Windows logo in the taskbar and selecting Run once the Power User menu appears. Pressing the Win keyboard button and R together is another way to launch it.
- After run appears, type “services.msc” (make sure you don’t add the quotes), and then press the Enter keyboard button.
- After the Services application opens, head to the Windows Audio service and click on it. If it’s running, go to the left side of the screen and click on Stop. Once the service is stopped, click on Start.
- Repeat Step 3 for the Windows Audio Endpoint Builder and the Multimedia Class Scheduler services.
Sixth Fix: Fix the Audio Driver
One of the major causes of the problem is the audio driver. The driver controls how the operating system communicates with the audio device. If it becomes outdated or corrupt, the device will be affected. To resolve the issue here, you have to perform a clean installation of the updated driver.
Your first course of action will be uninstalling the driver. Here are the steps you should take:
- Launch the Run dialog box by right-clicking the Windows logo in the taskbar and selecting Run once the Power User menu appears. Pressing the Win keyboard button and R together is another way to launch the Run dialog box.
- After run appears, type “devmgmt.msc” (make sure you don’t add the quotes), and then press the Enter keyboard button.
- Once the Device Manager opens, locate Sound, Video and Game Controllers, then click on the arrow beside it.
- Your audio devices will now appear.
- Right-click on your main speaker and click on Uninstall Device in the context menu.
- Once the Uninstall Device confirmation box opens, check the box beside “Delete the driver software for this device”.
- Click on the OK button.
- Now, restart your system.
Once your PC boots, it’s time to install the updated version of the driver. There are different ways to go about that. You can go to the website of the device’s manufacturer, use the Windows Update utility, update it via the Device Manager, or utilize a third-party program.
Use Windows Update
Windows Update is responsible for downloading and installing different types of updates, including driver updates for devices such as the audio adapter and speaker. When you run the tool, it will check for those programs that require updates and automatically download and install their updated versions.
If you don’t know how to use the Windows Update utility, follow these steps:
On Windows 10:
- Go to the taskbar and right-click on the Start button.
- Once you see the Power User menu on top of the Start button, select Settings.
- This should open the Settings application. You can also use the Windows + I keyboard shortcut to summon Settings.
- After the home page of Settings is displayed on your screen, click on the icon for Update & Security.
- On the Update & Security page, click on the Check for Updates button.
- Allow the utility to check for any available update and download them.
- Once the updates have been downloaded, click on the Restart Now button.
- Your PC will reboot and install the updates.
- After the process completes, check for the audio problem.
On Windows 11:
- Use the Win+X keyboard combo to open the Power User menu.
- Once you see the Power User menu on top of the taskbar, select Settings.
- This should open the Settings application. You can also use the Windows + I keyboard shortcut to summon Settings.
- After the home page of Settings is displayed on your screen, click on the icon for Windows Update. It’s the last item on the main Settings menu.
- Click on the Check for Updates button on the right.
- The utility will check for any available updates and download them. (In some cases it will install them automatically. This depends on the type of update.)
- Once the updates have been downloaded, click on the Restart Now button.
- Your PC will reboot and install the updates.
Now verify whether the audio problem is gone.
Use the Device Manager
- Launch the Run dialog box by right-clicking the Windows logo in the taskbar and selecting Run once the Power User menu appears. Pressing the Win and R keyboard buttons together is another way to launch the Run dialog box.
- After run appears, type “devmgmt.msc” (make sure you don’t add the quotes), and then press the Enter keyboard button.
- Once the Device Manager opens, locate “Sound, video and game controllers” and click on the arrow beside it.
- Your audio devices will now appear.
- Right-click on your main speaker and click on Update Driver in the context menu.
- After the Update Driver window opens, click on “Search automatically for updated driver software”. In Windows 11 and the latest versions of Windows 10, this option is known as “Search automatically for drivers”.
- Allow the Device Manager to search the internet for the driver update and install it.
- If the process is successful, the issue should be resolved.
Update Your Audio Driver Automatically, Using a Third-Party Program
Auslogics Driver Updater will make the process easy for you. when you install the program, you won’t have to bother about going through long processes to update any driver on your computer. the tool works with a database that contains official driver updates for Windows device drivers.
Once installed, the tool will scan your PC for faulty drivers and help you automatically download and install their updates. Also, when updates become available in the future, the program will notify you after one of its routine scans. More so, there’s an option that allows the tool to download and install multiple drivers automatically.
Here are the steps you have to follow to use the tool:
- Navigate to Auslogics Driver Updater’s product page.
- After the page loads, click on DOWNLOAD NOW.
- After that, click on Today’s Price to purchase the license key. Make sure you fill in the necessary information and make your payment to get a license key.
- Once the download is complete, run the setup.
- Next, select the language you’ll like the tool to run on.
- Choose an installation location.
- Following that are boxes that say, “Create a desktop icon,” “Launch program at Windows startup,” and “Send anonymous info to help improve our service”.
- After making your selections, click on “Click to install and check drivers”.
- All the program time to load.
- After the last installation stage appears, tick the box for “Launch Driver Updater and scan PC drivers”, and then click Finish.
- Once you’ve done that, the tool will start scanning your PC.
- Once the scan e is over, Auslogics Driver Updater will display the outdated drivers and their descriptions. Tick the ones that you’ll like to update, and then click on Update drivers.
- The tool will now automatically backup the previous versions of the drivers. This way, you can easily restore them if the latest updates encounter problems.
- The program will start to install the latest official version of the drivers.
Note that you can only install one driver update at a time with the trial version. If you want the tool to download multiple updates at once, however, go for the paid version.
Conclusion
The red X mark on your volume control icon in the system tray should no longer be an issue once you’ve applied these fixes. If you have any question or thoughts on the issue on Windows 10 or Windows 11, do well to use the comments section below.


 Done! Great to see you among our subscribers!