
Developers design games to suit the specific set of hardware contained in a game console. On the other hand, computers come in all sizes and shapes. There are units that rely on a graphics chip inside the main CPU while others have incredibly fast graphics cards. Regardless of what hardware you have, when playing video games on your computer, you would want to ensure that you’re getting the best possible frames per second (FPS) from your unit.
Frames per Second Definition
You can determine how efficient a game’s performance is by looking at the FPS. Expect a smooth gameplay with high FPS, and with low FPS, the game would jump from one frame to another. Your video games shouldn’t be a source of frustration and stress. This is why it can be useful for you to learn how to increase FPS in games on Windows 10.
Viewing a Game’s FPS
You will find that there are a lot of games that have integrated FPS counters. However, it is common for them to be disabled by default. If you want to view the FPS through an in-game option, you would have to explore the game’s advanced options menu or the graphics settings menu. If you’re still having trouble locating it, search for the specific game online and study how you can view its FPS.
Viewing the FPS in Fortnite
- Click Menu, then go to Settings.
- Select Video.
- Scroll to the bottom of the screen until you find the ‘Show FPS’ option.
- Turn the ‘Show FPS’ option on.
Viewing FPS in Overwatch
- Go to Options, then select Video.
- Look for the ‘Display Performance Stats’ option, then turn it on.
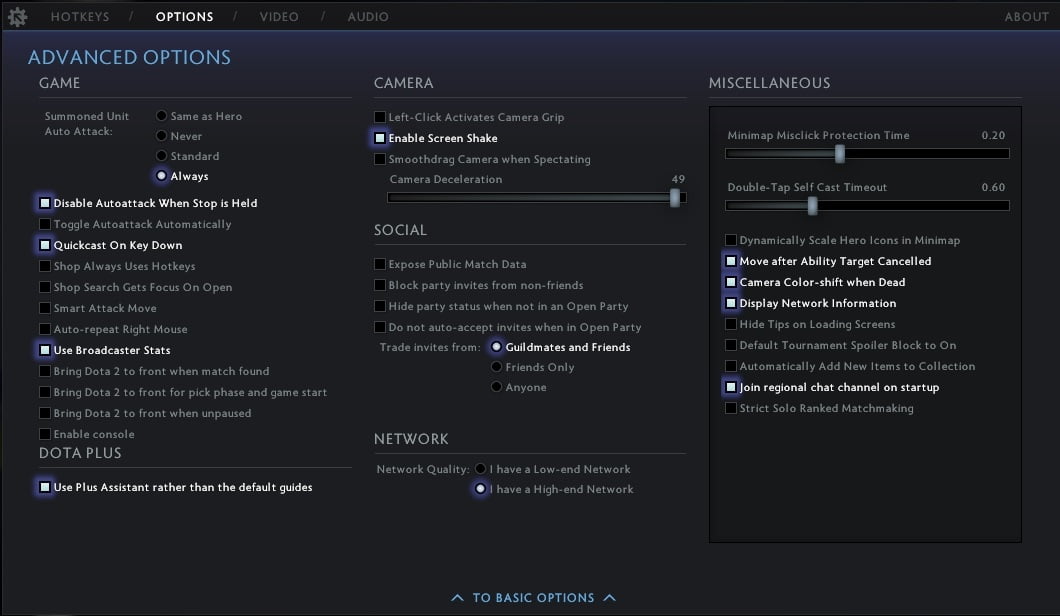
Viewing FPS in DOTA 2
- Go to the Dashboard, then select Gear.
- Go to Options, then choose Advanced Options.
- Turn on the ‘Display Network Information’ option.
After following the instructions above, you should now be able to see a small FPS counter somewhere on your screen. It is worth noting that its position is not the same for every game.
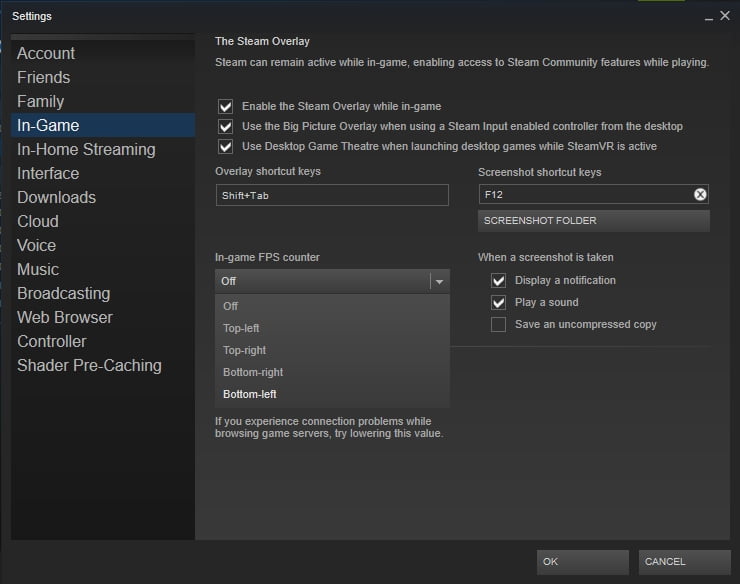
Viewing FPS on Steam
If you’re playing games on Steam, you will be delighted to know that it has its own FPS counter that can be used for any title in your library. To activate this feature, follow the instructions below:
- Click Steam, then go to Settings.
- Select In Game, then click the box below In-Game FPS Counter.
- Choose where you want to place the FPS counter on your screen.
How to increase FPS in games on Windows 10
If you want a smooth gameplay, you would generally need at least 30 FPS. However, you will start to notice that games perform better and smoother with 60 FPS. Now that you’ve learned how to view a game’s FPS, it is now time to try the methods that will bring them to a higher level.
Method 1: Updating your Drivers to Increase the FPS
Avid video gamers know how important it is to have the latest drivers for their PC’s graphics hardware or GPU. NVIDIA, AMD, and other graphics processor manufacturers regularly release updated versions of their drivers. They optimize these new versions to ensure that new games can be played efficiently. When you’re playing newer games, it is important to keep your graphics drivers up to date for optimum gaming performance.
There are two ways to update your graphics drivers. You can either do it manually or use a one-click solution like Auslogics Driver Updater.
The first choice is quite complicated and tedious. This is why we recommend automating the process instead. To give you a better understanding of why you should avoid manually updating your graphics drivers, let us explain to you how it’s done.
You begin by taking note of your computer’s GPU. If you do not know what it is, just follow the instructions below:
- Right-click the taskbar, then choose Task Manager from the list.
- If the Task Manager window is small, click More Details.
- Go to the Performance tab.
- On the left pane, search for GPU. You should now be able to see what type of GPU your system has.
You might see an Intel GPU alongside an AMD or NVIDIA GPU. This means that your AMD or NVIDIA GPU will be dedicated for gaming while the power-efficient Intel GPU will be used for other tasks.
Viewing the GPU on Windows 7
If you’re using Windows 7, you can learn about your system’s GPU in the dxdiag tool. Simply follow the steps below:
- On your keyboard, type Windows+R. This should open the run dialog box.
- Type “dxdiag” (no quotes), then hit Enter.
- Go to the Display tab.
- Go to the Device section and look to the right of the ‘Name’ entry.
Once you’ve taken note of what GPU your computer has, you have to go to the manufacturer’s website and find the latest versions for your graphics drivers. Make sure that the version you will download and install is compatible with your system. Otherwise, you would experience more problems when playing your favorite video games.
As you can see, the manual process can get complicated, and it may even consume a significant amount of your time. So, we suggest automating it, using Auslogics Driver Updater. With one click of a button, this program will automatically detect your system and GPU. It will search for the latest manufacturer-recommended versions of your drivers. The best part is, this tool will take care of all outdated drivers—not just your graphics drivers. After the process, you can expect an overall improvement in your computer’s speed and performance.
Method 2: Tweaking your Graphics Settings
As you use higher graphics settings, the lower the FPS becomes. If you want higher FPS in a game you’re playing, you can lower your graphical fidelity. This wouldn’t make your game look crisp. However, it will definitely make it run more smoothly and faster.
You have to find the Graphics or Video section in a game’s Options menu to tweak the individual settings. To improve your FPS, you just have to change the graphics settings from High to Medium or Low. Another good option would be to lower the display resolution of the game. This may make the image less sharp, but it would boost the FPS. On the other hand, you may also try setting the game to a Windowed view instead of a Full-Screen view. Some users have reported that this slightly improved the game’s FPS.
If you’re using NVIDIA hardware, we suggest you use NVIDIA GeForce Experience. This is already included with your graphics drivers, and you can conveniently launch it from the Start menu. Once you’ve opened the application, you will be able to see the games you’ve installed. Simply choose a game and click the Optimize button. This will automatically apply the settings that NVIDIA recommends for that game and your system’s hardware. Optimizing GeForce Experience is always a good starting point when you want to manually tweak your settings.
Did our methods help improve your FPS?
We’d like to read the results in the comments below!


 Done! Great to see you among our subscribers!