- What Does It Mean When a Network Change was Detected
- How to Fix Network Change Detected
- Reload Web Page
- Restart Web Browser: Close App and Terminate Operations from Task Manager
- Clear Browsing History and Cache
- Update Browser to the Most Current Version
- Try a Different Browser
- Restart Windows
- Reboot Network Connection Device
- Clear List of Saved Networks
- Use Command Prompt to Flush DNS Cache
- Modify DNS Server Configurations
- Check for Windows Update

“A Network Change Was Detected” is one of the most frustrating errors that a web browser can report. The most obvious explanation for this error is that you swapped your network. But what if you did not? What if your router or modem is still blinking away, thereby indicating that you are still connected to the same network you have been using for hours?
The focus of this article is to provide some of the most effective solutions to this problem on your Windows 10 or 11 computer. After trying one or more of the 11 remedies listed in this article, you should be able to get back to surfing the internet via Google Chrome or any other browser that you are using currently.
What Does It Mean When a Network Change was Detected
Before we proffer the aforementioned solutions, here are some of the most common culprits for the “A Network Change Was Detected” error:
- Your PC has Been Disconnected from Your Network: To quote Sherlock Holmes, sometimes the most obvious variable is the most liable variable. In the case of the network-change-detected error, your PC may be no longer connected to your browser. This could be because you have multiple networks saved on your PC. Of course, Windows 11 does not allow multiple networks to run at the same time. Still, there may be a glitch that forces one network to override another. In such instances, especially when the dominant network is not data-enabled, your browser reports the “Network Change Was Detected” error.
- Browser Issues: Your browser may be directly responsible for the network-changed error. Any number of things could have gone wrong. Maybe the browser is outdated and consequently unable to keep up with the tasks you have assigned to it. Maybe your browsing history is interrupting the connection process. It may even be, although it is very rare, that the browser you are using is incompatible with the network.
- Network (Proxy) Complications: If it is not your internet-enabling device that is at fault, and your web browser is also operating as it should, you may need to consider that it is your PC that is causing the glitch. The way the more recent Windows 11 works, network configurations are very important. Usually, the default settings for proxy, IPv4/IPv6 connectivity, and so on, are fundamental to your browsing experience. So, maybe the network-changed error you are getting from your browser is the result of a recent installation, update, or something else that modifies these default network settings.
- Drivers Need to be Updated: Lastly, the “A Network Change Was Detected” error may simply be the consequence of your delay in updating your drivers. Windows 10 and 11 are dynamic versions of the operating system and have many areas that are continually being improved. As a result, if you take too long to install some of these updates from Microsoft to your Windows PC, you may find your PC dragging behind privileges such as smooth and fast browsing. Moreover, it should be noted that the main variables to pay attention to during such updates are the drivers. Some of these drivers are directly responsible for your network. So, once they are outdated, you will naturally get browsing errors such as “A Network Change Was Detected.”
How to Fix Network Change Detected
Having identified some of the factors responsible for the “A Network Change Was Detected” error, how do you counter them and fix the problem? Here are some suggestions.
-
Reload Web Page
The first thing most users do when they encounter an error such as “A Network Change Was Detected” is reload or refresh the web page they are on. This is a very smart thing to do and it is widely accepted as being a useful way to diagnose the problem, if not fix it completely.
When you refresh the web page, you are instructing your browser to try and connect to the website of interest. This solution works when your network tripped off and the connection to your PC was severed. So, once you use the ctrl + R combination when the web page is activated, thereby refreshing it, your network connection is re-established and the problem is fixed.
-
Restart Web Browser: Close App and Terminate Operations from Task Manager
If refreshing the web page does not get rid of the “A Network Change Was Detected” error, the next best thing to do is refresh the web browser. The easiest way to do this is close the browser software and open it after a few seconds. This effectively shuts down the browser operations and restarts them. Simple network glitches should be fixed as a result of this restarting process.
You may want to be more thorough while using this solution. Instead of simply closing the browser and relaunching it, you can close it first and then use Task Manager to shut down every associated background process. To do this,
- Use the ctrl + shift + esc combination to launch Task Manager on your Windows PC.
- In the Processes tab, locate your browser and click on it to highlight it.
- Right-click on the browser icon under the Apps section and select End task.
Once you have done these, close Task Manager and relaunch your browser.
-
Clear Browsing History and Cache
There are times when even closing and relaunching your web browser will not get rid of the “A Network Change Was Detected” error. During such times, you should consider clearing your browsing history and cache. The data stored on your browser in the form of browsing history and cache can interrupt browsing from time to time. This usually happens when you have not erased them in a long time.
You can clear your browsing history and cache in different ways. The most straightforward of these methods in Google Chrome is to type chrome://settings/clearBrowserData into your search bar. This brings up a Chrome interface that lets you select browsing-related data, including browsing history, cookies, and cached files. You can also select an appropriate time range.
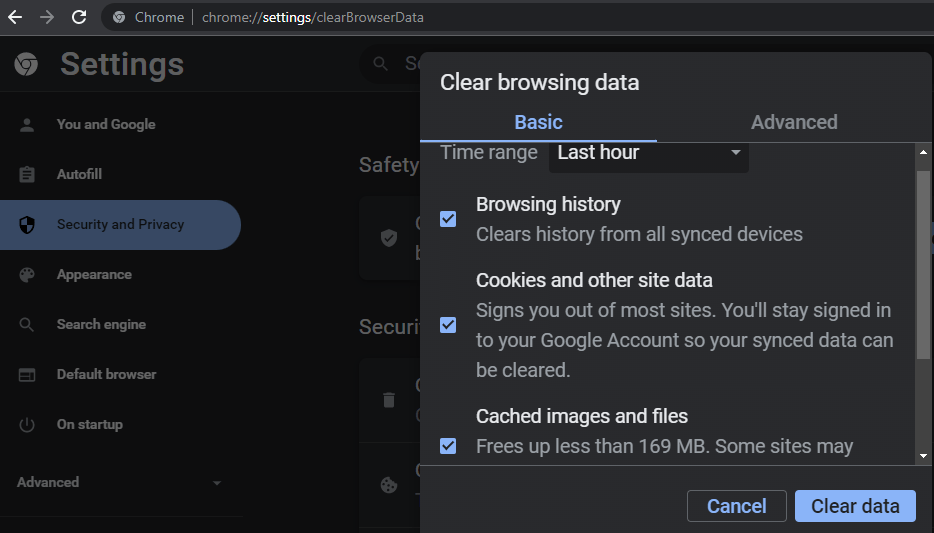
Once you clear everything, you should be able to recover your network connection.
-
Update Browser to the Most Current Version
If clearing your browsing data does not fix the network-change-detected error, you can update your browser to the latest version. Most of the time, updating your browser even helps you wipe out unnecessary baggage in the form of redundant data. And when such data is interrupting your network connection, the update helps you erase it and re-establish your network.
To update your Google Chrome, you can simply type chrome://settings/help into the search bar and then select the update option. This should help you get rid of the “A Network Change Was Detected” error.
-
Try a Different Browser
All the solutions we have suggested so far are based on how to fix the “Network Change Was Detected” error in Chrome and other browsers. If none of them have proved effective, it may be because you have been using the same web browser. So, just try using a different browser. Simply use the ctrl + L key combination to copy the address of your current web page and paste it into the URL bar of a different browser.
If you were originally using Google Chrome, you can switch to Microsoft Edge, Firefox, or Brave. Although the chances of switching browsers and fixing the problem is small, it is still a possibility.
-
Restart Windows
Another reliable way to fix the “A Network Change Was Detected” error is to restart your Windows PC. Whether you are using Windows 11 or 10, restarting your PC terminates every background and Windows process that may be causing the glitch. So, after you have closed every application, click the Windows key on your keyboard, move your cursor to the power icon and select it, and then initiate the restart process.
-
Reboot Network Connection Device
As earlier noted, your network connection device may be responsible for the network-change error. In such instances, simply rebooting your modem or router should fix the problem.
If you are using a connection cable, make sure that it is still connected to your PC and router. If you are using your mobile phone’s hotspot, make sure that you can still browse with the phone itself. If not, you can restart your mobile phone, turn on the hotspot, and connect it to your Windows Wi-Fi once again.
-
Clear List of Saved Networks
We noted earlier that one of the causes of the “A Network Change Was Detected” error is that you have saved multiple networks and some of these can override the one you are using currently. As a result, you can simply delete all the saved networks you aren’t using. This helps your PC focus on connecting with one.
To clear the list of saved networks,
- Move your cursor to your taskbar and click on the network icon.
- Click on any of the saved networks that you aren’t using currently and select forget.
You can do this for all the networks that are currently unneeded. Once you are done, launch your browser to see whether the “A Network Change Was Detected” error persists.
-
Use Command Prompt to Flush DNS Cache
Another common factor responsible for the “A Network Change Was Detected” error is DNS (Domain Name System). This system serves to improve browsing conditions, letting you connect to websites quicker and more efficiently. However, it does this by storing cache files that enable its function. These files can interrupt your browsing and lead to network errors.
So, to fix it, Windows lets you use Command Prompt to delete the DNS cache. To use this function,
- Click the Windows key to engage the Start menu.
- Type cmd to locate Command Prompt.
- Right-click on the Command Prompt app and select Run as administrator.
- Select YES to the Windows Command Processor prompt.
- On the editable interface of the running Command Prompt, paste the following command: ipconfig /flushdns, and tap the enter key on your keyboard.
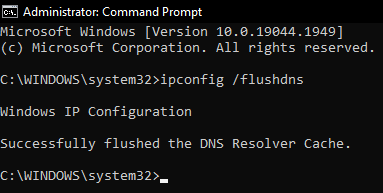
After flushing DNS, you can close Command Prompt and launch your browser to see if it worked.
-
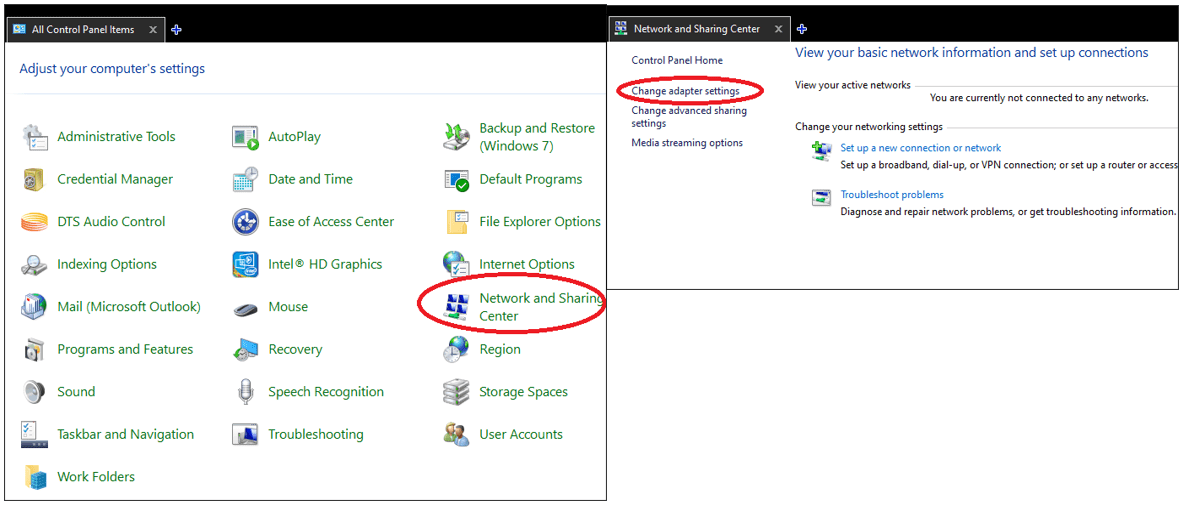
Modify DNS Server Configurations
If flushing your DNS cache does not fix the “A Network Change Was Detected” error, you may have to modify the DNS server configurations from your Windows settings app. To change DNS configurations,
- Use the Windows key + R key combination to launch the Run protocol.
- Type control panel into the Run search bar and click enter.
- From the list of Control Panel settings, find and select Network and Sharing Center.
- Move your cursor to the upper left corner of the Network and Sharing Center page and select Change adapter settings.
- On the new page, right-click on Wi-Fi and select Properties.
- Right-click on Internet Protocol Version 4 (TCP/IPv4) and select Properties.
- Select the Use the following DNS server addresses: option and enter 8.8.8 into the first field (Preferred DNS server:).
- Next, click on the tab key on your keyboard to activate the Alternate DNS server: entry box. Type 8.4.4 in the box.
- Select OK to complete and save the settings.
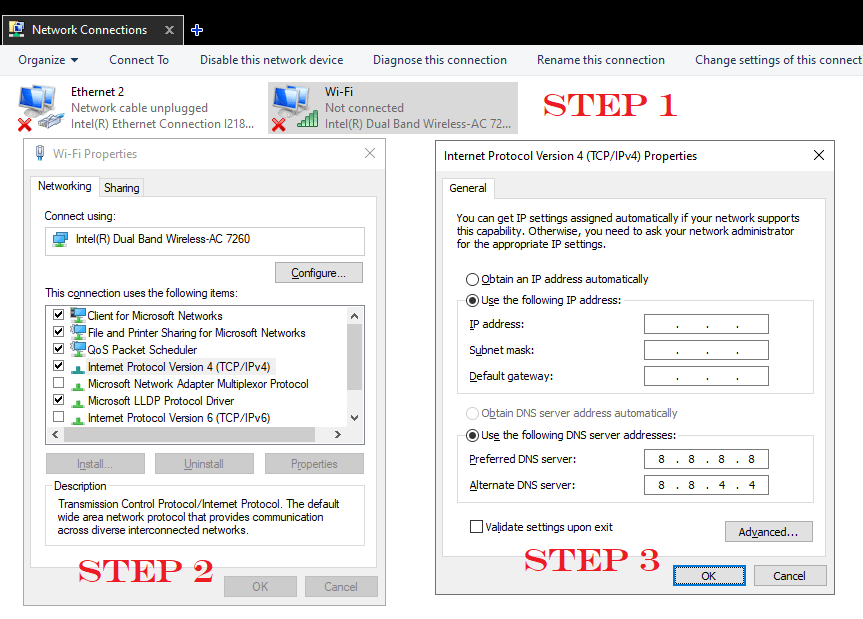
These configurations are known to fix browsing errors. So once you have implemented and saved them, launch your browser to see if the problem is fixed.
-
Check for Windows Update
If all the above suggestions have failed to fix the network-change-detected error, you can simply throw the problem at the developers at Microsoft. Whether you are using Windows 10 or 11, these developers provide updates that take care of errors such as “A Network Change Was Detected.” So, whenever you see the error,
- Launch the Run protocol with ctrl + R and enter control update into the search bar.
- Select the Check updates option and wait for Windows to search and update drivers and other needed components.
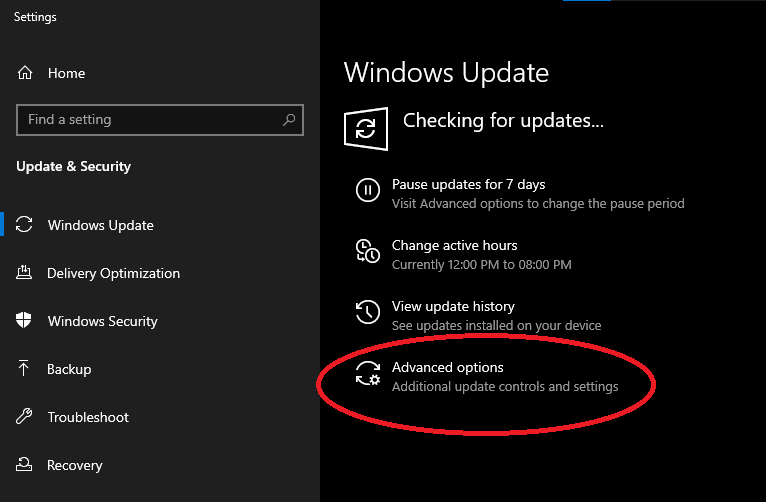
You can also select Advanced options to configure Windows to always download updates whenever there is a need. This will save you from the stress of implementing a dozen solutions in your attempt to fix the “A Network Change Was Detected” error.


 Done! Great to see you among our subscribers!